|
|
| |
|
| |
| |
|
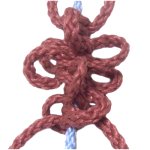
Description: Picot
designs are vintage Macrame techniques
frequently seen in patterns written in the early
and mid-1900's.
Picots are small
loops
that are arranged along edges of Macrame
sennits, which are a series of knots. They
are often used to add decoration, and make the
item look more feminine.
There are many ways to make picots, and they
can be placed anywhere in a Macrame
project. You can use these techniques when
creating items like purse straps, bracelets,
belts, etc.
The first three techniques described below
feature Square Knots.
There are also two other types, one with Vertical
Larks Head knots,
and the other with the Spiral Stitch.
Click on the links above to practice, if you
don't already know how to tie these decorative
knots.
|
| |
|
|
|
|
|
|
|
| There are two beginner's projects in the Kid's
section that feature picots. Both are a
great way to practice this important technique: |
|
|

|
|
Here is a
project that will help you practice
making a sennit with Square Knot
picots.
It's called the Flower
Bracelet, if you want to
give it a try. |
|
|
|
|
|
|
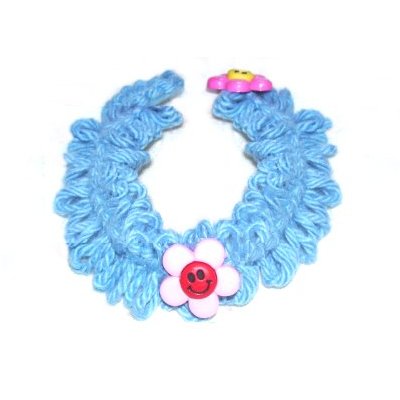
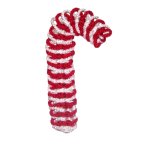
The Candy
Cane is another fun project
featuring picots. |
|
|
|
|
|
| |

|
| |
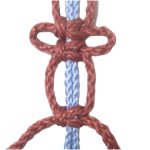
Square Knot Picots
|
| |
|
| |
| |
|
The first three Picot designs on this page are
created using Square Knots.
This particular design is the most common.
The size of the picot loops is determined by
the spacing of the knots.
Important:
When using Picot designs in a Macrame project,
the cords
used to make the picots need to be
longer than usual:
Determine the length of the area you wish to
make with the picots, and multiply
that by 15. That's how much
material you need for just the area with the
picots. This amount should be ADDED to the
lengths needed for the rest of the project.
|
|
|
| |
|
|
Step
1: Secure two 18-inch filler
cords, and two 36-inch working
cords to your board. The
fillers should rest between the working
cords.
Tie the first Square Knot with the
working cords, around the fillers.
|
|
| |
|
|
|
|
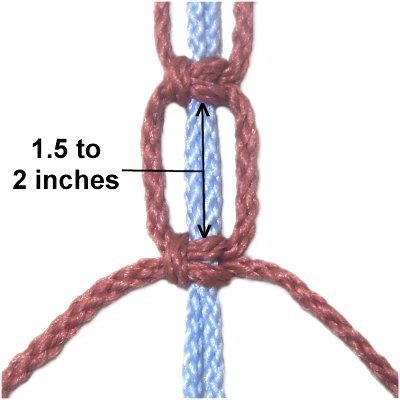
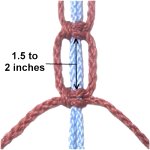
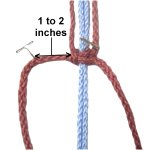
Step
2: Tie a second Square
knot, so it rests at least 1.5 to 2 inches
from the first one.
Most Macrame patterns won't tell you the
spacing, so you will need to experiment to
see what size picots works best for your
project. |
|
|
|
| |

|
|
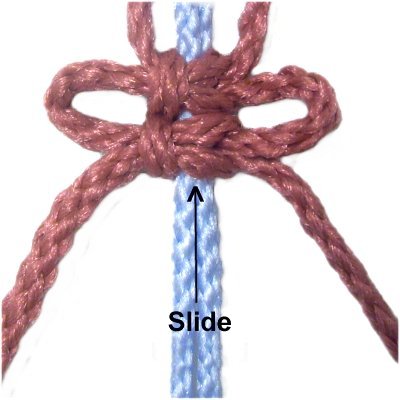
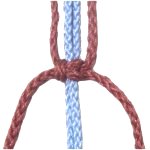
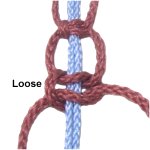
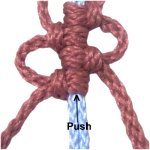
Step
3: Slide the second SK
backward, so it rests against
the first knot.
The loops on both sides are the picots.
|
|
| |
|
|
|
|
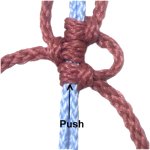
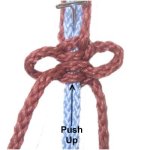
Step
4: Tie the third SK.
Make sure the distance between it and the
previous knot is the same (see information
below).
Slide it up to form the next set of
picots. |
|
|
|
|
|
|
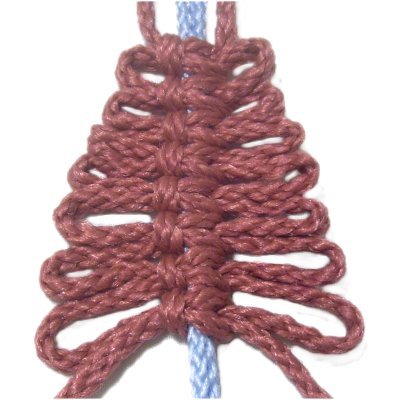
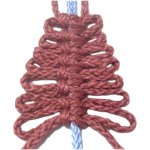
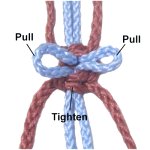
Designer's
Tip: Picot designs are
usually made with similar sized loops, but
there are exceptions.
For example, this tree shape was made by
gradually adding more space between the
knots.
Make sure you read the Macrame pattern
carefully to determine if they should be
the same size. |
|
|
|
| |

|
|
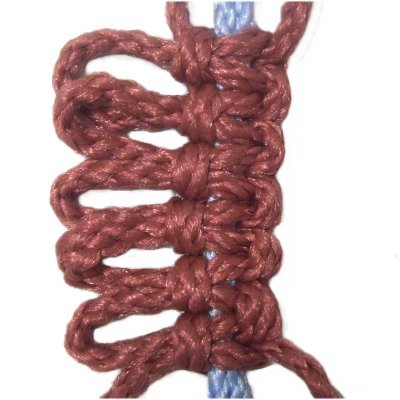
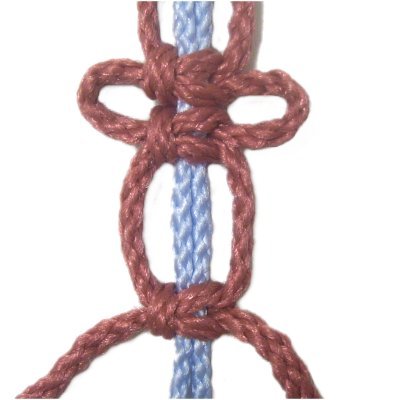
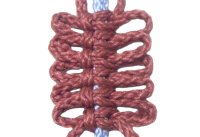
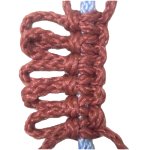
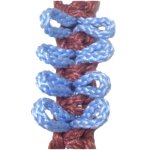
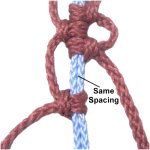
Step
5: To continue, tie several
more SK Picots.
In this image, the knots were all spaced
1.5 inches apart. |
|
| |
| |
|
|
|
|
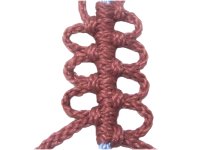
Square Knot Picots - One Side
|
|
|
|
|
|
Picot designs were very popular in the early
1900's. But they were usually made on one
side only, which is what you will learn
now.
How this design differs from the one shown
above is that you do
not add space between the Square knots.
The example shows the picots on the left, using
LEFT Square knots.
To make the picots on the right, tie RIGHT Square
Knots, and
pull the right
working cord to make the loops.
|
|
|
|
|
|
Repeat
step 1 from the instructions
above, tying the first LEFT SK.
Step
1: Pull the left
working
cord to the left, and secure it at
least 1-inch from the knot.
The distance between the knot and the
pin determines the overall size of the
picot.
|
|
|
|
|
|
|
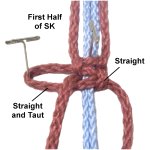
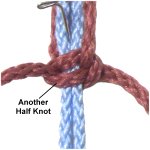
Step
2: Tie the first
half of a LEFT Square knot,
keeping
the secured segment in place.
As you tighten, make sure the left working
cord is straight and taut
(horizontal). |
|
|
|
Step 2,
continued: The right working cord
should be pulled more
than the left, so the segment between the knots is
straight (vertical).
Of all the Picot designs on this page, this one
requires the most attention during the tightening
process. Take your time and be consistent
with the tension.
|
|
|
|
|
|
Step
3: Tie the second half of
the Square knot, then tighten completely.
|
|
|
|
|
|
Step
4: Repeat
steps 1 - 3 a few more times,
forming the rest of the sennit.
|
|
|
|
|
|
|
Square Knot Picots - Top
|
|
|
|
|
|
Picot designs like this one are rarely used
anymore. I found this technique in a Macrame
book written in 1899.
The picots come out from the top
of the sennit, if it is resting flat on a
board. (Front if sennit is upright)
They are made by the fillers rather than the
working cords.
Should you decide to use it in a Macrame
project, the fillers need at least twice as long
as the working cords.
|
|
|
|
|
|
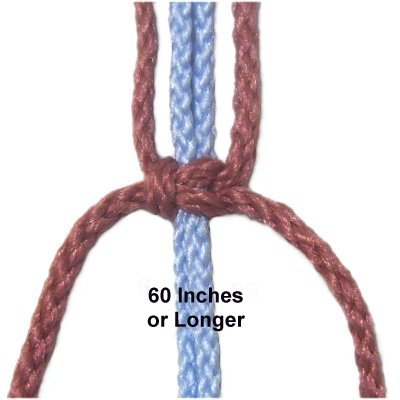
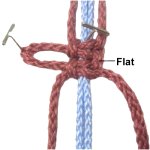
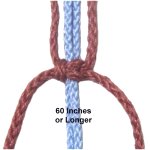
Step
1: Secure two filler cords to
your board, each at least 60 inches
long. Place two 36-inch working cords on
either side of it.
Tie a Square Knot with the working cord, onto
the fillers.
|
|
|
|
|
|
|
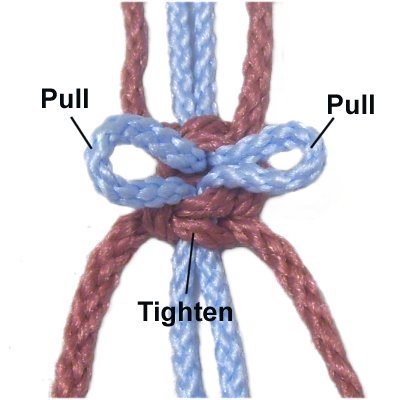
Step
2: Tie a second SK at least
1-inch from the first one, but make sure
it remains LOOSE (not tightened). |
|
|
|
|
|
|
Step
3: Pull the fillers
upward, and bend them into loops.
(Forward if upright).
Gradually
tighten the second SK tied in the
previous step.
Make sure it rests
as close to the first SK as
possible.
|
|
|
|
|
|
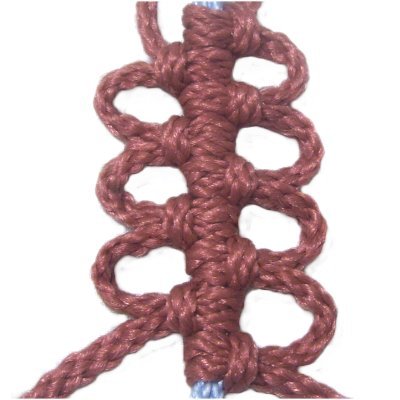
Step
4: Repeat
steps 2 and
3 at least three more times.
Picot designs usually look better if you
make several loops. |
|
|
|
| |
|
| |
Larks Head Picots
|
| |
|
| |
| |
|
The remaining two Picot designs are not made
with Square Knots. This design is made with the
Vertical
Larks Head knot.
The size of the picots is determined by the
amount of space between the knots, similar to
the first set of instructions on this page.
The picot loops won't be directly across from
each other. In Macrame patterns, a Square
Knot is usually tied above and below this
design.
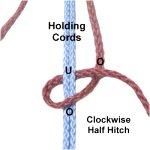
Step 1:
Secure two 18-inch holding cords to your
board. On either side, secure the working
cords, which should be at least 36 inches long.
|
| |
|
| |
|
|
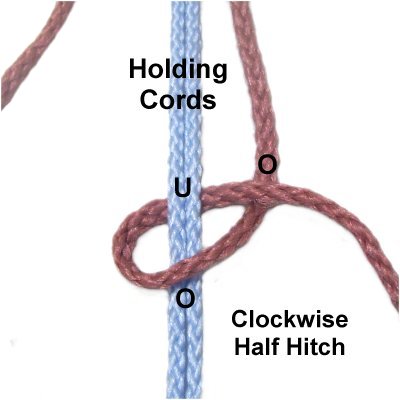
Tie a vertical Larks Head knot with the
right
working cord by making a clockwise loop
over
- under
the two holding
cords.
As you pull it right, pass over
the working cord.
|
|
| |
|
|
|
|
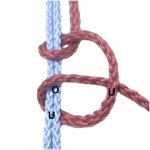
Step
2: Make the second loop, passing
under
- over the holding cords.
As you pull it right, pass under
the working cord.
Tighten both loops firmly. |
|
|
|
|
|
|
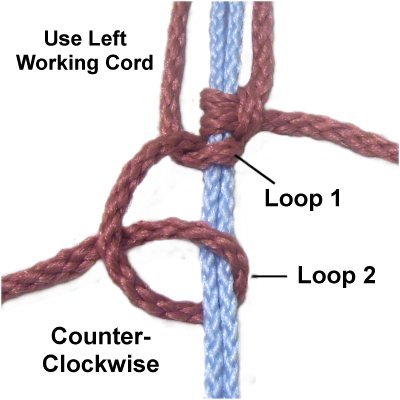
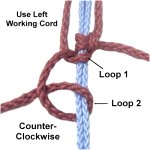
Step
3: Use the left
working cord to make the next Larks head
knot onto the holding cords.
The loops are made counter-clockwise,
and the two knots should be close
together.
|
|
|
|
|
|
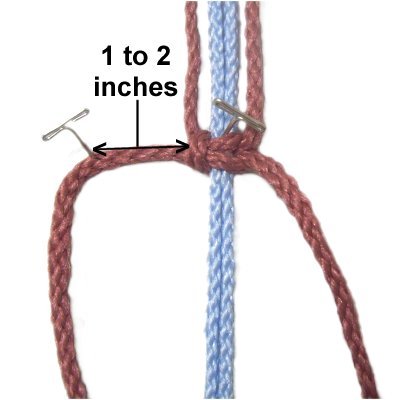
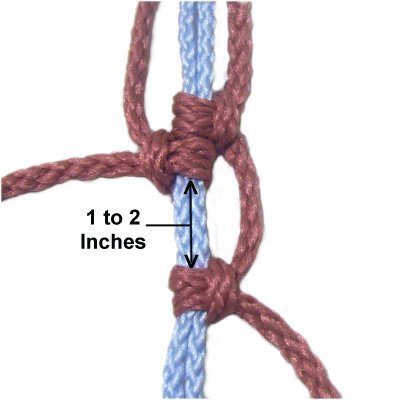
Step
4: Tie the third Larks Head
knot with the right working cord
(clockwise).
Tighten it so there is 1 to 2 inches
between it and the second knot. |
|
|
|
| |
|
|
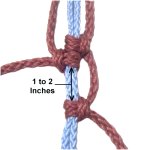
Step
5: Push the third Larks Head
back, until it touches the second knot.
This forms the first picot on the right
side.
|
|
| |
|
| |
|
|
Step
6: Switch to the left
working cord, and make the third Larks
Head knot
(counter-clockwise).
The spacing between it and the previous
knot should be the same as in step 4.
|
|
| |
|
|
|
|
Step
7: Push the third Larks
Head knot back to rest against the second
knot, forming a picot on the left.
|
|
|
|
|
Designer's
Tip: Picot designs can be used as
attachment points for other cords, and this
technique is especially useful for that purpose.
There is more space between the picots, so any
cords attached to the loops will be less likely to
overlap and look crowded. |
|
|
| |
|
|
Step
5: Repeat
steps 4 - 5 to make several more
Larks Head knots.
Alternate back and forth between the two
working cords. |
|
| |
| |
|
| |
|
|
Spiral Stitch Picots
|
| |
 |
|
| |
|
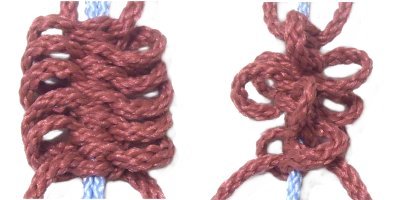
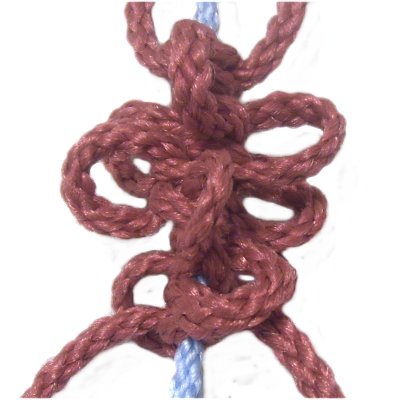
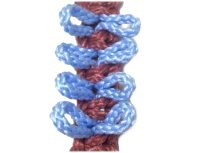
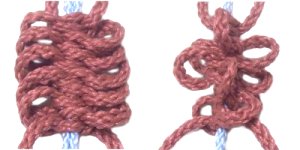
Picot designs can also be made with the Spiral
Stitch, which is a series of
Half Knots (first half of SK).
The best thing about this technique is that the
picots can be
twisted so they rest in different
directions (shown above right).
They can also be arranged flat (shown above
left). The picots stack on top of one another,
so the openings are vertical when held upright.
Like the first Square Knot technique, the size
of the picots is determined by the spacing of
the knots.
|
| |
|
|
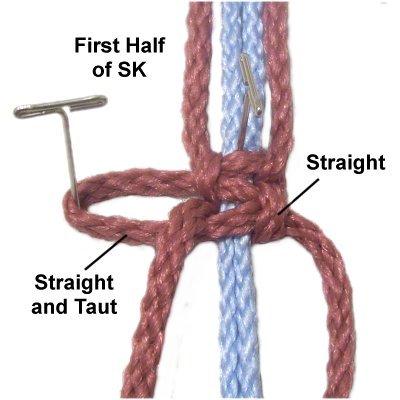
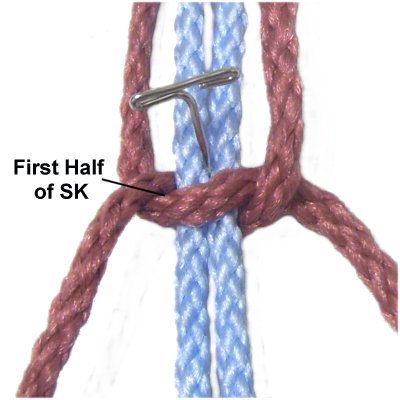
| Step 1:
Secure two 18-inch fillers vertically. On
either side, secure two working cords that are at
least 36 inches long. |
|
|
| |

|
|
Step
1: Secure two 18-inch
fillers vertically. On either
side, secure two working cords that are
at least 36 inches long.
Tie the FIRST HALF of a left Square
Knot with the working cords, onto the
fillers (Half Knot).
|
|
| |
|
| |
|
|
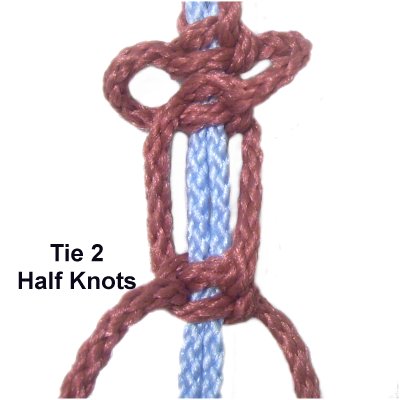
Step
2: Tie another Half Knot,
placing it against the first one.
|
|
| |
|
| |

|
|
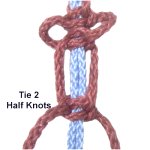
Step
3: Tie TWO Half Knots, after
moving forward at least 1.5 to 2 inches.
Picot designs need stable knots, which is
why you MUST tie two Half Knots every
time. Make sure the knots are firmly
tightened. |
|
| |
|
| |
 |
|
Step
4: Push the second pair
of Half knots back, so they rest against
the first two you tied.
|
|
| |
|
| |
|
|
Step
5: Repeat
steps 3 and 4 at least two
more times.
Remember that Picot designs are usually
made with several knots to form a
sennit.
|
|
| |
| |
|
|
|
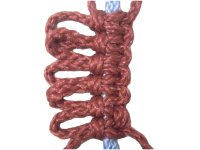
The Half Knots
won't spiral on their own because there is
too much space between the knots.
But you can twist the picots in different
directions if you wish. |
|
| |
|
|
|
|
By
using any text or images on Free Macrame
Patterns, you are agreeing to our Terms
of Use
|
|
|
|
|
Have
any comments about these Picot Designs? Contact
Me.
|
|
|
| |
|
| |
|
| |