|
|
| |
|
|
|
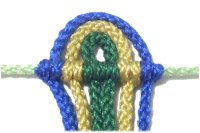
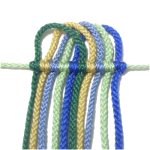
Description:
These Picot Mounts feature small loops that rest
above the level of the item they are attached
to.
The purpose for these techniques is to add
decoration to the top edge of designs like
handbags, baskets, wall hangings, and other
Macrame projects.
In the four designs described on this page, the
working cords are attached to a holding cord with
Double Half Hitches,
so be sure you know how to tie them before you
start practicing. |
| |
| |
|
| |
 |
|
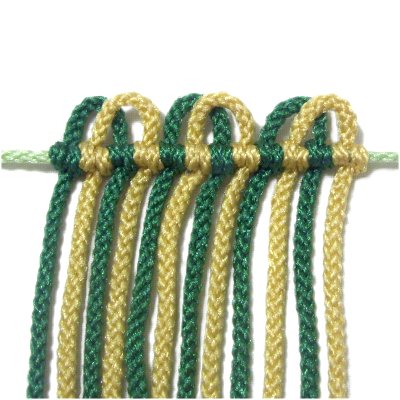
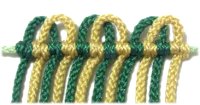
Alternating Mount
|
| |
 |
|
|
Description:
Picot Mounts can be made so that the loops
overlap, simply by alternating the cords.
You need 2 or more working cords, at least 18
inches long. Two colors are optional, but will
show the alternating pattern more clearly.
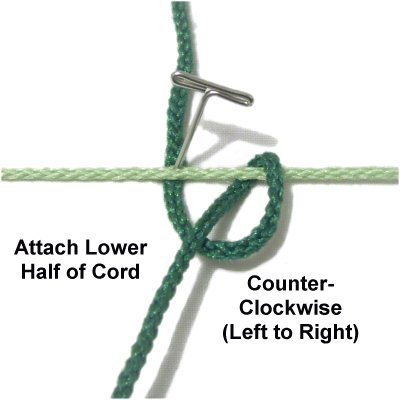
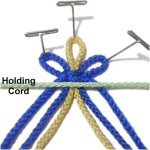
Step 1: To
practice, arrange one holding cord horizontally on
your board. Make sure it has tension.
Place one working cord under
the holding cord vertically. Match the ends
to balance it, then secure it near the holding
cord. |
| |
|

|
|
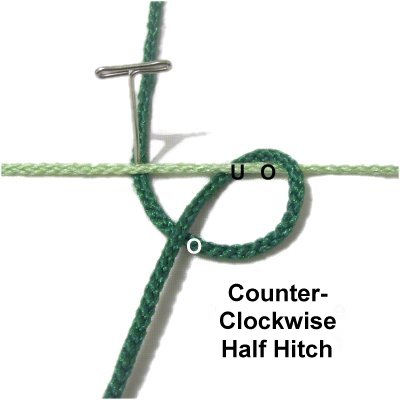
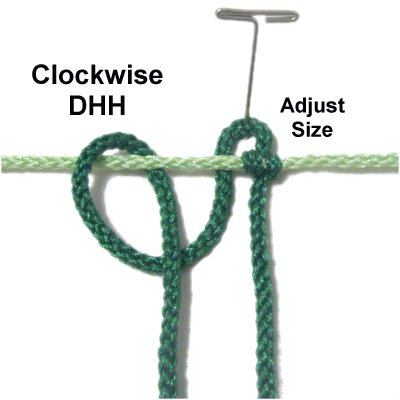
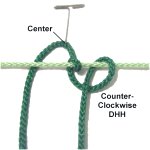
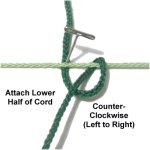
Use the lower half
of the working cord to make a counter-
clockwise Half Hitch, passing over
- under the holding cord, and over
the working cord.
After tightening, make a second Half Hitch
to the right of the first.
Double
Half Hitch (DHH) = 2 Half Hitches |
|
|
| |
| |

|
|
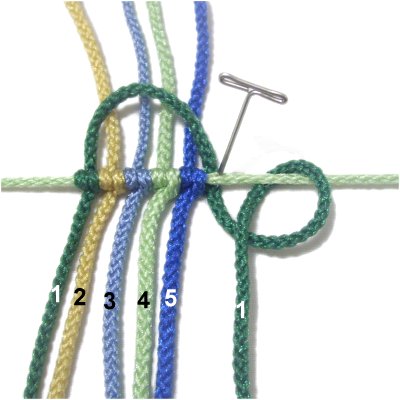
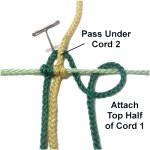
Step
2:
Repeat step 1 with a second cord,
which should be a different color.
Place it to the right of the first cord. |
|
| |
| |
| |
|
|
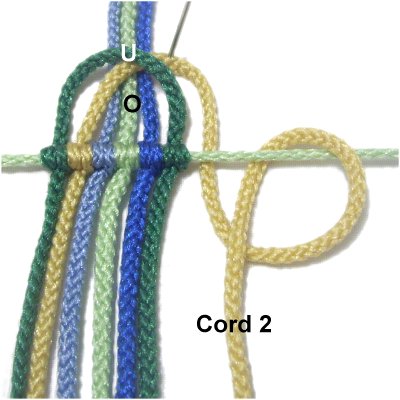
Step
3: Move the top
half of cord
1 under
the top half of cord 2, heading right.
Move it under
the holding cord, then adjust the size of
the picot loop by securing it where you
want the top to rest.
Attach it to the holding cord with a DHH.
|
|
| |
|
| |
|
|
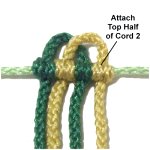
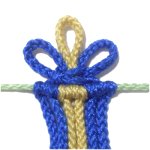
Step
4: Move the top
half of cord
2 under
the holding cord, to the right of cord
1.
Adjust the picot loop carefully, so it's
the same size as the first one, then
attach the cord with a DHH.
|
|
| |
|
| |
|
|
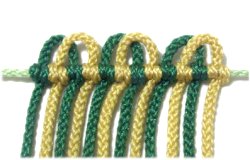
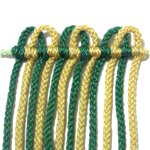
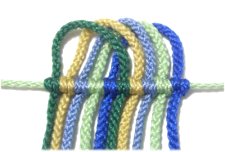
Step
5: Repeat
steps 1 - 4 with
additional cords, alternating the
colors.
Picot mounts are usually repeated with
ALL the cords that are being mounted.
|
|
| |
|
|
|
|
|
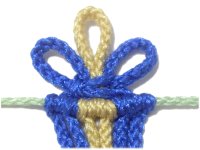
Nestled Mount
|
|
|
|
|
Description:
Picot mounts like this one were popular in the
early 1900's. It's sometimes called
the Loop Mount
in old Macrame books. The loops fit around
each other (nestled).
I recommend you practice making it with at least
three working cords. Using different colors
is optional.
Step 1:
Secure a holding cord horizontally on your board,
with tension. The working cords need to be
at least 18 inches long.
|
|
|
|
|
|
Fold one working cord in half and place
it under
the holding cord. Secure it at the
center,
which should rest at least 1/4-inch from
the holding cord.
Attach the right
half of the cord to the holding
cord with a counter-clockwise
DHH.
|
|
| |
|
|
|
|
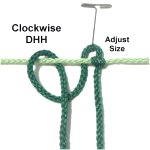
Step
2: Attach the left
half of the working cord to the
holding cord with a clockwise
DHH.
Before you tighten the first Half Hitch, adjust
the size of the picot loop if
needed. It should be small, but
still clearly seen. |
|
|
|
|
|
|
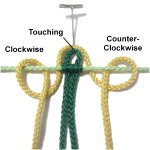
Step
3: Fold another working
cord in half and place it around the first
picot, and under
the holding cord. The center of both
cords should be touching.
Attach it with a counter-clockwise
DHH on the right, followed by a clockwise
DHH on the left. |
|
|
|
|
|
|
Step
4: Repeat
step 3 if you wish to
add one more cord, placing it around the
other two cords. |
|
| |
| |
|
|
|
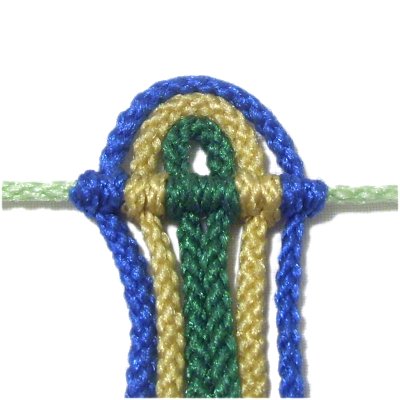
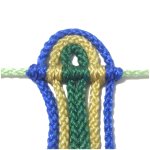
Triple Loop Mount
|
| |
|
| |
| |
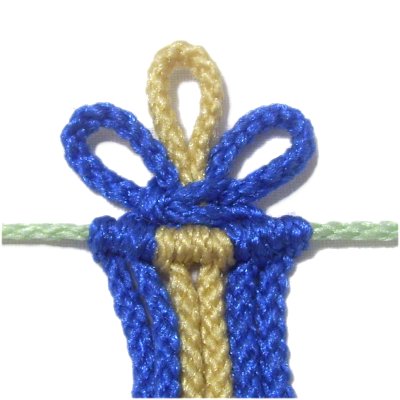
Description:
The Triple Loop Mount was popular in the early
1900's as well as in the 1970's. It is the
most common of all the picot mounts on this page.
This technique can be used in several types of
projects. Try using it along the edge of
handbags, or at the top of wall hangings and
curtains. Any time you want a cluster
of picot loops to decorate the edge, this is the
best choice.
You can make it with more than three cords, or add
a contrasting color in the center. The picot
loops can be made any size.
Make sure you know how to tie a Square
Knot, which is part of the design.
|
|
|
|
|
|
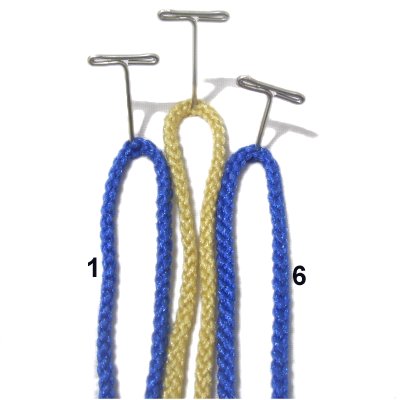
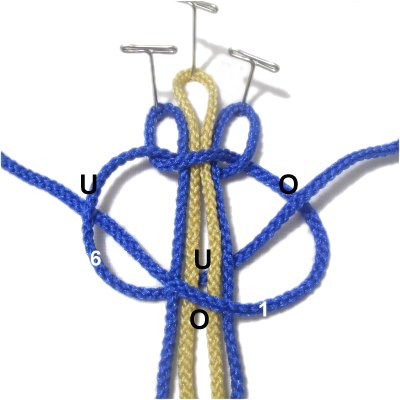
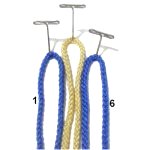
Step
1: To practice, fold three
20-inch cords in half and secure them
vertically at the center. The cord
in the middle should be secured above the
level of the other two.
Mentally number the cords. Cords 1
and 6 will be used as the working cords in
the next step. |
|
|
|
|
|
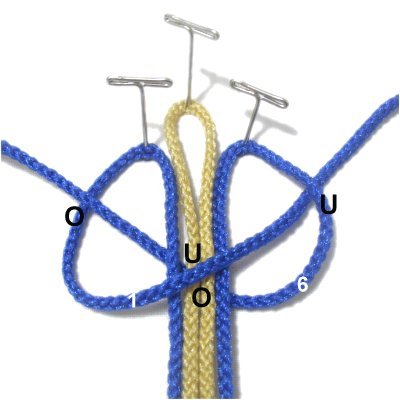
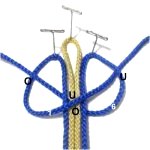
Step
2: Tie the first half of a Square
Knot (SK) by moving cord
1 over
cords 2 - 5, and under
cord 6, moving left to right.
Move cord
6 under
cords 2 - 5, and over cord 1, moving right
to left.
Tighten the knot loosely.
|
|
|
|

|
|
Step
3: Tie the second half of
the SK, using the same directions as in
step 2. The only change is the
direction:
Cord
1: Right to left
Cord
6: Left to Right
|
|
|
|
Step
3, continued: Tighten both halves
of the SK carefully, arranging it so the knot is
at least 1/2-inch from the top of the loops.
Make adjustments to the size of the picots by
CAREFULLY pulling on the cords numbered 2 - 5.
Designer's
Tip: Whenever you make picot mounts
in a Macrame project, you need to make the loops
at a size
most appropriate for your project.
In general, picots will be more visible if the top
of them are at least 1/2 inch from the holding
cord. With heavy material (4mm - 6mm),
you may need to increase the size to 1-inch.
|
| |
| |
|
|
|
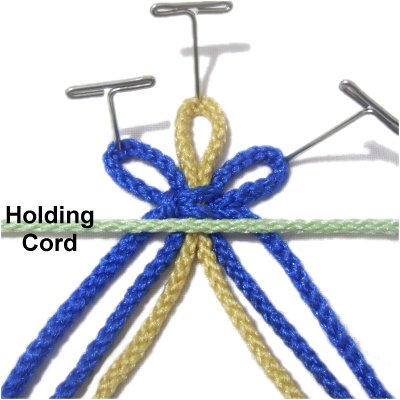
Step
4: Secure a holding cord
horizontally on your board, with tension.
Place the SK picot design under it, so
that the lower edge of the knot is touching
the holding cord.
Important:
Secure all three loops. |
|
|
|
|

|
|
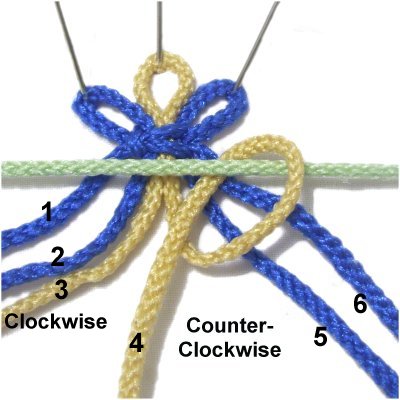
Step
5: Attach cords
4 - 6 to the holding cord with counter-clockwise
Double Half Hitches.
Attach cords
3 - 1 with clockwise
DHH, in
that order.
Continued
below |
|
|
| |
|
|
To make sure
there is no gap between the Square Knot
and the holding cord, each knot should be very tight. |
|
|
|
|
|
|
|
Progressive Mount
|
|
|
|
|
Description:
The Progressive Mount is my own creation, although
I am sure someone else may have thought this
up. It's a variation of the
Alternating Picot Mount that's shown first on this
page.
One important aspect of Picot Mounts is making
sure the loops are the same size. That can
get challenging, especially in a design like this
one.
Placing a piece of tape horizontally on your board
really helps. Each picot should be adjusted
until the top of it touches the edge of the tape.
When using this design in a Macrame project, try
to divide up the cords you are mounting into
groups of 4 - 6. The picots will be
too wide if you try to attach more than six cords
in this manner.
Step 1:
Arrange one holding cord horizontally on your
board. Stretch it as far as possible so
there is lots of tension.
You need 5 working cords, at least 20 inches
long. Using different colors is optional.
|
|
|
|
|
|
Place each
working cord under
the holding cord, then match the ends to
balance them.
Attach the lower half of each cord to the
holding cord with counter-clockwise
DHH, progressing left to right.
Mentally number the cords after you attach
them. |
|
|
|
|

|
|
Step
2: Bring the top
half of cord
1 over
all the other cords, and secure it under
the holding cord next to cord
5.
Adjust the picot to the size and shape you
like, then attach it to the holding cord
with a DHH.
|
|
|
|

|
|
Step
3: Move the top half of cord
2 to the right, passing over
cords 3 - 5.
The picot will rest behind (or below) the
one from the previous step.
Pass it under
the holding cord, adjust the size of the
picot, then attach it with a DHH.
|
|
|
|
|
|
Step
4: Attach cords
3 - 5 in the same manner, placing
each one to the right of the others.
Do your best to make sure the picots are
all the same height.
|
|
|
| |
|
|
| By using any
text or images on Free Macrame Patterns, you are
agreeing to our Terms of Use |
|
|
|
| Have
any comments about the Picot Mounts? Contact Me.
|
|
|
|
|
|
|