|
|
| |
 |
| |
|
|
Description: The Double Half
Hitch (DHH) is the primary knot used in Macrame.
Most of the Macrame patterns in existence use
this decorative knot in one form or another.
This is a very important
decorative knot, so you must know how to tie it,
or many patterns won't make sense to you.
By tying a series of Half Hitches with several
cords, a raised bar will form.
You can construct the bars in any direction, and
even form elaborate shapes.
|
|
|
|
To
practice creating shapes with DHH, click on the
links or images of the pages described below:
|
|
|
|
|
|
|
|
|
|
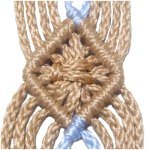
Vintage
Diamonds are just as
popular now as they were in the early to
mid-1900's.
There are several ways to decorate the
inside area, including folding, weaving,
and tying knots. |
|
|
| |
|
|
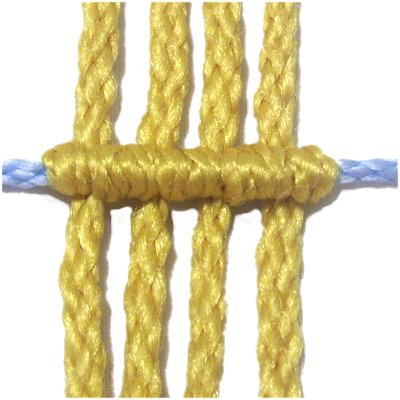
Horizontal DHH
|
|
|
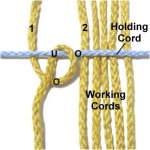
| Double Half Hitches
need to be attached to another piece of cord
material, which is called a holding
cord.
You can also attach them to rings and dowels.
Several cords are used to tie the Half Hitches
onto the holding cord. These are called working cords.
It helps if they are a different
color than the holding cord.
Make sure you understand the difference between
the two types of cords before practicing.
|
|
|
|
| |
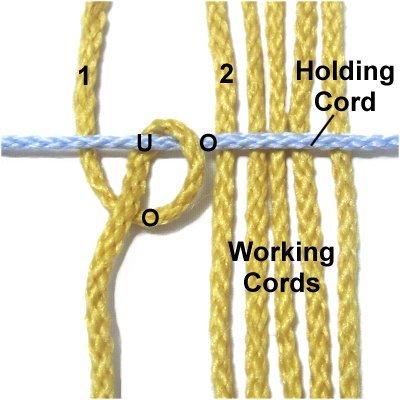
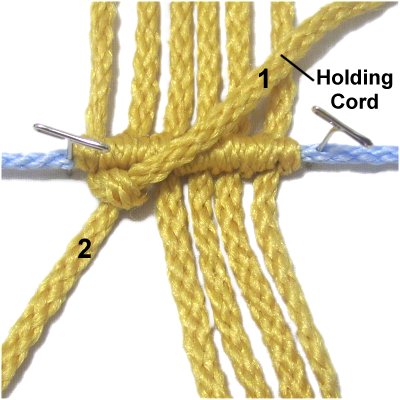
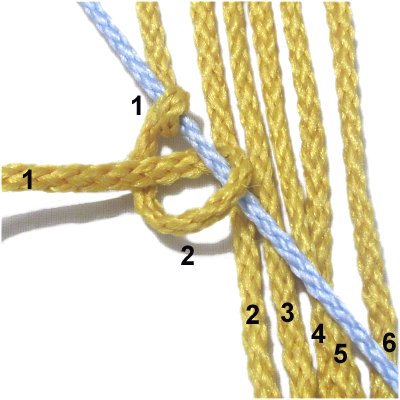
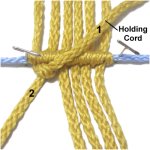
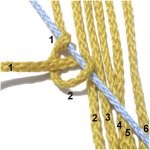
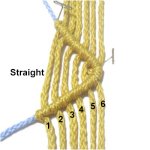
Step 1:
Fold three 36-inch working
cords in half, and secure them to your
project board vertically.
Mentally number the cords 1 - 6.
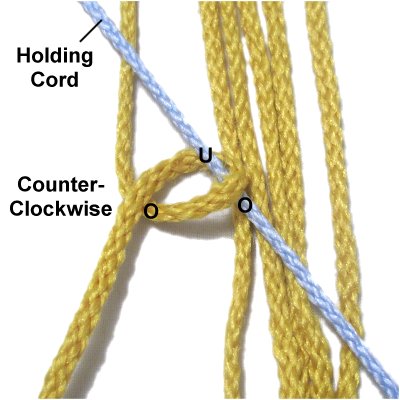
Place the holding
cord on top of the working cords,
arranged horizontally.
It should be straight and pulled so it has
tension.
Designer's
Tip: The shape of the bar is
determined by the holding
cord. In this case, the bar
will be horizontal.
|
| |
|
| |
|
|
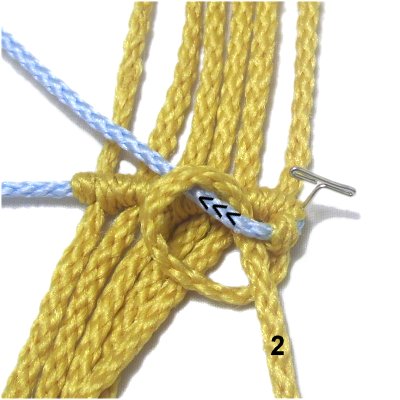
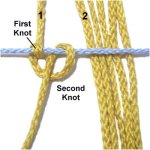
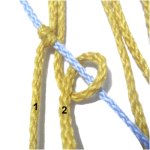
Step 2: Move
working
cord 1 over
- under the holding cord,
forming a counter-clockwise
loop.
As you pull it forward, it should pass
over
the working cord.
Tighten the knot firmly, making sure
the secured portion of the holding cord
is straight.
|
|
| |
|
|
Designer's
Tip: When tying the DHH from
left to right as shown, the knots are always
tied counter-clockwise.
So the portion that leads to the end should be
on the left.
When moving right to left they are made clockwise,
with the portion that leads to the end on the
right.
|
|
|
| |
|
|
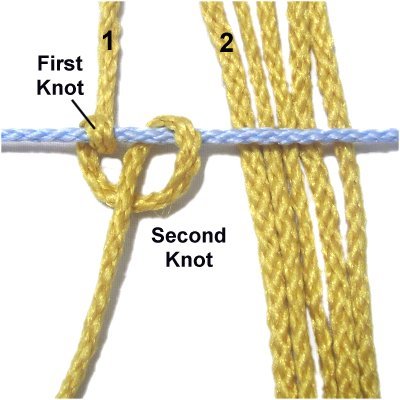
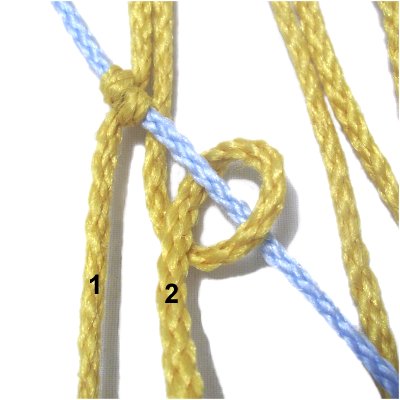
Step 3: Repeat
step 2, making a second Half
Hitch to the right
of the first.
As
you tighten, make sure the first Half
Hitch does not loosen.
Steps 2 + 3 = one Double Half
Hitch.
|
|
| |
|
|
Designer's
Tip: The Double Half Hitch is
supposed to be quite tight compared to other
decorative knots. The tighter you make them,
the neater they will be.
Both Half Hitches need to be the same size and
rest next to each other without
overlapping. |
|
|
| |

|
|
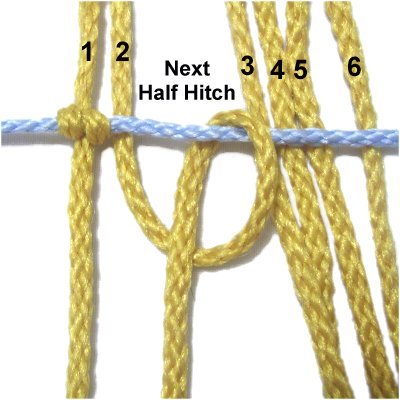
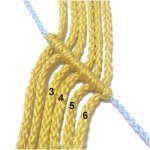
Step 4:
Repeat
steps 2 and 3 to make the next
Half Hitch with working cord
2. |
|
| |
|
| |

|
|
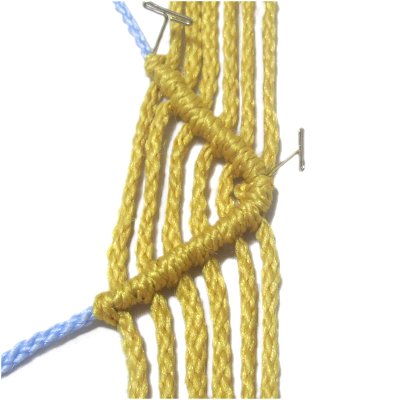
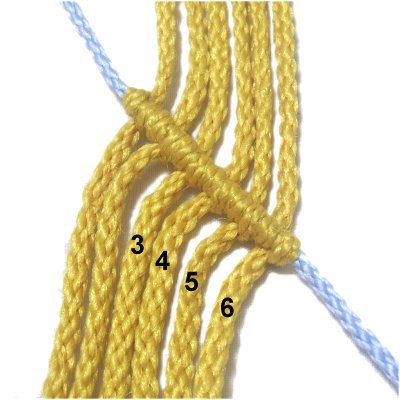
Step 5: Repeat
steps 2 - 3 with working cords
3 - 6.
Make sure the knots are neat and
tight.
|
|
| |
|
|
Now you are going to reverse the
direction, making a second row of
DHH.
This gives you an opportunity to learn how to
make sure the rows rest close together.
|
|
|
|
|
|
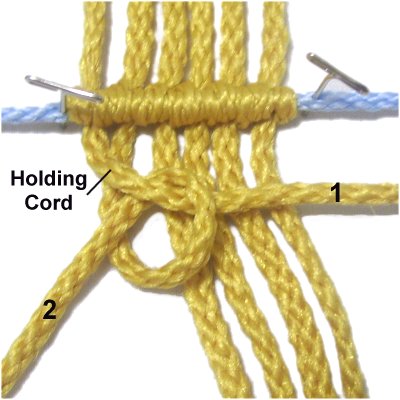
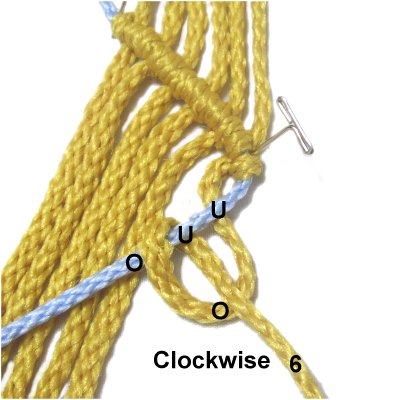
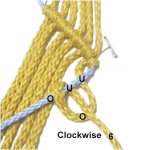
Step
6: Secure the last DHH on
the right with a pin. Move the
holding cord towards the left (not
secured).
Make a clockwise
Half Hitch with working cord 6.
As you tighten it, straighten the holding
cord so the knot is as close to the first
row as possible.
|
|
|
|
Designer's
Tip: It's important that you are
able to tie rows of DHH without securing the
holding cord.
You can control the holding cord in one hand while
tightening the knot with the other hand.
|
|
|
| |
|
|
Step
7: Make the second Half
Hitch with cord
6.
As you tighten
it, move the holding cord towards the
previous row, so the knots are close to
each other.
Then let
the knot relax by moving
the holding cord forward, so it's
horizontal again. |
|
| |
|
| |
|
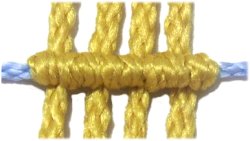
|
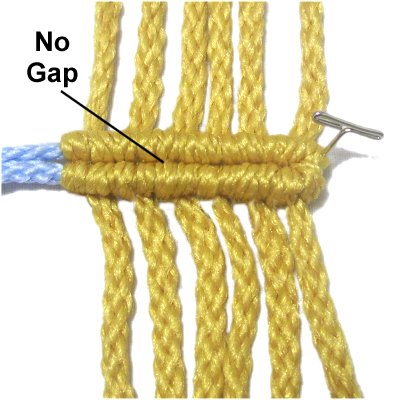
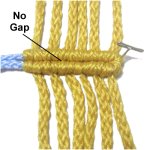
Step
8: Tie the remaining DHH
with cords
5 - 1 (in that order).
Make sure you tighten EVERY Half Hitch as
described above.
There should be no gap between the two
rows, if you have tightened the knots
correctly. |
|
| |
|
|
|
There are many Macrame patterns that require
you to use working cords as holding cords
temporarily. The following
instructions describe the process:
Repeat
steps 1 - 5, tying one row of
DHH.
|
|
|
|

|
|
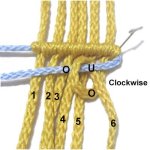
Move cord
1 to the right, and position it
horizontally. It's the holding cord
for the next row of DHH.
Make counter-clockwise
Double Half Hitches with the remaining
working cords (see tightening below). |
|
|
|
| |
|
|
Remember to
move the holding cord towards the previous
row as you tighten each Half Hitch.
Then let it
relax before tying the next knot.
|
|
| |
|
|
|
| |
|
|
| |
Diagonal Double Half Hitch
|
|
|
|
| |
|
The Diagonal DHH can be used to form a variety
of designs. It's used frequently to make diamond
and V shapes, as well as zigzags.
Chevrons, leaf shapes, and other complex designs
are also made with this technique.
It's actually more common than the horizontal
variation. Be sure to practice it in both
directions, since you will use it often.
|
| |
|
| |
Fold three 36-inch
working cords in half, and secure them to your
board vertically. Mentally number the cords
1- 6.
Place a holding cord to the left of the group, and
secure it on a diagonal slant. Make sure you
stretch it so the cord has tension.
Designer's
Tip: Many Macrame patterns will
have you use one of the working cords to hold the
Half Hitches. When practicing, it's better
to use a separate cord.
|
| |
| |
|
|
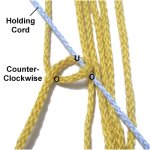
Step
1: Move the first working
cord over
- under the holding cord, in a counter-clockwise
direction.
As you pull it left, it should pass over
the working cord.
Tighten the knot firmly, making sure the
secured portion of the holding cord is
straight. |
|
| |
|
| |
|
|
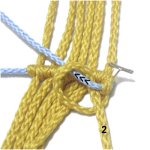
Step 2: Tie the second
Half Hitch with cord 1, placing it to
the right
of the first knot.
Steps 1 + 2 = Double Half Hitch
|
|
| |
|
| |
|
|
Step
3:
Repeat steps 1 - 2,
tying the next DHH with working cord
2. |
|
| |
|
| |
|
|
Step 4: Repeat
steps 1- 2,
attaching cords
3 - 6 to the holding cord.
Place a pin on the DHH made with cord 6,
to support the corner.
|
|
| |
|
| |
|
|
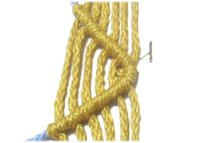
Step
5: Move the holding cord
towards the left,
resting on top of the working cords.
Attach cord
6 to it with a clockwise
DHH, so the end of the cord is heading
right when you finish.
|
|
| |
|
| |
|
|
Step
6: Attach cords
5 - 1 to the holding cord with
DHH.
Make sure the segments between the two
rows of knots are straight.
|
|
| |
| |
| |
|
|
By
using any text or images on Free Macrame
Patterns, you are agreeing to our Terms
of Use
|
|
|
|
|
Have
any comments about the Double Half Hitch? Contact
Me.
|
|
|
|

|
|
|
| |