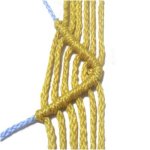
Double Half Hitch Patterns are used in many
Macrame projects. The key to mastering these
designs is to remember:
The direction and angle
of the holding
cords
will determine the shape of the design.
On this page are three examples of how this
decorative knot can be used to make different
shapes -- Horizontal Angles, Serpentine Design,
and Eyelets.
Click on the link or image to view the Daisy
Design, which is just one of
the many unique Double Half Hitch patterns
you can make once you understand the basic
concepts.
Make sure you
know how to tie the Double Half
Hitch in both directions.
You should know the difference between a
holding cord and a working cord.
Click on the link or image to visit the page
now.
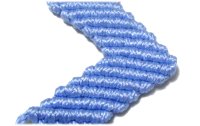
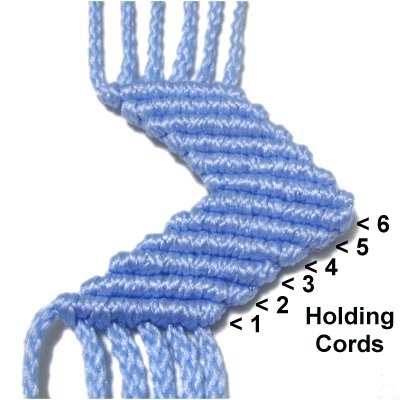
Horizontal Angles
Double Half Hitch Patterns include designs where
you tie horizontal rows that result in diagonal
edges. This is a very common practice,
especially in vintage Macrame projects.
The instructions below will show you how to
create the rows of DHHin both directions, forming the arrow shape
shown above.
Step 1:
Secure at least six 36-inch cords vertically to
your board. I recommend you use 4mm
size material, since the knots will be
neater.
Mentally number the cords 1 - 6.
Move cord
1 to the right,
so it rests on top of the other cords.
Secure it so it has tension
and is horizontal.
It will be the holding
cord for the first row.
Step 2: Attachcord 2
by passing it over
- under the holding cord, in a counter-clockwise
direction.
As you pull it forward, it should pass over
cord 2 to complete the loop.
Tighten the knot firmly. The secured
portion of the holding cord should be
straight.
Step
3: Tie another Half Hitch to
the right
of the first, making it a Double Half Hitch.
Make sure the first knot remains tight
as you construct and tighten the second
knot.
Step
4:Repeat
steps 2 - 3 with each of the
remaining cords (3 - 6).
Make sure you tighten the knots firmly and
evenly, so the row looks neat.
Bring cord 1to the right of cord 6, arranged
vertically.
Designer's
Tip: For many Double Half Hitch
patterns, it's better to control the holding cord
with one hand while tying the knots with the other.
You will be able to adjust the tension and direction
without relying on pins. See
step 6 below.
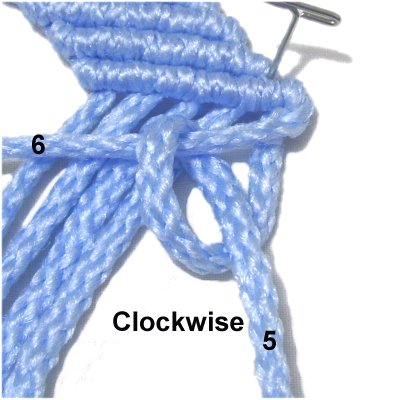
Step
5: Move cord
2 to the right, and use it as the
next holding cord.
Make a counter-clockwise
Half Hitch with cord
3, onto holding cord 2.
See
tightening information below:
Step
6: Pull holding cord 2
towards the previous row (right), using your
right hand.
Tighten the Half Hitch with your left hand.
This method of tightening will bring the
second row of knots closer to the first row.
Step
7: Bring the holding cord back
to it's original position, allowing it to relax
slightly. Make sure the first Half Hitch
doesn't loosen.
Tie the second Half Hitch to the right
of the first, then tighten it as described in step
6.
Attach cords 4 - 6, as well as cord 1, to holding
cord 2. Always tighten as described above, so
there is NO GAP between the two rows.
Move cord
3 to the right, and use it as the
next holding cord.
Attach cords 4 - 6, and 1 - 2 to it with
DHH.
Repeat
step 6 to tighten each Half Hitch.
Step
8: Continue to repeat the same
process, moving the next holding cord into
position, then attaching all the others to
it with DHH.
The last three holding cords are 4, 5, and
6.
Repeat
step 6 each time you tighten the
knots.
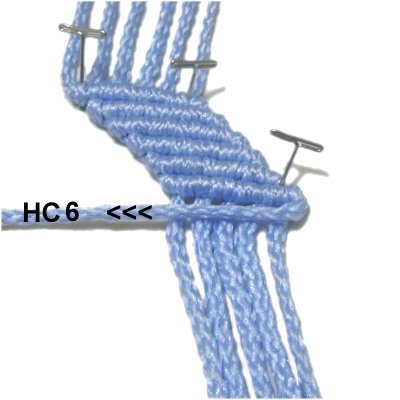
Step
9: Move cord
6 to the LEFT, and use it as the
next holding cord.
Step
10: Attach cord
5 to holding cord 6 with a clockwise
DHH.
Pull the holding cord towards the previous
row (left) with your left hand, while
tightening the knot with your right hand.
Do this with both knots.
Step 10,
continued: Attach cords
4 - 1 to holding cord 6 with clockwise
DHH.
Tighten each knot as described above.
Step
11: Move holding cord 5 into
position (towards the left).
Attach cords 4 - 1, as well as cord 6, with
DHH.
Tighten as described in step 10.
Step
12: Repeat the same process to make
the remaining rows. Always start by moving
the next holding cord into position (cords 4
- 1).
Then attach all the remaining cords to it.
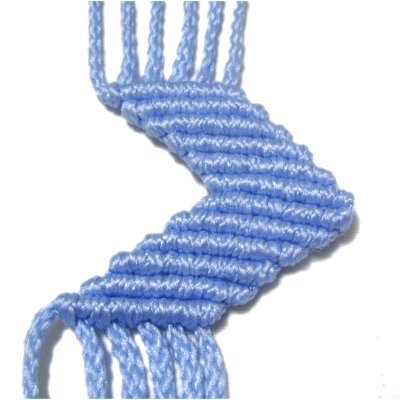
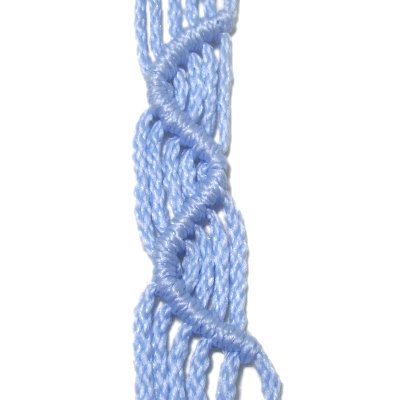
Serpentine Design
Remember that Double
Half Hitch patterns are determined by the position
of the holding cord. So in this
Serpentine design, the holding cord simply
alternates directions.
You can make a variety of shapes, such as letters
and numbers, using this technique.
Step 1: You
will need at least six 36-inch cords
secured to a board vertically.
Mentally number the cords 1 - 6.
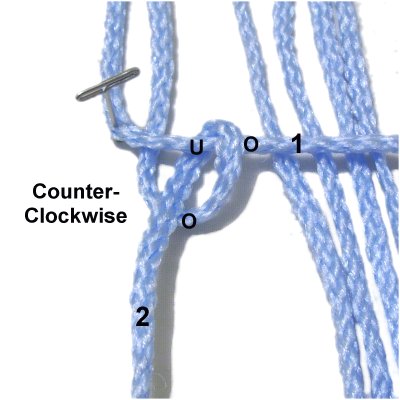
Move cord
6 to the
left diagonally, and stretch
it so there is tension.
Place a pin where the cord bends.
This will be the holding cord for the
entire design.
Step 2: Attachcord
5 to the holding cord with a clockwise
Half Hitch, since you are moving right to
left.
Tighten it firmly and push it next to the
pin.
Step
3: Tie another Half Hitch
with the same cord, placing it to the left of
the first.
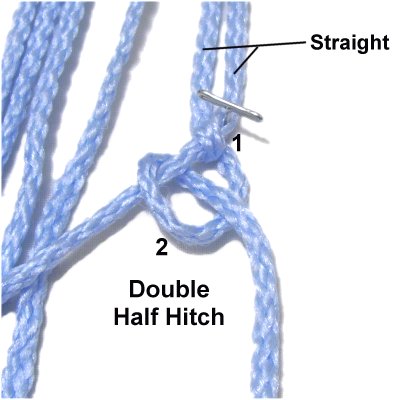
Steps 2 + 3
= One Double Half Hitch
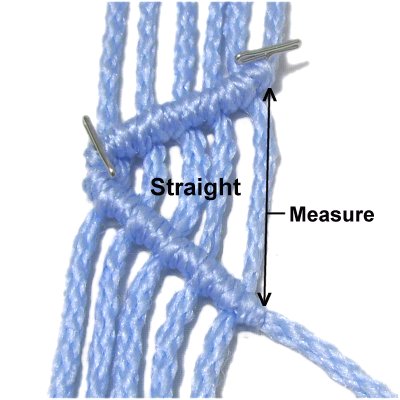
Step 4:Repeat
steps 2 - 3 with cords 4 - 1, in
that order.
Make sure all the knots are firmly
tightened, so the row is neat. The
secured portion should be straight.
Step 5: Place a pin on
the last DHH tied in the previous step, to
secure and support the corner.
Move holding cord 6 to the right, and
stretch it so it has tension.
Try to mimic the diagonal slant of the
first row.
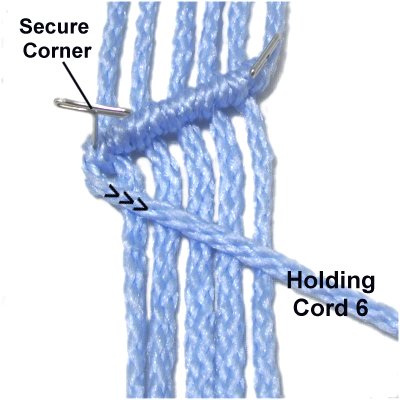
Step
6: Attach working cord 1 to
holding cord 6 with a counter-clockwise
DHH, since you are now moving left to right.
This image shows the first knot only.
Make sure you tie two Half Hitches.
Step
7: Attach cords 2 - 5 to the
holding cord with DHH. Make sure each
cord is straight as you tighten each knot.
Push the knots close together to make the
corner more rounded.
See Tip
below
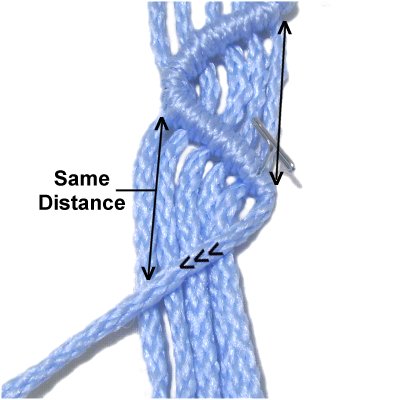
Designer's
Tip: Double Half Hitch patterns
should look the same from one area to the
next.
So you should MEASURE
the distance between the two rows in the widest area
(shown above).
As you progress, you would then adjust the slant of
the holding cord to match that measurement (shown
below).
Step 8: Move the holding
cord back to the left. (This
is where you would measure and adjust the
slant).
Attach cords 5 - 1 to it with DHH.
Most Double Half Hitch patterns look
better if you repeat the design more than
once.
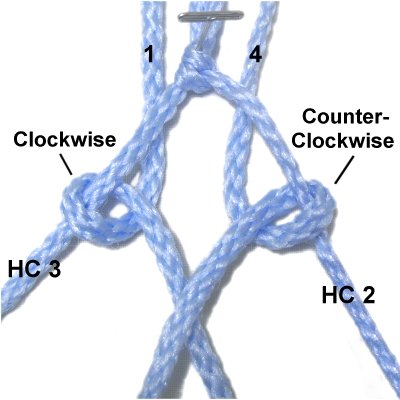
Eyelets
Double Half Hitch patterns include Eyelets, which
are oval shaped designs made with very few
cords. They are sometimes called "florets" in
vintage Macrame books.
They can be tied in a vertical row, as shown in the
example below. This form can be used as a
bracelet or belt. Handbag straps can also be
made using this technique.
You can also tie them in horizontal rows. By
alternating which cords are used to tie the Eyelets,
you can create a panel.
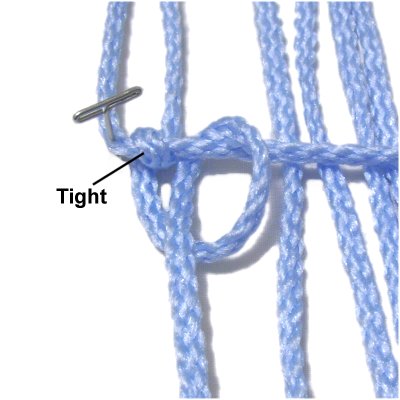
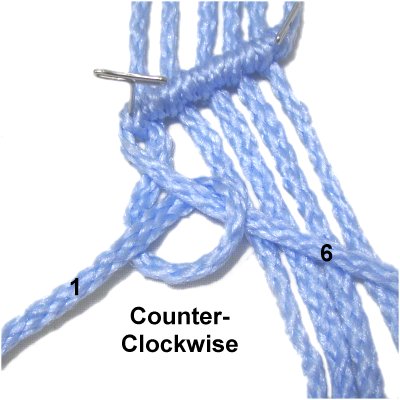
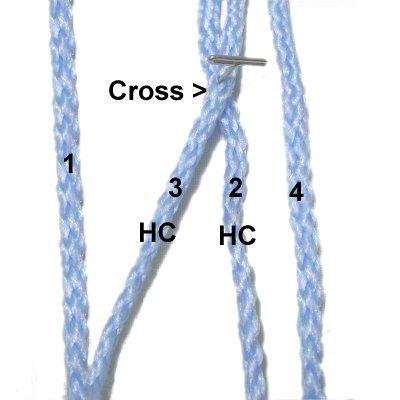
Step
1: Arrange four 36-inch cords
on your board vertically, and mentally
number them.
Cross cord 3 over cord 2, and secure
them. They are the holding cords for
all the Eyelets you will make.
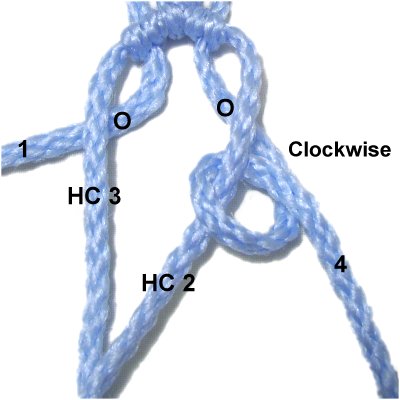
Step
2: Attach cord
2 to holding cord 3 with a Double
Half Hitch, rotating clockwise.
Slide the knot against the pin after tying
both loops.
Move cord 2 to the right, and cord 3 to the
left.
Designer's
Tip: Double Half Hitch patterns often
include other types of knots.
Step 2 is optional, if you have tied other knots
just before making the Eyelet.
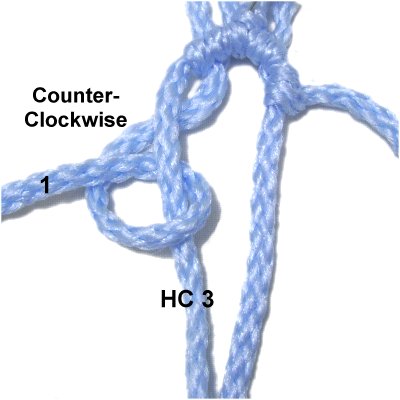
Step
3: Attach cord
1 to holding cord 3 with a DHH,
rotating clockwise.
Attach cord
4 to holding cord 2 with a DHH,
rotating counter-clockwise.
Step
4: Move the holding cords
towards each other, passing over
cords 1 and 4.
Curve cords 1 and 4 to the right and left.
Attach cord
4 to holding cord 2 with a clockwise
DHH. The cord should be heading right
when you are done.
Step
5: Attach cord
1 to holding cord 3 with a DHH,
rotating counter-clockwise.
The cord should be heading left when you are
finished.
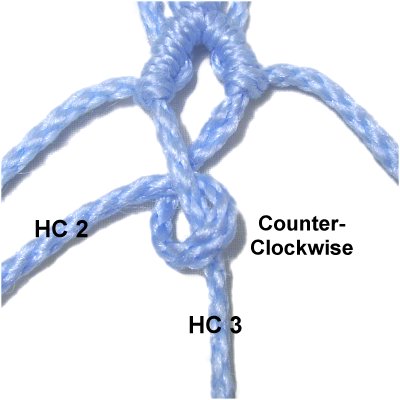
Step
6: Close the Eyelet by attaching holdingcord
2 to holding cord 3 with a counter-clockwise
DHH.
Step
7: Repeat steps
3 - 6 at least 2 more
times, to make more Eyelets.
By
using any text or images on Free Macrame
Patterns, you are agreeing to ourTerms
of Use