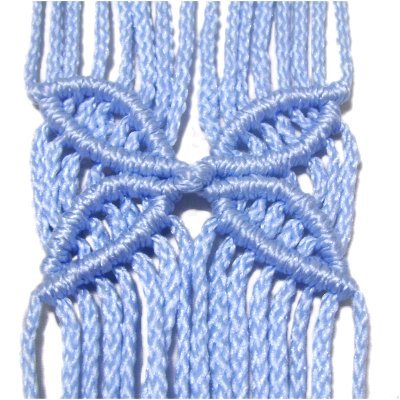
The Daisy Design is a popular Macrame pattern
made with Double Half Hitches. Leaves and
flowers are frequently found in projects in the
early and mid-1900's, so they are considered
vintage designs.
In the instructions below, the directions show you
how to make the DHH curve
to form the four petals. In the
center, you can tie a knot as described below, or
attach a bead.
I recommend
you practice horizontal and diagonal Double
Half Hitches several times.
Try to control the holding cord with one
hand while tying the knots with the
other.
Click on the image or link to visit that
page.
Preparation:
To practice the Daisy Design, cut
8 cords, each 36 inches long.
Fold them in half and secure them to your project
board with pins. Mentally number the cords 1
- 16.
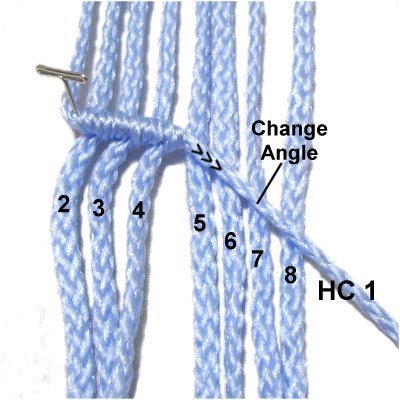
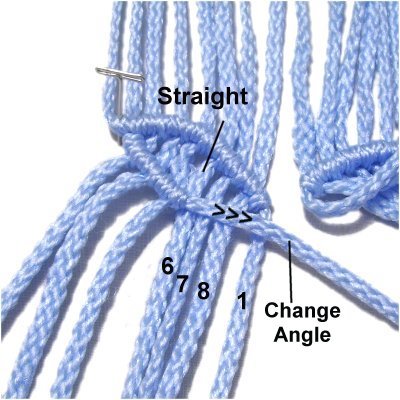
Step
1: Move cord
1 to the right horizontally,
resting on top of cords 2 - 8. It
should have tension, since it's a holding
cord.
Attach cords
2 - 4 to it with counter-clockwiseDouble
Half Hitches (DHH).
Designer's
Tip: It's important to tighten each
Half Hitch firmly and evenly, so the petals of the
Daisy design are neat.
The cords should be straight between the petals
and in the secured area.
Change
the angle of holding cord 1 so
that it's diagonal.
Attach cords
5 - 8 to it with DHH, arranging
the knots so they curve.
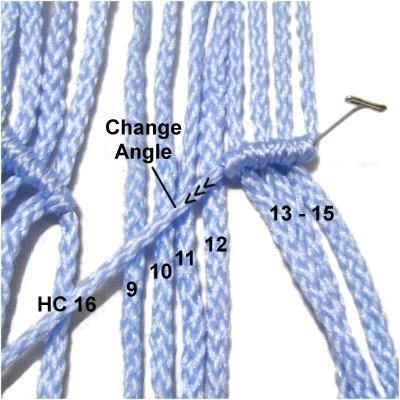
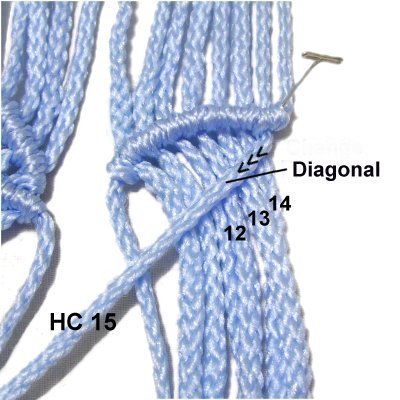
Step
2: Move cord
16 to the left, resting on top of
the other cords. It should be
horizontal.
Attach cords
15 - 13 to it with clockwise
DHH (in that order).
Change
the angle of holding cord 16, so
it's diagonal.
Attach cords
12 - 9 to it with DHH, arranged
so they curve.
Try to make the curved shape the same on
both sides.
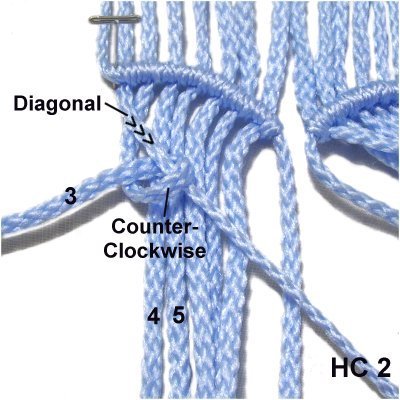
Step
3: Now you will form the
lower portion of the left
petal for the Daisy Design.
Move cord
2 to the right diagonally.
It will be the next holding cord.
Attach cords
3 - 6 to it with counter-clockwise
DHH.
Change
the angle of holding cord 2, so
it touches the last DHH in the top
row.
Attach cords
6 - 8, as well as cord
1, with DHH.
Make sure the cords remain straight in the
area between the two rows.
Step
4: To form the lower
portion of the right
petal for your Daisy Design, move
cord
15 to the left diagonally. It
will be the holding cord.
Attach cords
14 - 12 with clockwise
DHH, in that order.
Change
the angle of holding cord 15, so
it curves towards the last knot in the top
row.
Attach cords
11 - 9, as well as cord
16, with DHH.
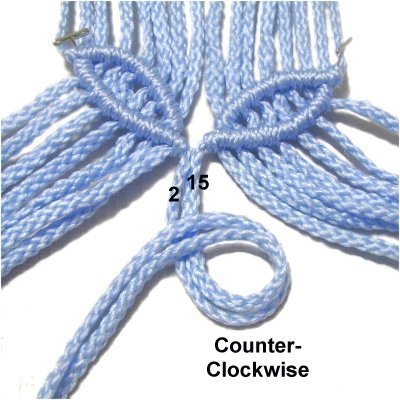
Step
5: There needs to be a knot
(or small bead) in the center of the Daisy
design.
For an Overhand knot, use holding cords
2 and 15 together to make a counter-clockwise
loop.
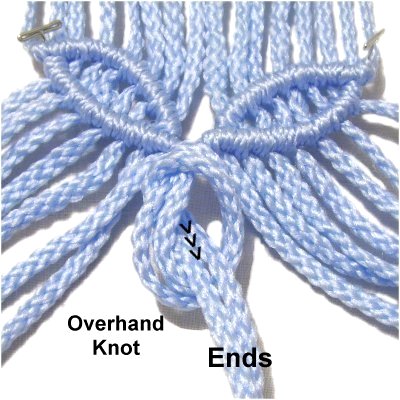
Complete the
Overhand Knot by passing the ends through
the loop from below, pulling them towards
you.
Tighten slowly until the knot is firm.
Should you decide to add a bead instead of
the knot, pass the cords through in
opposite directions.
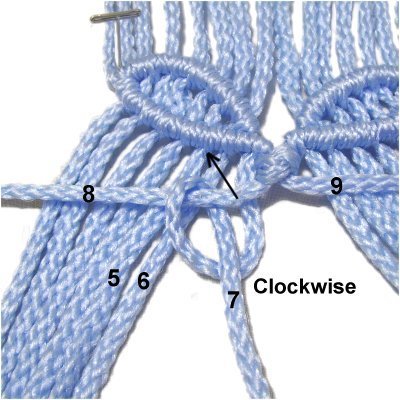
Step 6:
Now it's time to make the two lower petals for the
Daisy. The direction they are made is
different from the first two, since you start in
the center and move outward.
Mentally re-number the cords. The two cords
coming from the Overhand knot should be 8 and 9.
Move holding cord
8 to the left. Attach cords
7 - 5 to it with clockwise
DHH.
As you tighten each Half Hitch, pull the
holding cord towards the
previous row, so the DHH
rest against
the petal above (seen in next image).
Change
the angle of holding cord 8, so
it starts out on a diagonal slant.
Attach cords
4 - 1 with DHH, curving the knots
so they look similar to the ones above.
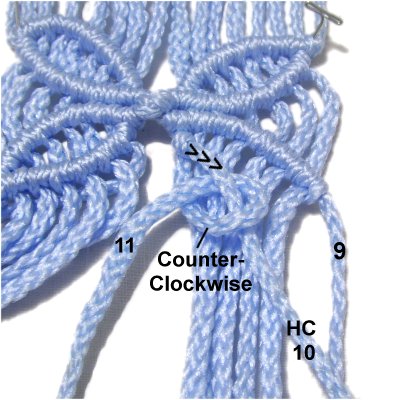
Step
7: Move holding cord
9 to the right. Attach cords
10 - 12 to it with counter-clockwise
DHH.
Pull the holding cord towards the previous
row when tightening each Half Hitch, so
they are close together.
Change the
angle of holding cord 9 so it starts out
diagonal.
Attach cords
13 - 16 to it with DHH, curving
the knots like the other petals.
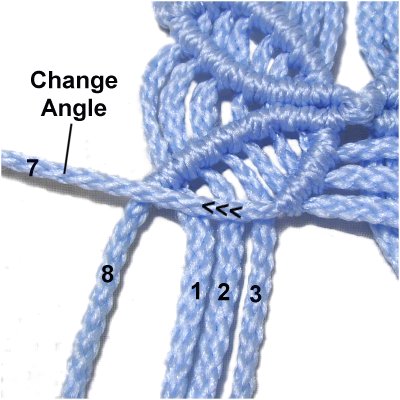
Step
8: To make the bottom of
the left
petal, move cord
7 diagonally, and use it as the
holding cord.
Attach cords
6 - 4 to it with clockwise
DHH, in that order.
Change
the angle of holding cord 7, so
it curves towards the DHH in the top
row.
Attach cords
3 - 1, as well as cord
8, with DHH.
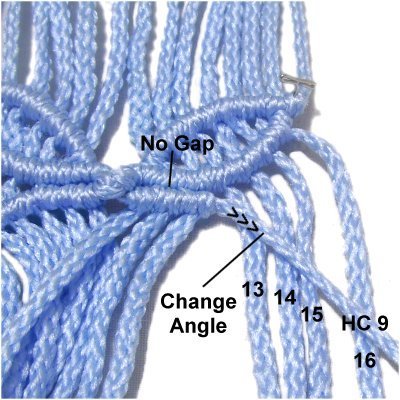
Step
9: To make the bottom of
the right
petal, move cord
10 diagonally and use it as the
next holding cord.
Attach cords
11 - 13 to it with counter-clockwise
DHH.
Change
the angle of holding cord 10,
curving it towards the last DHH in the top
row.
Attach cords
14 - 16, along with cord
9, with DHH.
By using any
text or images on Free Macrame Patterns, you are
agreeing to ourTerms of Use.