|
|
|
|
|
|
|
|
|
|
|
|
|
|
|
|
|
|
|
|
|
|
|
|
|
|
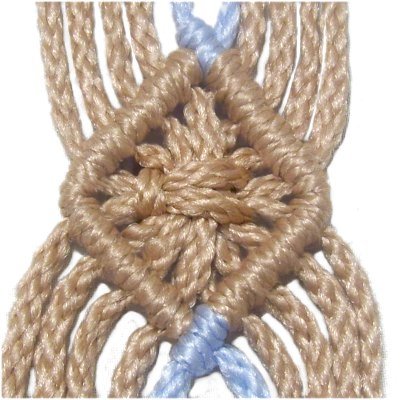
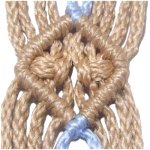
Description: Vintage Diamonds
are the most frequently used Half Hitch patterns
used in Macrame projects.
You create diagonal rows of Double Half Hitches
to make the top and bottom edges of the diamond.
The design in the center
can be made using various techniques. On
this page are three of the most common designs
suitable for the center area.
|
|
|
|
|
|
|
|
|
|
|
|
|
|
|
|
|
|
|
|
|
|
Make sure you
know how to tie Double Half
Hitches
arranged diagonally.
Click on the link or image to visit that
page now.
Also be sure you know the difference
between holding
and working
cords. |
|
|
|
|
|
|
|
|
|
|
|
|
|
|
|
|
|
|
|
|
|
|
Another page you
should visit is Unique
Diamonds.
The interior of the diamonds is handled in
unusual ways, so be sure to practice
those, too.
Click on the link or image to view the
page. |
|
|
|
|
|
|
|
|
|
|
|
|
|
|
|
|
|
|
|
|
|
|
|
|
|

|
|
|
|
|
|
|
|
|
|
Top Portion
|
|
|
|
|
|
|
|
|
|
|
|
|
|
|
When you make ALL the Vintage Diamonds on this
page, you start by creating the top
portion, as described in the following
steps.
In the example shown below, a different color was
used for the two holding
cords (light blue), to
make learning easier.
|
|
|
|
|
|
|
|
|
|
|
|
|
|
|
|
|
|
|
|
|
|
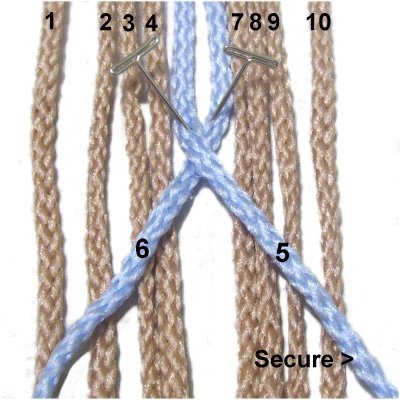
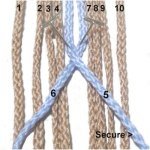
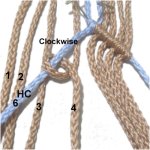
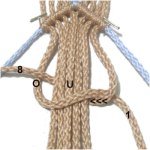
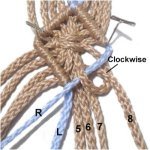
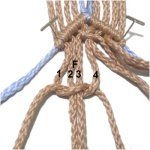
Step 1: Secure the
holding cords vertically to a project
board. On each side, secure 4
working cords.
Mentally number the cords 1 - 10.
Cross holding
cord 5 over
cord 6, heading right. Secure it
closer to the front of your board (with
tension).
|
|
|
|
|
|
|
|
|
|
|
|
|
|
|
|
|
|
|
|
|
|
|
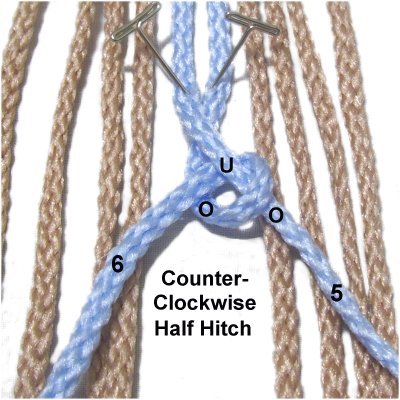
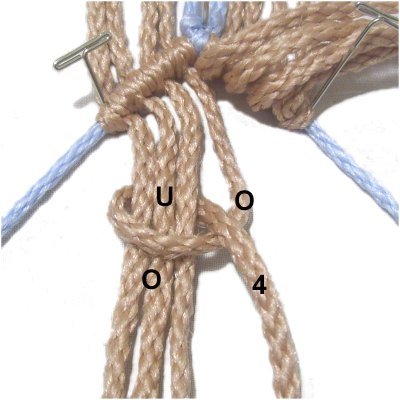
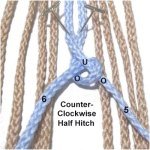
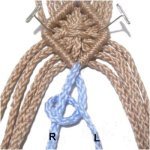
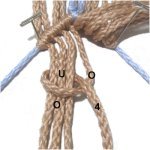
Step
2: Attach
cord 6 to holding cord 5 with a
Half Hitch, rotating
counter-clockwise.
A Half Hitch is a loop that passes over
- under the holding cord.
As you pull the cord left, pass over
to complete the loop.
|
|
|
|
|
|
|
|
|
|
|
|
|
|
|
|
|
|
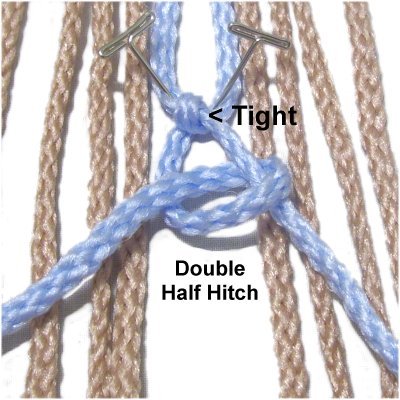
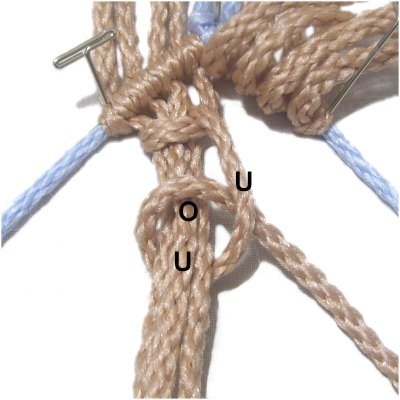
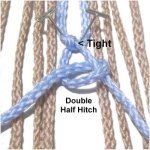
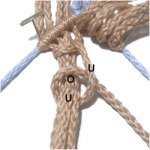
Tighten the
first Half Hitch firmly, then tie a second
Half Hitch to the right of the
first. Make sure the first
loop does not loosen as you tighten the
second knot.
2 Half Hitches = 1 Double Half Hitch (DHH)
|
|
|
|
|
|
|
|
|
|
|
|
|
|
|
|
|
|
|
|
|
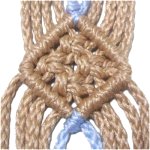
Step
3: Secure BOTH holding
cords with lots of tension, so
the rows you will be making are
straight.
The angle of the holding
cords determines the shape of Vintage Diamonds, so
adjust each one until you are satisfied with the
shape and width. |
|
|
|
|
|
|
|
|
|
|
|
|
|
|
|
|
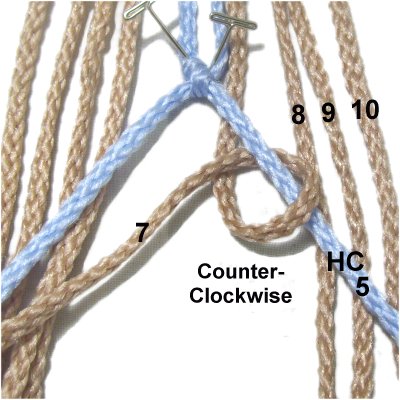
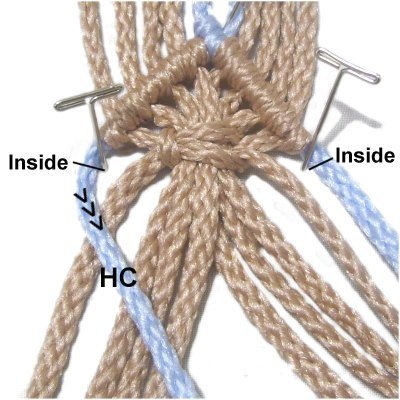
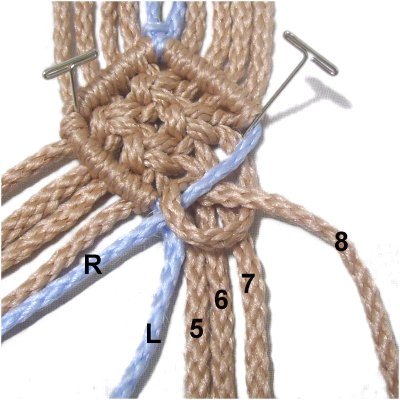
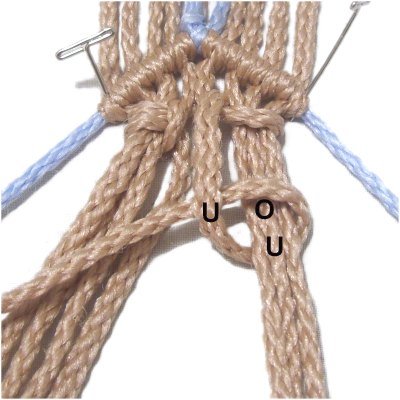
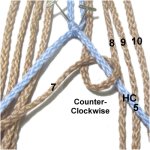
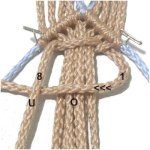
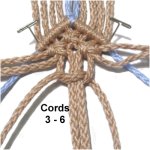
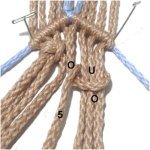
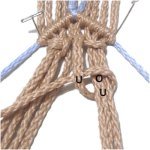
Attach cords
7 - 10 to holding cord 5 with
DHH, rotating counter-clockwise.
Make sure the knots are well tightened and
neatly arranged without overlapping (see
next image).
|
|
|
|
|
|
|
|
|
|
|
|
|
|
|
|
|
|
|
|
|
|
|
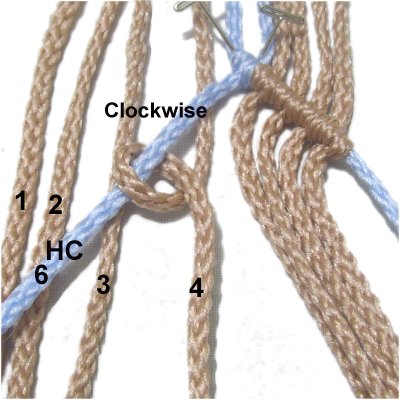
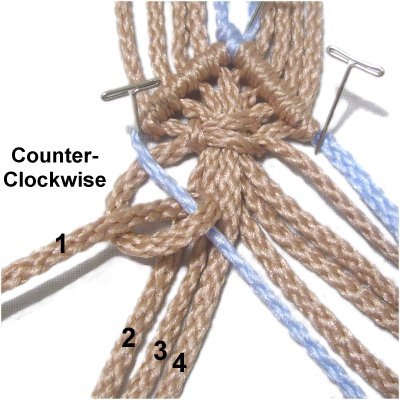
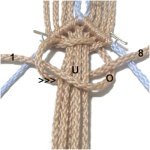
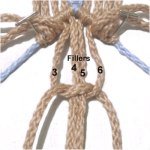
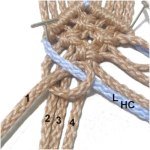
Step
4: Attach cords
4 - 1 to holding cord 6 with
DHH, in that order.
The knots should be tied clockwise,
since you are moving right to left.
|
|
|
|
|
|
|
|
|
|
|
|
|
|
|
|
|
|
|
|
|
|
|
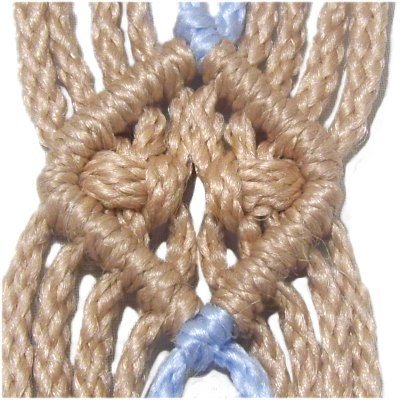
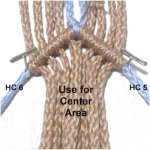
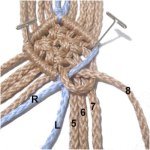
Holding cords
5 and 6 are not used for the center area,
so keep them secured.
Place pins next to the first and last DHH,
so the top portion is stable and can't
move. |
|
|
|
|
|
|
|
|
|
|
|
|
|
|
|
|
|
|
|
|
|
|
|
|
|
|
|
|
|
|
|
|
|
|
|
Center Area + Bottom of Diamonds
|
|
|
|
|
|
|
|
|
|
|
|
|
|
|
After you complete the top area, you will need
to decide how to decorate the inside
of your Vintage Diamonds.
Below are three common techniques you can use for
the center area. The first two are Square
Knot patterns, and one is made with
the Vertical Larks Head
knot.
Other knots can be used, so be sure to EXPERIMENT
to see what works for your project.
The key is to find a knot or pattern that is small
enough to fit the size you are making. The
larger you make the diamonds, the more options you
will have.
|
|
|
|
|
|
|
|
|
|
|
|
|
|
|
|
|
|
|
|
|
|
|
|
|
Square Knot Technique
|
|
|
|
|
|
|
|
|
|
|
|
|
|
|
|
|
|
|
|
|
|
|
|
|
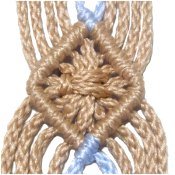
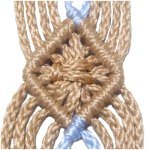
Description:
The Square Knot
technique is the most common variation you will
find in Macrame patterns.
Follow
steps 1 - 4 above to create the Top
Portion of the diamond.
|
|
|
|
|
|
|
|
|
|
|
|
|
|
|
|
|
|
|
|
|
|
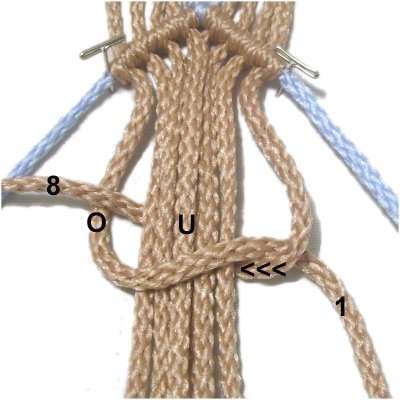
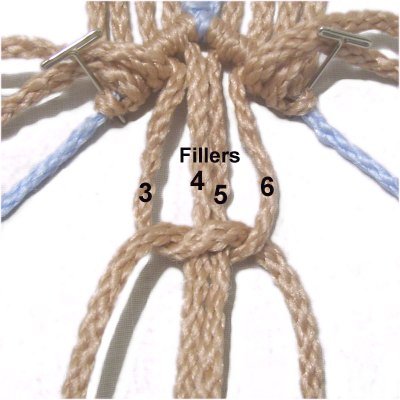
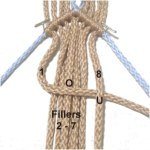
Mentally
number the working cords 1
- 8.
Move cord
1 to the right,
passing over
the fillers (2 - 7) and under
cord 8.
|
|
|
|
|
|
|
|
|
|
|
|
|
|
|
|
|
|
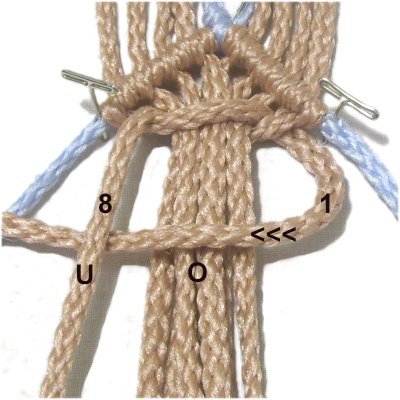
Step
2:
Move cord
8 under
the fillers, and over cord
1, as you pull it out on the the left.
Tighten the first half of the SK so it
lines up with the pins placed on the
corners of the top portion (see next
image). |
|
|
|
|
|
|
|
|
|
|
|
|
|
|
|
|
|
|
|
|
|
|
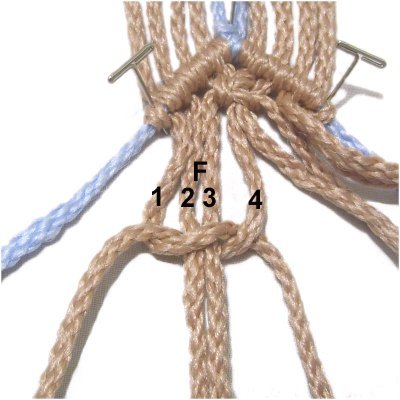
Step
3: The second half of the
SK is tied in reverse direction, since the
working cords have changed places.
Move cord
1 over
the fillers and under
cord 1, heading left. |
|
|
|
|
|
|
|
|
|
|
|
|
|
|
|
|
|
Step
4: Bring cord
8 under
the fillers and over cord
1, as you pull it out on the right.
Tighten and adjust both halves of the
Square Knot until you like how it
fits. |
|
|
|
|
|
|
|
|
|
|
|
|
|
|
|
|
|
|
|
|
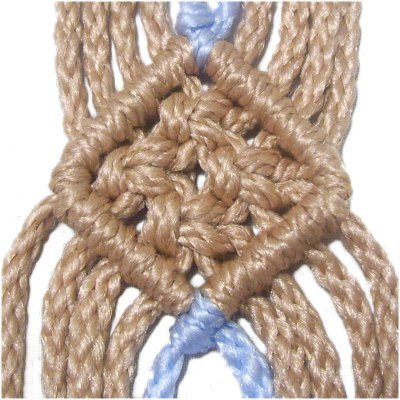
Designer's
Tip: Vintage Diamonds can end up
with rounded corners, especially with materials
more than 2mm thick.
When using 4mm or 6mm cord material, move the pins
so they are on the
inside, next
to the holding cords (shown below).
This way the holding cords pass around them to
form the corners, giving them better angles. |
|
|
|
|
|
|
|
|
|
|
|
|
|
|
|
|
|
|
|

|
|
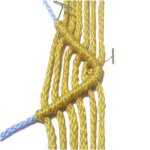
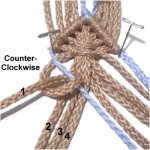
Step
5: Move
the
left holding
cord towards the center
and secure it with tension.
Try to match the diagonal slant of the right
upper row of DHH. |
|
|
|
|
|
|
|
|
|
|
|
|
|
|
|
|
|
|
|
|
|
|
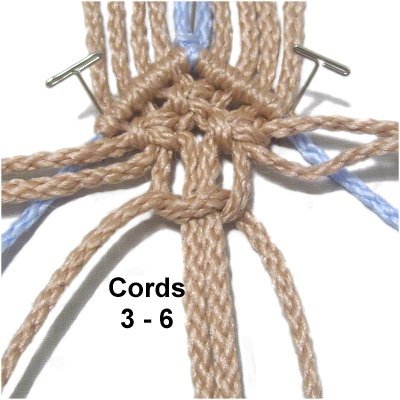
Step
6: Attach cords
1 - 4 to the holding cord with
DHH, rotating counter-clockwise.
Tighten firmly and evenly so the
row is neat. |
|
|
|
|
|
|
|
|
|
|
|
|
|
|
|
|
|
|
|
|
|
|
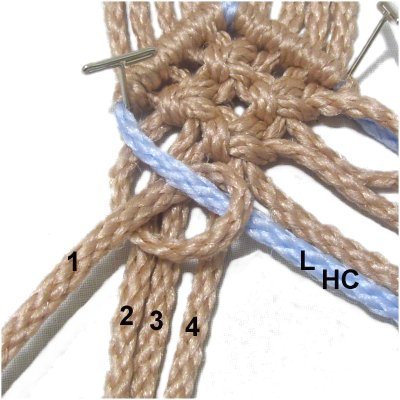
Step
7: Move the right holding cord
towards the center and secure it.
Try to match the slant of the left upper
row of DHH.
Attach working cords
8 - 5 to it with clockwise
DHH,
in that order. |
|
|
|
|
|
|
|
|
|
|
|
|
|
|
|
|
|
|
|
|
|
|
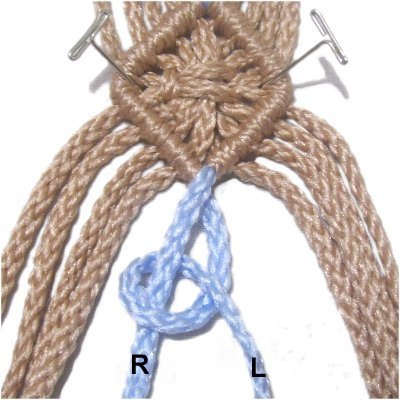
Vintage
Diamonds are usually closed by attaching
one holding cord to the other.
In this case, attach the holding cord from
the left onto the right.
|
|
|
|
|
|
|
|
|
|
|
|
|
|
|
|
|
|
|
|
|
Designer's
Tip: Are you using the same cords
to practice all the Vintage Diamonds on this
page?
You can remove the lower rows of DHH by untying
the DHH made with the holding cords in the last
step. Pull the holding
cords out of the DHH (at the
corners).
Then remove the knots or other design in the
center, and you will be ready to practice the next
technique. |
|
|
|
|
|
|
|
|
|
|
|
|
|
|
|
|
|
|
|
|
|
|
|
|
|
|
|
|
|
|
|
|
|
|
Alternating Square Knot Technique
|
|
|
|
|
|
|
|
|
|
|
|
|
|
|
|
|
|
|
|
|
|
|
|
|
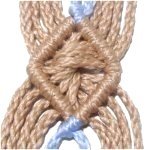
Description:
This is another common technique for filling the
center of Vintage Diamonds.
You tie four
Alternating Square
knots rather than one SK.
|
|
|
|
|
|
|
|
|
|
|
|
|
|
|
|
|
|
|
|
Step 1:
Create the Top
Portion of the diamond following the
steps described in that section. Keep the
holding cords secured to you board
afterward.
Mentally number just the working cords 1 -
8.
|
|
|
|
|
|
|
|
|
|
|
|
|
|
|
|
|
|
|
|
|
|
Tie a left
Square Knot with cords
3 and 6, around the fillers,
which are cords 4 and 5.
Tighten it firmly, making sure it rests
near the top
of the diamond.
|
|
|
|
|
|
|
|
|
|
|
|
|
|
|
|
|
|
Step
2: Tie a left SK with cords
1 - 4.
Tie another SK with cords
5 - 8. You can make it a
left or right SK.
Both knots should rest in front of the SK
from the previous step. |
|
|
|
|
|
|
|
|
|
|
|
|
|
|
|
|
|
Step
3: Tie the last left SK with cords
3 - 6, which will also rest in
front of the SK from step 1.
|
|
|
|
|
|
|
|
|
|
|
|
|
Step
4: Move the left
holding cord towards the center,
close to the left edge of the SK
design.
Attach cords
1 - 4
to the holding cord with DHH,
rotating counter-clockwise.
|
|
|
|
|
|
|
|
|
|
|
|
|
|
|
|
|
|
|
|
|
|
|
Step
5: Move the right
holding cord to the center, near
the right edge of the SK design.
Attach cords
8 - 5 (in that order) with clockwise
DHH.
Attach the left
holding cord as well, to close
the diamond. |
|
|
|
|
|
|
|
|
|
|
|
|
|
|
|
|
|
|
|
|
|
|
|
|
|
|
|
|
|
|
|
|
|
|
Larks Head Technique
|
|
|
|
|
|
|
|
|
|
 |
|
|
|
|
|
|
|
|
|
|
|
|
|
|
Description:
Here's another interesting technique you
can use for the inside of Vintage Diamonds.
Start by making the Top
Portion of the diamond. Mentally
number the working cords 1 - 8. |
|
|
|
|
|
|
|
|
|
|
|
|
|
|
|
|
|
|
|
|
|
Step
1: To make the first half
of the Larks Head knot on the left, use
working cord 4.
Make a clockwise
loop over
- under cords 1 - 3. As you
pull the end right, pass over
cord 4.
|
|
|
|
|
|
|
|
|
|
|
|
|
|
|
|
|
|
|
|
|
|
|
Step
2: To complete the Larks
Head knot, make another loop with cord
4, passing under
- over cords 1 - 3.
As you pull the end right, pass under
cord 4.
|
|
|
|
|
|
|
|
|
|
|
|
|
|
|
|
|
|
Step
3: Repeat
step 1 on the right, using working
cord 5 to tie the first half of
the Larks Head knot around cords 6 -
8.
Rotate
counter-clockwise.
|
|
|
|
|
|
|
|
|
|
|
|
|
|
|
|
|
|
|
|
|
|
|
Step
4: Repeat
step 2, tying the second half of
the Larks Head knot.
|
|
|
|
|
|
|
|
|
|
|
|
|
|
|
|
Designer's
Tip: Vintage Diamonds look better
if they are symmetrical, especially on the
inside.
So check to see if both Larks Head knots are lined
up, and are the same size. Make adjustments
before moving on. |
|
|
|
|
|
|
|
|
|
|
|
|
|
|
|
|
|
|
|
|
|
Step
4: Complete the diamond by
attaching working cords
1 - 4 to the left
holding cord
with DHH, rotating counter-clockwise.
Attach cords
8 - 5 to the right
holding cord DHH, rotating clockwise.
Also attach the left holding cord to close
the diamond.
|
|
|
|
|
|
|
|
|
|
|
|
|
|
|
|
|
|
|
|
|
|
|
|
|
By
using any text or images on Free Macrame
Patterns, you are agreeing to our Terms
of Use |
|
|
|
|
|
|
|
|
|
|
|
|
|
|
|
|
|
|
|
Have
any comments about Vintage Diamonds? Contact
Me.
|
|
|
|
|
|
|
|
|
|
|
|
|
|
|
|
|
|
|
|
|
|
|
|
|
|
|
|
|
|
|
|
|
|