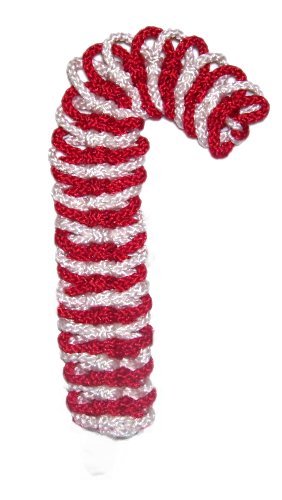
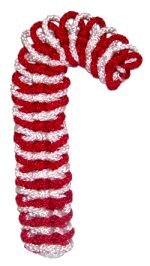
Candy Cane
|
|
|
|
|
Description:
This Candy Cane can be used as a
holiday ornament if made with 2mm size
material.
The finished size is 6 inches long and 1
inch wide.
By using 4mm - 6mm size cords, you can
make this design larger for a wall
decoration.
This is an easy Macrame project, suitable
for beginners and children. |
|
| |
|
Supplies
Needed:
- 2mm Nylon material, red and white
Knots Used:
Square Knot and
Overhand
knot
|
|
|
|
|
Preparation:
Cut one piece of wire, 15 inches
long.
Cut one piece of both the red and white material,
72 inches long (2 yards). Prepare the two
cords to prevent unraveling.
When making the Candy Cane larger, use 4mm - 6mm
material, and cut the cords to 3-yards. The
wire should be at least 20 inches long. |
|
|
|

|
|
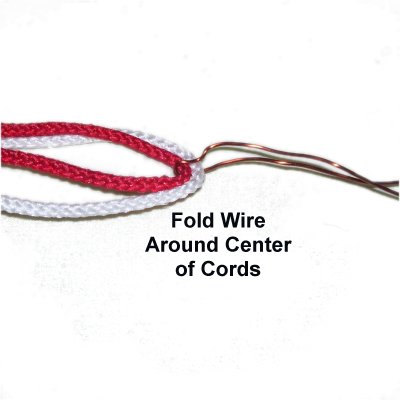
Step
1: Locate the center of
both cords. Fold the wire around the
center of them.
You can now twist the two halves of the
wire together if you wish. |
|
|
|
|

|
|
Step
2: Tie an Overhand Knot
with the two cords.
As you are tightening it, arrange the ends
so the two colors are in the same
order on both sides of the knot.
|
|
|
|
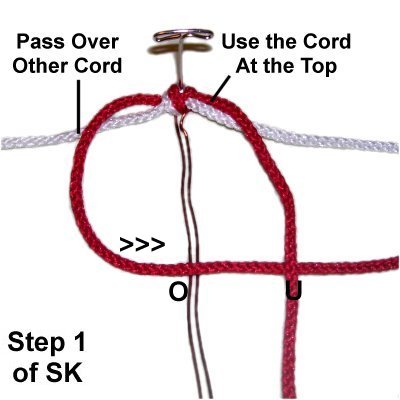
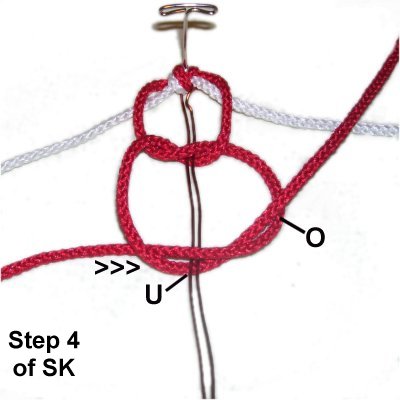
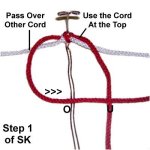
Step 3:
The next 4 images for the Candy Cane show you how
to make a Square Knot.
The wire acts as the filler for the Square knots.
The first knot is tied with the cord at the top,
which in this case is the red one. |
|
| |
|
|
Move the cord
at the top over
the one below it.
Bring the left half to the right, over
the wire and under
the right half. |
|
|
|
|
|
|
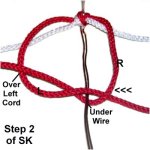
Move the right half under
the wire and over
the left half as you pull it to the right.
|
|
|
|
|
|
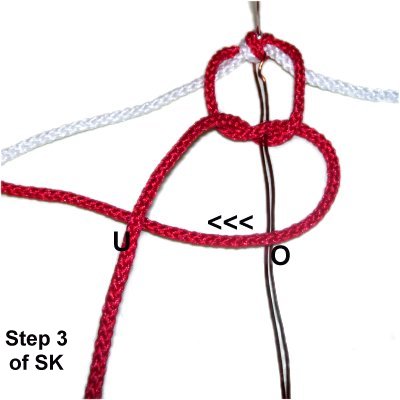
The two halves
has switched places, so the left half is
now on the right.
Place the left half over
the wire and under
the right half of the cord as you move it
left. |
|
|
|

|
|
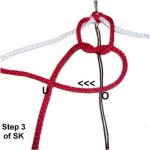
Move the right
half (now on the left) under
the wire and over the other half as you
pull it right. |
|
|
|
|

|
|
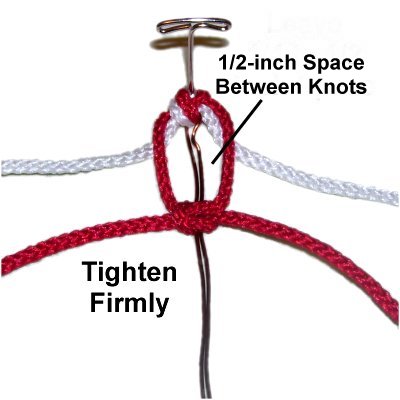
Step
4: Tighten the Square knot
so there is a 1/2-inch space between it
and the Overhand knot.
When making a larger version of the Candy
Cane, increase the spacing between the
knots to 1-inch.
|
|
|
|
|
|
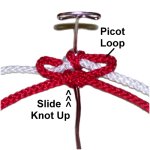
Step
5: To make the picot loops,
slide the Square knot back to the Overhand
knot.
|
|
|
|
|
|
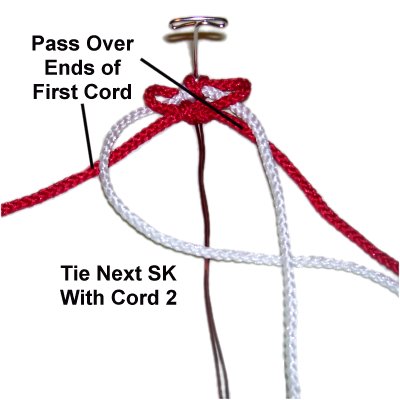
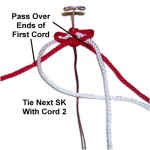
Step
6: Pass the two halves of
the other cord over
the cord you just used.
Repeat
steps 3 - 5 to tie the next SK
with the second cord (white in this
example).
|
|
|
|
|
|
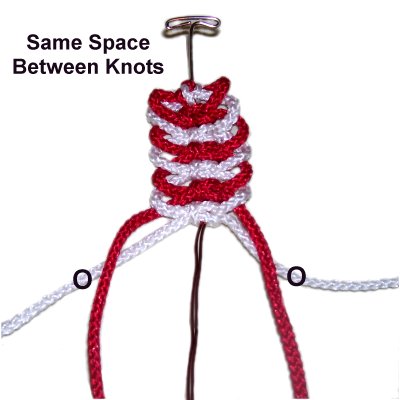
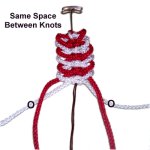
Step
7: Repeat
steps 3 - 6 several more
times, alternating between the two colors.
Make sure you always pass the two halves
of the cord you will be using over
those of the opposite color.
Also, make sure the spacing between the
knots is the same, so the picots are the
same size.
|
|
| |
|
|
|
|
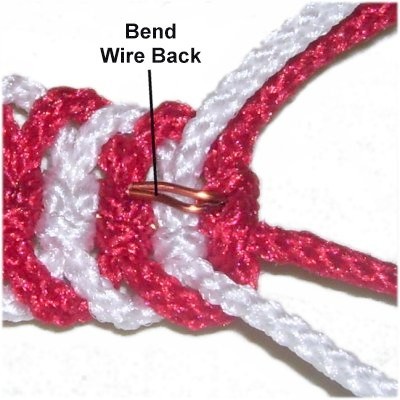
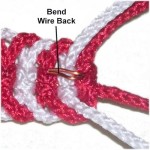
Step
8: When you reach the
end of the wire, push the knots close
together.
Trim the wire to 1/4-inch and bend it
backward. This will prevent the
knots from sliding off.
|
|
|
|

|
|
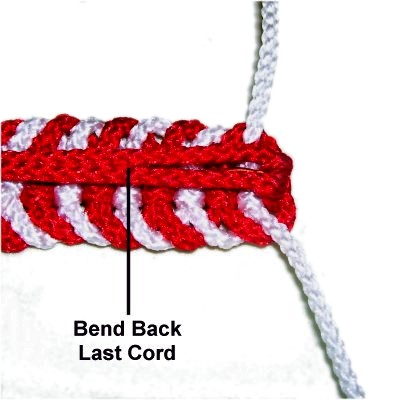
Step
9: Bend back the last cord
used, so the two halves are arranged on
top of the wire.
|
|
|
|
|
|
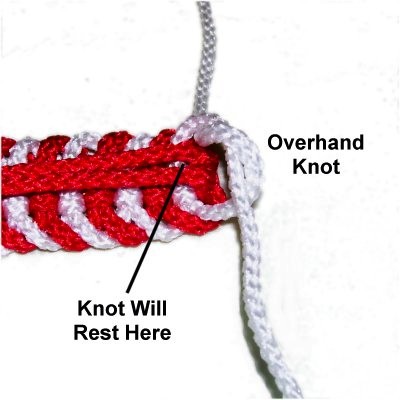
Step
10: Tie an Overhand knot
with the two halves of the other cord.
It will rest on top of the one you bent
back. Apply glue as you tighten. |
|
|
|
|

|
|
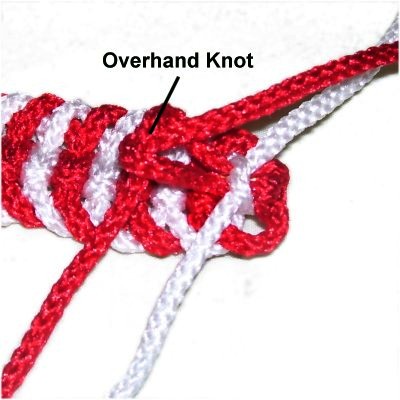
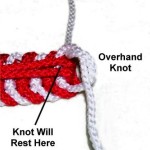
Tie an
Overhand knot with the two ends of the
cord you bent backward. Add glue
while tightening.
Trim all 4 ends close to the knots when
the glue is dry. Heat
the tips with a flame to melt the
material (only if using nylon).
Bend the Candy Cane into shape, and apply
a hook (optional).
|
|
| |
|
|
|
By
using any text or images on Free Macrame
Patterns, you are agreeing to our Terms
of Use
|
|
|
|
|
|
Have
any comments about the Candy Cane? Contact
Me.
|
|
|
| |
 |
| |
| |