Description:
The Glow Owl is a Micro-Macrame necklace
that features beads along the edges of the owl
pendant.
The necklace is a simple chain, and there is a
sliding bead clasp as well.
This is a great project for Halloween. Try
using beads that glow in the dark, or have an
Aurora Borealis (AB) finish.
Craft stores that carry a wide selection of beads
will usually have these types, along with bright
neon beads.
This Macrame pattern is rated Easy, since few
knots are used in the design. So this
owl necklace is a suitable project for beginners
and older children just learning this craft.
Hemp cord was used in the example shown, and the
round beads were white with a finish that glows in
bright light.
Color A =
Black Color B =Green
Supplies
Needed:
1mm cord material (color
A = 6 yards
color B=
12 yards)
Color A
-- cut 6 cords, each 1-yard long (36 inches)
Color
B -- cut 2 cords, each 3 yards long
(for necklace chain)
Color
B -- cut 6 cords, each 1-yard long
(36 inches)
Prepare
the cords by applying glue
to the tips.
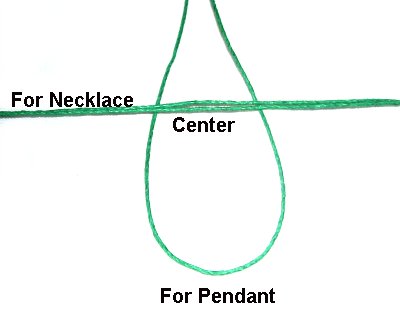
Secure the
3-yard
necklace cords horizontally on
your board, so the center
is in front of you.
Fold one of the 1-yardcolor
B cords in half, and slide it
under the necklace cords(vertically).
Bring the ends
down, passing over
the necklace cords, and under
the folded portion.
This
is a Larks
Head knot.
Repeat the
process with the other 1-yard cords,
placing them as follows:
2 color B
- 3 color A - 2
color B - 3 color A - 2
color B
Design Tip:
The most important part of the color arrangement
is the first and
lasttwo cords.
Those need to be
color B.
It's OK to change the arrangement of the other
cords. Try creating the Glow Owl as shown,
then make a second one with a different
arrangement.
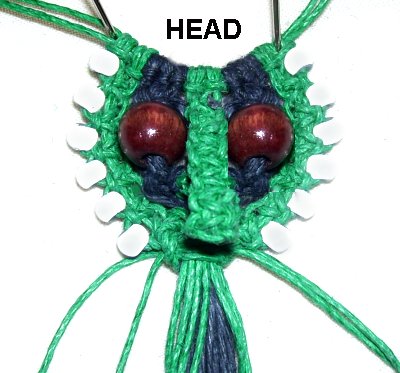
The Head
The head and body for the Glow Owl is made
entirely of Square
Knots(SK).
It's very
important
that you can tie them in both
directions.
Below are the four steps to making right
SK, which are on the right side of the
owl design.
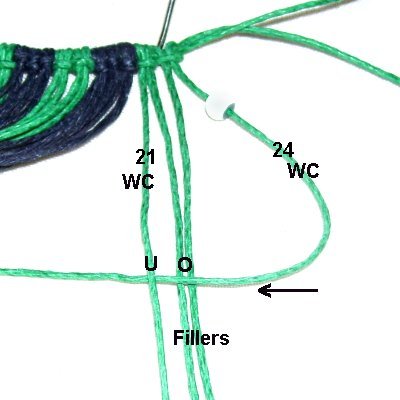
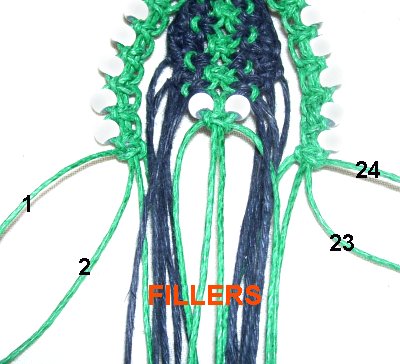
Step 1:
Mentally number the cords 1 - 24.
Use color
Bcords
21 - 24 for the right
side of the head.
The working
cords are 21 and 24, and cords 22 - 23
are the fillers.
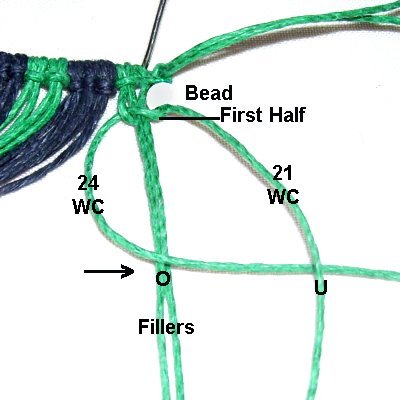
Slide
a6mmbeadonto cord
24.
<<
Step A: Move cord 24 to the
left, going over
the fillers and under
cord 21.
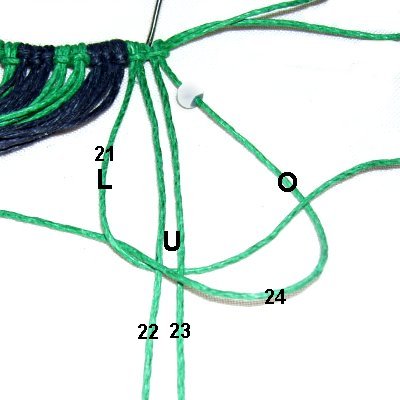
Step
B: Bring cord 21 under
the fillers and over
cord 24 . >>
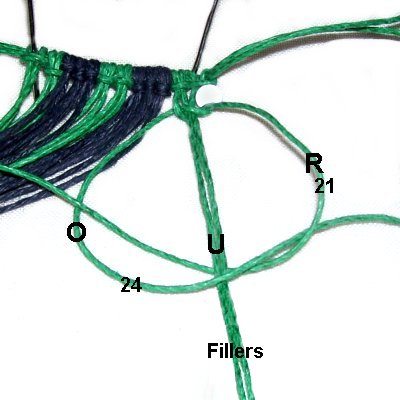
The
working cords have now switched places.
<<
Step C: Move cord 24 to the
right, over
the fillers and under
cord 21.
Step D:
Bring cord 21 under
the fillers and over
cord 24. >>
Repeat
steps A - D,
adding a total of 6 beads, followed by
SK.
Make sure you add the beads to cord
24.
Step 2: Repeat step 1,
usingcolor
Bcords
1
- 4to make theleft sideof the
head for your Glow Owl.
These
SK are tied with steps
C and D first, followed by steps
A and B.
This will result in a left
SK.
(See design tip below)
Add the bead to cord 1each
time. The working
cords are 1 and 4. The fillers
are cords 2 - 3.
Design
Tip: The rule for tying Square
Knots is that they will face the same direction as
the first
cord moved.
So in step 2, the first cord you should move is
cord 1, since it's on the left. The head of the
knot will face left.
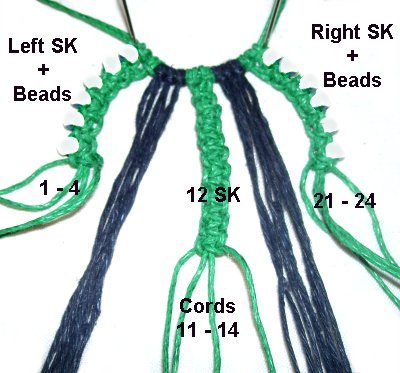
Use cords
11 - 14, in the center of the
Glow Owl head design.
Tie a chain of 12 SK using cords
11 and 14 as the working cords.
This is used for the beak, so tighten the
knots firmly.
Step
3: Now you will tie a double
SK with cords 5
- 10(color
A).
That means you use four
working cords instead of 2:
On the left, the working cords are 5 -
6. On the right, use 9 - 10.
The fillers are 7 - 8.
Tie
aLeft
SK(as
in step 1). Tighten it firmly, so it
rests against the Larks Head knots.
Add a 10mm
bead for the eye, placing it on the filler cords
(7 - 8).
Tie another left
double
SK below the bead, using the same
working cords as the first knot you just
tied.
Tighten both halves of the SK firmly,
so the bead can't move. The working
cords will wrap around the bead.
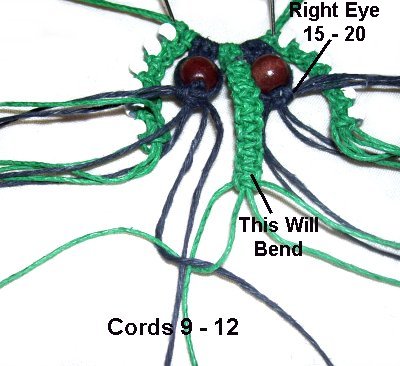
Step 4: Repeat step 3,
using cords 15 -
20 for the right eye.
The knots above and below the bead should be right
SK.
The working cords are 15 - 16 and 19 - 20.
Place the bead on cord 17 - 18, which are the fillers.
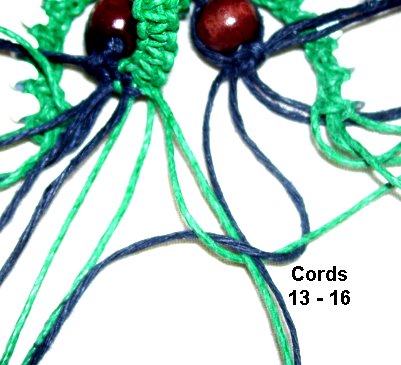
Locate cords 9
- 12. Two cords come from the left eye (color A)
and two are from the beak (color
B).
Tie a left
SK using cords 9 and 12. The
fillers are cords 10 - 11.
Tighten it so it rests next to the SK
under the left eye. This
will cause the beak to fold.
Locate cords
13 - 16. Two color
B cords from the beak will
combine with two color
A cords from the right eye.
Tie a right SK.
Tighten it so it rests just below the SK
under the right eye.
Step 4,
continued: Fold and bend the beak
until it's the shape similar to the Glow Owl image
at the top of the page.
Step
5: Now you will tie a double SK
using cords 1 - 2 and 23 - 24 as the
working cords.
All
the remaining cords are the fillers.
Tighten this large SK firmly, to hold the
bundle of filler cords together.
Pull on each filler cord, to eliminate any
slack above the knot.
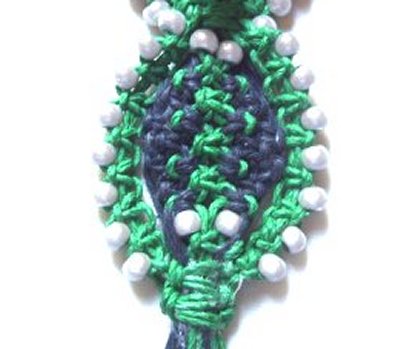
The Body
The inner portion for the body
of the Glow Owl is made with rows of Square Knots,
where you change the cords used each time.
The outer edges of the body are the same technique
as the head (with beads).
There are two working cords used to tie each knot,
and two fillers between them.
For these instructions, I will only indicate which
four cords are used to tie each knot, and the
direction.
Use the Square Knot instructions for steps
1 and 2, if you need a guide.
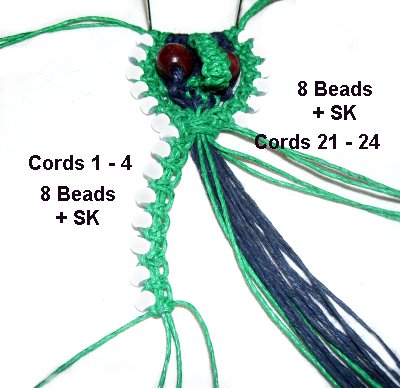
Step
6: On the left, use cords
1 - 4 to tie a series of left
SK.
Attach 8
beads onto cord
1, with a SK between each bead.(See
step 2)
Do the same on the right, using cords
21 - 24 to tie right
SK. Attach the beads to cord
24. (See step 1).
Step 7:
For the inner portion, you will tie the SK in
horizontal rows. Each row will have a
different number of knots, so pay close attention
to the following details.
Row
1: Use cords
11 - 14 to tie a left
SK, after you apply beads to the
working cords (11 and 14).
Tighten it firmly, so it rests at the very
top of the Glow Owl's body.
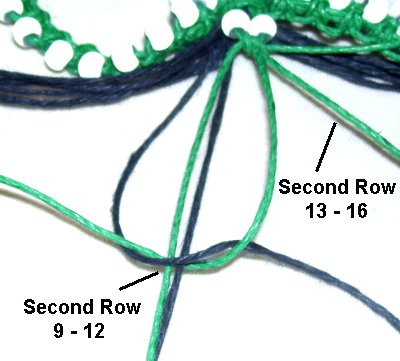
Row
2: Use cords 9 - 12to tie left
SK.
Use cords 13 - 16 to tie right
SK.
Tighten both SK firmly, so they rest just
below the single knot tied in row 1, with
no gaps.
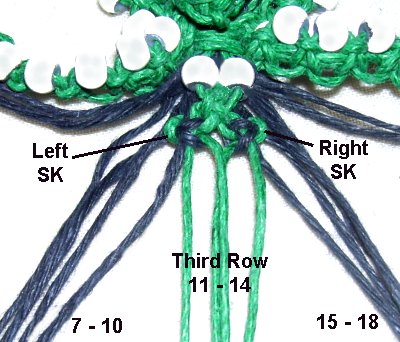
Row
3: Tie the ASK as follows:
Cords 7 - 10 (left
SK)
Cords 11 - 14 (left
SK)
Cords 15 - 18 (right SK)
Design
Tip: The knots running down the
middle of the Glow Owl body can be tied in either
direction, but you need to be
consistent.
The heads are facing left in the example, but that
can be changed.
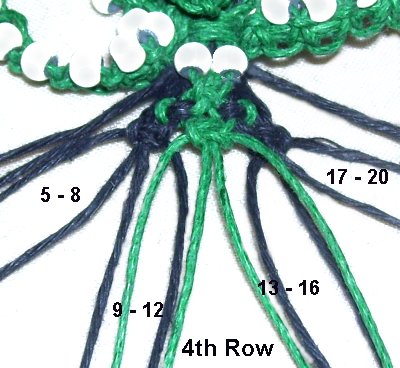
Row 4:
Tie the next row of ASK as follows:
Cords 5 - 8 (left
SK)
Cords 9 - 12 (left
SK)
Cords 13 - 16 (right
SK)
Cords 17 - 20 (right
SK)
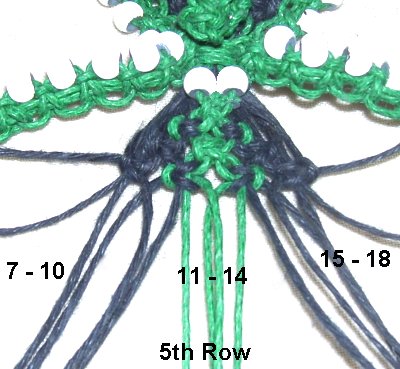
Row
5: Tie the ASK as follows:
Cords 7 - 10 (left
SK)
Cords 11- 14 (left
SK )
Cords 15 - 18 (right
SK).
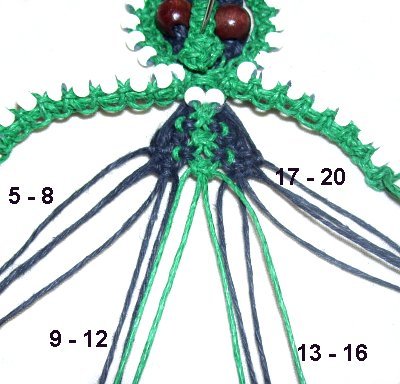
Row 6:
The ASK are tied in the following groups:
Cords 5 - 8 (left
SK )
Cords 9 - 12 (left
SK)
Cords 13 - 16 (right
SK)
Cords 17 - 20 (right
SK)
Row
7: Repeat row 5
Row 8: Repeat row 2
Row 9: Add beads to cords
11 and 14.
Tie the last SK with cords 11 - 14 (left
SK).
Step
8: Use cords 1 - 2 on the left,
and 23 - 24 on the right to tie a large
SK. The remaining cords are the
fillers. Tighten the knot firmly.
This
is the same as step 5.
Step 8,
continued: Pull down on each
filler to remove as much slack as
possible.
The beaded areas on
each side should follow
the curve of the SK pattern you just
made.
(See the image at the top of the page).
Step 9: Tie
a second SK below the one you just tied, applying
glue as you tighten it (so
it's inside).
Turn over the
Glow Owl, so you work in the back.
Tie a very tight Overhand Knot with cords
1 and 24, applying glue while
tightening.
Do the same with cords
2 and 23. When the glue
dries, cut off the excess material.
Trim the remaining cords so they are even, to
form the fringe. Apply glue to the tips to
prevent fraying.
Necklace Chain
The necklace portion of the Glow Owl is made
with a simple Alternating
Half Hitch design.
Here are some options if you want to use a
different knot:
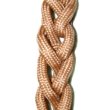
For the Round Braid and Endless falls, just
follow the instructions on the page.
For the Chain or Zipper sennits, you will use two
cords acting together.
Secure the
Glow Owl pendant to your board as
shown. Arrange the two necklace
cords side-by-side.
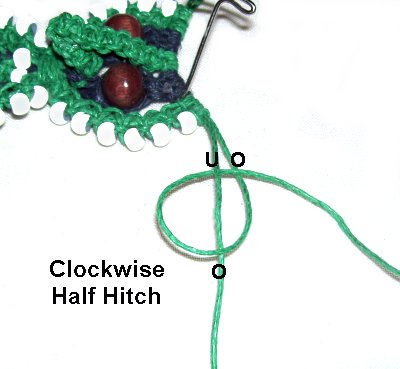
Use the one on the right
to tie a clockwise
Half Hitch.
Do this by passing it over
- under the left
cord, and over
the right
cord,
as you pull it to the right.
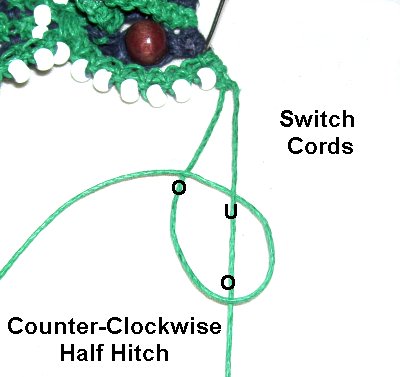
Use
the left
cord to tie the next Half Hitch onto the
right cord, rotating counter-clockwise.
This knot is tied the same as the first
knot.
Alternate back and forth between the two
cords, and stop when the chain measures 1
- 2 inches long.
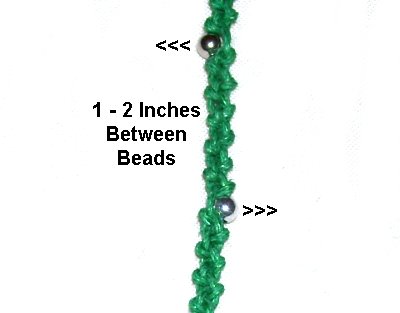
(Optional)
Add a bead onto the next cord you will be
using to tie the knot, and then tie the
Half Hitch with
that cord.
Continue on for 1 - 2 inches, and add
another bead, but to the opposite
cord. The beads will face
opposite directions.
Continue on, tying short chains of knots
followed by beads, until the first
half of the Glow Owl necklace is the size
you want.
For Adults, that's usually 10 to 12 inches for
each half. Hold the pendant on your chest
and see if the end of the chain reaches your
spine. Tie more
knots if necessary.
Turn the
pendant around so you use the other half
of the necklace cords.
Before
tying the chain, push the mounting knots
as close together as possible (top edge of
Glow Owl).
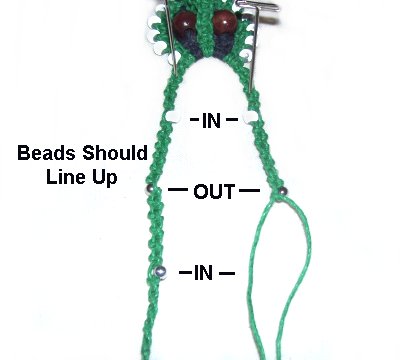
Tie the chain
as you did the first half. Arrange
it so the beads line
up when the two chains rest
side-by-side.
To keep the beads looking neat, they
should be placed facing either inward or
outward as shown.
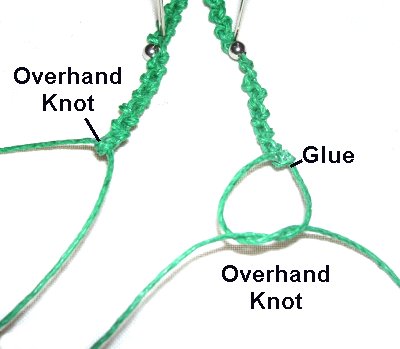
Finishing
Touches + Bead Clasp
To finish each
end of the Glow Owl necklace, tie a tight
Overhand knot with the two ends.
Apply glue to the cords before tightening
the knot, so it's on the inside.
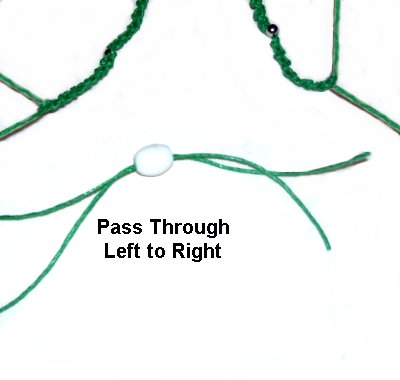
<<
Pass the two ends from the left
chain through a 10mm
bead fromleft
to right.
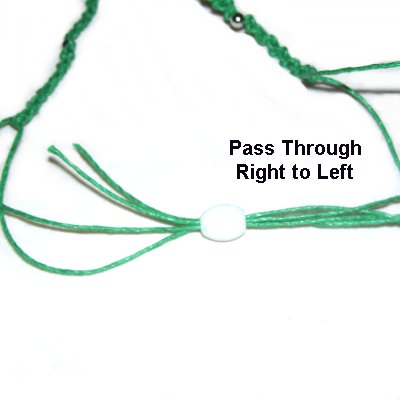
Pass the ends from the right
chain through from right
to left.
>>
Pull on the ends to close
the Glow Owl Necklace.
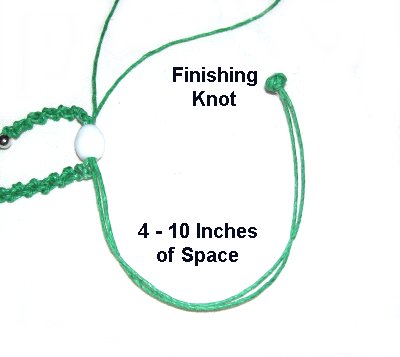
Leave 4
to 10 inches of space, just
enough to allow you to expand
the necklace to fit over your head.
Using two cords together, tie a Barrel
knot (or other finishing knot). Apply glue
as you tighten it.
Do the same with the other two
cords. When the glue is dry, cut off
the excess material.
By
using any text or images on Free Macrame
Patterns, you are agreeing to ourTerms
of Use