Zipper Sennit
|
| |
|
| |
| |
|
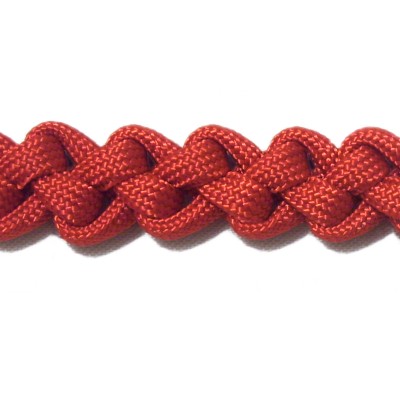
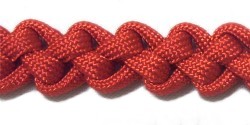
Description: The Zipper Sennit
is related to the Chain
Sennit and is based on the Slipknot.
It's sometimes called the "Zippy Chain".
It's made with a series of bights tucked into
each other, using both
halves of the cord.
This decorative knot is suitable for a variety
of uses, including jewelry, Macrame belts,
handbag straps, and plant hanger designs.
This knot is easy to tie, so can be used for
projects involving children and beginners new to
Macrame.
|
|
|
|

|
|
The Zigzag
Pendant features this
knotting technique, so is a good project
to work on after practicing.
Paracord was used in the example shown,
but you can make it with much finer
materials like Hemp and Satin.
Flexible leather looks interesting, too.
Click on
the link or image to view the page. |
|
|
| |
| |
| |
|
This knot is found on the Fusion
Knots website.
Click on the link or image to visit
The video gallery contains many other
interesting knotting techniques and
designs.
|
|

|
|
| |
| |
|
|
|
Preparation:
To practice,
you need one cord at least 36 inches long.
The cord should be at least 10
x the finished length of the item you are
making, if you are using the Zipper Sennit for a
project.
Make the cord longer if you plan to tie a button
knot, or want to decorate the ends with beads. |
|
|
| |
|
|
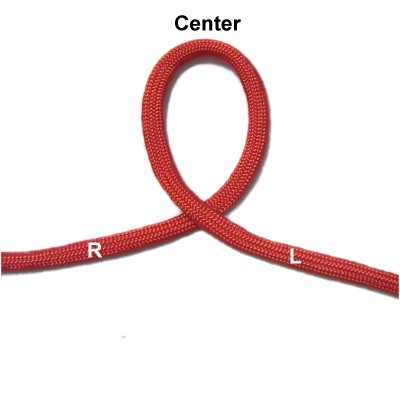
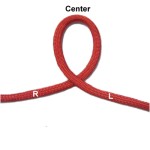
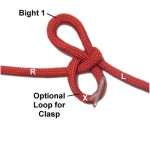
Step 1: Make a loop
at the center of the cord, crossing left
over right.
|
|
| |
|
| |
|
|
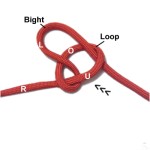
Fold the left
half of the cord
to form a bight.
Push it into the loop under
- over (from below), on a
diagonal slant toward the left.
|
|
| |
|
| |
|
|
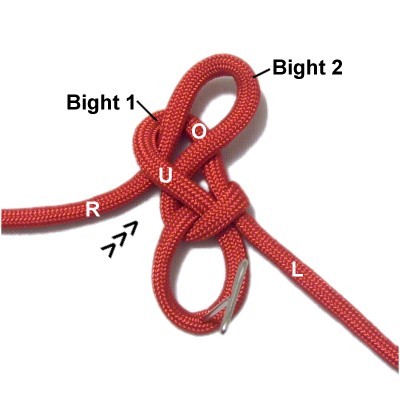
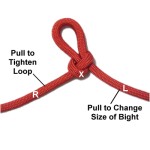
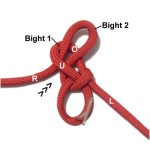
Step
2: Pull the right
half of the cord to tighten the
first loop around the bight.
Pull the left
half of the cord to change the
size of the bight if needed.
Identify the segment marked with the X.
|
|
| |
|
|
|
|
Make sure both
halves of the cord are the same length,
adjusting the knot as needed.
Pull the marked segment until it's the
right size for a clasp, if you need one
(optional). |
|
|
| |
|
|
Step 3: Fold the right
half
of the cord to make the second bight.
Pass it into bight 1 under
- over (from
below).
It should be arranged diagonally toward
the right.
|
|
| |
|
|
|
|
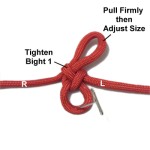
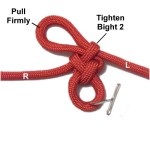
Step
4: Tighten bight
1 by pulling the left
half of the cord.
Pull bight
2 firmly, then adjust it's size
by pulling the right
half of the cord. |
|
|
|
| |
|
|
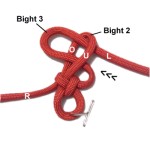
Step 5: Fold the left
half
of the cord to make the third bight.
Pass it into bight
2 under
- over, heading diagonally
toward the left.
|
|
| |
|
|
|
|
Step
6: Tighten bight
2 by pulling the right
half of the cord.
Pull bight
3 firmly, then adjust the size by
pulling the left
half of the cord. |
|
|
|
| |

|
|
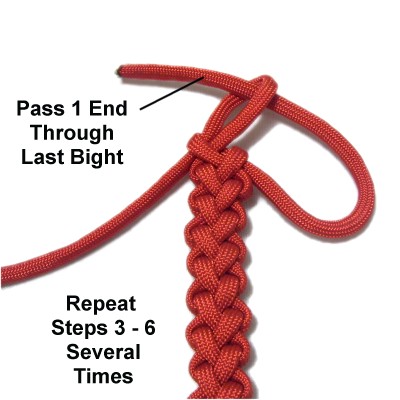
Step 7
: Repeat
steps 3 - 6 several times, or
until the Zipper Sennit is the length you
need for your project.
Finish by passing one half of the cord
through the last bight (not another
bight). The direction depends on
where you stopped. |
|
| |
| |
| |
Step
7, continued: Tighten the last
bight as much as possible. Apply glue as you
do so, if you are working on a project.
The two ends can be decorated, or you can use them
to tie a button knot if you need a clasp.
|
| |
| |
|
|
|
| By using any
text or images on Free Macrame Patterns, you are
agreeing to our Terms of Use. |
|
|
| |
|
Have
any comments about the Zipper Sennit? Contact
Me.
|
|
|
| |
 |
| |
| |