Description:
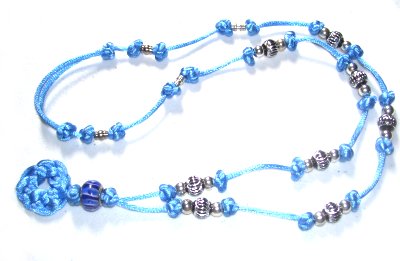
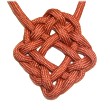
The Celtic Button Necklace is a
Micro-Macrame design because it is made with
delicate Satin cord material. It features
the Celtic Button knot arranged on either side of
beads. The closure is a sliding clasp made
with two button knots in an unusual
arrangement. The pendant can be made using a
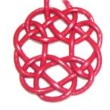
variety of decorative knots. The Celtic Ring
Knot is shown in the example, and is described
below.
Since button knots are a challenge to tighten,
this Macrame pattern is rated Moderate, suitable
for those with experience.
Important:
When using Satin or other delicate material, do
not push pins through the cord. Instead,
using the Cross Pin Technique
orLEAN the pins over the
cord.
Here
are the instructions for the Ring
Pendant used in the example shown:
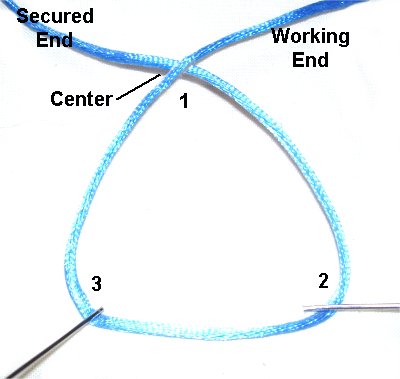
Step
1: Cut one cord for the
Celtic Button Necklace, at least 4 yards
long (20 inch to 24 inch necklace).
Secure one end near the center.
Moving clockwise,
create a triangle with the working
end. Mentally number the three
angles as shown.
Secure
each angle in this step as well
as the next.
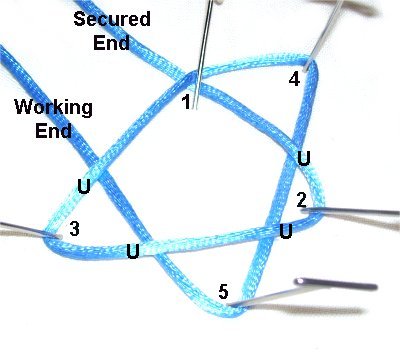
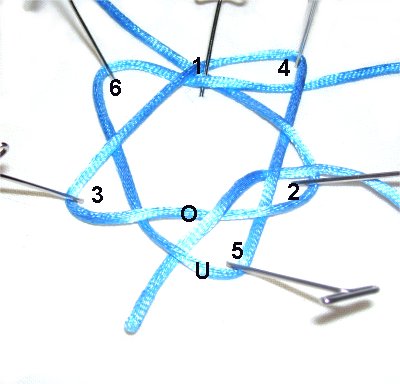
Step
2: Move the working end to
the left, to form the 4th angle.
Bring it down to the area between angles 2
and 3, to form angle 5. It should
pass underangle
2.
Bring the end up to the left side of the
pendant, passing it underangle
3.
Step
3: To create the last
angle and begin the weaving, move the
working end to the left.
Pass it under
the segment between angles
1 and 3.
Pass it over
- under the two segments at angle
4.
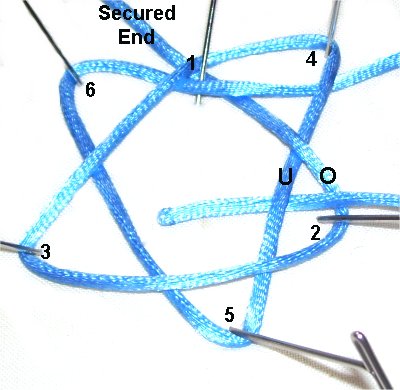
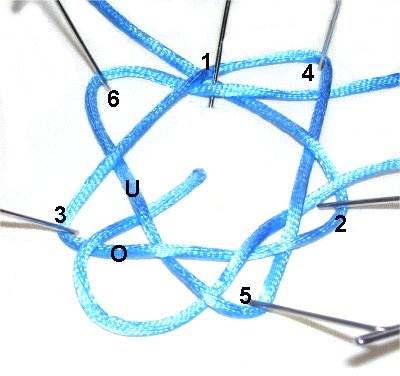
Step 4 -
6: To do the weaving for the
pendant of the Celtic Button Necklace, the working
end passes over
- under the segments in the following
areas:
Weave the
end through Angle
2, heading left to right.
Weave the
end through Angle
5, heading downward.
Weave the
end through Angle
3, heading left to right.
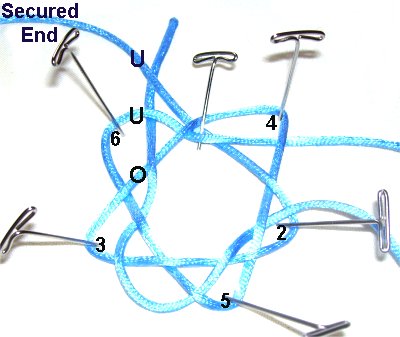
Step
7: To complete the weaving, pass
the end through the two segments at Angle
6.
Pass it over
the secured end as well.
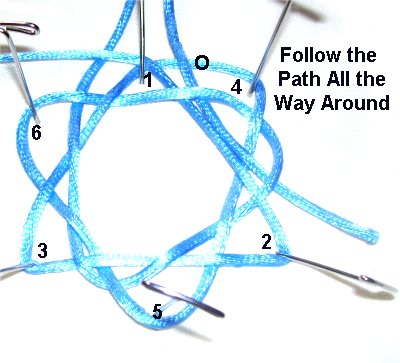
Step
8: Now you need to double
the knot so the pendant for the Celtic
Button Necklace is a bit larger.
Move the working end over
the segment at the top right area, near angles
1 and 4.
Then follow the path of the first cord all
the way through the knot.
Design
Tip: When doubling this knot, the best
approach is to stay on the outside
of the first portion. Keep the coils flat
and neatly arranged.
Step
9: Tighten each area by
pulling the slack out gradually.
Start near angle
2 at the bottom right.
Step 9,
continued: You can reduce the size by
pulling on both the first knot and the doubled
portion (working together). There will be an area
at the top that is loose, which will need to be
adjusted separately.
The other option is to remove the slack from the
first knot, then do the same with the doubled
portion.
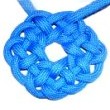
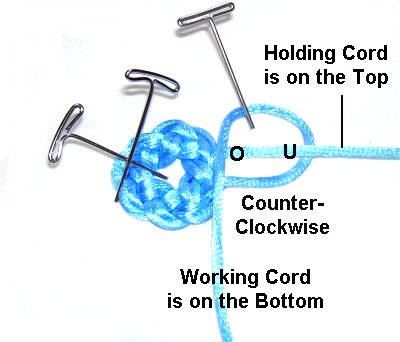
Instructions for Celtic Button Knot
Step
1A: Arrange the pendant for
the Celtic Button Necklace, so it's on your
left. The longest cord should be at the
bottom.
The one at the top holds the knot, since you are
making a Sliding
button knot.
Pass the working cord under
- over the holding cord, rotating
counter-clockwise.
This is Loop 1.
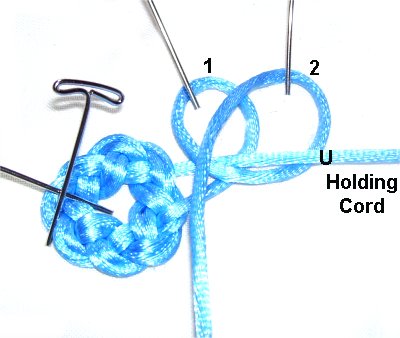
Step
1B: Pass the working cord under
the holding cord, and create Loop 2.
Arrange it partially over Loop
1.
Step
1C: To create Loop 3,
rotate the end counter-clockwise,
under
the holding cord.
Weave it through, over
- under - over - under loops 1
and 2, heading right to left.
Step
1D: To create the 4th
loop, rotate the end around again
(counter-clockwise), passing it underthe
holding cord.
Pass it over
the first segment (loop 3), andunder
the next two segments (loops 1 and 2).
Position
loop 4 below the others, so it's easy to
identify.
The Celtic Button
Necklace is made entirely of these knots,so you must know how
to tighten them successfully.
The best approach is to tighten the loops in order
(1 - 4). Pull on loop 1 to bring the entire
knot close to the pendant.
Hold it steady against the work surface as you
pull on loop 2, which will tighten it. Hold
loop 2 steady as you pull on loop 3.
By now the knot should be a bit more snug.
Pull on loop 4 to tighten loop 3.
Make sure the knot is round and compact. If
it's not, go back and tighten each loop a bit
more.
Once the knot is the size and shape you want, pull
on the end to
tighten loop 4.
Knot and Bead
Arrangements
The Celtic Button Necklace can be decorated in
many ways. This is just one example of the
bead and knot arrangements. Buttons, shells,
and charms can also be used to decorate the
overall design.
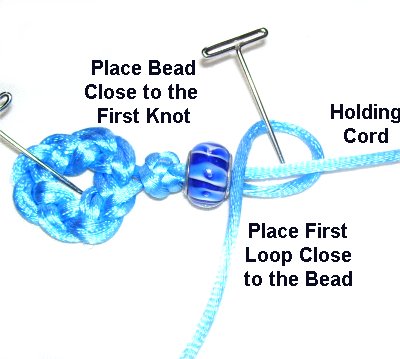
Step
2: Slide the first button knot
close to the pendant. Add the focal
bead, and tie a second knot.
Tie the first loop as close to the bead as
possible. When you tighten the
second knot, remove ALL
the slack from loops 1 and 2, and tighten
the loops firmly.
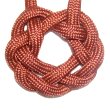
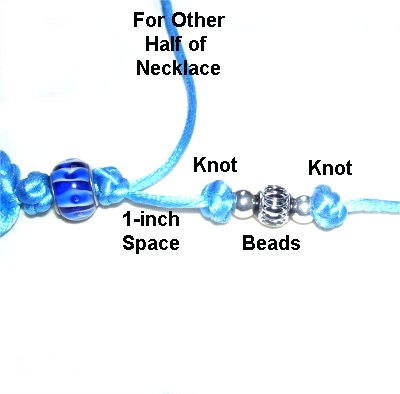
Step
3: Separate the two cords,
so you use only one for each half of the
Celtic Button Necklace.
Leave a 1-inch space, and tie a regular
button knot. This variation does not
have a holding cord, but is tied the same
way (step 1).
Add small beads and tie the next button
knot.
Design
Tip:Loops
1 and 2 determine the position of the
button knots on the cord. Once the first
knot is tied, slide the beads against it.
As you make the next knot, create the first loop
against the other side of the beads.
Pull firmly
on loops 1 and 2 to keep the knot as close to the
bead as possible.
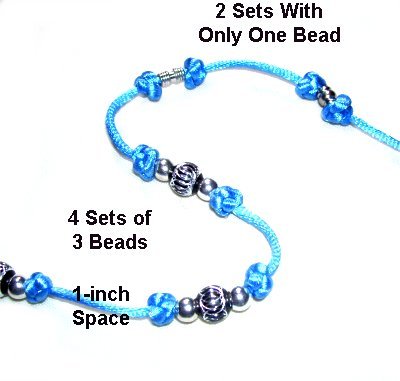
In the example
shown, I used 4 sets of 3 beads. One inch
of space was left between each beaded
design.
I switched to one bead between the knots,
so the Celtic Button Necklace would not be
so bulky at the back of the neck.
Step
4: After the beads are
arranged to your liking, and the first
half is the length you need, it's time for
the second half.
The button-bead arrangements should match
as closely as possible, along with the
spacing.
Sliding Clasp
IMPORTANT:
The sliding clasp described below is made with two
button knots, which means the necklace fits over
the head.
So you need to leave enough space between
the two knots to adjust the size.
If you prefer, you can add a regular metal clasp,
so the ends can be separated.
Step
5: Make a circle with the
Celtic Button Necklace, so the ends head
in opposite directions.
Use the left end to tie a button knot onto
the right end (same as step 1).
Leave a 1-inch space between this new knot
and the last one tied on the right.
Design Note:I
flipped over the necklace when I made the
second knot so I could tie it in a counter-clockwise
direction (see photo below).
Switch cords,
so you use the right end now. Tie a button
knot onto the left end.
You can
leave as much space between the two
knots as you wish. To keep
the design balanced, leave 1-inch of space
between this knot and the last one tied
for the necklace.
Finishing:Apply a small
amount of glue to each knot for the
clasp, right where the end comes out. After
it's dry, cut off the excess material.
You can heat fuse the end if the material is
Satin, since it's a synthetic fiber. Don't
heat material that is natural, like Hemp. Just use
glue.
<<<
The knots in the clasp will be close
together when the necklace is in the open
position.
The knots are spread apart in the closed
position. >>>
By
using any text or images on Free Macrame
Patterns, you are agreeing to ourTerms
of Use