|
|
| |
 |
Celtic Button Sliding Celtic
Button
|
| |
| |
|
Description: The Celtic Button
Knot is a historic decorative knot that is very
well known. It's easy to tie, but tightening
it is the real challenge.
Be sure you have no distractions when you
practice. I also recommend you use a project
board and pins.
Button Knots can be used for decorations and
jewelry. They can also be used as
finishing knots to hide the ends of cords.
The Sliding
Celtic Button is also described
below. It's tied around a holding cord, which
means it can be positioned where you need it.
To view a Macrame project featuring this knot,
see the Celtic Button
Necklace.
|
| |
| |
| |
| |
 |
|
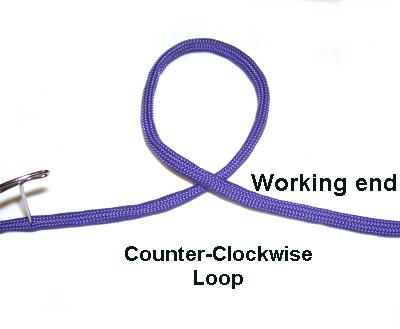
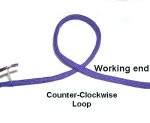
Step 1: You need one 36-inch
cord to practice. Secure the left
end to your working surface with pins
or tape.
Make a counter-clockwise
loop, passing the working end over
the secured end, as you bring it towards the
right.
|
|
| |
|
|
|
|
|
| |
| |
 |
|
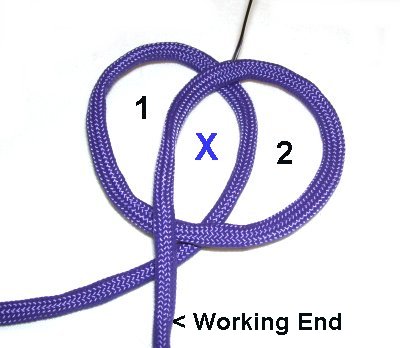
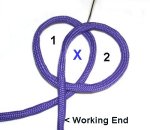
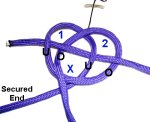
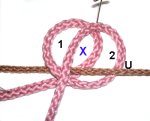
Step 2: Make a second counter-clockwise
loop with the working end. Position it so it
rests on top
of the first loop, and slightly towards the
right. There should be three obvious spaces.
Identify
the space in the center, which is marked
with an X in the image.
|
|
| |
|
|
|
|
|
| |
| |
 |
|
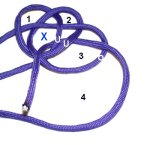
Step 3: Bring the working end
around again to make a third loop, moving counter-clockwise.
Weave the end through the first two loops,
passing over
- under - over - under the four
segments.
|
|
| |
|
|
|
|
|
| |
| |
 |
|
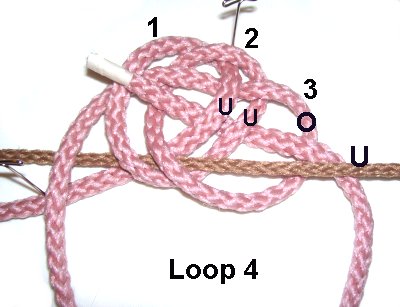
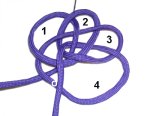
Step 4: Create Loop 4 by
moving the working end over
the secured end, and over
loop 3 on the right. Pass it under
the next two segments.
The
end should come out through the space.
Make sure the end passes over
the segment of loop 4 at the bottom of the
knot.
|
|
| |
|
|
|
|
|
| |
| |
 |
|
Step 5: Start with loop
2, to tighten loop 1.
Tighten
loop 3, and then 4.
Each loop
you pull will tighten the one before it.
The final step is to pull on the end, which
tightens loop 4.
|
|
| |
| |
| |
| |
|
|
| |
| |

|
|
|
|
|
|
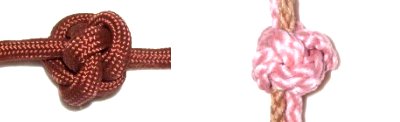
Sliding Celtic Button Knot
|
|
|
|
|
|
| |
|
The Sliding Celtic Button is
tied the same way as the standard button. The
difference is that there is a holding
cord running through it.
This allows the knot to be positioned where you
need it, since it slides along the holding cord.
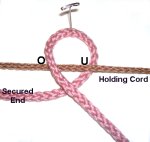
Step 1: To practice this
variation of the Celtic Button knot, you need 2
cords. The working cord should be at least
36 inches long.
In the images, that's the
pink
cord. The holding cord is brown.
Secure the holding
cord horizontally,
with tension.
Secure the other cord at the left end, also
resting horizontally. It should rest below
the holding cord.
|
| |
| |
| |
 |
|
Make the first loop with the working end,
rotating counter-clockwise.
As you do this, make sure you pass the end under
the holding cord, and then over
to form the loop.
|
|
| |
|
|
|
|
|
| |
| |
 |
|
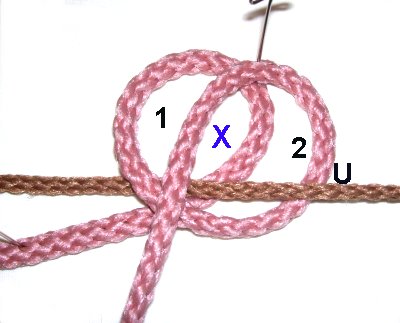
Step 2: Rotate counter-clockwise
to make loop 2, passing the end under
the holding cord first.
Place it to the right of the first loop,
resting on top. You need to have three obvious
spaces.
|
|
| |
|
|
|
|
|
| |
| |
 |
|
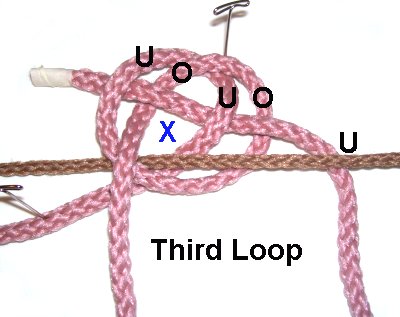
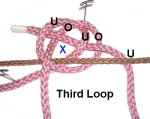
Step 3: Start the third loop
by passing the working end under
the holding cord.
Weave the working end through the four
segments over
- under - over - under.
Arrange the loops so you can still see the
central space clearly (X).
|
|
| |
|
|
|
|
|
| |
| |
 |
|
Step 5: Start the fourth loop
by first passing under
the holding cord.
Move the working end over
the segment of loop 3 on the right, under
the next two segments, and out through the
central space.
|
|
| |
|
|
|
|
|
| |
|
Tighten the Sliding Celtic Button Knot
gradually, removing the slack from the loops,
starting with the second one.
Remember that each loop you pull on will
tighten the one before it.
The last step is to pull on the end.
|
| |
|
|
|
|
|
|
|
|
|
|
|
|
| |
|
|
|
|
|