|
|
| |
 |
|
|
|
|
|
| |
|
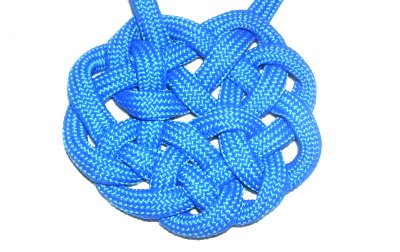
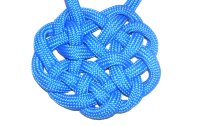
Description: The Celtic Circle
Knot is based on the ancient symbol that
represents eternal life.
The beautiful, interlaced pattern is just
perfect for Micro-Macrame earrings and
pendants. Tying this unique
decorative knot can be a challenge, so be sure
you have no distractions.
Use a project board and pins to control the
loops, securing each one as you progress. When
using Leather, Satin, or very fine cord,
lean
the pins over the cord rather than through the
material.
To see a Macrame project that features this
knot, see the Circle
Earrings.
|
| |
|
|
|
|
|
|
|
|
|
|
|
|
|
|
|
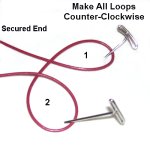
| All
the Loops are made counter-clockwise. |
|
|
|
|
|
|
|
|
|
|
|
|
|
|
|
|
|
|
|
Step 1: Cut
one cord, at least 45 inches long.
I recommend you make the Circle knot large at
first, until you are comfortable with tying it.
|
|
|
|
|
| |
|
|
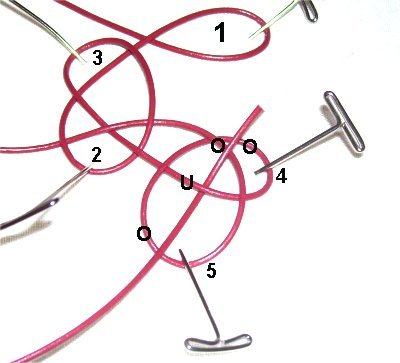
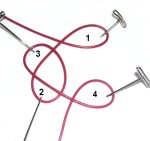
Secure one end of the cord. Create loop
1 and position it horizontally,
with the crossed area on the left.
Make loop
2, and place it below the first,
slightly to the left
of loop 1. |
|
|
|
|
|
|
|
|
|
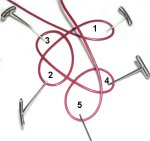
Step
2: Make loop
3, and position it on top of loop
2. The crook should be slightly to
the left
and on a diagonal slant, as shown.
Make loop
4 and place it further down and
to the right
of the other loops.
|
|
| |
|
|
|
|
|
|
|
|
|
|
|
|
Step
3: Make loop
5, placing to the
left of loop 4.
The working end should pass over
loop 4.
|
|
|
|
|
|
|
|
|
|
|
|
|
|
|
|
|
|
|
|
|
|
|
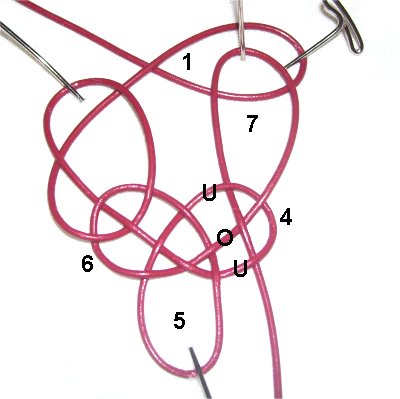
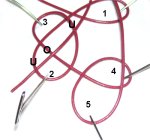
Step
4: Bring the working end
up to loops
2 and 3.
Move it right
to left, on a diagonal slant.
Weave through the loops over
- under - over.
|
|
|
|
|
|
|
|
|
|
|
|
|
|
|
|
|
|
|
|
|
|
|
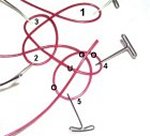
Step
5: Bring the working cord
to loops
5 and 4.
Weave it through the four segments moving
left
to right, over
- under - over - over.
|
|
|
|
|
|
|
|
|
|
|
|
|
|
|
|
|
|
|
|
|

|
|
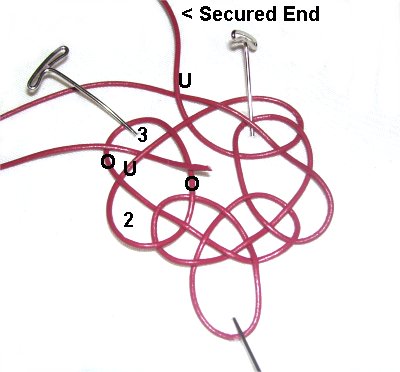
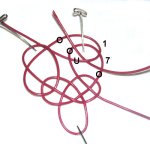
Step
6: Bring the working end
up to loop
1. Rotate the end to make loop
7. Place it partially over
loop 1.
Bring the end down to loop
4. Pass it through the
three segments under
- over - under.
Make
sure the end does NOT pass through loop
5. The weaving
takes place to the right
of it.
|
|
|
|
|
|
|
|
|
|
|
|
|
|
|
|
|
|
|
|
|
|
|
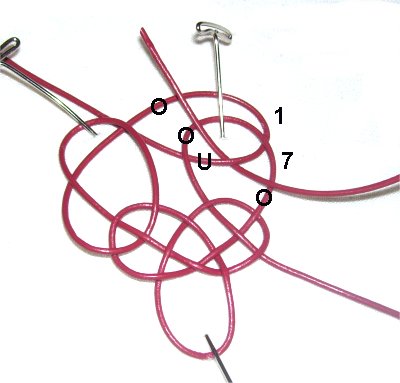
Step
7: Bring the working end
up to loops
7 and 1. Move it
right to
left, diagonally.
Weave it through over
- under - over - over.
The working end should be at the top of
the Celtic Circle knot when you are
finished. |
|
|
|
|
|
|
|
|
|
|
|
|
|
|
|
|
|
|
|
|

|
|
Step
8: Pass the working end under
the secured end.
Move it to the left
of loops
2 and 3.
Weave it through over
- under - over,
heading right.
|
|
|
|
|
|
|
|
|
|
|
|
|
|
|
|
|
|
|
|
|
|
|
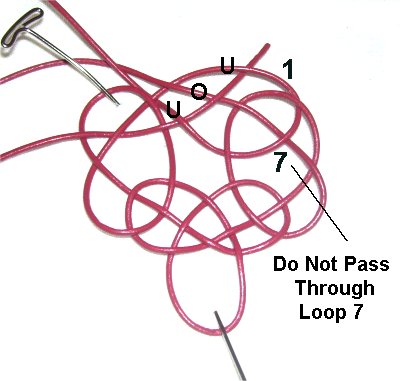
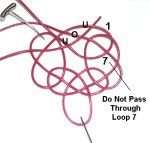
Step
9: Weave the working
end through loop
1, passing under
- over - under the three
segments.
Make
sure the end does not pass through
loop 7.
The weaving takes place to the left
of loop 7, at the top of the Celtic Circle
knot. |
|
|
|
|
|
|
|
|
|
|
|
|
|
|
|
|
|
|
|
|
Step 10:
Tighten the knot gradually, starting at the secured
end. It can be any size, depending
on what you are using it for.
The ends come out at the top of the knot, and can
now be used to tie other knots. |
|
|
|
|
|
|
|
|
|
|
|
|
|
|
|
|
|
|
|
|
|
|
|
|
|
|
|
|
|
By
using any text or images on Free Macrame
Patterns, you are agreeing to our Terms
of Use
|
|
|
|
|
|
|
|
|
|
|
|
|
|
|
|
|
|
|
|
|
Have
any comments about the Celtic Circle Knot? Contact
Me.
|
|
|
|
|
|
|
|
|
|
|
|
|
|
|
|
|
|
|
|

|
|
|
|
|
|
|
|
|
|
|
|
|
|
|
| |