Description: The Panel Knot
is a historic knot that resembles many of the
Celtic designs. It's a type of continuous
weaving that can be made any size. It's
similar in appearance to a Celtic Mat.
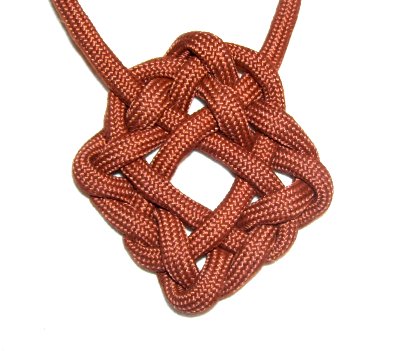
The ends come out at the top, so they can be
used as part of a Macrame necklace, with this
knot as the pendant.
Another way to use this decorative knot is to
make items like place mats and rugs, which
require a flat rectangular knot.
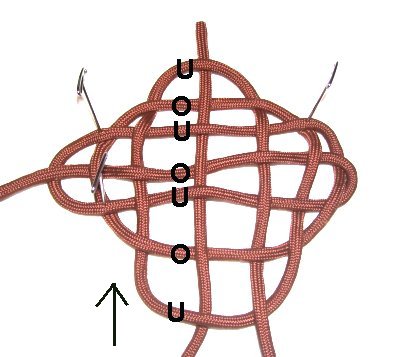
All you need to do is make it much larger and
thicken it with additional cords, like the image
at the top of the page.
The material used in the example was Paracord,
which needs to be prepared by melting the ends
of the cord with a flame.
In the video gallery are a large number
of tutorials for unique combination
knots, and historical knots.
Step 1:
You need a long cord, at least 2 yards long to practice the
Panel Knot.
To make large items like place mats and rugs, use
the material still wrapped on the roll, without
cutting. This way you can do
as many rows of weaving as you wish, without
worrying that the cord is too short.
Secure one end to your project board, on your
left.
Make a longclockwise
loop, about 3 inches in size for small
items like pendants. The crook of the
loop should be on the right.
Pass the working end under
the secured end to form the crossing
point on the left.
To make this knot
larger, start off with a longer loop, at least double
the size you want to end up with.
The size of the loop from right
to left is considered the length,
since you will turn it later.
You will need to do additional rows of weaving to
fill in a large loop.
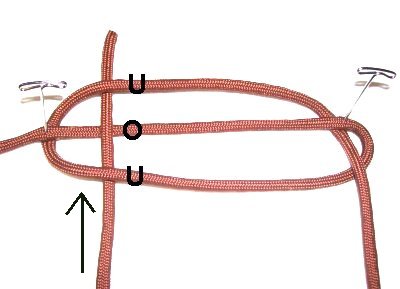
Step 2: Move the
working end to the right,
next to the crook of the first loop.
Pass it through the loop, weaving under
- over the two segments. The
end should be heading downward.
Step 3: Bring the
working end back to the left
side of the Panel knot.
Weave through under
- over - under, as you bring
the end upward.
Important:Start the weaving for each loop of
the Panel Knot passing underthe
first segment. Make sure the working end is
vertical.
Each row of weaving is placed so you progress
gradually towards
the center of the Panel knot.
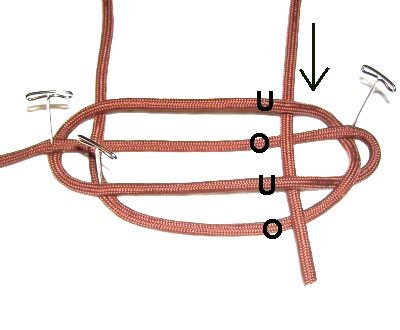
Step4:
Bring the end over to the right.
Weave through under
- over - under - over,as you bring the end downward.
Step 5: The next row
of weaving takes place at the left
again.
Weave under
- over - under - over - under
the five segments, bringing the end
upward.
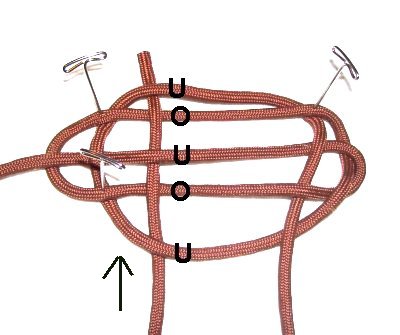
Step 6: Weave through
at the right,
alternating under and over the six
segments.
To make a larger knot, you would repeat
the weaving several more times,
progressing towards the center.
Step 7: The final row
of weaving takes place at the center.
Alternate over and under the seven
segments, as you bring the end upward.
Step 8: Turn the knot
so both ends are at the top.
Tighten the knot gradually, removing
the slack starting from the working
end.
You can tighten it to form any shape,
but a rectangle or square is how it's
usually arranged.
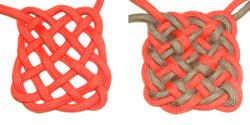
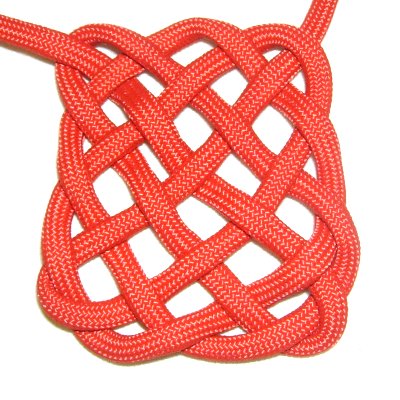
Here are two additional images of the Panel
knot:
<<
Rectangular design that's tightened
loosely.
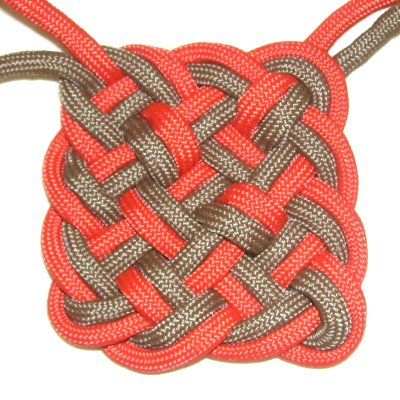
You can add a second cord to thicken the
design, by using it to follow the path of
the first. >>
By
using any text or images on Free Macrame
Patterns, you are agreeing to ourTerms
of Use