|
|
| |
|
|
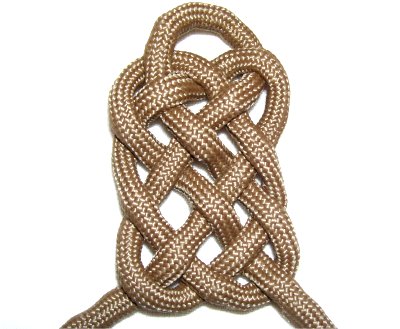
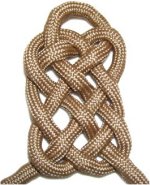
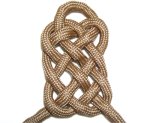
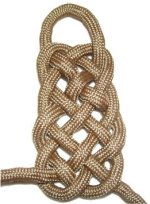
Description: A Celtic
Mat is a type of Macrame knot that is
flat and rectangular in shape.
Each of the three decorative knots
shown on this page have the woven
elements and interlaced pattern of all
Celtic knots.
The first is called the Ocean
Plait, followed by the Basket
Weave. The third design is the
Prosperity Knot.
Each one is slightly different in
appearance and vary in how they are
constructed.
|
|
| |
|
|
|
Another page you might want to see, if you like
this type of decorative knot, is the Masthead
Mat. It features a round or
oval shape, and has similarities to the designs
described here.
These Celtic knots are perfect for rugs, but
can also be used as pendants if made with
slender cord (2mm or less).
To make a rug, you would simply create any of
these designs very large and follow the path of
the first cord with several others, filling in
the knot.
|
| |
|
| |
| |
 |
|
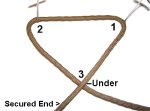
Ocean
Plait Mat
You need one cord, at least 36 inches
long, to make the first type of Celtic
Mat called the Ocean Plait.
Make sure you use a project board and
pins when first learning this technique.
|
|
| |
| |
| |
 |
|
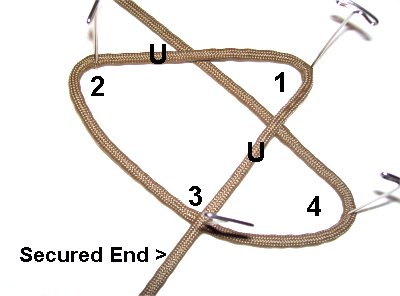
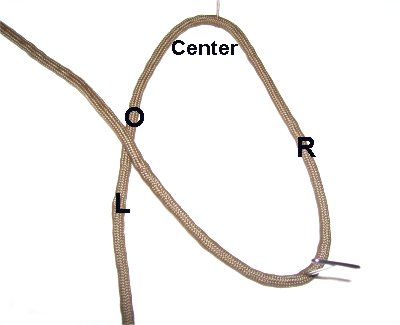
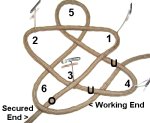
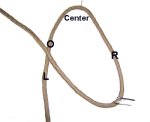
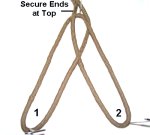
Step 1: Secure one end
to the board, on your left. Move
the working end up and to the right, to
make Area
1.
Move it to the left to make Area
2.
|
|
| |
|
|
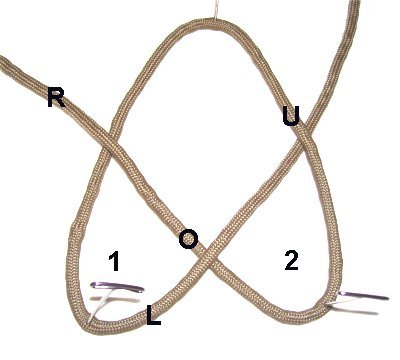
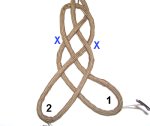
Step 1,
continued: To make Area
3 at the bottom, pass the working end under
the secured end.
Secure all 3
areas. |
|
|
| |
 |
|
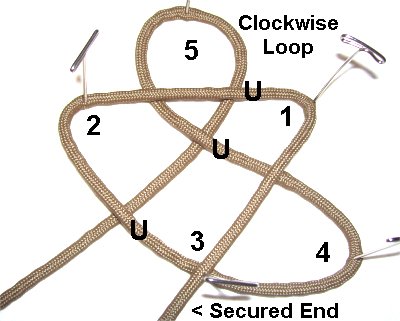
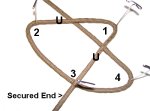
Step 2: Move the
working end to the right
and curve it upward, to make Area
4.
Bring it under
both segments near Area 1, moving right to
left on an angle.
|
|
| |
|
| |
 |
|
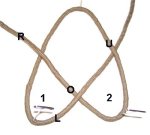
Step 3: Make a loop at
the top of the design, rotating clockwise.
That's considered Area
5.
Bring the working end down so it rests
between areas 2 and 3, passing under
the three segments.
|
|
| |
|
| |
 |
|
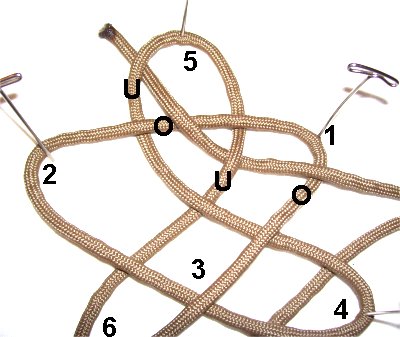
Step 4: Curve the
working end towards the right
to make Area
6.
Pass it over
the secured end, and then under
both segments at Area
4.
|
|
| |
|
| |
 |
|
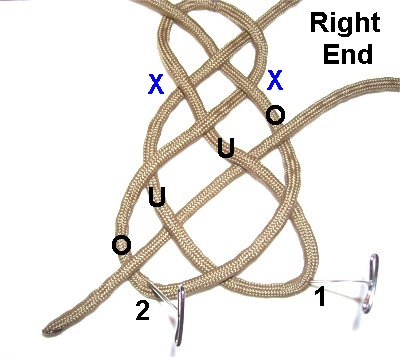
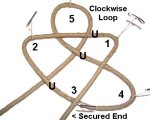
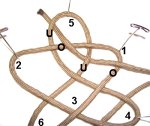
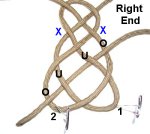
Step 5: Spread the
design out a little, so you can see all
areas clearly. Move the working end
towards the top, heading right to
left.
Weave the end over-under-over-under
the four segments near Areas 1
and 5.
|
|
| |
|
| |
 |
|
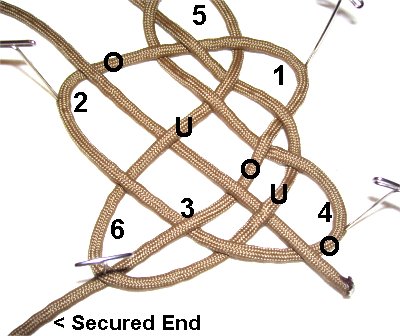
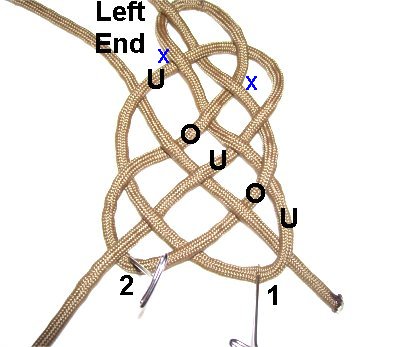
Step 6: Bring the
working end back to the lower
right (to Area 4).
Weave it over
- under - over - under - over
the segments in
Areas
2, 3, and 4.
|
|
|
| |
| |
 |
|
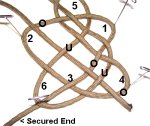
Step 7: To thicken
this Celtic Mat, use a
second cord and follow the path
of the first all the way through.
(optional)
Balance the design by tightening each
area. The top loop should be a bit
larger and rounder than the others.
|
|
| |
|
| |
 |
|
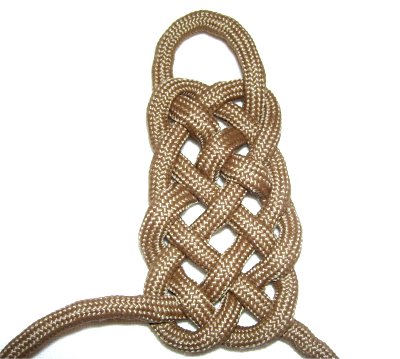
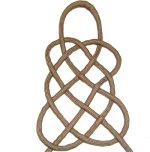
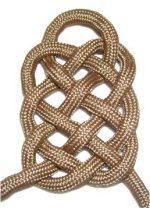
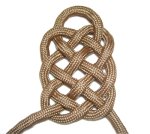
This is the Celtic Mat design when it's
completed. It's a good idea to leave
some space to see the details.
|
|
| |
| |
|
| |
 |
| |
 |
|
I found the next two Celtic Mat designs
in a book called Decorative
Fusion Knots, by JD
Lenzen.
Click on the link or image to visit
the author's website, which contains a video
gallery showing many other
interesting knotting techniques.
|
|
|
| |
|
|
| |
| |
 |
|
Basket
Weave
This type of Celtic Mat is called the
Basket Weave. It's very similar to the
design shown above, but is constructed
in a different manner.
You need one cord at least 36 inches
long. Make sure you use a project board
and pins to secure the loops.
|
|
| |
| |
| |
 |
|
Step 1: Secure the
cord at the center.
Bring the right
end of the cord down, and
secure it 4 inches below the center.
Move it to the upper left, passing over
the left end of the cord.
|
|
| |
|
| |
 |
|
Step 2: Move the left
end down 4 inches, and secure
it.
Bring it to the upper right, passing it
over
- under the two segments.
|
|
| |
|
| |
 |
|
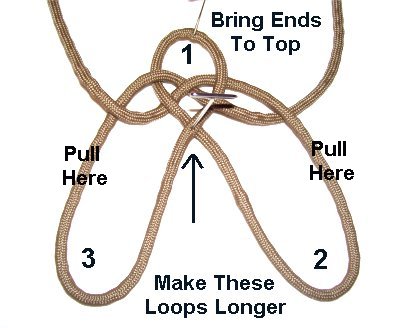
Step 3: Bring both
ends to the top, and secure them.
Pull down on the curved areas at the
bottom, to make two long bights.
Mentally label them as shown.
|
|
| |
|
| |
 |
|
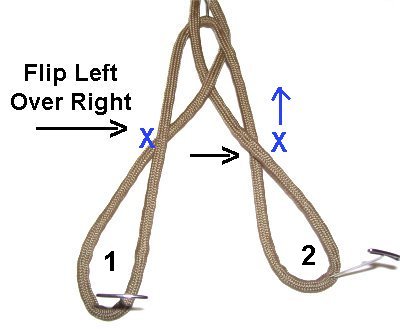
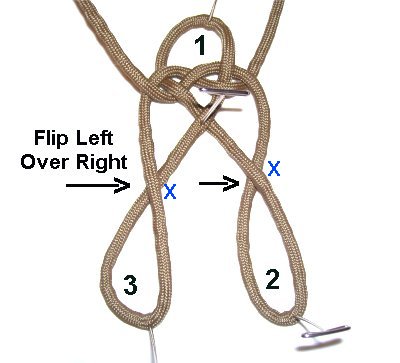
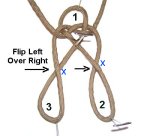
Step 4: For
each bight, flip
the left side over the
right.
Put your finger below each crossing
point and slide it up (blue
X), to make the lower area more
open for the next steps.
|
|
| |
|
| |
 |
|
Step 5: Cross the two
bights, so that bight 2 is on
top of bight 1. Secure them to
your board.
Make the bights slightly wider and
curved as shown, before moving on to the
next step.
|
|
| |
|
|
| Important:
For the next two steps, make sure the weaving
takes place below the crossed areas (blue
X). |
|
|
| |
 |
|
Step 6: Weave the end
on the right
down through
the middle of
bight 2, moving right to left.
Weave it over
- under - under - over the four
segments.
|
|
| |
|
| |
 |
|
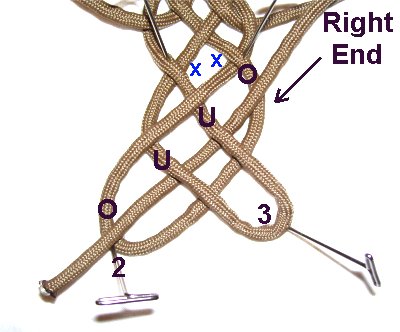
Step 7: Weave the
other end (left) down through the middle
of
Loop 1, heading left to right.
Weave under
- over - under - over - under
the five segments.
|
|
| |
|
| |
 |
|
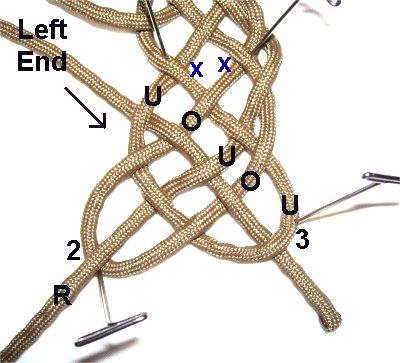
To double the knot, use a second
cord and follow the path of the
first one all the way through.
Balance and tighten the Celtic Mat,
removing the slack in each area
gradually.
|
|
| |
| |
|
| |
|
|
| |
 |
|
Prosperity
Knot
This historical knot has been featured
in many Celtic as well as Chinese works
of art.
The Chinese name for it is the
Prosperity Knot. It represents
abundance, long life, and wealth.
This variation of the Celtic Mat is
similar to the others, but is longer and
has more woven elements.
|
|
| |
| |
| |
 |
|
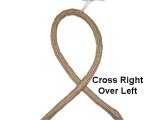
Step 1: Make a
loop in the center of a 45-inch cord.
The right end should cross over the
left.
|
|
| |
|
| |
 |
|
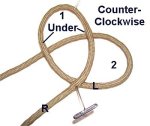
Step 2: Move the left
end (now on the right)
to make a counter-clockwise
loop.
Position it so it passes under
the first loop, and rests slightly to
the right.
|
|
| |
|
| |
 |
|
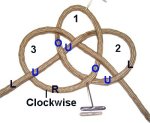
Step 3: To make the
third loop, move the right
end clockwise,
passing it under
the left end.
Weave it over
- under - over - under the four
segments of loops 1 and 2.
|
|
| |
|
| |
 |
|
Step 4: Move both ends
to the top. Place your finger below the
crossing point for loop
1 (arrow) and slide it up.
Make loops
2 and 3 longer, by pulling the
outer portions
downward.
|
|
| |
|
| |
 |
|
Step 5: For both
loops, flip
the left side over the right.
Put your finger below the crossing
points and slide them up, so the lower
areas are larger and more open.
|
|
| |
|
|
| Important:
Make sure the following steps take place below
the crossed areas. |
|
|
| |
 |
|
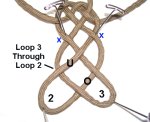
Step 6: Move Loop
2 to the left,
curving it slightly.
Pass Loop
3 through
it, under
- over (from below).
|
|
| |
|
|
| Important:
Make sure you can clearly see each segment and
crossing point of the two loops before moving on. |
|
|
| |
 |
|
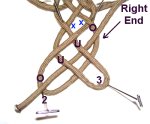
Step 7: Weave the
right end through the middle of Loop
2, over
- under - under - over the four
segments.
|
|
| |
|
| |
 |
|
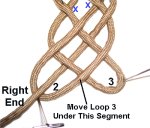
Step 8: In
the previous steps, Loop 3 was resting over
the right
side of Loop 2.
Now you need to move Loop
3, and bring it under
the right side of Loop 2.
|
|
| |
|
| |
 |
|
Step 9: Weave the left
end through the middle of Loop
3,
heading left to right.
Weave under
- over - under - over - under.
The end comes out below the crook of
loop 3.
|
|
| |
|
| |
 |
|
To double this variation of the Celtic
Mat, use a second
cord. (Optional)
Follow the path of the first cord,
starting at one of the ends.
Tighten the loops so they are balanced.
|
|
| |
| |
|
|
By
using any text or images on Free Macrame
Patterns, you are agreeing to our Terms
of Use
|
|
|
| |
| Have
any comments about the Celtic Mat? Contact
Me. |
|
|
|
|
|
| |
| |