Step
1:Cut 2 cords,
each9.5
yardslong.
Prepare the ends to prevent unraveling.
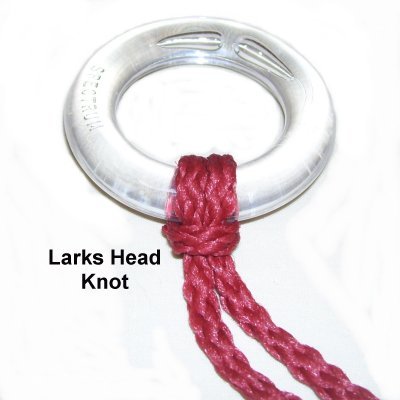
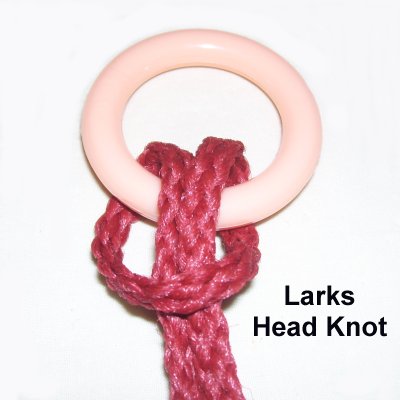
Mount them to a 2-inch ring with Larks
Head knots.
(Optional)
Roll up each cord for the Owl Pouch by
wrapping them around your hand several
times.
Remove it, and place a rubber band around
the middle to secure the bundle.
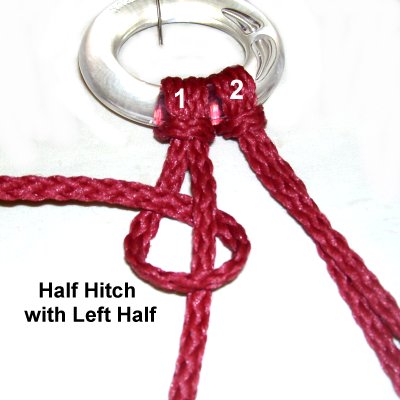
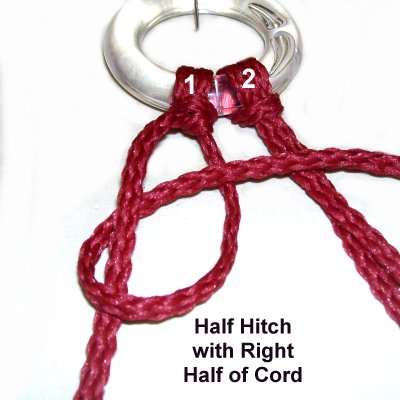
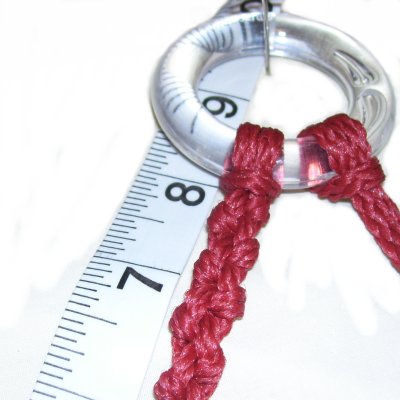
Step 2:
Tie a chain of Alternating Half Hitches
with one cord.
Stop
when the sennit measures 8 inches long.
Step 3:
Repeat step 2 with the
other cord.
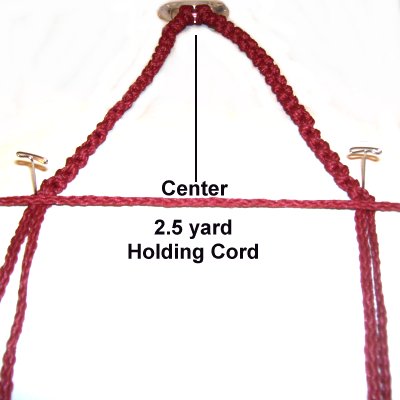
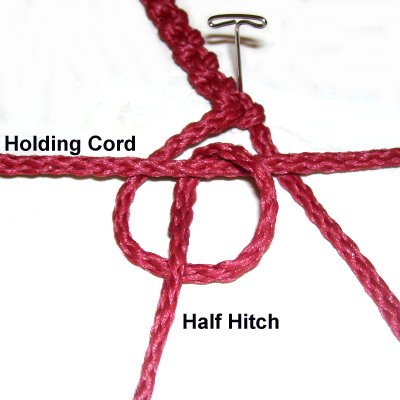
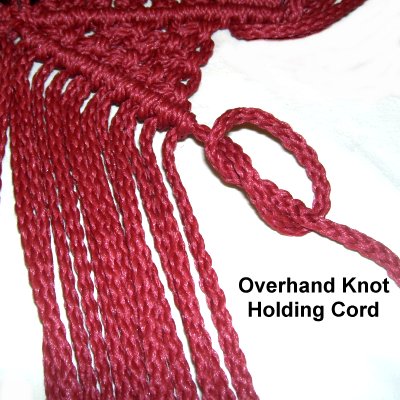
Step 4: Cut
one holding cord, 2.5
yards long.
Apply
tape to each end to
mark it, since you will need to locate it
several times as you make the Owl Pouch.
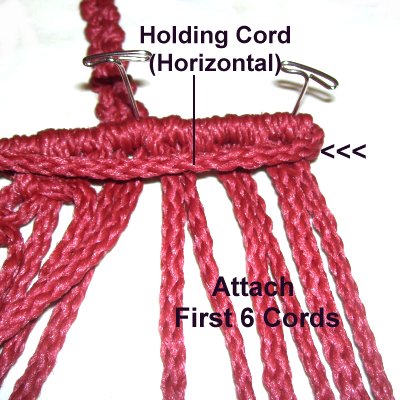
Secure it to your board
horizontally. Mark the
center with a pin. Place the ends of
the hanger cords underneath it.
Arrange the hanger so the center of the
holding cord lines up with the center of
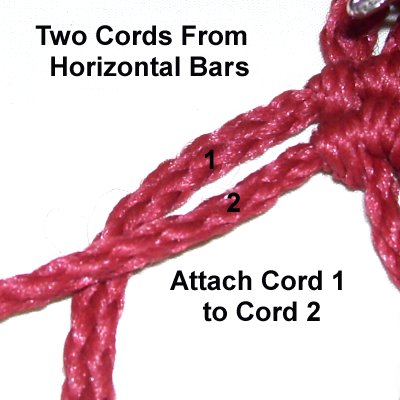
the ring.
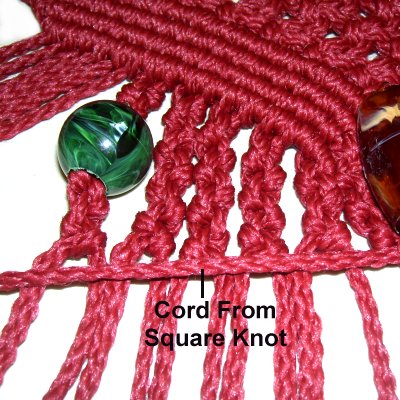
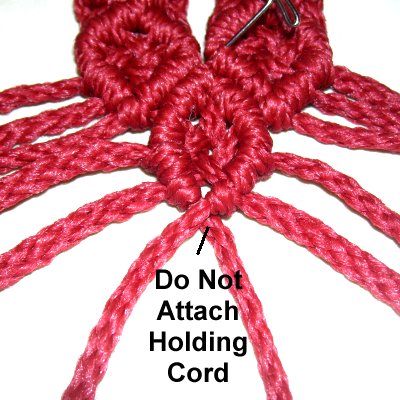
Attach the 2
cords from each half of the hanger to the
holding cord with Double Half
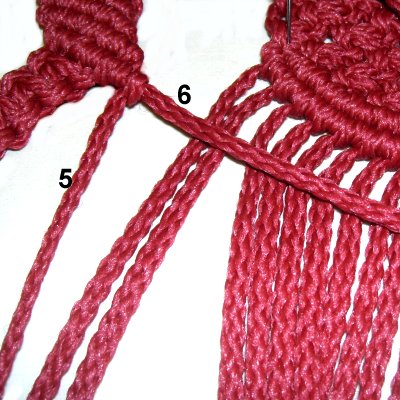
Hitches.
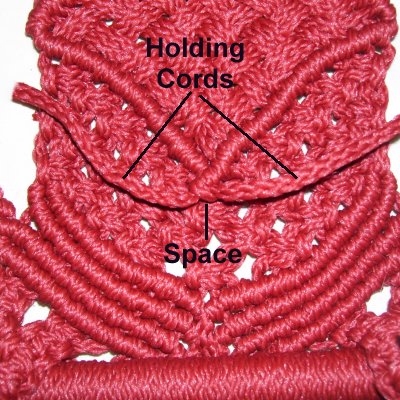
Leave at least 8
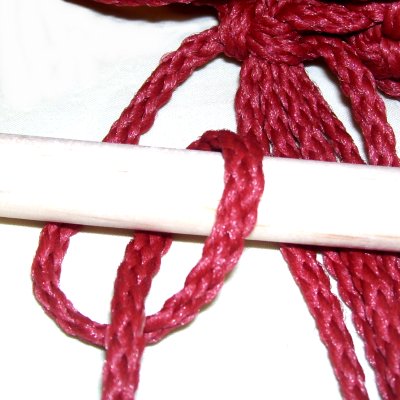
inches of space between the two
sennits (similar to the image above).
Tighten the knots firmly,
so the hanger rests against
the holding cord.
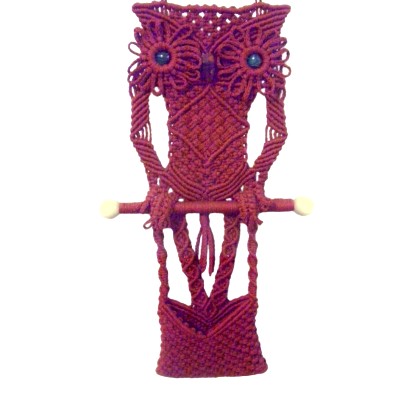
Mounting
Process for Owl Pouch
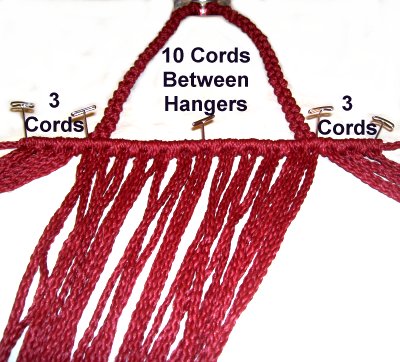
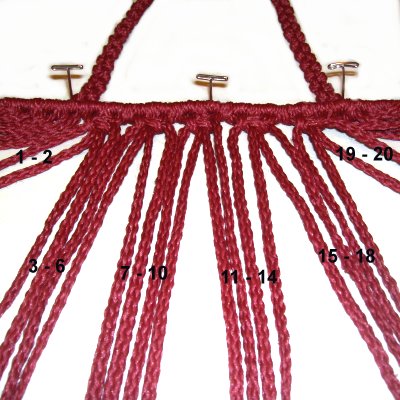
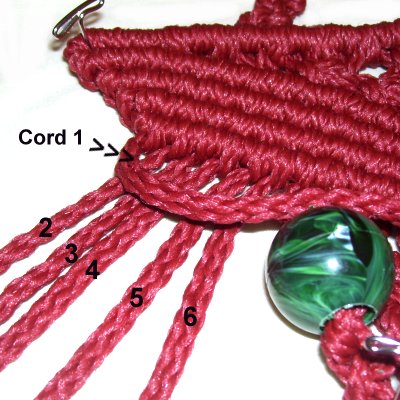
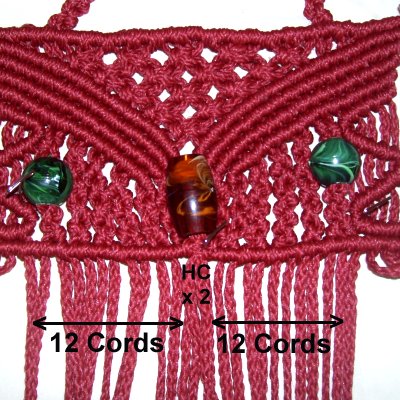
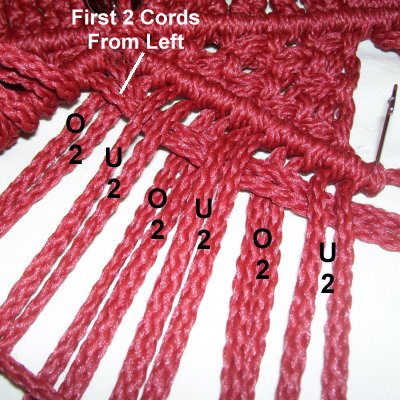
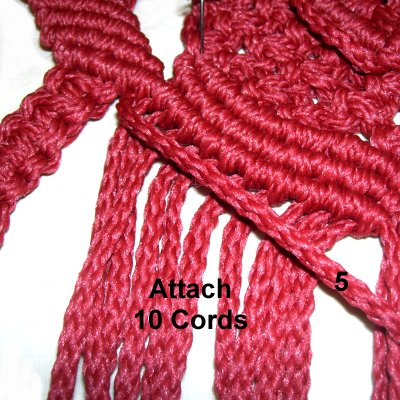
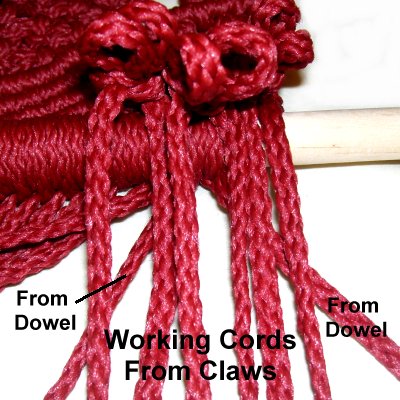
Step 5:
Cut 16 working cords, each 7.5
yards long. Prepare them
to prevent unraveling.
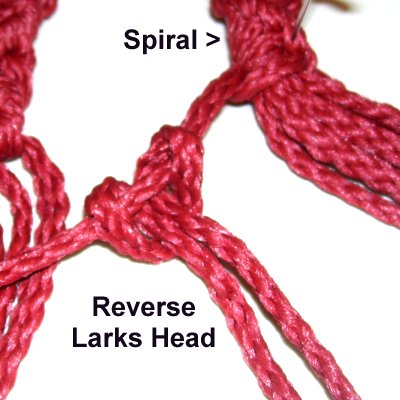
Mount the first 10 between the two halves of the
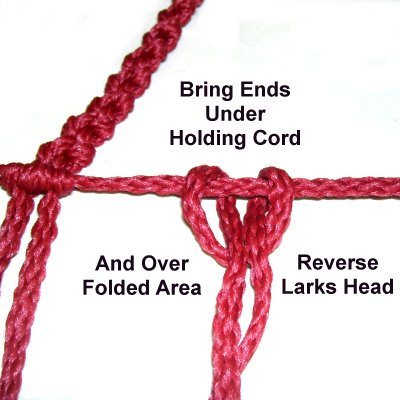
hanger with Reverse
Larks Head Knots (see below).
<<
Fold one cord in half, and place it on top
of the holding cord with the ends heading
upward.
Bring the ends down and under
the holding cord. Pass them over
the folded area. >>
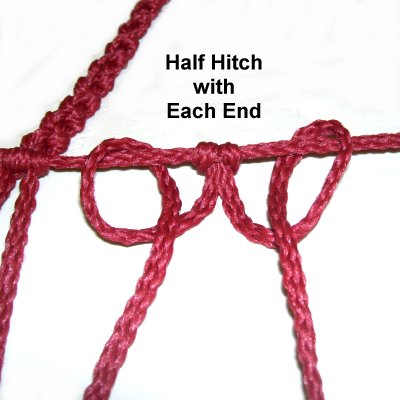
Tie a Half
Hitch with each
end. Move the cord to the
left, and then mount the next cord.
After you have mounted 5
cords, move them, along with the
left hanger cords, to the center
of the holding cord.
Mount 5 more cordsto the
right of the others.
Push the hanger cords towards those on the
left, so they are all close together.
Mount 3 more
working cords to the left and right of the
hanger cords.
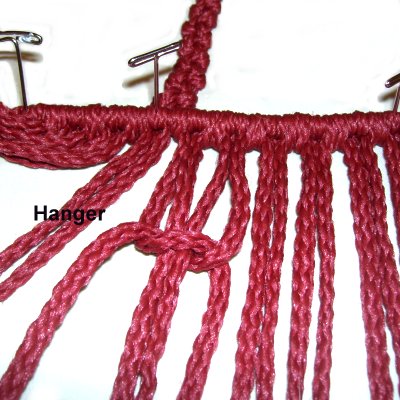
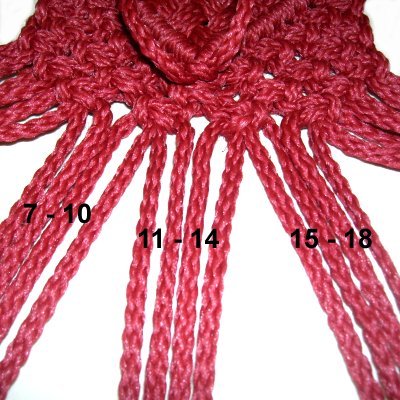
Head of Owl Pouch
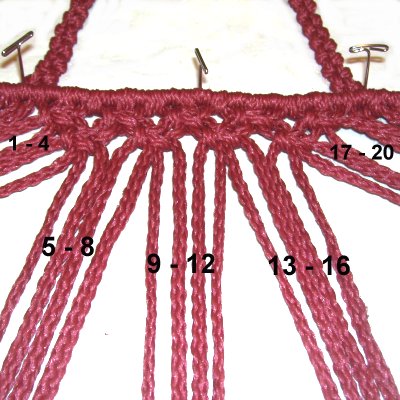
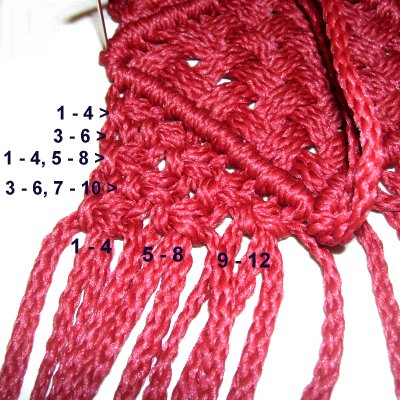
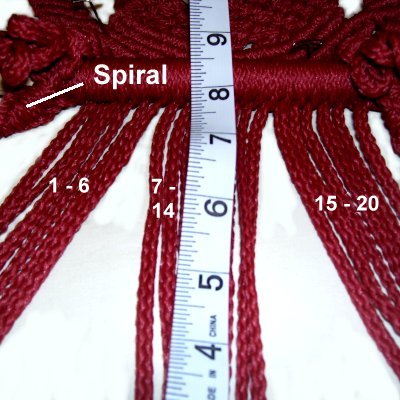
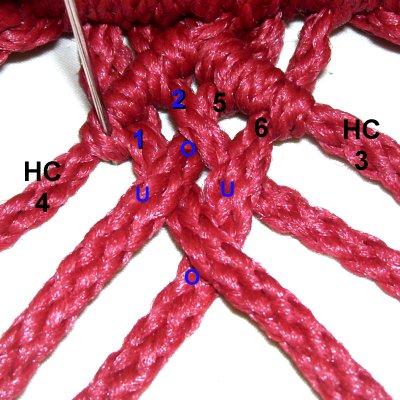
Step 6:
Mentally number the 20 cords between the two parts of the
hanger.
These are for the V pattern at the top of the Owl
Pouch.
Important:
Do not include the
cords from the hanger or the 6 cords at each
end.
Row
1: Tie Alternating Square
Knots in the following groups:
1 - 4,
5 - 8, 9 - 12, 13 -
15, 16 - 20
Row 2:
Tie the ASK with cords:
3 -
6, 7 - 10, 11 - 14, 15
- 18
Row 3:
Tie the ASK with 5 - 8, 9 -
12, 13 - 16.
Row
4: Tie the ASK with
7 - 10 and 11 - 14.
Row
5: Tie the final knot with
cords 9 - 12.
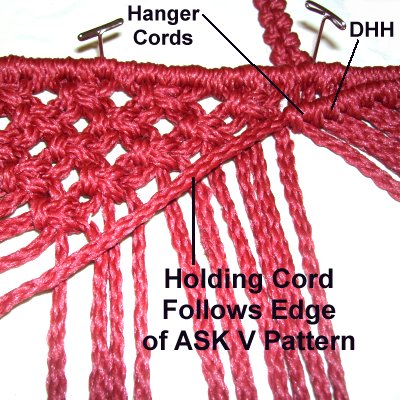
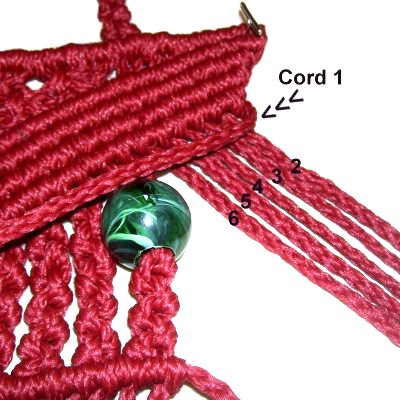
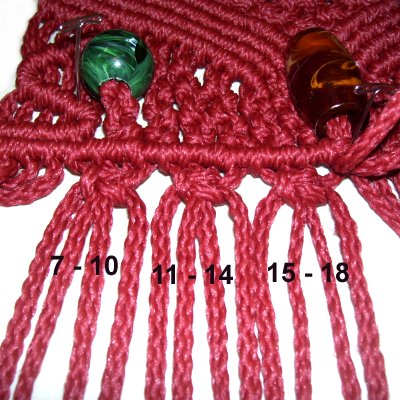
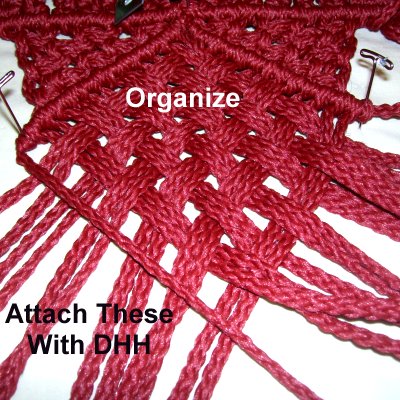
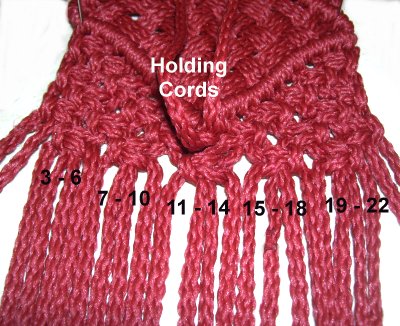
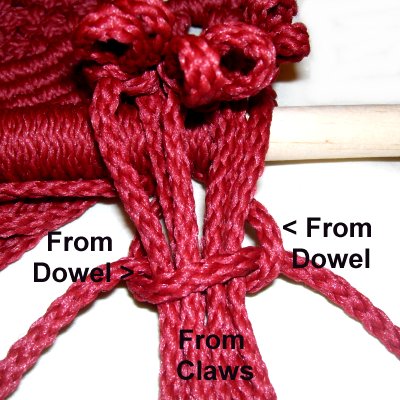
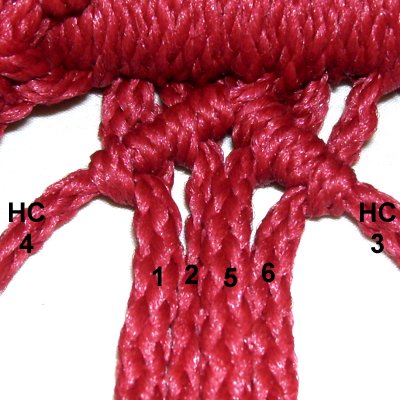
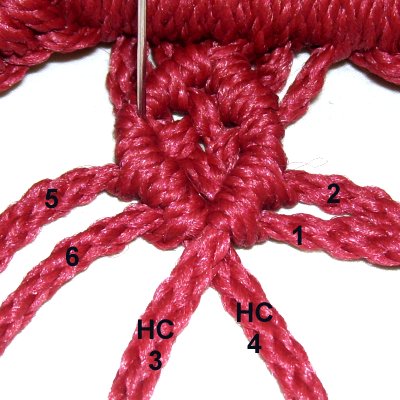
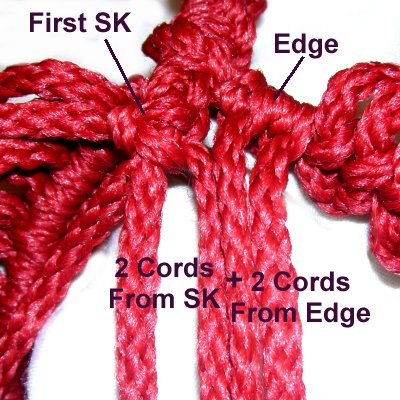
Step 7:
Divide the 18 cords on the right
side of the Owl Pouch design into
3 groups:
Six
cords to the right
of the hanger cords
Two
Hanger Cords
Ten
cords along the right
side of the V design
Locate the
marked holding cord. Move it left
and secure it horizontally.
Attach the first
6 cords to it with DHH, moving right
to left.
Tighten them firmly, so they rest against
the mounting knots.
Change
the angle of the holding cord so
it follows the right edge of the ASK V
Pattern.
Attach the 2
cords from the Hangerand the 10
cords from the V design, with
DHH.
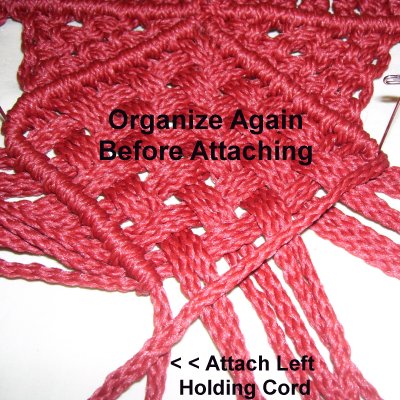
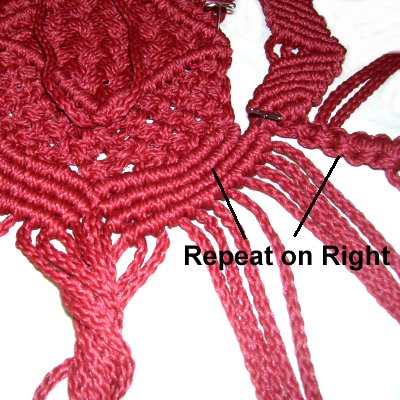
Step 8:
Repeat step 7 on the left side
of the Owl Pouch, movingleft to right.
Do not
include the holding cord from the right.
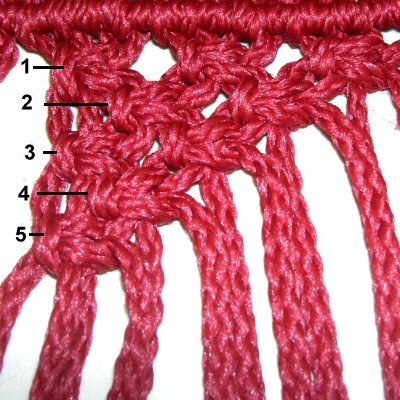
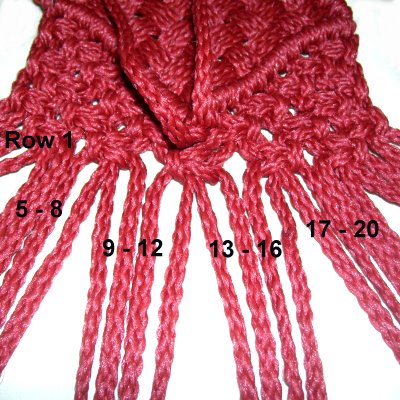
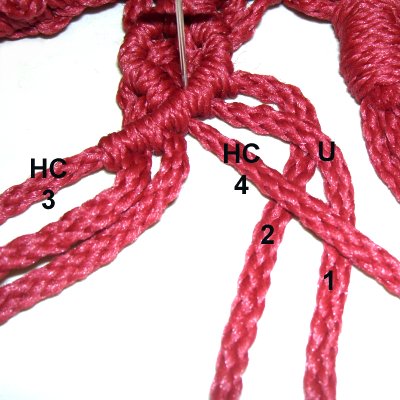
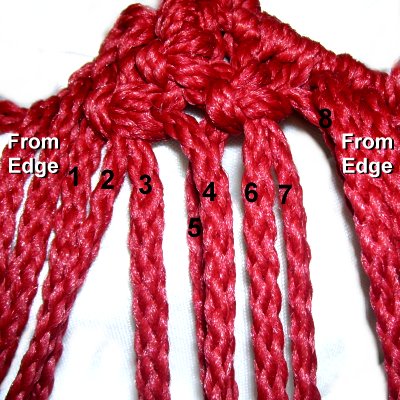
Step
9: Mentally number the 18
cords on the left
side of the Owl Pouch (left to
right).
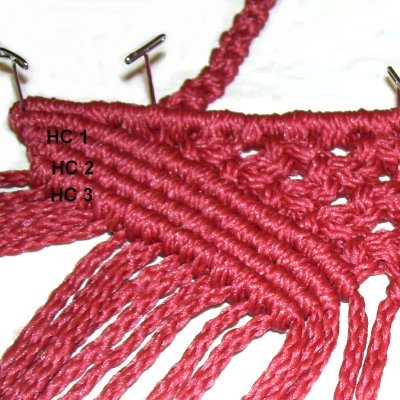
Move cord
1 to the right, along the row
tied in the last step. Secure it
with tension. Attach cords 2 - 18 to it
with DHH.
Do not
attach the previous holding cords.
Cord
2 is the next holding cord.
Attach cords 3 - 18 to it with DHH.
Cord
3 is the final holding
cord. Attach cords 4 - 18 to it with
DHH.
Do not
attach the previous holding cords.
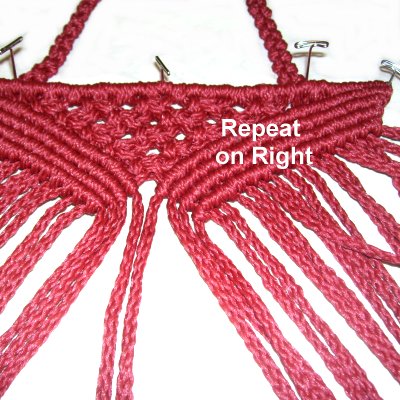
Step
10: Repeat
step 9 on the right side
of the Owl Pouch.
Mentally number fromright to
left, and follow the
same instructions.
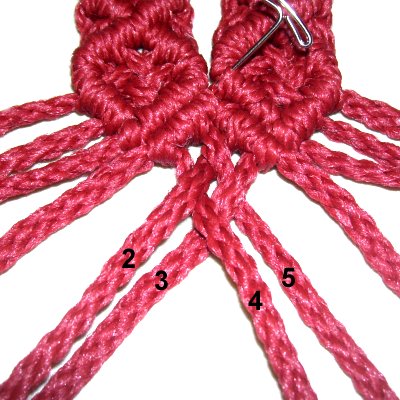
Step
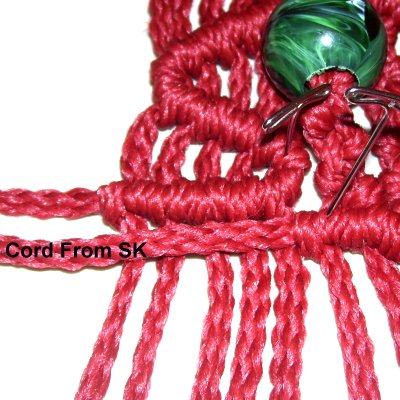
11: Locate the 6
holding cords from the first
three rows of DHH.
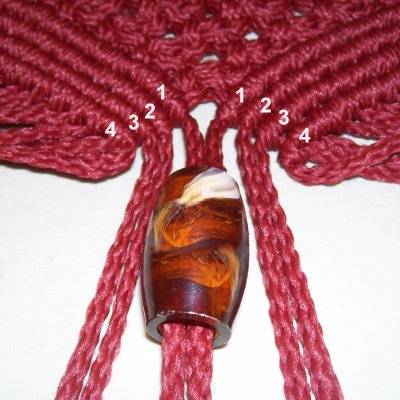
Slide the bead
for the beak onto themarked
holding cords from the first row of
DHH.
Tie Alternating Half Hitches with the cords from
rows 2 and 3, on each side of the beak.
Stop when the sennits line up with the bottom
of the beak.
Mentally
number the same six cords, which includes
the two sennits you just made, and those
running through the beak.
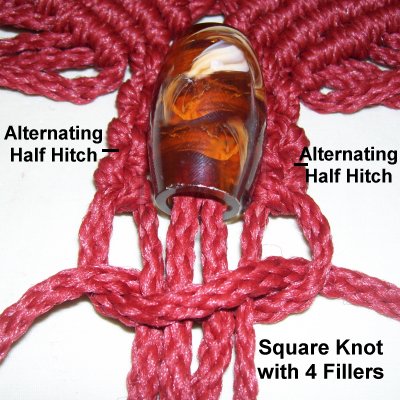
Tie a Square Knot with cords
1 and 6 around the other four
(fillers).
Step 12: Mentally
number the 16 cords to theleft of
the SK you just tied below the beak
(left to right).
Move theleft
working cord from the Square Knot
under the beak, towards the left.
Secure it horizontally,
since it's a holding cord.
Use cords
7 and 8 to tie four
Alternating Half Hitches.
Slide the bead
for the left eye onto the two cords.
Tie at least 4 - 6 more Alternating Half
Hitches, so the sennit reaches the
horizontal holding cord.
Step
13: Tie four sennits of
Alternating Half Hitches with these groups
of 2 cords:
9 - 10 ,
11 - 12, 13 - 14, 15 - 16
Stop when each sennit reaches the holding
cord.
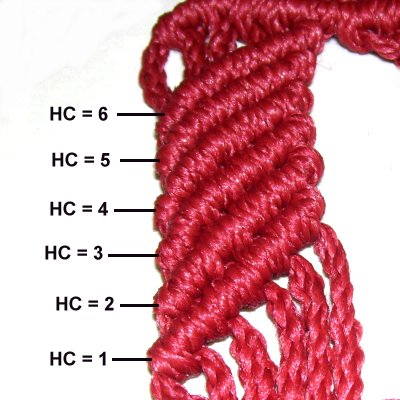
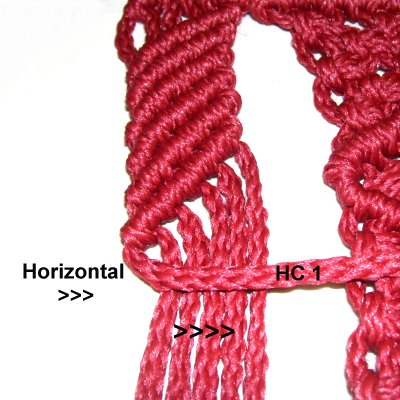
Step 14:
Attach cords
16 - 7 to the holding cord with DHH.
Do not attach
cords 1 - 6.
Step 15: Repeat steps 12 - 14on the right side of the Owl Pouch.
Mentally number the cords from right
to left, and follow the same
instructions.
Use the right
working cord from the SK under the beak
as the holding cord.
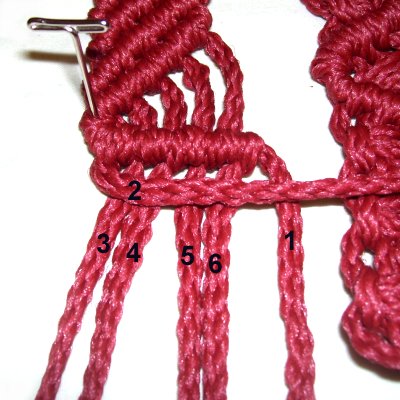
Step
16: Go back to the left
side of the Owl Pouch.
Move cord
1 to the right, on the same angle
as the rows of DHH above it.
Attach cords 2 - 6 to it with DHH.
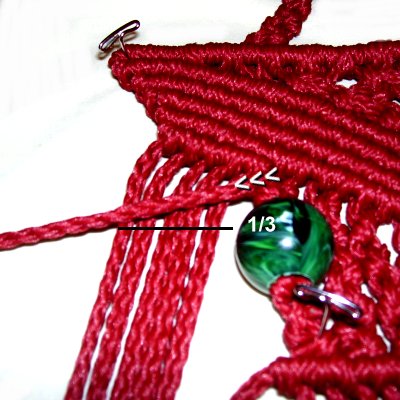
Step
17: Move cord
1 to the left.
The angle should be roughly 1/3 of the way
from the top and bottom of the eye.
Attach cords 6 - 2 to it with DHH.
Move cord 1 to
the right.
The angle should bring it just below the
bottom of the bead. Attach cords 2 -
6 to it with DHH.
Move cord 1 to the left
again. Line it up with the horizontal
holding cord from the SK (step 12).
Attach cords 6 - 2 to cord 1 with DHH.
Attach cords 6
- 2 to the horizontal holding cord (from
the SK).
Mentally
number the two holding
cords. Cord 2 is from the
SK (step 12), and cord 1 is from the
design you just made.
Move cord 1 under
cord 2, and then attach it with a DHH.
Step
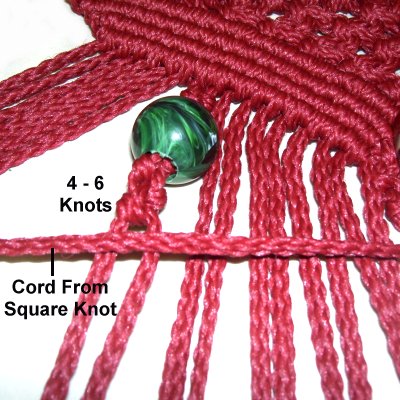
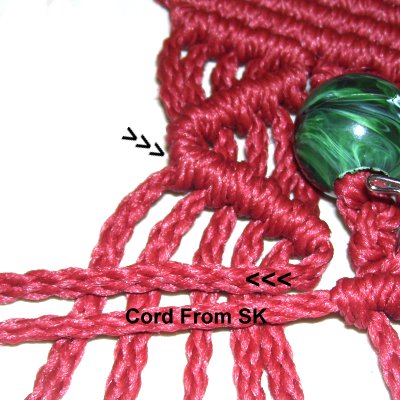
18: Move to the right side
of the Owl Pouch. Mentally number
the 6 cords right
to left.
Repeat step
16.
Read the information below, and then repeat
step 17.
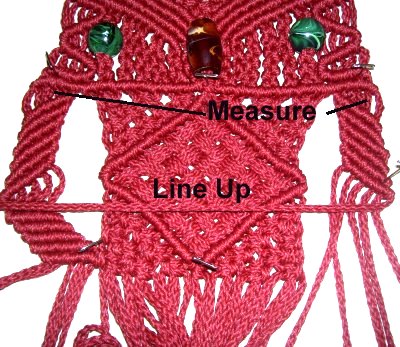
Measure
the angles you made on the left.
Arrange the holding cord that same
distance on the right,
so the Owl Pouch is balanced.
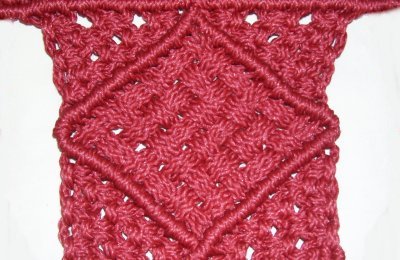
Body of Owl Pouch
Locate the two marked
holding cords, which are below
the beak in the middle of the
Owl Pouch. They are used for the diamond
only.
Do
not include them when you tie the next
rows of ASK described below:
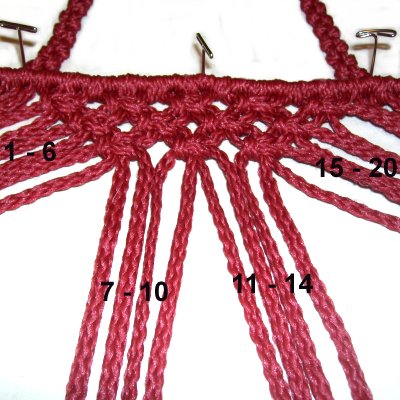
Step
19: Mentally number the
first 18 cordson the left
side of the Owl Pouch (left
to right).
Do not use
cords 1 - 6.
Row 1: Tie leftASK
with 7 - 10, 11 - 14, and 15 - 18.
Row
2: Tie left ASK with 9 - 12
and 13 - 16.
Row 3:
Tie left ASK with 7 - 10 and 11 - 14.
Row 4:
Tie left ASK with cords 9 - 12.
Row 5:
Tie left ASK with cords 7 - 10.
Step 20:
On the right
side of the Owl Pouch, mentally number the 18
cords fromright to left.
Repeat
step 19,tyingRIGHT
ASK.
Step
21: Place the marked
holding cords along the diagonal
edges of the V designs you just made.
Secure them with tension. Attach 12
cords to each of them with DHH.
Start near the center and move towards the
edges.
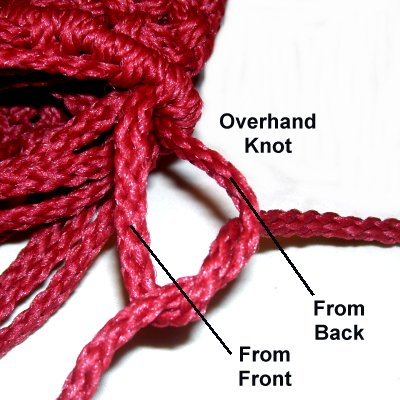
Tie anOverhand knot with each holding
cord, so it rests next to the
DHH.
Measure
the width
between one Overhand knot and the
other.
Measure
the same distance from the top of the
diamond heading downward.
Move the left
holding cord to the right, so it
rests at the measured spot. Secure
it to your board.
Move the 12
working cords from the right,
across to the left.
Slide them under the left
holding cord, and secure them
with tension.
Step
22: Locate the first two
cords on the left
side of the diamond, closest to the top
point.
Weave both of them through the cords
coming from the right,
in groups
of 2.
To do this, pass them over
the first two
cords, then under
the next two, and so on.
Use the next
two cords on the left. Pass under
the first two cords, so the pattern
alternates.
Continue on in the same manner, for 4 more
rows.
Alternate
the over -
under pattern each time.
Step
23: Organize the 12 cords
on the left
so they are straight.
Attach them to the left
holding cord with
DHH.
Move left
to right as you progress.
Organize the
remaining 12 cords, so they are equally
spaced.
Attach them to the right
holding cord, moving
right to left.
Also attach the
left
holding cord, to close the
diamond.
Step 24:
Move the two marked holding cords out of
the way.
They
will no longer be usedfor
the rest of the Owl Pouch.
Mentally number the 12
cords on the left side of the diamond (left
to right).
Make sure the following knots along the edge of
the diamond are as close to it as possible.
Row
1: Tie left
ASK with cords 1 - 4.
Row 2:
Tie left ASK with cords 3 - 6.
Row 3:
Tie left ASK with 1 - 4 and 5 - 8.
Row 4:
Tie left ASK with 3 - 6 and 7 - 10.
Row 5:
Tie left ASK with 1 - 4, 5 - 8, and 9 -
12.
Step 25:
Mentally number the 12 cords on the right,
moving right to left.
Repeat step 24,
tying rightASK.
Lower Body, Wings, Claws, Tail
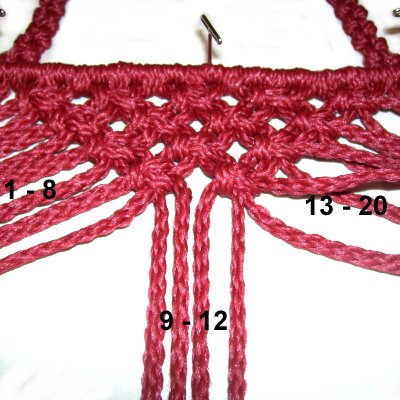
Step 26:
Mentally number the 24 cords you have been using
for the upper body.
Make sure you do
not include the marked holding cords,
which should be secured out of the way.
Row 1: Tie left
ASK with 3 - 6, 7 - 10, 11 -
14.
Tie right
ASK with 15 - 18 and 19 -22.
Row
2: Tie left
ASK with 5 - 8, 9 - 12.
Tie right
ASK with 13 - 16, and 17 - 20.
Row
3: Tie left
ASK with 7 - 10, 11 - 14.
Tie right
ASK with 15 - 18.
Step
27: Mentally number the
first 6 cords (furthest to the left), for
the left
wing. Cord
6 is the first holding cord.
Measure from the horizontal bar downward,
to 1-inch. Move the holding cord to
that point, so it's resting diagonally.
Attach cords 5 - 1 to it with DHH.
For the remaining 5 diagonal rows in this area
of the Owl Pouch design, attach the cords in the
order described below, which includesprevious
holding cords.
Tighten each knot firmly, so the bars are
close together.
Row
2: Holding cord = 5.
Attach cords 4 - 1 + 6.
Row 3:
Holding cord = 4. Attach 3 - 1 + 6
and 5.
Row 4:
Holding cord = 3. Attach 2 -1 + 6 -
4.
Row 5:
Holding cord = 2. Attach cord 1 + 6
- 3.
Row 6:
Holding cord = 1. Attach cords 6 -
2.
Step
28: Mentally re-number the
cords 1 - 6 (left to
right).
Step 29:Repeat
step 27, using the 6 cords on
the right
side of the Owl Pouch.
Mentally number them right
to left.
Repeat step
28.
Before tying each row, move the
holding cord to the left
side of the Owl Pouch.
Line up each one with the DHH on the left,
so the wing designs are balanced.
Step
30: Mentally number the 12
cords for the body,
on the left
side of the Owl Pouch.
Move cord
2 along the left diagonal edge of
the ASK.
Attachcords
3 - 6 to it with DHH.
Change the
angle of holding cord 2, so it's horizontal.
Attach cords 7 - 12 to it with DHH.
Step
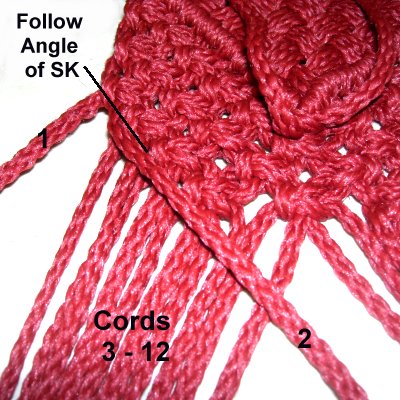
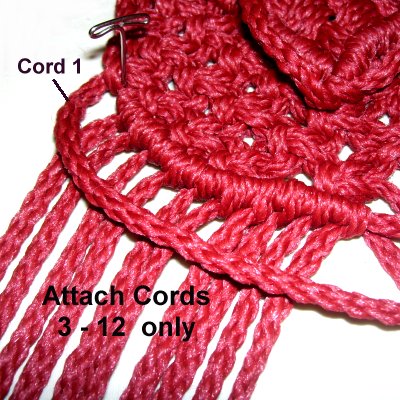
31: Move cord
1 next, following the curve of
the previous holding cord.
Attach cords 3 - 12 to it with DHH.
Do not
attach holding cord 1.
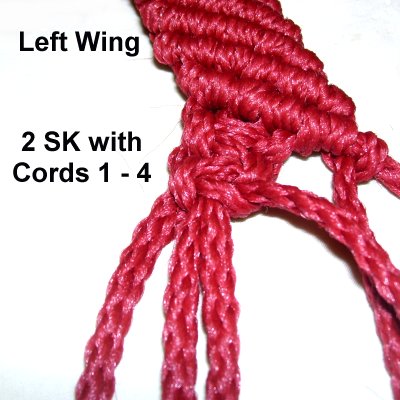
Step 32:
Mentally number the 6 cords from the left
wing.
Holding cord 6 is from the last row of
DHH.
Step
33: To make the first
claw for the Owl Pouch, tie two
Square knots with cords
1 - 4.
Make sure the knots are tilted
to the left, so they follow the diagonal
row of DHH.
Fold the
fillers (cords 2 and 3) back
towards the left wing. Move them under
the wing.
Tie the next Square Knot, making sure you
pass the working cords around both
parts of the fillers, forming two
loops.
Tie two
more SK (total of 5 knots).
Adjust the size of the loops to 1/2
inch, by pulling on the ends
of the filler cords.
Step
34: Move holding
cord 6 from the left
wing to the right, just below the
DHH in the lower body of the Owl Pouch.
Attach 10
cords to it with DHH.
Do not include
the previous holding cords (2 - 1).
Cord
5 from the wing is the next
holding cord.
Attach 10
cords to it with DHH.
Do
not include the previous holding cords.
Step
35:
Repeat steps 30 -34 on
the right
side of the Owl Pouch.
Mentally number right
to left.
Step 36: Mentally number all the
cords 1 - 36.
Organize the cords into two groups of 4 on
each side, and the remainder in the
center.
Repeat step 33
with cords
5 - 8, tying a total of seven
knots.
Be sure to tie two
knots, bend the fillers and tie the
remaining five.
Repeat
step 33 with cords
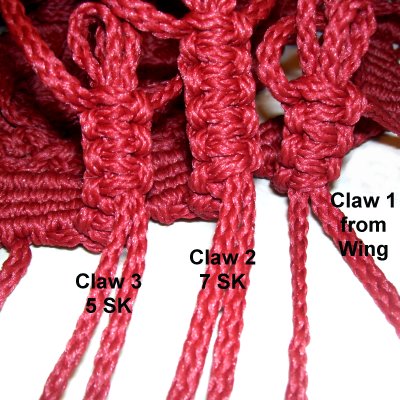
9 - 12. Tie a total of five knots.
Repeatstep 33
to make the two claws on the right.
Use cords
25 - 28 to tie
five knots.
Do the same with cords
29 - 32, tying seven
knots.
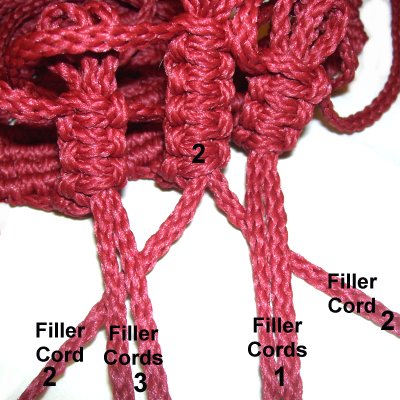
Step
37: Stand up the claws on
the right,
to expose the bottom
of them. Locate the filler
cords that were bent back to form
the loops.
Slide thetwo fillers from claw
2 (longest) under those from
claws 1 and 3. Use them to tie a
Square Knot around the other four.
Tie an
Overhand knot with each pair of working
cords (near the loops on each
claw).
Make sure they rest at the back
of the sennits.
Step 38:
Repeat step 37
to make the remaining three claws, on the left
side of the Owl Pouch.
Organize the filler
cords for the claws (six from
each side), along with the 12 cords in the
center of the Owl Pouch (total of 24).
Step
39: Attach the 24 cords to
the dowel with DHH.
Progress from left to right, and hold the
dowel close to the lower body, so there
are no gaps.
Step
40: Locate the sixworking
cords near the top of the claws,
on the right
side of the Owl Pouch.
Place them over
the dowel.
Move the last
two cords from the dowel under
them, on each side.
Tie a Half
Knot (first half of Square Knot)
with the cords coming from the dowel,
around the six claw cords. Tighten it
firmly.
Tie six
more Half Knots to create the first
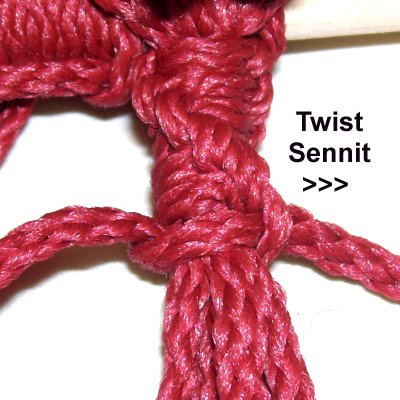
section of the Spiral Stitch.
Twist the
sennit so the working cords switch places,
and then tie the next seven
knots.
Repeat
until the sennit measures10 inches.
Step 41: Repeat
step 40 with the claws
on the left side of the Owl Pouch.
The knots are tied with the first
two cords on the dowel.
Step
42: Mentally number the
remaining 20 cords, between the two
spirals.
The tail will be made with cords 7 -
14.
Measure the cords from the dowel down
8 inches, and then cut off the
remaining material.
Save
any scraps 45 inches or more. They will
be used for the pouch.
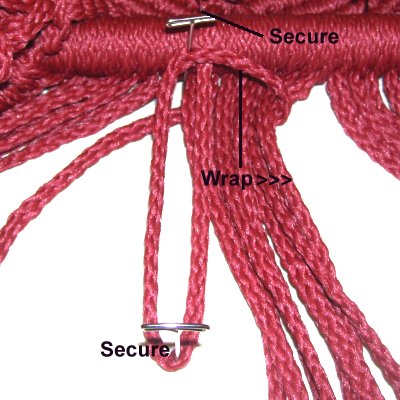
Secure a new 24-inch
cord to the left
of the cords for the tail.
Bring the cord down 3 inches, fold it, and
bring it back up to the top. Secure
it at the fold.
Wrap the long
end firmly
around the bundle of cords, for two
inches.
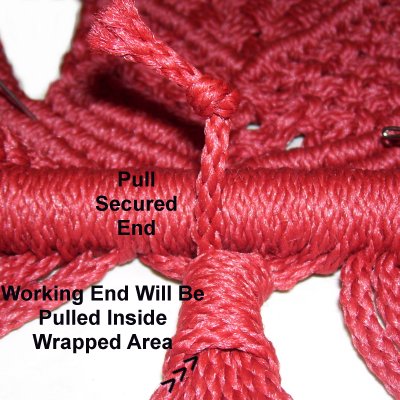
Pass the end through the folded area as
shown.
Pull on the secured end
(at the top), to complete the Wrapped
Knot.
Pull down on the 8 cords running through
the knot, to eliminate any space above the
knot.
Apply glue to the top and bottom edges of the
knot. When it's dry, cut off the extra
material (short cord only).
Trim the tail cords to 3 - 5 inches below the
wrapped portion. Apply glue or knots to the
tips, or unravel and brush the fibers.
The Pouch
Step
43: Locate the remaining six cords on
each side of the tail. Mentally number the
cords in the left
group.
You'll be making eyelets, which are small diamond
shaped designs.
Cords
3 and 4 are the holding cords
for the strap, and should be crossed.
Place them on top of the other 4 cords,
diagonally.
Attach cords 2
and 1 to holding cord 4 with DHH.
Attach cords 5 and 6 to holding cord 3.
Step
44: Move cords
5 and 6 to the left,
diagonally.
Weave cord
2 to the right,
passing it over
- under cords 5 and 6.
Weave cord
1under
- over cords 5 and 6.
Move holding
cord 4 on top of cords 5 - 6.
Attach cords 5 - 6 to it with DHH.
Move holding
cord 3 on top of cords 1 and 2.
Attach cords 1, 2, and holding cord 4 to
it with DHH.
Step 45:
To start the top of the next eyelet, move
cord
5 (left upper), under cord 6 and
holding cord 3.
Attach it to holding cord 3 with a DHH.
Attach cord 6 (left lower) as
well.
Move cord
2 (right upper) under cord 1 and
holding cord 4. Attach it to holding
cord 4 with a DHH.
Attach cord 1 (right lower) as well.
Repeat step 44to complete the
bottom.
You can mentally re-number the working
cords if necessary, since they have
switched places.
Step
46: Repeat
step 45 four more times, for a
total of 6 eyelets.
The cords will change positions, so remember that
the cord closest to the top
of the design is attached first when you make the
bottom half.
Step
47: Repeat
steps 43 - 46 with the 6
cords to the right
of the tail.
Mentally
number right
to left.
Step 48:
The final eyelet connects the two straps
for the Owl Pouch. Mentally number the cords in
each strap 1 - 6 (both left to right).
Use cords
4 - 6 from the left strap and cords
1 - 3 from the right. The holding
cords are 6 and 1.
Cross cord 1 over cord 6, and secure them with
tension.
Attach cords 5
and 4 to holding cord 1.
Attach cords 2 and 3 to holding cord 6.
Pull the cords firmly so the two bars rest
next to the eyelets made previously.
Weave the working cords as you did in
step 44
(see image below).
Move
holding
cord 1 to the right,
and attach cords 2 - 3 to it.
Move holding
cord 6 to the left,
and attach cords 4 - 5 to it.
Do
not attach holding cord 1.
Cut
18 cords, at least 45
inches long. The scraps from the
tail can be used, if they are long enough.
The pouch measures 6 inches from the highest area
at the sides, to the bottom.
You an increase the length by cutting the new
cords at least 7.5
times the length you want.
Step
49: Select one cord from
the right
spiral sennit, to be used as a holding
cord.
Mount three
new cords to it with a reverse Larks Head
knot plus a Half Hitch with each end.
This is the same as step
5.
Secure the
holding cord so it follows the angle of
the last eyelet in the strap (lower edge).
Attach 6
cords coming from the straps with
DHH.
Step 50:
Repeat step 49
on the left, selecting 1 cord from the left
spiral as the holding cord.
Do not attach the
holding cord from the right.
Step
51: Select another holding
cord from the right
spiral sennit. Attach only
12 cords to it with DHH, not
the previous holding cords.
Make sure you pull the knots tightly, so
the bars rest next to each other.
Repeat this process on the left.
Tie a SK with
the four holding
cords.
The two from the first row are
fillers. Those from the 2nd row are
the working cords.
Step 52: Repeat steps 49 - 51to
create the front
edges of the pouch.
There
are no straps, so add six
new cords to each half instead of
three.
In the steps below,
the first 7 rows of ASK follow
the angle of the diagonal edges you just
completed.
Tie all knots firmly, so there is very little
space between them and the edges.
You will find it easier to make this area of the
Owl Pouch with it hanging.
Important:
Do not use the cords at the point of the V shaped
edges,which
arethe
four
holding cords tied together instep 51.
Temporarily separate them from the other
cords, or mark them somehow.
Step
53: Arrange the design so
one spiral sennit is directly in front of
you.
Row 1:
Tie a tight Square Knot with the remaining
four cords from the spiral
sennit (not the
edges).
Row
2: Mentally number the
cords 1 - 4.
Combine cords 3 - 4 with two from the edge
on the right. Tie a Square knot.
Combine cords 1 - 2 with two from the edge
on the left. Tie a Square Knot.
Row
3: Mentally number the 8
cords.
Combine cords 1 - 2 with two from the left
edge, and tie a Square Knot.
Tie a SK with cords 3 - 6.
Combine cords 7 - 8 with two from the
right edge, and tie the third SK for this
row.
Row 4:
You now have 12 cords. Combine 1 - 2 with
two from the left edge. Combine 11 - 12 with two
from the right.
The remaining knots are tied with 3 - 6 and 7 -
10.
Row 5: You
now have 16 cords. Combine 1 - 2 with two
from the left edge. Combine 15 -16 with two
from the right.
Tie the remaining knots with 3 - 6, 7 - 10, and 11
- 14.
Row 6: You
now have 20 cords. Combine 1 - 2 with two
from the left edge. Combine 19 - 20 with two from
the right.
Tie the remaining knots with 3 - 6, 7 - 10,
11 - 14, and 15 - 18.
Row 7:
The final row is tied with 24 cords. Combine
1 - 2 with two from the left edge. Combine
23 - 24 with two from the right.
Tie the remaining knots with 3 - 6, 7 - 10, 11 -
14, 15 - 18, and 19 - 22.
Step
54: Tie at least 10
more rows of ASK, all the way around the
pouch.
Start at the center front area, and work
in opposite directions, so you finish in
the back
each time.
Use ALL the cords,
including
the ones separated in step 52.
You can tie additional rows in this area of the
Owl Pouch, if you cut the new cords longer than 45
inches.
The
shortest
cords need to be at least 10
inches long for the final steps, so
measure as you progress.
Step 55:
Cut one holding cord, at
least 20 inches long.
Place the center
of it over the knots in the center front, and
arrange it horizontally. Secure it with tension.
It helps if you place this part of the Owl Pouch
on your board while working.
Attach each cord to it with a Double Half Hitch
working in two directions, ending in the back.
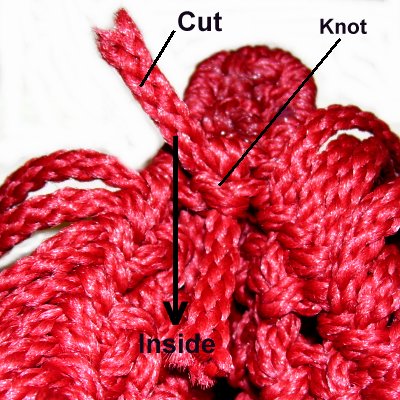
Tie the ends of the holding cord together with an
Overhand knot. Apply glue while tightening.
Trim the ends to 1-inch.
Step
56: Hold the pouch between
your knees to close the bottom.
Match the front and back diagonal edges
first, so it's folded properly.
Start at one side and select one cord from
the front as well as the back. Tie
an Overhand knot. Apply glue and tie
a second knot on top of the first.
Cut the ends
to 1-inch,
and push them to the inside
of the pouch. Then tie tie off the
next two cords.
Work from one edge to the center.
Turn the pouch around and repeat, so the
last knot tied is near the center.
Save the longest
pieces of scrap material.
Finishing Touches for Owl Pouch
Step
57: Locate the two holding
cords you pushed aside, at the bottom of
the large diamond (body of the Owl Pouch).
Pass both cords through the space below
them, to the back. Tie them
together with an Overhand knot.
Apply glue and tie a second knot.
Cut off the excess material when the glue
is dry.
Step 58:
Use a piece of scrap material
at least25 inches long.
Tie an Overhand knot at one end. Pass it
under the cords in an area below
the claws on one side, near the exposed
part of the dowel. Apply glue to hold it in
place.
Attach the end
cap to the dowel, after applying glue. Wrap
the cord around the dowel ,almost all the way to
the edge of the cap. Tie a Double Half Hitch to
hold the wraps in place.
To finish off cord, tie an Overhand knot so it
rests in the back
of the dowel. Apply glue, and cut off the
extra material when it's dry.
Repeat this process with another cord, to cover
the opposite end of the dowel.
Next are the eye feathers for the Owl
Pouch. You will be making 1.5-inch
picot loops onto the 2-inch rings.
Measure accurately.
Step
59:Cut 1 cord,4 yards
long.
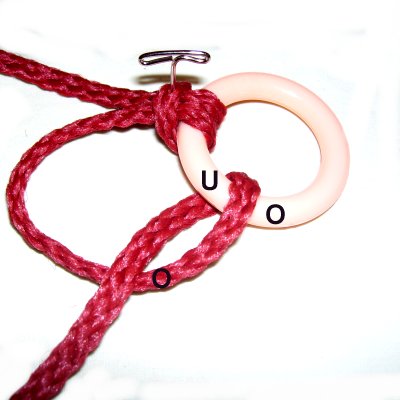
Fold the cord in half and secure it to the
ring with a regular Larks Head knot.
Secure the ring so the knot is on your left, arranged
like the image below.
First
Half of next knot:
Bring one end of the cord over
- under the ring, and over
the cord.
Do
not tighten the knot yet.
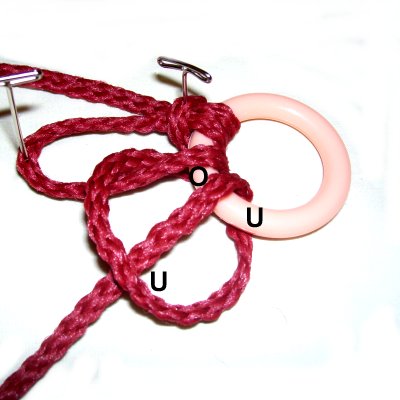
Picot
Loop: Measure 1.5
inches from the edge
of the ring, to the curved part of the
cord.
Secure the cord at that point.
Second
half of knot:
Pass the end under
- over the ring, and under
the cord. Tighten firmly, and slide
the knot next to the first.
Use the same end to repeat the process, covering
1/2 of the ring. Use the
other end to cover the rest.
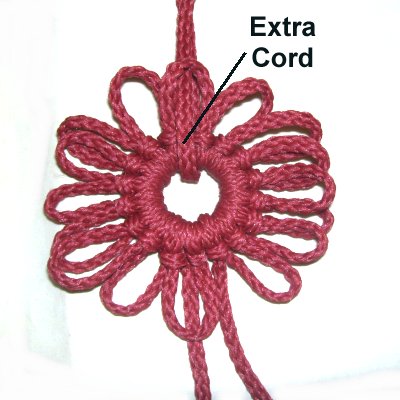
Push two of
the knots aside, on the opposite
side of the ring from where the two ends
come off.
Pass an 8-inch
piece of scrap cord around the ring at
that spot.
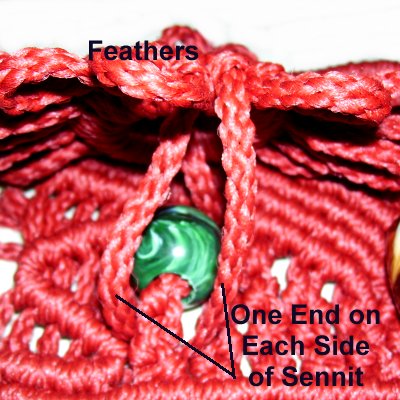
Place the ring
around the eye on the front of
the face.
Pass the ends of the cord used to cover
the ring to the back, positioned on either
side of the sennit below
the bead.
Do the same with the 8-inch scrap cord,
placing the ends on either side of the
sennit above
the bead.
Turn over the Owl Pouch, so you work in the back of the
face. Tie the ends of the cords together
with Overhand knots. Apply glue and cut off
the extra material.
Step 60:Repeat
step 59 to create the second set
of eye feathers.
By
using any text or images on Free Macrame
Patterns, you are agreeing to ourTerms
of Use