Measure around your neck, to the point on your
chest where you want the Owl Pendant to
rest.
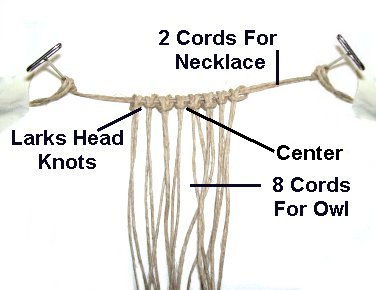
Cut these lengths for the necklace:
For 28 to 36 inches: Cut 2 cords, 4 yards
long
For 37 - 45 inches: Cut 2 cords, 5 yards
long
For 46 inches or more: Cut 2 cords, 6 yards
long
For the Owl pendant, cut 8 cords, each 2
yards long
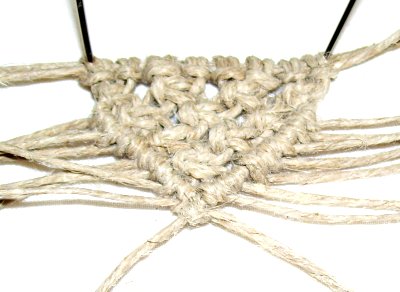
Forehead Area
Step 1: Secure the necklace
cords to your board so you have access
to the center
of them.
Mount the 8 cords for the Owl Pendant
to both
necklace cords, using Larks
Head knots. Place the first two cords at
the center,
and the others on either side.
Design
Tip: A good way to secure slender cords
is to wrap them around the
T-Pins several times.
Apply tape to the pin or project board, to hold
the cord in place.
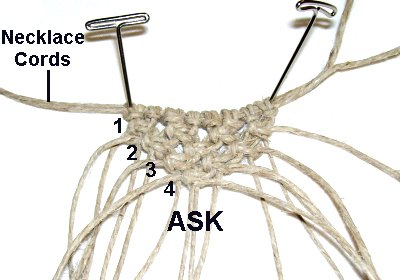
Step 2: Mentally
number the pendant
cords 1 - 16.
To create the forehead area of the Owl
Necklace, tie 4 rows of Square Knots to
form an Alternating V pattern, as
follows:
Row 1: Tie the ASK using cords 1
- 4, 5 - 8, 9 - 12 and 13 - 16.
Row 2: Tie the ASK with cords 3 -
6, 7 - 10, and 11 - 14.
Row 3: Tie the ASK with cords 5 -
8 and 9 - 12.
Row 4: Tie the final ASK using
cords 7 - 10.
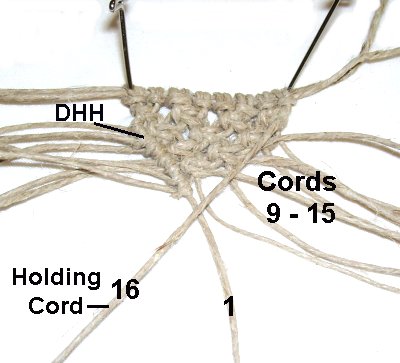
Mentally re-number the cords 1- 16.
Move cord
1 to the right, placing it against
the
left side of the forehead (V
design). Secure it so it's taut.
Attach cords 2 - 8 to it with Double
Half Hitches, rotating counter-clockwise.
Position cord
16 (right) against
the right
side of the forehead. Secure it so it's
taut.
Attach cords 15 - 9 to it with DHH (in
that order), rotating clockwise.
Attach the left
holding cord (1) to the right one (16)
with a DHH.
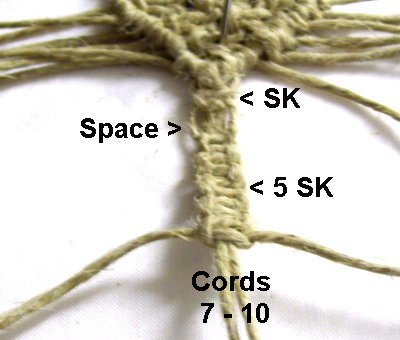
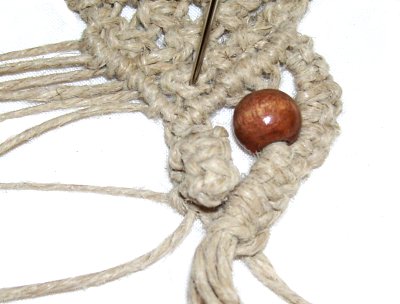
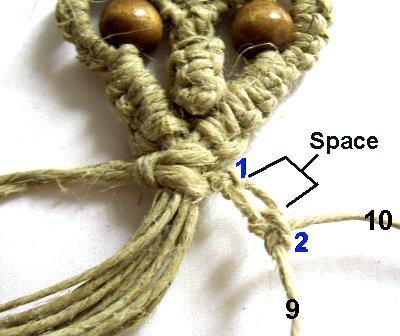
Create the Beak
Step 3: You will now be
creating a Square Knot button to make the beak
for the pendant of the Owl Necklace. Mentally
re-number the cords 1 - 16.
Use cords
7 - 10.
The working cords are 7 and 10. The other two
are the fillers.
Step A: Tie 1 Square
Knot just below the point of the
forehead.
Leave a 1/8-inch
space, and tie 5 more Square
Knots.
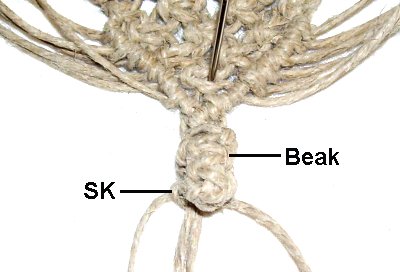
Step B: Pull all 4
ends through the space. There should be
two on each side of the filler cords.
(see
image below)
Pull on the ends to roll the knots,
forming the button shape.
This
image shows the spaces on either side of
the filler cords more clearly.
One working cord and one holding cord will
go into each space, front to back.
Step C:
Tie a tight
Square Knot under the beak, to secure the
four cords.
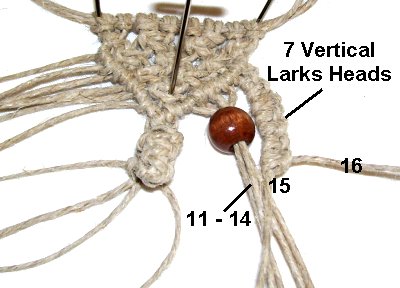
The Face
Step 4:
Now it's time to create the face for the pendant
of your Owl Necklace. Mentally re-number the
cords.
Step A: Slide a medium
bead onto cords 11 - 14.
Push it all the way up, so it rests next to V
shaped design (forehead).
Use cord
16 to tie a sennit of seven (7)
Vertical Larks head knots onto cord
15.
Tie the knots
in a clockwise
direction.
See
instructions below.
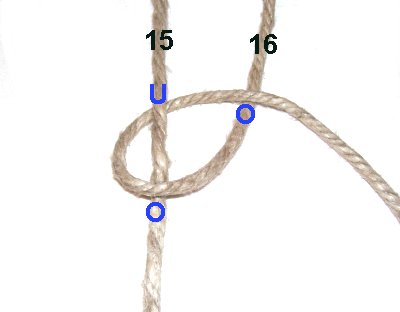
To make the first half of a Vertical
Larks Head knot, you pass the working
cord (16) over,
and then under,
the holding
cord (15).
Bring it overthe working
cord as you pull it right.
For
the second half of the knot, pass the
working cord under
the holding cord, and then overit.
Pass under
the working cord as you pull it right.
Step B: Still using
working cord 16, tie three (3) Vertical
Larks Head knots onto cords 11 - 15.
Tighten these knots firmly, so they
rest just below the bead for the eye.
Step C: Locate the
cords from the beak (7 - 10).
Working cords
9 and 10are usedtogether
to tie two (2) Vertical Larks Head knots
around cords 11 - 16.
This is what the right half of the
owl's face looks like when you are
through.
You need to repeat these steps for the
left half of the face, following the
instructions below:
Step D: Use cord
1 to tie seven (7) Vertical Larks head
knots onto cord 2.
The heads of these knots will face
left. They should be tied counter-clockwise.
Slide a medium
bead onto cords
3 - 6, so it rests next to the forehead
area.
Step E: Use cord
1 to tie three(3) vertical Larks Head knots onto cords
2 - 6. Tighten these knots firmly, so they rest
just below the bead.
Step F: Usecords 7 and 8from the beak together
to tie two (2) vertical Larks Head knots around
cords 1 - 6.
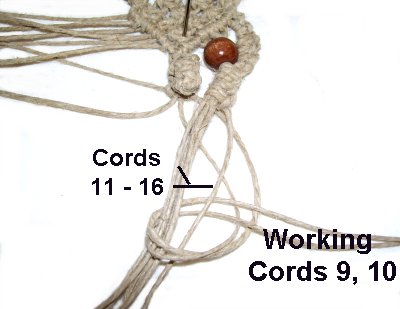
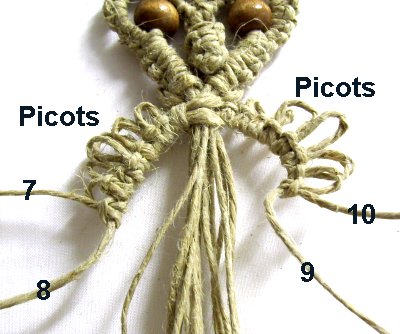
Wings and Body
Step 5: The body and
wings for the Owl Necklace are next.
Organize the cords so that you can
clearly see working cords 7 and 8 on the
left, and 9 and 10 on the right. The
rest should form a bundle
in the center.
Design
Tip: Remember that these four
working cords were the ones that came from the
beak.
You used them to make the last two Larks Head
knots in the face.
Use the 2 working cords together, on
the right and left, to tie a tight
Square Knot around the remaining cords.
Step A: To make the
wings, use cord
10 to tie one Vertical Larks
Head knot onto cord 9.
Rotateclockwise.
Leave a 1/2-inchspace,
and tie another one. Slide this second
knot next to the first, forming a picot
loop.
Step B: Leave a
slightly larger space, and tie the next
knot.
Repeat this until you have a total of
six (6) picot loops.
Step C:Repeat
steps A and B on the left.
Use cord
7 to tie counter-clockwise
knots onto cord 8.
Try to make the picots the same size as the ones
on the right.
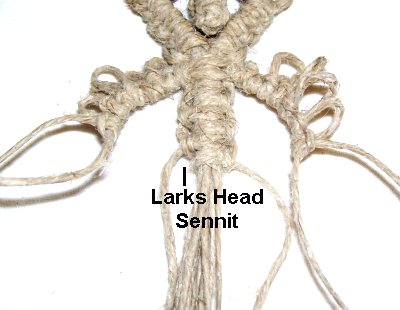
Step 6:
To create the body for your Owl Necklace, select
the two longest
cords from the bundle. There should be one
on each side.
Move the wing designs out of the way for now.
Use the long cord on the left
to tie the first Vertical Larks Head
knot around the
bundleof cords.
The second knot is tied using the long
cord on the right.
Alternate
back and forth between the two cords,
tying 2 more knots with each one.
There should be a total of six (6)
Larks Heads in the sennit when you are
through.
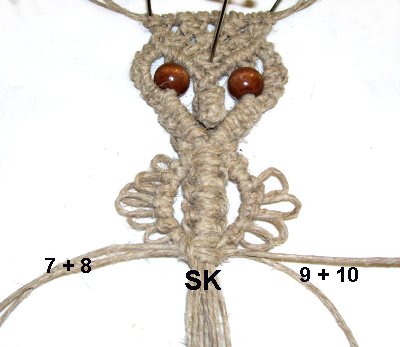
Bring the wings
towards the body so that they
curve outward.
You can dd more knots in the wings if necessary,
to get a good shape.
Use the two
working cords from the wings
(7 + 8 on the left, 9 + 10 on the right).
Tie a tight
Square Knot around all the other cords.
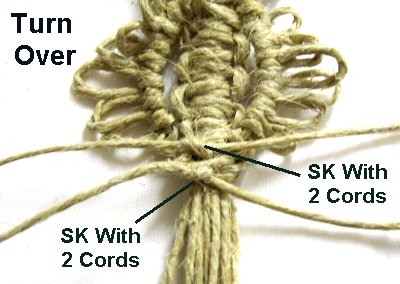
Turn over the pendant for your Owl Necklace, so
you are working in the back.
Combine cord 7 and 10 and tie 2 very
tight Overhand knots.
Do the same with cords 8 and 9.
Apply glue inside the Overhand knots as
you tighten.
When the glue
is dry, cut off the excess material from
the four cords (7 - 10).
Trim the remaining cords to 1.5
inches, forming a fringe.
They should be longer if you plan to add
beads. Apply glue to the tips to
prevent unraveling.
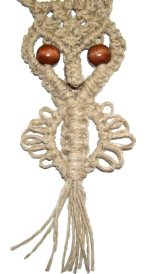
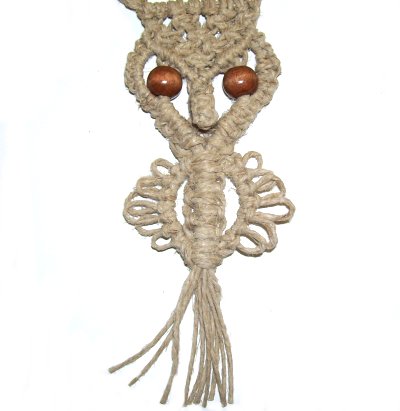
Necklace Portion
The pendant for the
Owl Necklace is now complete.
In the following steps you will be creating the
necklace itself, as well as the clasp.
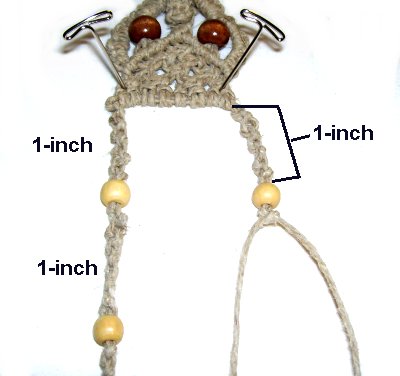
Step 7: Turn over the
Owl necklace so the pendant is
horizontal.
Tie an Alternating Half Hitch sennit,
by selecting one cord to tie the first
knot onto the other.
Switch cords, so that the previous
working cord now holds the next knot.
Alternate back and forth between the
two cords until the sennit measures
approximately 1-inch.
Step 8: Slide bothcords
through asmall
bead, and tie another inch of knots.
Repeat
steps 7 and 8 several times
until the first half of the Owl Necklace
is done.
Step 9:Repeat
steps 7 and 8 to make the necklace on the
other side of the pendant.
Make sure the beads are positioned the same on
each half.
To make the bead clasp for your Owl
necklace, pass the two ends on the right
half through a mediumbead from right to left.
The other two ends should be passed
through the bead from left to right.
Make sure the Owl Necklace fits over your head,
and is balanced.
Pull
on the ends to close the necklace. The bead
should be resting against the
last Alternating Half Hitches you tied.
Move down at
least 2 to 3 inches, and tie
tight Barrel Knots to prevent the ends
from coming out of the clasp.
Use two cords working
together to tie the knots,
rather than individually. Cut off
the excess material.
By
using any text or images on Free Macrame
Patterns, you are agreeing to ourTerms
of Use