Attach both cords to a 1.5-inch ring with
Larks Head knots.
Step 2:
To make the hanger for your Owl Basket, tie an 8-inch
Alternating Half Hitch sennit with the two halves
of one cord, as described below.
Then do the same with the other cord.
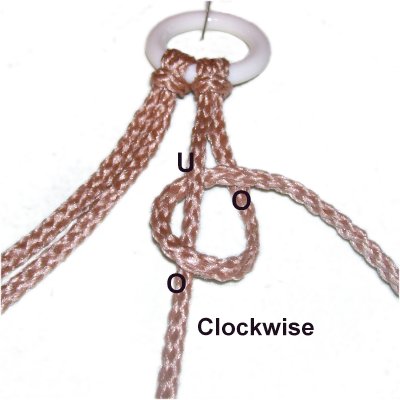
<<
Tie a clockwise
Half Hitch with the right half of the cord
onto
the left half.
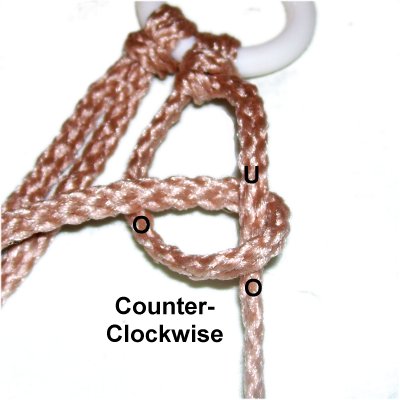
Tie a counter-clockwise
Half Hitch with the left half of the
cord, onto the right half.
>>
Repeat
several times
Step 3:
Prepare the dowel for your Owl Basket by attaching
the 25mm beads at each end. Apply glue if
needed.
Attach both halves of each cord to the dowel with
Double Half Hitches (DHH). Push these knots
against the beads.
Step
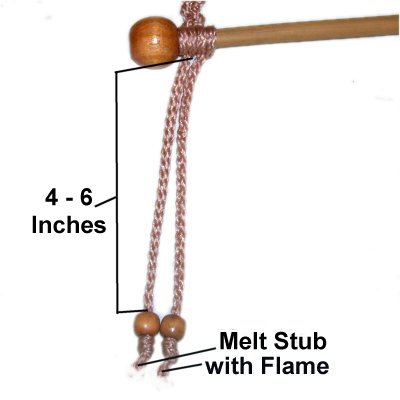
4 (optional): Slide a 12mm
bead onto each cord 4 - 6 inches below the
dowel.
Tie a Barrel knot below the beads, then
cut off the excess material.
When using Bonnie
Braid, leave a 1/8-inch stub,
then melt it with a BBQ lighter flame.
The Forehead
To start the forehead area of your Owl Basket, cut
12 cords, each 4 yards long.
Prepare the cords to prevent unraveling.
Important:
Tighten all the following knots firmly so the rows
are close together.
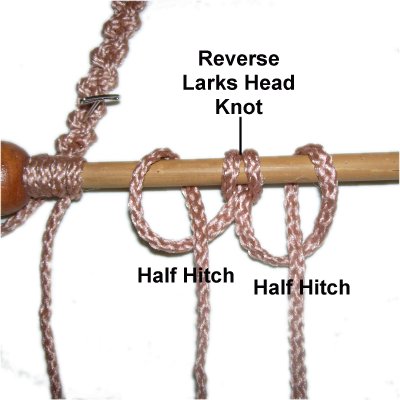
Step
5: Mount one cord to the
dowel with a REVERSE Larks Head
knot.
Then add a Half Hitch with each half of
the cord.
Repeat with the remaining cords.
Push the knots close together so they all
fit on the dowel.
Step
6: The forehead for the Owl
Basket is made with 10 rows of ASK,
dropping cords to form a V shape.
Row 1: Mentally number the
cords. Tie ASK with cords 1 - 4, 5 - 8, 9
- 12, 13 - 16, 17 - 20 and 21 - 24.
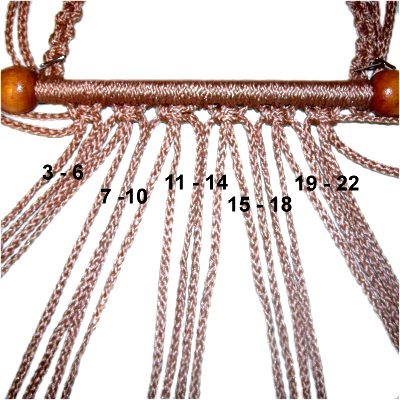
Row
2: Do not use cords 1 - 2
and 23 - 24.
Tie ASK with cords 3 - 6, 7 - 10, 11 - 14,
15 - 18, and 19 - 22.
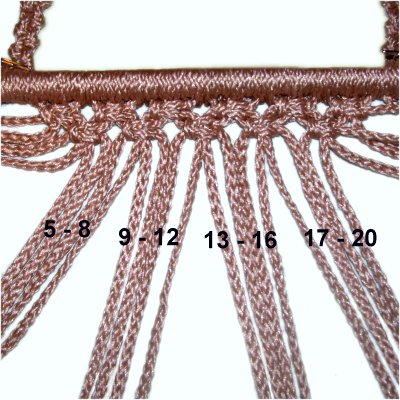
Row
3: Do not use cords 1 - 4 or 21 -
24.
Tie ASK with 5 - 8, 9 - 12, 13 - 16, and
17 - 20.
Row 4:
Tie ASK with cords 7 - 10, 11 - 14, and 15 -
18.
Row 5: Tie ASK with cords 9 - 12
and 13 - 16.
Row 6: Tie the final ASK with cords
11 - 14.
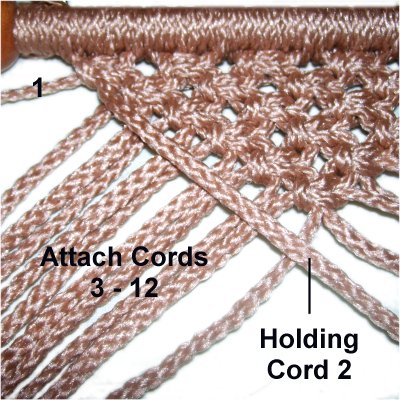
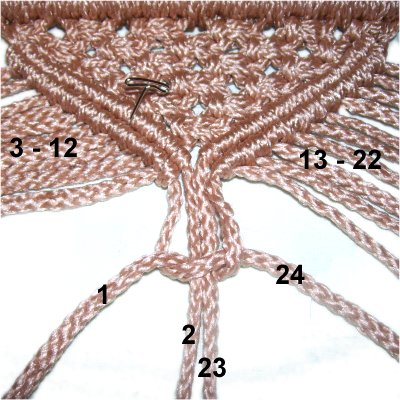
Step
7: Place cord
2 against the left
diagonal edge of the ASK.
It will be a holding cord.
Attach cords 3 - 12 to it with DHH, moving
left to right.
Step
8: Move cord
1 diagonally, next to the
previous row of DHH.
Attach cords 3 - 12 to it with DHH.
Tighten the knots firmly, so the two rows
are touching.
Step 9:
Repeat steps 7 and 8, on the right side
of the Owl Basket, with the following
changes:
Move cord
23 down the right side of the V, as the
first holding cord.
Attach cords 22 - 13 to it with DHH,
in that order.
Cord
24 is the holding cord for the second
row.
Step
10: Tie a Square Knot with
holding cords 1 and 24, around cords 2 and
23 (fillers).
The Face
The face for your Owl Basket is very basic, just
eyes and beak. There are SK sennits on the
outside to make the area more stable.
Most of this area will be covered by the eye
feathers.
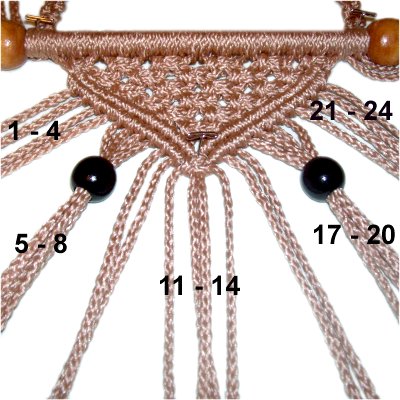
Step
11: Mentally re-number the
cords.
Slide cords 5 - 8 through a black 20mm
bead, and cords 17 - 20 through another
(one cord at a time).
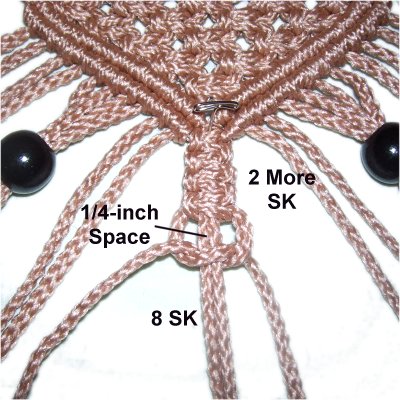
Step 11:
To make the beak for your Owl Basket,
start by tying two more SK with the cords
in the center.
They've
been re-numbered as cords 11 - 14.
Leave
a 1/4-inch
space, then tie 8 more SK.
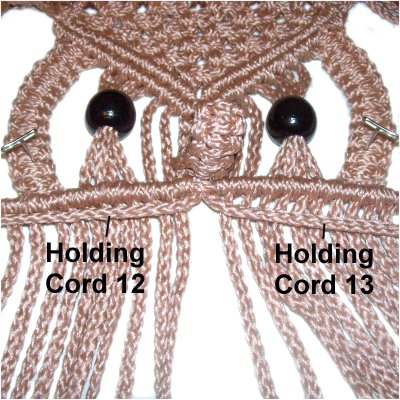
Step
12: In the space you left
are openings to the right and left of the
filler cords, which run through the
center.
Pass cords 13 -14 through the right
opening, and cords 11 - 12 through the left
opening.
Pull the four
cords so the sennit folds backward to form
the beak.
The last knot tied in the sennit should be
touching
the knots near the space.
To complete
the beak for your Owl Basket, tie a Square
Knot with the four cords, so it rests
under the folded sennit.
Step
13: Tie 12
SK with cords 21 - 24, on a
diagonal slant as shown. Push the
knots close together so the sennit is
close to 3 inches. Repeat
with cords 1 - 4.
Measure it to be sure it's exactly
the same length as the first
sennit, so the Owl Basket is symmetrical.
Step 14:
Mentally re-number the cords. Move cord
11 to the left horizontally, and cord
14 to the right, resting on top of the
other cords.
Step
15: Attach cords 10 - 1 to
holding cord 11 with DHH
(in that order).
Attach cords 15 - 24 to holding
cord 14 with DHH.
The sennits made with 1 - 4 and 21 - 24
should be curved.
The DHH should be close together.
Step
16: Move cord 12 left, so
it rests below the DHH you just
tied. Move cord 13 right.
These are the next pair of holding cords.
Attach cords 10 - 1 to holding
cord 12 with DHH.
Attach cords 15 - 24 to holding
cord 13 with DHH.
Body and Wings
Step 17:Cut
24 cords, each 2.5 yards long.
Prepare the cords to prevent unraveling.
Make sure you know how to tie both RIGHT and LEFT
Square Knots.
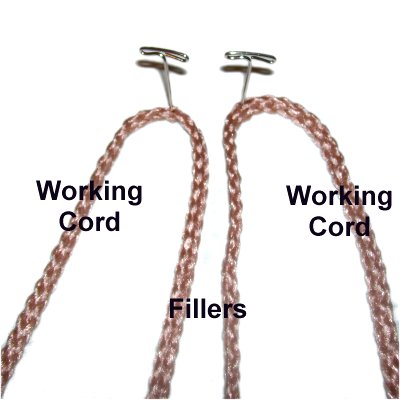
Fold two cords
in half and secure them at the center,
resting side-by-side.
The segments furthest to the left and
right are the working cords. The two
between them are the fillers.
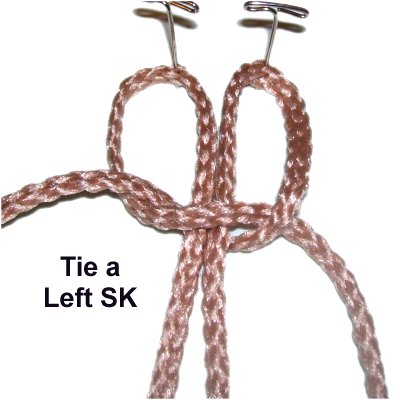
Tie a LEFT SK
using the working cords.
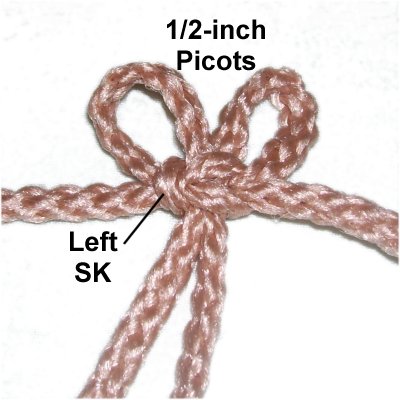
Tighten it so it rests 1/2-inch below the
fold, forming two picots.
<<
Tie 5 more LEFT SK picots, for a
total of 6.
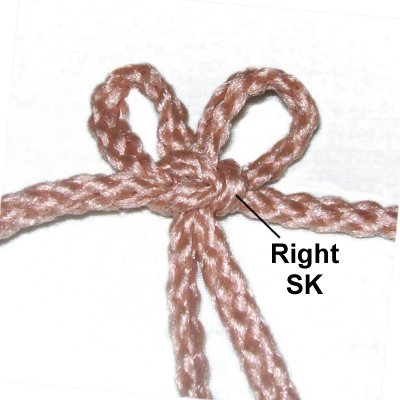
Tie 6 RIGHT SK Picots >>
Make sure each SK is tightened as much as
possible.
Step 18:
Arrange the holding cords from steps 14 - 16
diagonally.
When you attach the picots in the following steps,
make sure the SK rest against the holding cords.
Attach 6 LEFT
SK picots to holding
cord 11with
DHH.
Then attach them to holding
cord 12.
Attach holding cord 11 to holding cord 12.
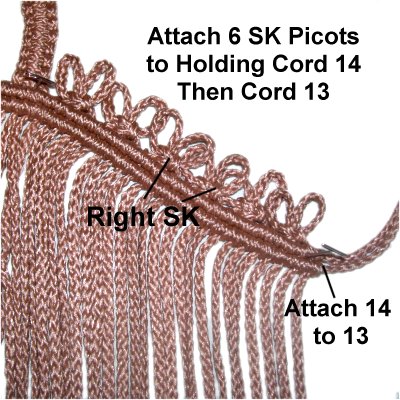
Attach 6 RIGHT
SK picots to holding
cord 14 with DHH.
Then attach them to holding
cord 13.
Attach holding cord 14 to holding cord 13.
Step 19:
The body and wings for your Owl Basket are made in
one piece. There's a diagonal edge on the bottom
of the wings that allows them to fit around the
edge of the basket evenly.
The first and
last 6 cords are not used to tie the SK, so push
them aside.
You will start this portion of the Owl Basket by
attaching the wing/body design to the ring.
The Double Half Hitches are tied so the front of
the knots are facing inward,
and the wings and body wrap around the outside
of the ring.
Tip:
In the front, it's going to feel like you are
making the DHH backward. You should reach
inside the ring to tie the knots.
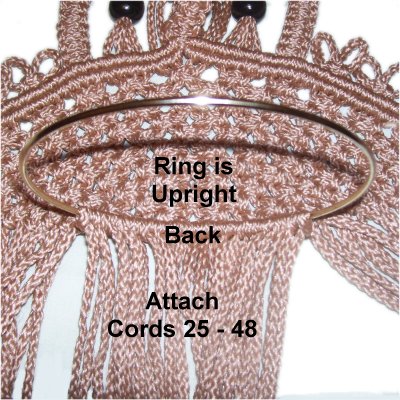
Step 20: Place the 5-inch ring
upright, against the 10th row of ASK in
the body, so cords 25 - 48 are under the back
of it.
Attach the fillers
coming from each SK to the ring with single
Half Hitches.
The working
cords should be attached with Double
Half Hitches.
Step
21: Attach the remaining cords
with Double
Half Hitches, moving from the back towards
the front of the ring, on both
sides. Curve the wings as you
progress.
When you get to the cords in the front of
the Owl Basket, make sure the rows of DHH
in the wings are against
the ring (no gaps).
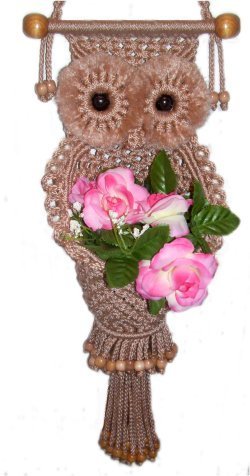
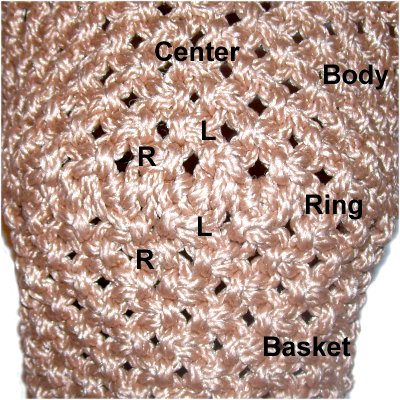
Step 22:
Now it's time to make the basket for your Owl
Basket.
The ASK switch from left to right in the back
center area, as well as the front center
area.
In the back
center area, look closely at the knots in
the body, just above the ring.
The knots in the pot should match those in
the body, 2
rows above the row you are working on.
Place pins to mark where they switch
directions.
R and L = Right and Left ASK
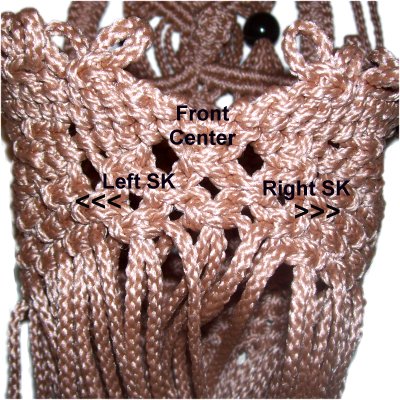
Step
23: Starting in the front, tie
LEFT ASK with the four cords in the
center. They were the last cords you
attached to the ring.
Tie left ASK as you move left. Tie
right ASK as you move right. In the
back, make sure the last few knots match
the ones in the body.
Step 24:
Tie 11 more rows of ASK, working in a circle
(total of 12 rows).
In the final row, make sure the knots are as tight
as possible.
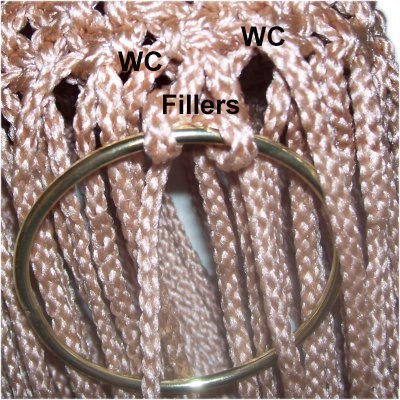
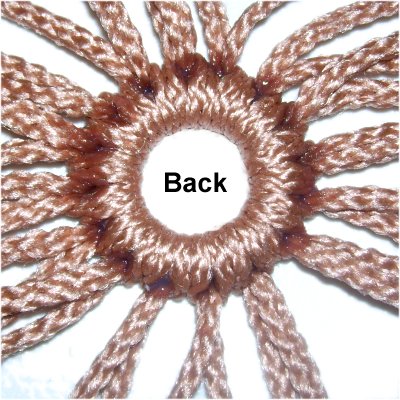
Step 25:
Locate the FILLERS
for each of the ASK in the last row. They
should be the only cords attached to the next
ring.
Pass
each one under
(or through) the ring before you attach it.
Attach each
filler to the 3-inch ring with a DHH. Push
the knots close together as you
progress.
There should be no gap between the ASK and
the ring.
The front of the DHH should be on the outside,
which is the opposite of the first ring.
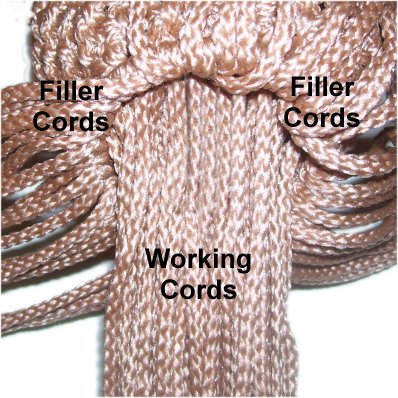
Bring all the
WORKING CORDS through the ring, and move
the fillers off to the side.
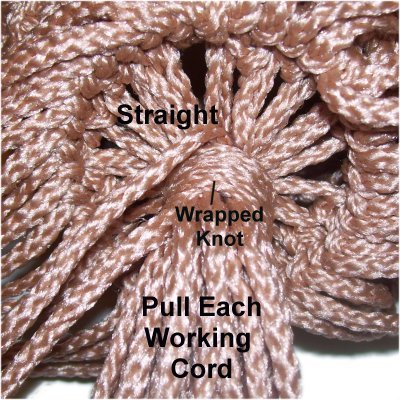
Step
26:
Cut 1 cord, 36 inches long.
Use it to make a 1.5-inch Wrapped Knot
around all the working cords.
After you tighten it, pull each working
cord firmly. They should be straight
and taut in the area above the Wrapped
knot.
Cut and finish off the ends of the cord
used to make the Wrapped Knot.
Eye Feathers and Fringe
Step 27:
You must first create the fringes at the bottom of
the Owl Basket, so you have the scraps to make the
eye feathers.
The upper fringe that comes off the ring (fillers)
should be at
least 3 inches long. The lower
fringe (working cords) should be at
least 6 inches long.
Beaded
Fringe: Place one bead on each cord at
the place you want it to rest. Tie a Barrel
knot below it, and cut off the
excess. For Bonnie Braid, melt
the tip with a flame, so it adheres to the knot.
Brushed Fringe:Cut the cords to the length you want the
fringe. Unravel and brush each fiber and until
smooth.
Step
28: Cut the scraps into 6-inch
pieces.
Attach 16
cords to a 1.5-inch ring with
Larks Head knots. Push them close
together as you progress, and tighten the
knots firmly.
Repeat for the second ring.
Step
29 (Optional): To
discourage the eye feathers from untying,
apply glue to the cords in the back of the
ring.
Allow the glue to dry completely before
moving on.
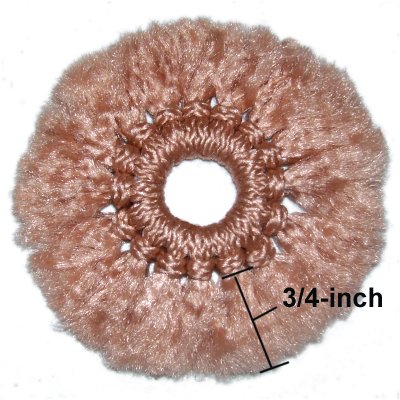
Step
31: Unravel each cord, then
brush every fiber to form the
feathers.
Cut each cord 3/4-inches from the Larks
Head knot.
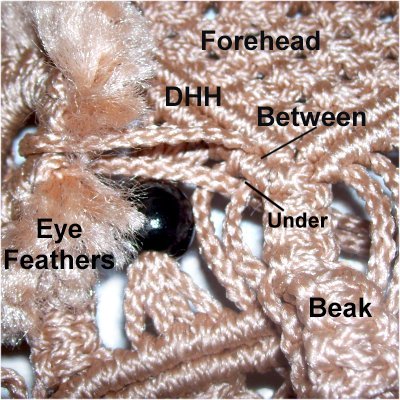
Step 32:
Complete the following step with each set of eye
feathers, to decorate both the left and right eye
of the Owl Basket.
Place a piece of scrap cord around the ring
between two Larks Head knots.
Slide one end
of it through a space between
the two rows of DHH on the forehead (front
to back).
Bring the other end directly to the back
of the face, passing under
the DHH (not between).
Make sure the eye feathers fit properly around
the black eye beads.
Tie a Barrel knot with the two ends of the cord,
so it rests in the back
of the Owl Basket.
The ring needs to be secured on the opposite side,
to the SK sennit.
So place another scrap cord around it, squeezing
it in between two Larks Head knots.
Use tweezers to work one end of it through
the SK sennit. The best place is
between two knots.
Make sure the eye feathers still fit
properly, then tie the two ends together
with a Barrel Knot, in the back.
Finish off the cords used to attach the
eyes. Melt the tips if using Bonnie Braid.
The Owl Basket can now be hung from the ring at
the top of the hanger.
Some areas may rest flat against the wall, but
don't expect all of it to do so, unless you secure
it with nails or screws.
By
using any text or images on Free Macrame
Patterns, you are agreeing to ourTerms
of Use