Description:
The Holiday Candle design is
based on the traditional celebration of
Christmas.
The white
candle is symbolic of the purity and light
of Christ.
The evergreenwreath
reminds us that God's love is
eternal. The red
berries on the wreath represent
birth.
And the three gold
flowers are symbolic of the treasures that
await us in heaven.
I strongly recommend that you use the materials
described below.
Yarn is
the best material for the wreath,
and Olefin cord is perfect for the candle (Bonnie
Braid). The flowers are made with lace and
nylon cord (Amy Braid).
This holiday project is rated easy, but you should
practice tying Square
Knotsbefore you get
started.
Creating the wreath is time
consuming, and will take several hours to
make.
The Holiday Candle features a Crown Knot design,
which is described in the images below.
Cut 4 cords of the 6
mmwhite
material, each 72
inches long. Prepare the tips
to prevent unraveling.
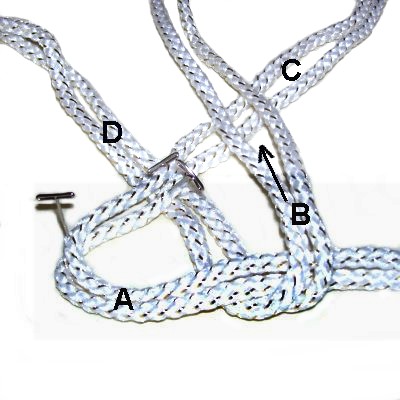
Arrange the cords to form an X shape as shown in
the images below. Secure them at the
center. Mentally label the four segments A -
D.
The two cords in
each segment work together.
Step
1: Fold both cords labeled
segment
A to the right
so they are resting on top of segment
B.
Secure the
curved area to mark that space.
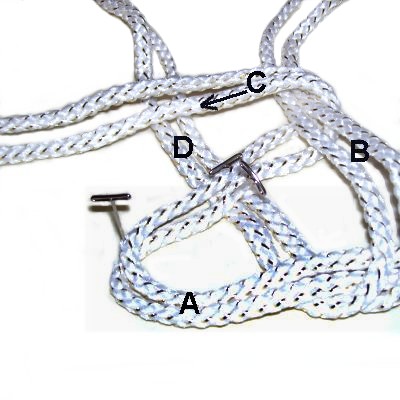
Fold segment
Bbackwardso they are vertical and resting on
top of segment C.
Fold the cords
labeled segment
C to the left
so they are resting on top of
segment D.
Fold segment
Dforward
toward segment A.
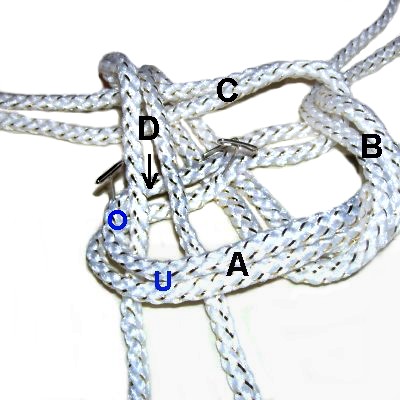
Pass over
- under the curved area of
segment A.
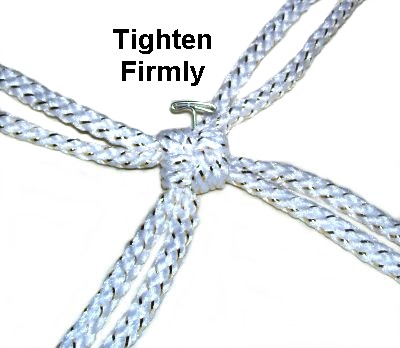
Tighten the
first knot as much as you can by pulling
on each segment gradually until
firm.
Make sure the two cords remain
side-by-side and are neatly arranged.
Secure the knot to your board by placing
the pin on the outside
edge (on an angle if necessary).
Step 2: Repeat step 1
several times until the Holiday Candle measures six inches.
The knots will stack
on top of each other as you progress.
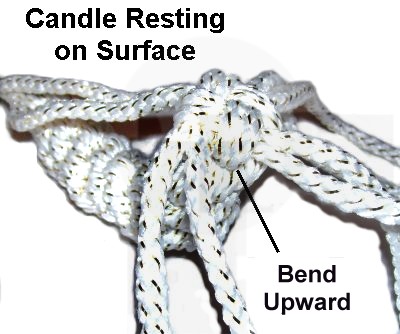
You will
eventually need to place the candle on
it's side. When that time comes,
just bend the area where you are working
upward.
Important:
Apply glue to the last Crown knot, then
tie another one on top of the glue.
Let it dry before moving on.
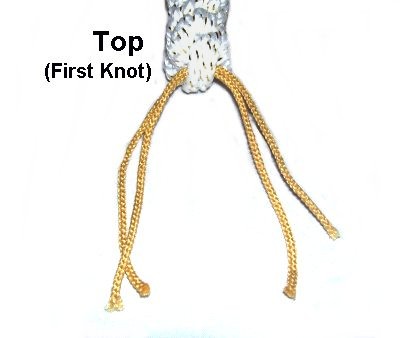
Step
3: Go back to the top
of the Holiday Candle where you tied the
first Crown knot.
Cut 2
pieces of gold
material,
each 10
inches long.
Work them through the crossed area with
tweezers or pliers. Match the ends
so they are centered.
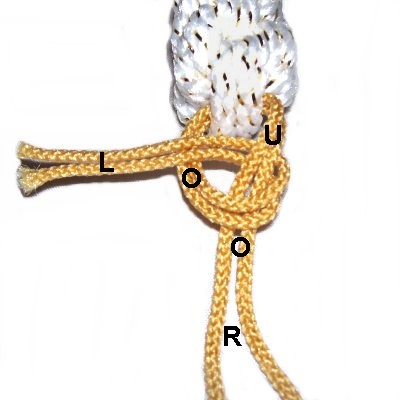
Tie a Half
Hitch with the left
half of the cords, passing over
- under the right half in a counter-clockwise
direction.
As you pull them to the left, pass over
the cords you are holding to complete the
loop.
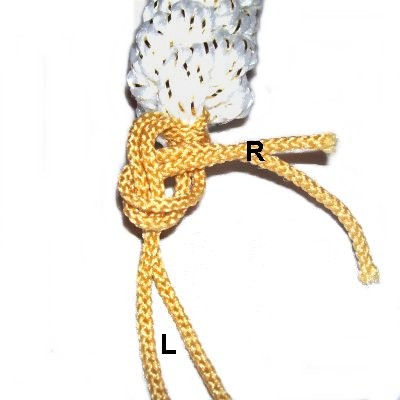
Tie another
Half Hitch with the righthalf
of the cords onto the left,movingin a clockwise
direction.
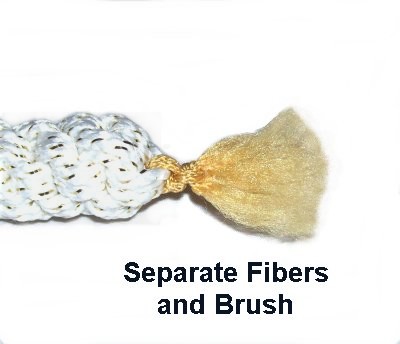
Separate the
fibers from each end of the gold cords,
then brush
until the flame is soft and fluffy.
Trim the "flame" as needed.
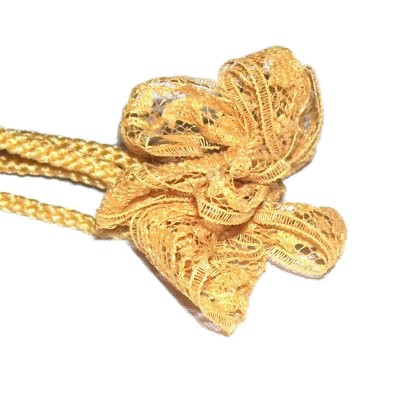
Gold Flowers
The three gold flowers
for the Holiday Candle are optional.
You can skip this step if you prefer to
use something else to decorate the base of the
candle.
Cut 6 pieces of 2
mm gold cord
material, each 12 incheslong.
Cut 3 pieces of gold
LACE, each 30
inches long.
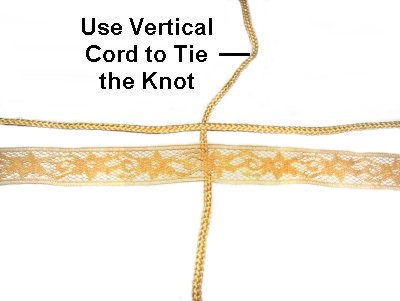
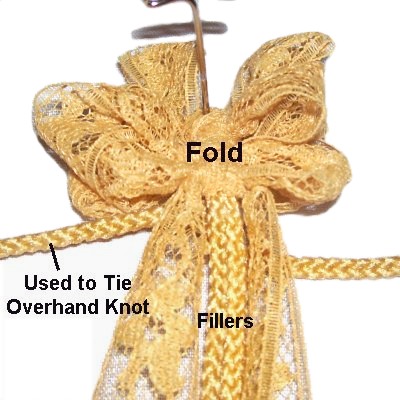
Step
4: Arrange one CORD
vertically.
Place another CORD
on top of it, along with one piece of LACE.They should be horizontal.
Make sure center
of all three cords match up.
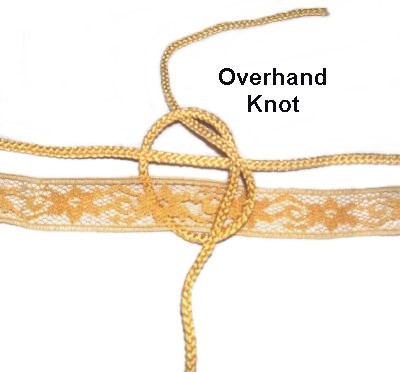
Tie an
Overhand knot with the vertical
cord, so it passes
around the horizontal cord and lace.
Make sure the knot is at the center,
then tighten it firmly.
Arrange the
two halves of the vertical
cord heading backward.
Positionthe two horizontal
cords forward
vertically, with the lace on either side.
The gold
CORDS will be the fillers
for the Square Knots below, which are tied
with the LACE.
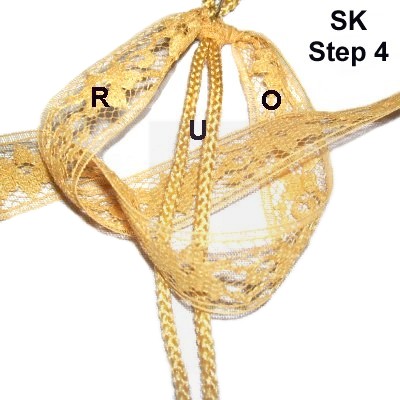
Step 4: The
instructions below show you the four steps for
tying all the Square Knots in the entire Holiday
Candle design (flowers and wreath).
To make the flowers you will be tying the knots
with LACE,
which is challenging. Practice the Square
Knot if you are unfamiliar with it, before
making these flowers.
Designer's
Tip: Don't worry about keeping the lace
flat. The end result is the same if it's folded in
some areas.
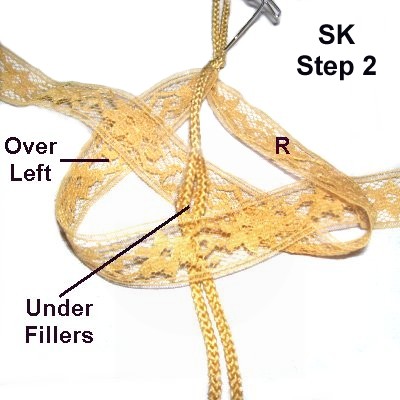
Fold the left
half of the LACE
to the right, resting over
the fillers and under
the right half.
Fold the righthalf
of the lace to the left, passing it under
the fillers and over
the left half (near the curve).
Tighten the first half of the SK
completely.
The two halves
of the lace have switched
places, so the direction you tie
the second part of the knot is the
opposite of the first part.
Move the lefthalf
of the lace to the left,
passing it over
the fillers and under
the right halfof the lace.
Move the righthalf
of the lace to the right,
passing it under
the fillers and over
the left half of the lace.
Tighten completely.
Step 5: The
next set of instructions show you how to make the
petals of the flowers. They are still Square
knots, but with picot loops.
The evergreen
wreath for the Holiday Candle is made
with this technique as well.
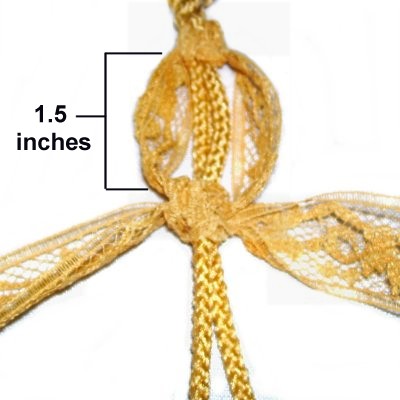
Repeat
step 4, tying the next Square
Knot with the lace.
Tighten it so it rests 1.5
inches from the first knot.
Hold the
fillers cords steady while you push the
second SK backwards to rest next to the
first one.
Two picot loops form on each side.
Manipulate the lace so they are as neat as
possible.
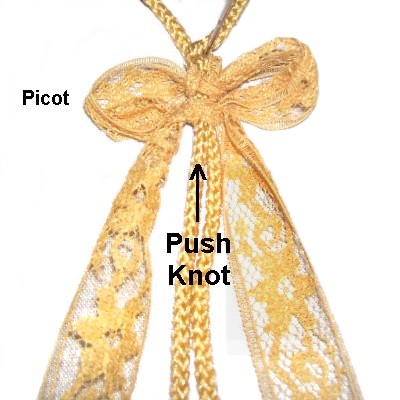
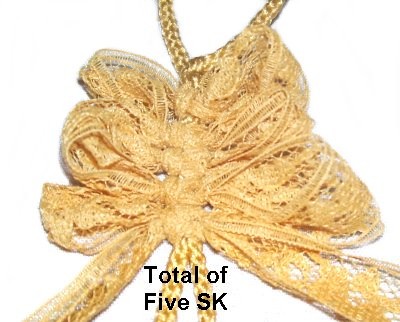
Step
6: Repeat
steps 4 and 5three
times, tying a total of four Square Knot
Picots.
Apply glue to the last SK you tie just
before tightening it.
Step 7:Fold
the picot designs in half so both halves
of the cords
are all heading forward.
Two will rest under
the lace.
Position the two cords on the bottomhorizontally.
They will be
used to tie the next knot.
Tie an
Overhand knot with the two bottom cords
that are arranged horizontally, passing
them around the other half of the cords
and the lace.
Apply glue and cut off the excess LACE
when it's dry.
Do
not cut the cords.
Step 8
: Repeat
steps 4 - 7 to create two more
gold flowers for your Holiday Candle (total of
three). You can make a fourth one if
you wish (optional).
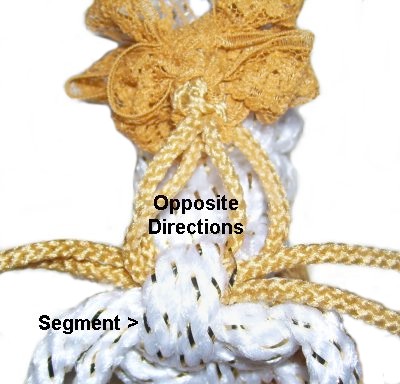
Place the Holiday Candle in front of you and
locate one
segment of the Crown Knot near the
BOTTOM.
Step
9: Use your tweezers or pliers to
pass the 4
gold cords from the flower under
theCrown
Knot segment in opposite
directions.
Arrange the candle so you are looking at
the bottom
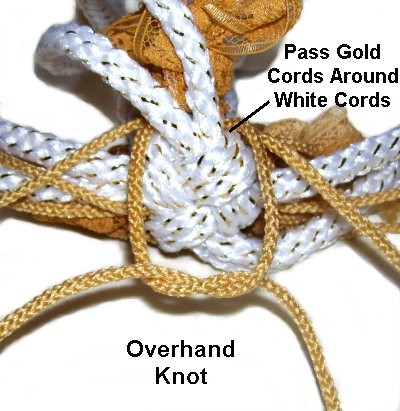
of the last Crown knot.
Pass 2
gold
cords around the two
white cords closest to them.
Tie 2
tight Overhand knots with the goldcords.
Apply glue before tightening the second
one.
Repeat with the other two gold cords.
Step 10:
Repeat step 9
to attach the other two gold flowers to the
candle.
Try to space them evenly around the candle even if
you need to attach them to it differently than
described in step 9.
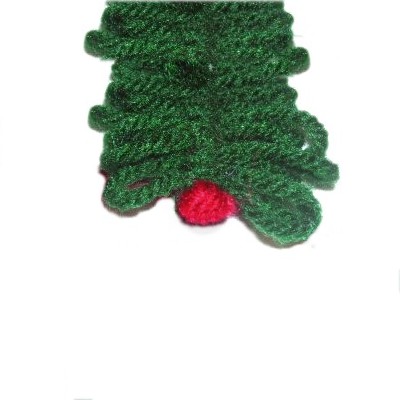
The Wreath
Step 11:
The evergreen wreath decorates the bottom of the
Holiday Candle. It's made with Square Knot
picots, similar to what you did with the lace for
the flowers.
Don't
cut the yarn ahead of time. It's
best to cut as you mount each cord to the ring,
since the number will depend on the thickness of
the material.
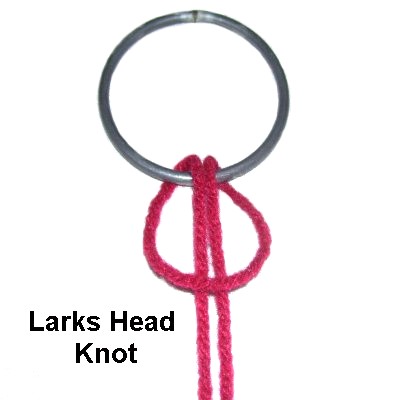
Cut a 24-inch
piece of red
yarn.
Fold it in half and place it under
the ring with the fold forward.
Bring both halves over
the ring and under
the folded area. Tighten the Larks Head
knot firmly.
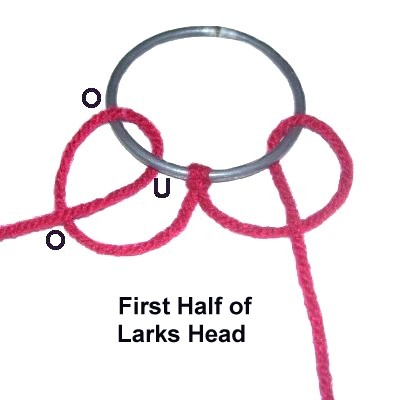
Tie
two Larks Head knots next to the
first.
You make the first half of the knot by
moving each half of the yarn over
- under the ring and over
the yarn.
Rotate clockwise
on the left and counter-clockwise
on the right.
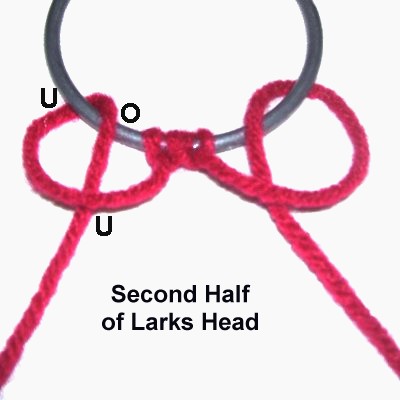
To make the
second half, bring each half of the yarn under
- over the ring and under
the yarn.
Step 12:Repeat
step 11, mounting more pieces of red
yarn to the ring until it is completely
covered.
You will probably need at least 15 to 20 pieces.
Step 13:
Now you will attach the green
yarn to the red ones to make the
wreath.
Don't
cut these ahead of time either.
Cut
one 90-inch
piece of green
yarn.
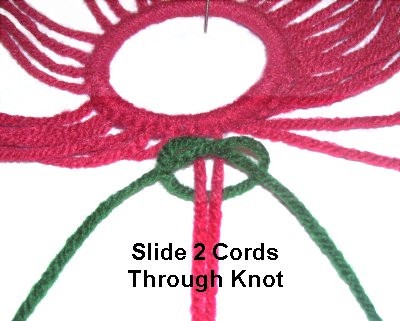
Tie an Overhand knot in the center
of it, but don't tighten.
Slide two pieces of red
yarn coming from the ring through
the knot. Push the knot close to the
ringand
tighten it firmly.
Step
14:
Tie a Square knot with the green
yarn. The two halves of the
red yarn are the fillers.
Place it 1.5
to 2.5 inches from the
Overhand knot.
Push the knot towards the ring, so it
rests against the Overhand knot. This will
form the picots.
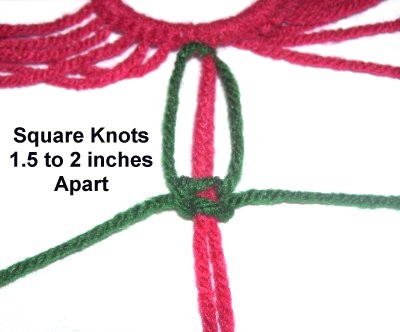
Step 15:
Repeat step 14
several times to make more picot loops with the greenyarn.
Stop when the two halves are around 4
inches long. The picots for the wreath of the Holiday
Candle should NOT
be the same size. The spacing between the SK
should change each time you make one.
Designer's
Tip: The design looks great if you
alternate sizesby
starting out wide (2.5 inches) and narrowing as
you progress.
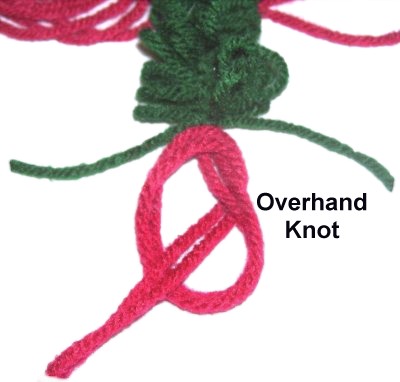
Step
16: Tie the two halves of
the red
yarn together with a single
Overhand knot as shown.
This will form the red berry at the tips
of the wreath.
Tighten it completely, but keep it a
little loose so it's not too small.
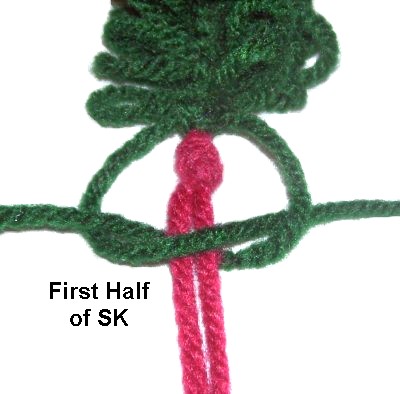
Tie the first
half of a Square Knot with the green
yarn, so it rests in
front of the Overhand knot.
Tighten it slightly and then pull on the
berry so it stands up.
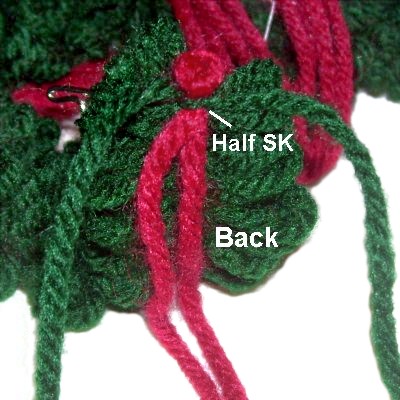
Bend the red
yarn to the back
of the picot design.
The half Square Knot you just tied should
also rest in the back.
Pull on the berry so it's as visible as
you can make it (see next image).
Step
17: To finish off the 2
pieces of green
yarn, tie a tight
Overhand knot using both of them, so it
rests on top of the half SK in the BACK of
the design.
Apply glue, then cut off the excess
material close to the knot (both green and
red yarn) when it's dry.
Step 18: Repeat steps 13 - 17,
creating one picot design with the green
yarn on each
pair of the red
yarn pieces mounted to the ring.
Time
Consuming: Be prepared to spend
several hours completing the wreath for your
Holiday Candle.
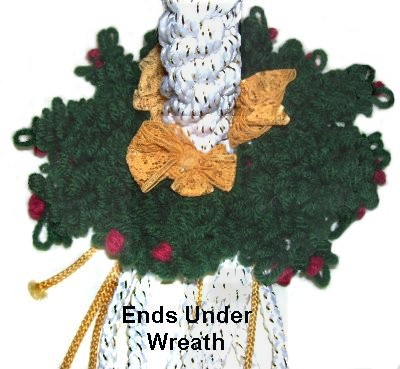
Finishing Touches
Slide the
candle through the ring from
the bottom up.
Make sure the ends of the white cords
remain under
the wreath. The flowers
should be above it.
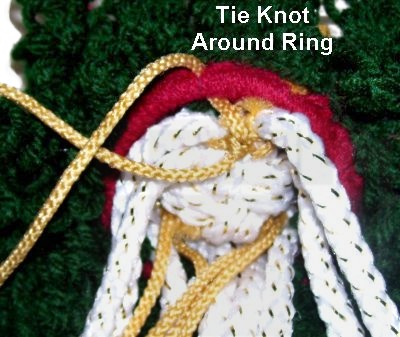
Turn the design upside down or on it's
side.
Select two gold
cords close to each other.
Bring one around the ring.
Use the two cords to tie a tight Overhand
knot. Apply glue and tie a second
knot.
Repeat this step with the other sets of
gold cords.
Finishing
Option #1: You can stop here and
cut off the excess material after applying glue to
the last Crown knot (no fringe).
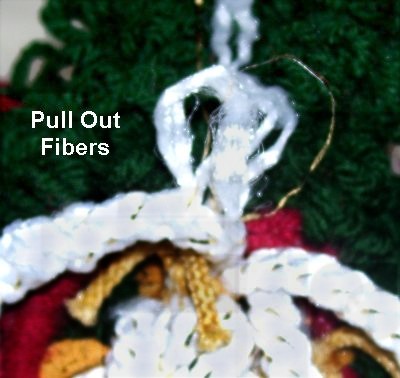
Finishing Option
#2: Follow the instructions below
to make a soft white fringe for your Holiday
Candle.
Unravel each
white cord by pulling out individual
fibers.
Do this near
the ring rather than at
the tip of the cord. Once three or
more fibers are free, the rest will
unravel more easily.
Add
extra white cords to thicken the
fringe and fill in gaps by sliding them
under portions of the Crown knots near the
bottom of the Holiday Candle.
Brush all the unraveled fibers
individually until soft and
fluffy.
Trim the fringe to make a circle around
the evergreen wreath.
By
using any text or images on Free Macrame
Patterns, you are agreeing to ourTerms
of Use