|
|
| |
|
|
Description:
The Crown Knot is frequently found in
Macrame patterns, especially at the top of
plant hanger designs.
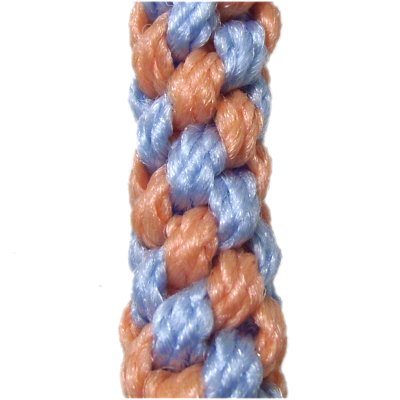
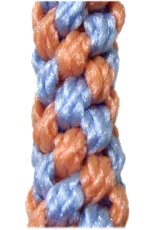
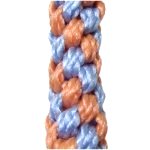
This decorative knot is primarily used to
form sennits that make beautiful woven
patterns, like this Spiral design shown
here.
They are easy to make, and can be used for
jewelry, pet collars, belts, animal
designs, holiday ornaments, and much
more.
|
|
|
|
On
this page are three different designs, all
based on the single Crown Knot, which is
described first. Beginners should
practice all the designs on this page.
|
| |
|
|
|

|
|
Single Knot
|
|

|
|
You need two cords, at least 18 inches long, to
practice making a single
Crown Knot.
In some Macrame projects, you will secure the
cords to a board. That's the easiest way to make
them, which is why you should use a board when
practicing.
In other projects, you may be asked to make them
with the cords coming from other knots. This
occurs often with plant hanger designs, where
these knots are placed close to the top of the
design.
In that case, the best way to tie them is by
holding the cords between your knees upside
down. The cords are not crossed, so
you would skip step 1.
|
|
|
|
|
|
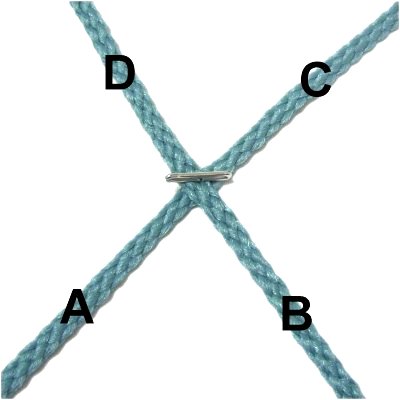
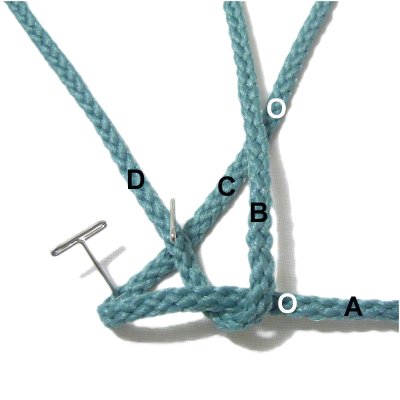
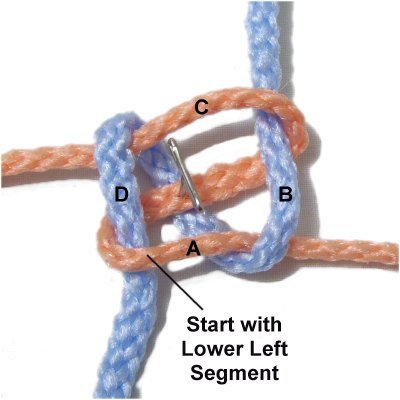
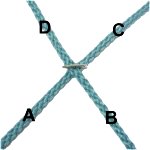
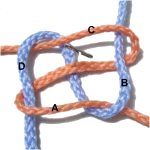
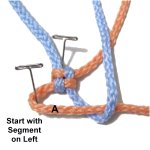
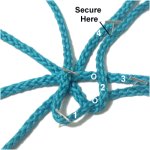
Step
1: Match the centers of the two
cords.
Arrange them in an X shape, and secure
them at the center.
Mentally label the four segments as shown,
starting with the one on the lower left.
|
|
|
|

|
|
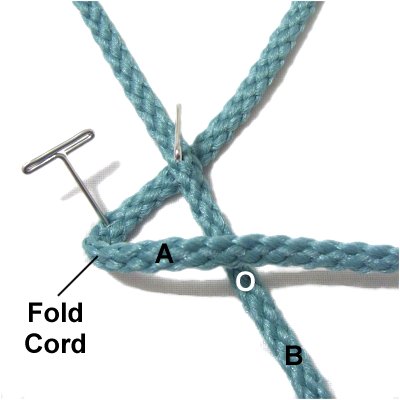
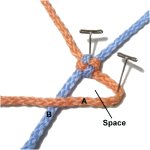
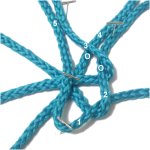
Step
2: Fold Segment
A to the right, arranged
horizontally, passing over
Segment B.
Leave some space at the corner and secure
it with a pin.
See
information below |
|
|
|
Designer's
Tip: When you fold a cord, you
don't just make a curve. You turn the cord upside
down after the corner is made.
The bottom surface that was touching the board
will be face up when you are through.
This will make more sense when you see the
following images, where the folding is more
obvious. Be sure to click on the small
images to view the large ones, so you can see the
details better. |
|
|
|

|
|
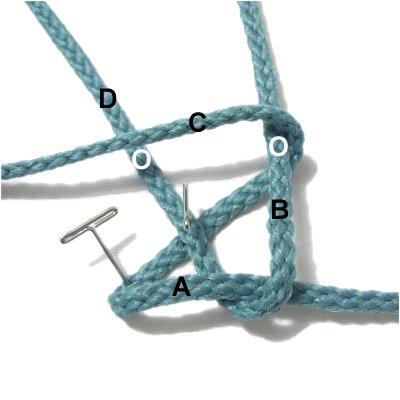
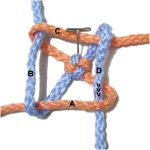
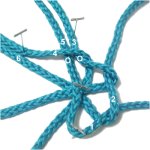
Step
3: Fold Segment
B vertically, passing over
Segments A and C.
It helps if you secure each cord after you
fold it.
|
|
|
|

|
|
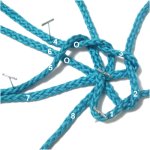
Step
4: Fold Segment
C to the left, passing over
Segments B and D.
|
|
|
|

|
|
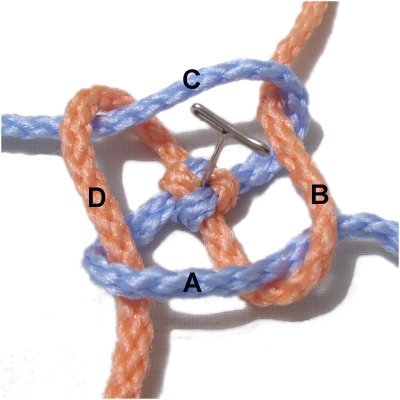
Step
5: Fold Segment D forward
(towards you), passing over
Segment C.
Pass it through the space at the corner of
Segment A, over
- under the two parts.
|
|
|
|
|
|
Step
6: Tighten the Crown Knot
slowly, one segment at a time.
Don't remove the pin in the center until
it's almost completely tightened.
|
|
|
|
|
|
|
|
Spiral Design
|
|
|
|
The Spiral Design is the most common type of
Crown Knot sennit you will find in Macrame
projects. You will be able to see the
diagonal progression of the knots if you use two
colors.
Below are two projects you can make to help you
master this knot. Click on the links or images to
view the page described: |
| |

|
|
The
Serpent is an easy project
featuring the Spiral design. |
|
| |
| |
|
|
|
|
|
|
Preparation:
You need two cords, at least 36 inches long (to
practice).
In a Macrame project, the cords need to be 12 x
the length you are trying to make. So for a
6-inch sennit, you need at least 72 inches of
material. |
|
| |
| |
|
|
Step
1: Repeat
steps 1 - 5 from the instructions
for the single knot. |
|
| |
| |

|
|
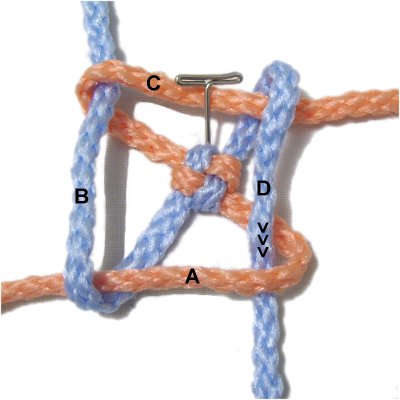
Step
2: Repeat
step 6 as well, tightening the
first knot.
Take note of where the four segments are
arranged now. They are vertical and
horizontal, with Segment A on the right.
|
|
| |
|
|
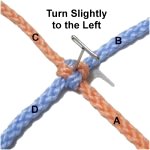
Step
3: Turn the knot slightly
to the left, so the four segments are diagonal
again.
Segment D is on the lower left, which is
ALWAYS where you start each knot. So
you begin with a different color this
time, if you are using two. |
|
| |
|
| |
|
|
Step
4: Mentally re-label the
segments where they are positioned
now.
Repeat
steps 1 - 5 from the single knot
instructions. Remember to move counter-clockwise,
starting with the segment on the lower
left.
|
|
| |
|
| |
|
|
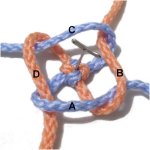
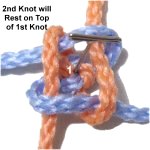
Step
5: When you tighten the
second Crown Knot, it will rest on
top of the first knot, which is
labeled with a (1) in this image. |
|
| |
|
| |

|
|
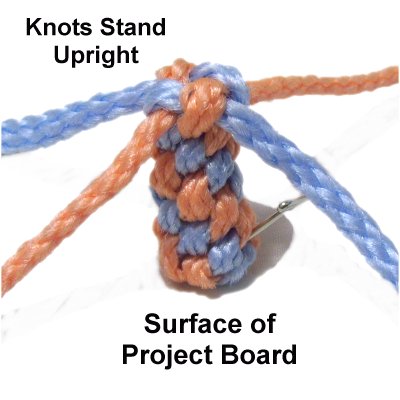
Step
6: Repeat
steps 1 - 6 several more times.
The knots will stack on top of each
other, so the sennit will be standing
upright.
Remember to always start each knot with
the segment on the lower
left.
|
|
| |
|
|
|
|
The colors
will alternate to form the Spiral design
as long as you continue to move counter-clockwise.
When using one color, the spiral pattern
won't be as obvious, but it will still
look interesting.
|
|
| |
|
|
|
|
Vertical Design
|
| |
|
|
|
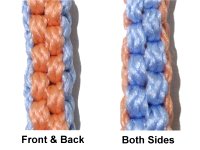
Description:
This unique Crown Knot sennit results in knots
arranged vertically on four flat surfaces.
So this sennit will be rectangular rather than
round.
The front and back will be one color and the sides
will be the other color. I recommend you use
two colors when practicing, so you can clearly see
the design.
|
|
|
|

|
|
The Candy Cane
Decoration is a fun project
you can make to master this Vertical
Design.
Click on the image or link to view the
page. |
|
|
|
|
|
Preparation:
To
practice, you need two cords, at least 36 inches
long. In a Macrame project, you need 12 x
the finished length you are trying to make.
Arrange the cords in an X shape, secured in the
center.
Mark the segment on the lower
left with a piece of tape, and mentally
label it segment
A.
Mentally label the other segments in a counter-clockwise
direction. |
|
|
|

|
|
Step
1: Make the first Crown
Knot as described in the instructions for
the single knot.
Make sure you start with the marked
segment (A).
|
|
|
|

|
|
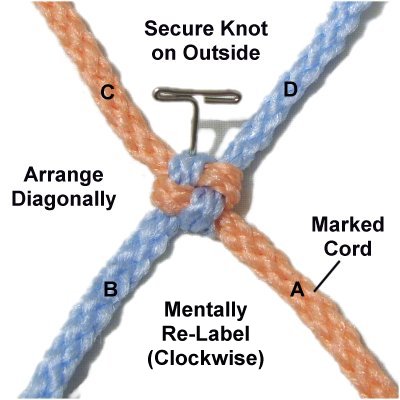
Step
2: After you tighten the
first knot, turn it just a little, so the
cords form an X shape again
(diagonal). Secure the knot on the outside
rather than the center.
The marked cord is now on the lower right,
and it is still labeled A. Mentally
re-label the other segments, moving clockwise.
|
|
|
|
Designer's
Tip: This type of Crown Knot will
not work if the knots are moved too much.
The marked cord must ALWAYS remain in the lower
left or lower right position.
Placing the pin on the outside will help keep it
in place, but you will need to move the knot
slightly, since the cords should always start out
diagonal.
|
|
|
|
|
|
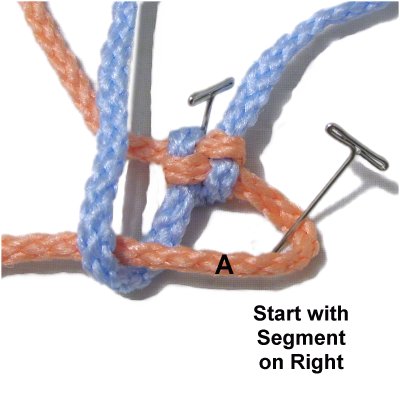
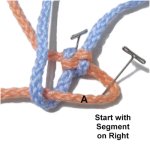
Step
3: Start the second knot by
folding the marked segment (A) to the
left, over segment B.
Remember to leave a space. |
|
|
|
|
|
Step
4: Complete the second knot
as follows, moving in a clockwise
direction:
- Fold segment B over segments A and
C.
- Fold segment C over segments B and
D.
- Fold segment D over C, then through
the space made by segment A.
|
|
|
|
|
|
Step
5: Mentally re-label the
cords, starting with the marked cord on
the lower left (A) and moving counter-clockwise.
Repeat
step 1 to tie the third
Crown Knot.
All the odd numbered knots are tied
counter-clockwise. (3, 5, 7, 9, etc.)
|
|
|
|
|
|
Step
6: Repeat
steps 2 - 4, tying the fourth
knot in a clockwise
direction.
All the even numbered knots are tied
clockwise (4, 6, 8, 10, etc.)
|
|
|
|
Step 7:
Repeat
steps 5 and 6 several times, until the
Crown Knot is the size you want to make.
|
|
|
|
|
|
|
Crown Circle
|
|
|
|
|
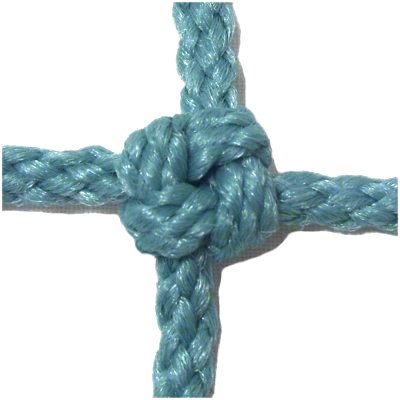
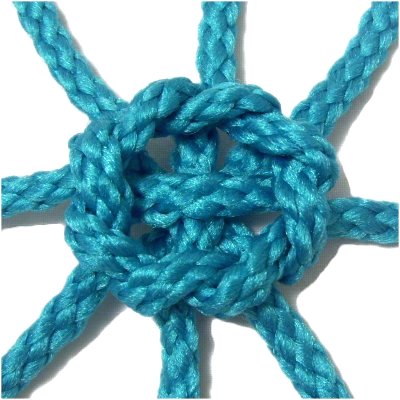
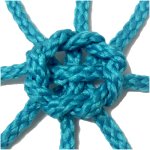
Description:
A single Crown Knot can be tied with multiple
cords to form a circular shape.
It's a great technique to use in the center of a
Macrame design where you need attachment points
for other cords. A flower can be made using
this technique.
It doesn't work out well with material less than
4mm thick. In the example shown, 6mm size
Bonnie Braid (Olefin) was used to make the Crown
Circle.
|
|
|
|
Preparation:
To practice, you need 4 cords, each at least 20
inches long.
In a Macrame project, increase the cord lengths by
12 inches if you plan to use this knot. |
|
|
|
|
|
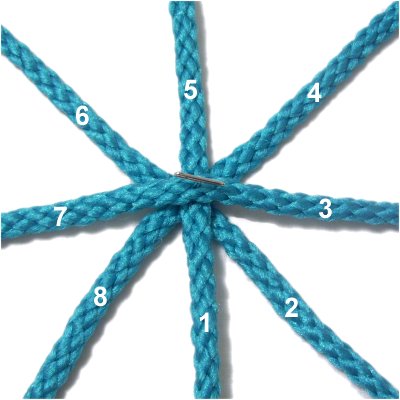
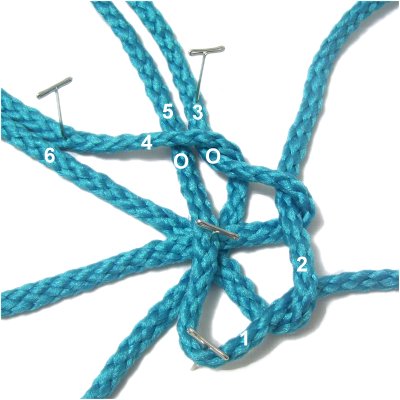
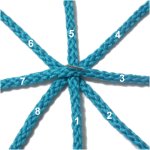
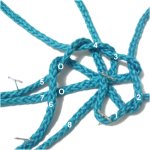
Step
1: Arrange two cords
diagonally, one vertically, and one
horizontally. Match the centers and
secure them with one pin.
Mentally number the segments 1 - 8 as
shown. |
|
| |
| |
Designer's
Tip: You can secure the center of the
cords to your board when practicing.
In a Macrame project, it's helpful if you tie a
knot with one cord around the others, so it has a
firmer base. |
| |
| |
| |

|
|
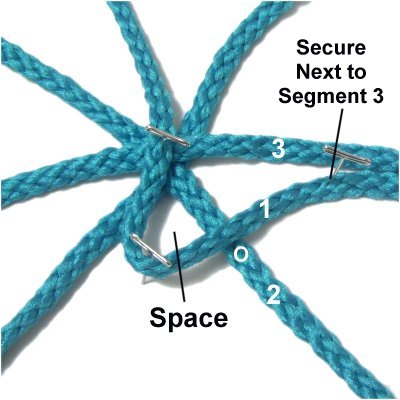
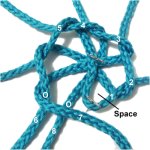
Step
2: Fold segment
1 over segment 2, leaving a space
at the corner.
Secure it next
to segment
3, and do not allow it to rest on
top of it. |
|
|
|
Designer's
Tip: A complex Crown Knot can get
confusing. Securing the cords in specific
places will help you keep them organized.
By securing segment 1 near segment 3, it makes
them easy to identify for the next step. |
|
|
|
|
|
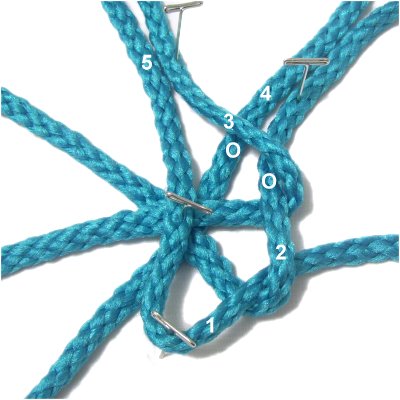
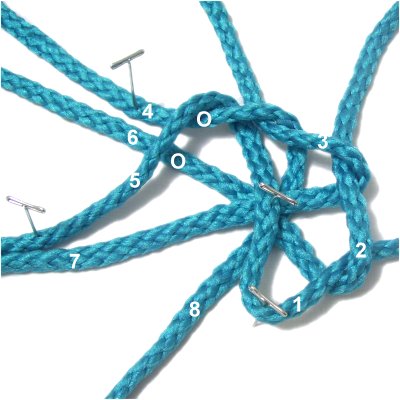
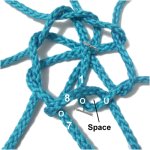
Step
3: Fold segment
2 over segments 1 and 3.
Secure it next to segment
4.
|
|
|
|
|
|
Step
4: Fold segment
3 over segments 2 and 4, which
are close together.
Secure it next to segment
5.
|
|
|
|
|
|
Step
5: Fold segment
4 over segments 3 and 5.
Secure it next to segment
6.
|
|
|
|
|
|
Step
6: Fold segment
5 over segments 4 and 6.
Secure it next to segment
7.
|
|
|
|
|
|
Step
7: Fold segment
6 over segments 5 and 7.
Secure it next to segment
8.
|
|
|
|
|
|
Step
8: Fold segment
7 over segments 6 and 8.
Secure it to the right of segment 8.
Identify the space you left at the corner
of segment 1.
|
|
|
|
|
Step
9: Fold segment
8 over segment 7.
Bring it through the space at the corner
of segment 1, passing over
- under the two parts.
|
|
|
|
| |
|
|
Step
10: Tighten the Crown Knot
slowly, one segment at a time.
Don't remove the pin in the center until
it's the size you want.
|
|
| |
| |
| |
|
|
| By using any
text or images on Free Macrame Patterns, you are
agreeing to our Terms of Use |
|
|
|
| Have
any comments about the Crown Knot? Contact
Me. |
|
|
|
|
|
|
|