Use the chart below to
determine the lengths to cut the cords for the
wings and body of the Holiday Angel, and for the
ring size.
Size
Ring
Body
Wings
Small
- 2 mm cords
1.5 inch
50-inch
cords x 6
36-inch
cords x 6
Medium
- 4 mm cords
2 inch
65-inch
cords x 6
45-inch
cords x 8
Large - 6 mm
cords
2.5 inch
80-inch
cords x 6
60-inch
cords x 8
Cut 2 holding
cords at least 40 inches long for
small and medium sized Angels. For a
large size, they should be at least 45 inches
long.
Prepare all the cords by applying tape
at the tips (or other method).
Halo and Head
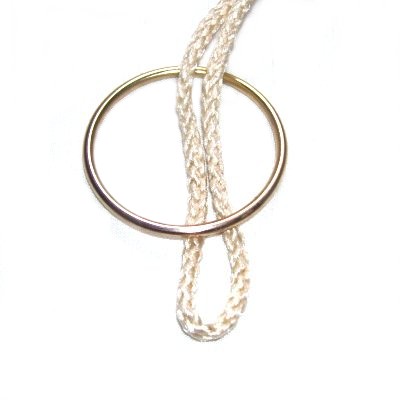
Step 1: Fold
one cord for the BODY in half and place it
through the ring withe the folded area
heading forward.
It should rest under
the portion of the ring closest to you.
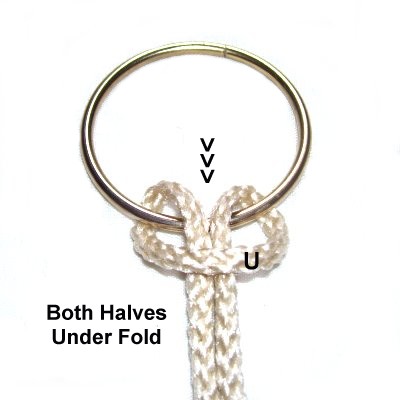
To complete
the Larks Head knot, move both halves
toward you over
the ring and under
the folded area of the cord.
Tighten firmly.
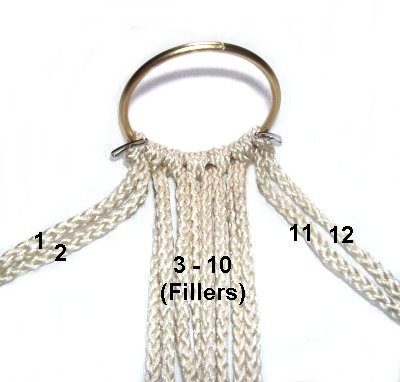
Step 1,
continued:Mount the remaining 5
cords for the body to the ring in the same
manner. Then
turn the ring upside down.
Secure it to your board so it's standing upright
with the knots flat on the board.
Mentally number the cords 1 - 12.
Cords 1 and 2 worktogether
as the left
working cords for the Square Knots.
Cords 11 and 12 are the right
working cords.
Cords 3 - 10 are the fillers.
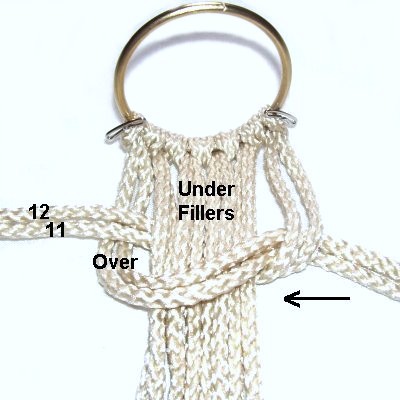
Step
2: The next 4 images show you how
to tie the first Square Knot for the head of your
Holiday Angel.
Move the left
working cords (1 - 2) to the right,
passing over
the fillers and under
the right working cords.
Bring the right
working cords (11 - 12) under
the fillers and over
the left working cords as you pull it out
on the left.
Pull all 4 working cords to tighten the
first half of the knot. It should
rest against the knots on the ring.
The working cords have
switched
places.
You now make the second half of the Square knot in
the opposite direction:
Move the leftworkingcords over
the fillers and under
the right working cords, heading right to
left.
Bring the right
working cords under
the fillers and over
the left working cords as you pull it out
on the right.
Pull all four working cords firmly
to tighten the second half of the SK.
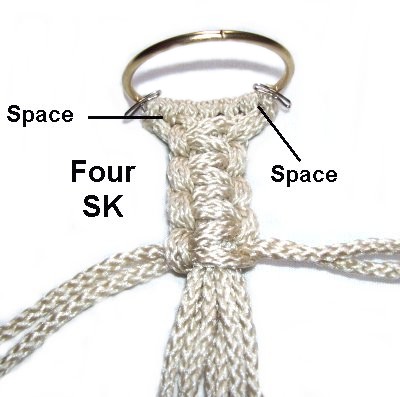
Tie 3
more SK next to the one you just
made.
Locate the spaces just below the ring,
between the SK and the 1st and 6th Larks
Head knots.
That's where the cords will pass through
in the next step.
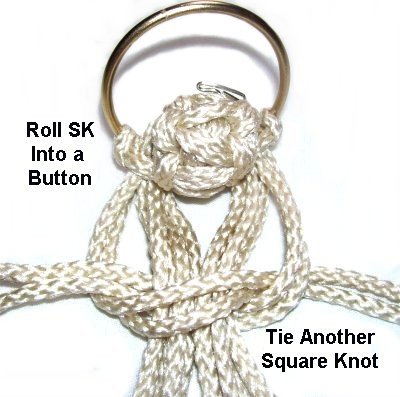
To create the
head for your Holiday Angel, divide the
cords into two groups of six.
Pass each group through one of the spaces
located in the previous step.
You may
need to use pliers or tweezers.
Roll the
Square Knots into a button by pulling firmly
on all the cords.
Select the 4 cords furthest to the right
and left. Use them as working cords to tie
another Square Knot below the
button.
Make
sure it's as tight as possible.
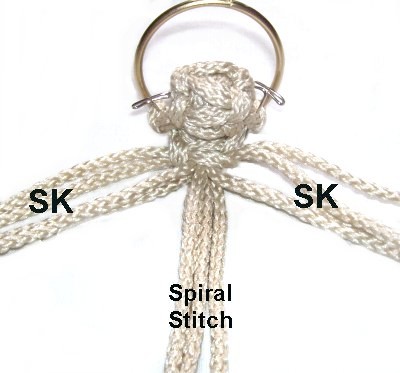
Body and Arms
Step
3: Divide the cords into
three sets of four. The set in the
middle is for the body, which is made with
the Spiral Stitch.
The other two are for the arms of the
Holiday Angel, which you will be making
next with Square Knots.
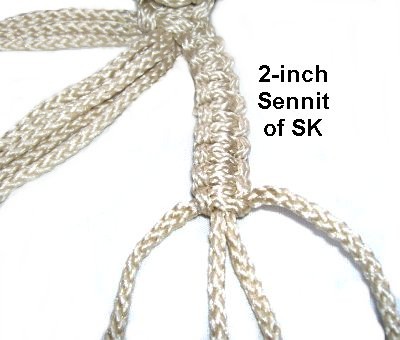
Using the
cords for the right
arm, tie a sennit of Square Knots
measuring 2
inches for a small or medium
size. It should be 3
inches for a large angel.
There are only two
working cords and two
fillers, but the process for tying the SK
is the same as in step
2.
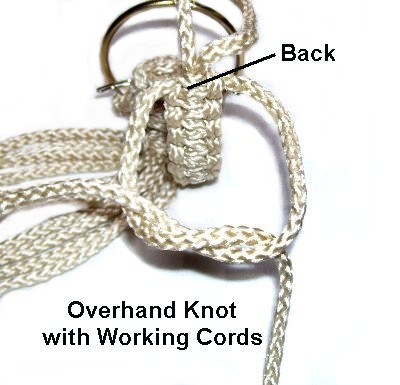
Lift up the
arm so you are working in the back.
Use the two working
cords to tie a tight
Overhand knot. Apply glue to the inside
as you tighten it.
Do
not cut off the extra
material.
Step 4:
Repeat step 3 to make the left
arm for your Holiday Angel.
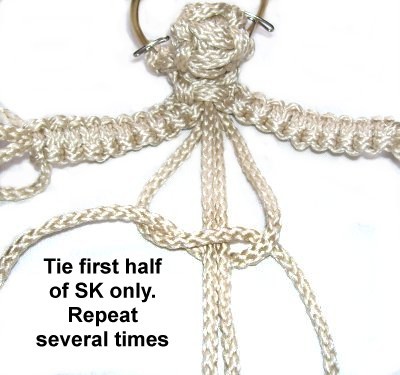
Step
5: Use the four cords in the
center to create the body (2 working cords
+ 2 fillers).
Tie a Spiral Stitch, which is the same as
tying the first
half of a SK several times.
Rotate the sennit as needed.
The body should be 1/2-inch
longer
than the arms.
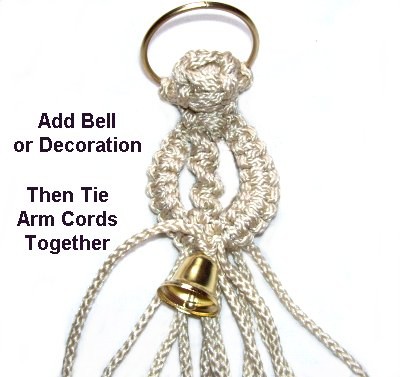
Curve the arms
in front of the body. Add a bell or
other decoration to one
cord. Tie the arm cords together
with tight
Overhand knots.
Pull one cord from each arm through
the body, so they stay in a
rounded position.
Designer's
Tip: There's no need to add another
knot to secure the arms.
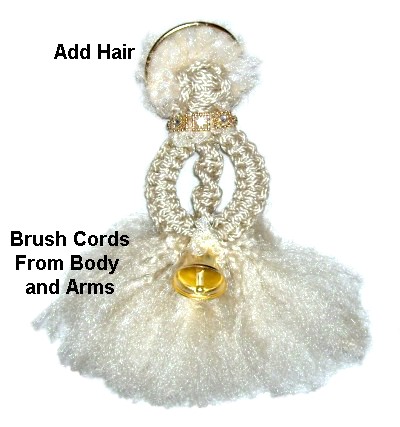
Just unravel the cords and brush the fibers (see
below).
Step
5: To make the upper skirt
for the Holiday Angel, trim the cords and
unravel them one
at a time.
The easiest way is to pull out onefiber
using tweezers. Do this near the
area where the cords are tied
together. Repeat this with several
fibers.
Once the fibers are all loose, brush them.
Step 6:
Add small pieces of the trimmings to the head if
you want your Holiday Angel to have hair.
The best way is to work your tweezers under the
cords and pull the new one through half way.
They don't need to be knotted because the knots
are very tight at the top of the head.
You can use different cord material for the hair
if you have scraps of cord or yarn available from
other projects.
The Wings
The
wings of the Holiday Angel are made with Double
Half Hitches (DHH). You will be tying them
in two
directions, so pay close attention to the
images and instructions.
Each wing will have 4 working cords for large and
medium sized Angels.
When makingsmall
Angel ornaments,each
wing will have3 cords.
Secure one holding cord to your board
horizontally, making sure it has tension.
Mark thecenterof the holding cord with a pin.
Step 7:
Fold one working cord for the WING in half and
place it under
the holding cord to the RIGHT of the center.
The fold should rest 1/4-inch back from the
holding cord, so you end up with a picot loop (see
image below).
Make
a Half Hitch with the left
half of the working cord, passing over
- under the holding cord while
rotating clockwise.
Pull it toward you, passing over
the working cord to complete the
loop. Tighten
firmly.
Tie the second
Half Hitch to the left of the first,
making it a Double Half Hitch.
Tighten
it firmly.
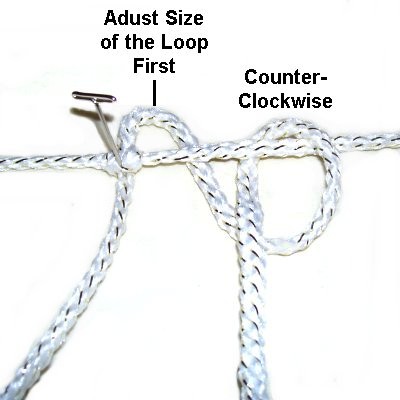
Adjust the
size of the picot loop if necessary.
Tie a DHH with the right
half of the cord, rotating counter-clockwise.
The second knot should rest to the right
of the first.
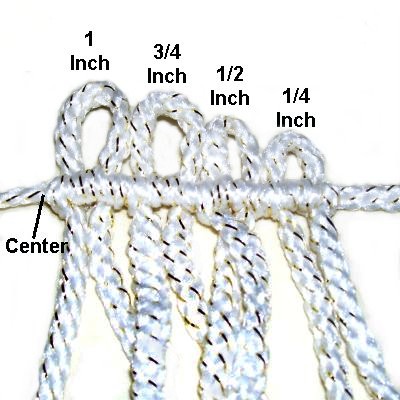
Step
8: Repeat
step 7 to make the
remaining loops, arranging them to the left of
the first one.
For a Holiday Angel of medium
or large size, each of these
loops should be 1/4-inch larger than the
one made before it (total
of 4).
For a small
Angel ornament, there should be onlythree
loops in 1/4 -- 1/2 --
3/4 inch sizes.
Step 8, continued:
Before moving on, push the knots
to the left so the
largest loop is at the centerof the holding cord.
Step 9: In
the previous steps, you have been making the lower area of
the right
wing. So the wing is upside
down at the moment.
In the next step you create the upper
area.
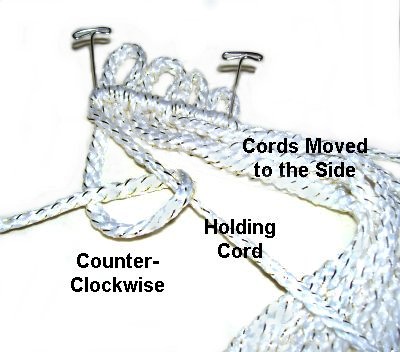
Curve the
holding cord to the right
diagonally, resting on top of the working
cords.
In the image the working cords are pushed
to the side.
The shape of the wings for the Holiday
Angel is determined by the angle of the
holding cord, so adjust it until you like
the shape.
Step 9,
continued: Attach the working cords
to it with DHH, moving left to
right. These knots should
all be tied in a counter-clockwise
direction.
Important:
Make sure the portion of the working cords that
rest between the two halves of the holding cord
have tension. The next image shows this more
clearly.
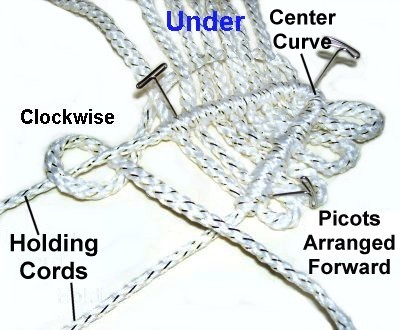
Step 10:
Turn the wing so the center curved area of the
holding cord is on the right,
with the loops heading forward and right (see next
image).
Secure both halves of the holding cord. Make sure they have
tension.
Pass
the working cord closest to the center
curve under
the ones waiting to be attached (right to
left).
Pass it under
the left
half of the holding cord.
Attach it to the holding cord with a clockwise
Double Half Hitch. Tighten firmly.
Step 10,
continued: Pass the same working
cord under
the right
half of the holding cord, and attach it
with a clockwise
Double Half Hitch.
Important:
Make sure the portion of the working cord that
rests between the two halves of the holding cord
has tension.
Step
11:Repeat
step 10 with the remaining
working cords.
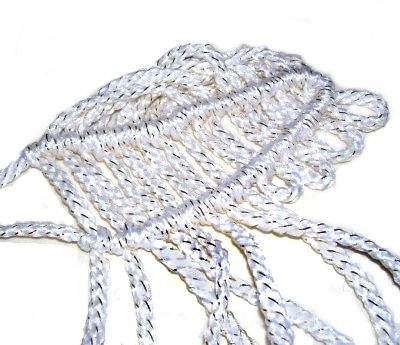
Progress from
right to left so there are large
loops at the top of the wing for the
Holiday Angel.
You can curve the holding cords to shape
the wing if necessary.
Step 12:
The process for making the left
wing is similar, but there are details
for each step that need to be changed:
Changes,
Step 8:
Secure the holding cord so the center is
on your right.
Arrange the loops so the largest one is
furthest to the right(closest
to the center of the holding cord).
Changes,
Step 9: Curve the holding cord
diagonally to the LEFT to make the upper
portion. Rotate clockwise
when tying the DHH.
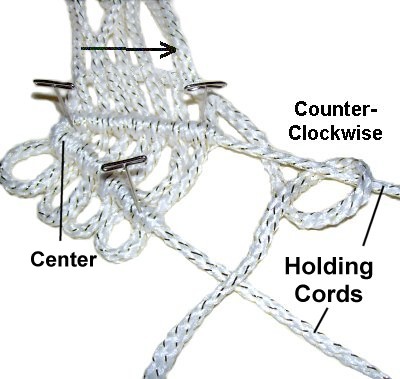
Changes, step 10:Position
the wing as shown in the image below, with
the center curved area on the left.
The loops should be forward and left.
Attach the working cords moving left
to right, starting with the one closest
to the curved area.
Pass each cord
under the working cords first, then under
the holding cords, before tying the knots.
Attach each cord to the upper
half of the holding cord with counter-clockwise
DHH.
Bring it left to make the bottom
portion.
Step 13:
Arrange the right and left wings so they
are close together.
Make sure the smallpicot loops
(made in step 7) are heading forward, or closest
to you.
Tie 2 Overhand knots with the upper
holding cords to connect the
wings.
After you tie the first knot, apply glue
and tie the second one on top of it.
Do
Not Cut Off the Extra Material.
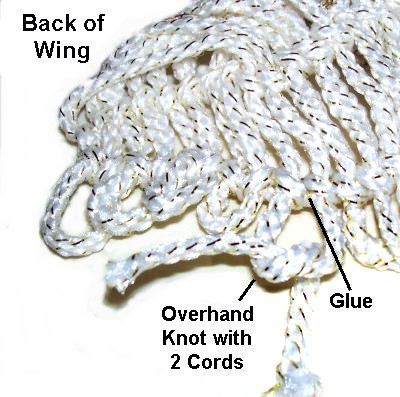
Step
14: Turn the wings upside
down, so you work in the back.
Finish off the working
cords by tying very
tight Overhand knots using two
cords per knot.
Step 14,
continued: Apply glue to the
back of the DHH before tightening, so
the glue is under
the Overhand knots. The goal is to hide the
knots behind the DHH so they are not seen.
When the glue is dry, you can cut off the excess
material. Save
the Scraps.
Finishing Touches
Step 15:
To complete the Holiday Angel, turn the
body so the front is face down. You will attach
the wings to the body near the head.
Important:
Make sure you have the front
of the wings touching the back
of the body.
Remember that the large
loops are considered the top
of the wing (step 10).
The knots you tied in the previous step are at the
bottom of
the wing.
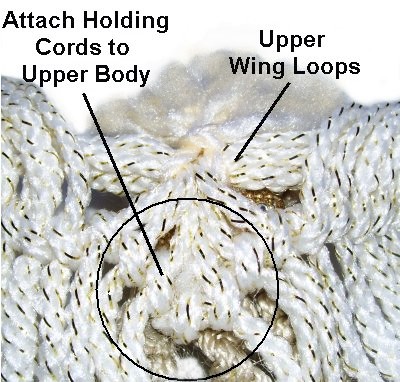
Pass both upper holding cords
through the body near the "neck" of the Holiday
Angel. These
are the cords you tied together in step 13.
Pass them
through to the front
of the body, then through a different
space to the back
again.
Tie an Overhand knot to secure them.
Add glue and cut off the excess material
when dry.
I recommend you attach the wings to the ring so
they are more stable.
You need a short piece of the same material used
for the hair.
Select 3 of the large loops from bothupper wings
closest to the center
of the Angel. Fold the short
cord around them.
Pass both halves under
one of the SK on the top of the head. The
ends of the short cord should be heading forward,
so you can blend them in with the hair.
There is no need to tie any knots.
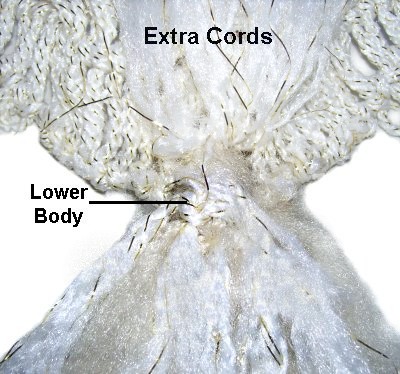
Step
16: Attach the lowerholding
cords for the wings to the lower
part of the body.
Pass them through to the front
of the body, then through a different
space to the back
again.
Tie an Overhand knot to secure them.
Unravel and brush these cords so they are
part of the skirt.
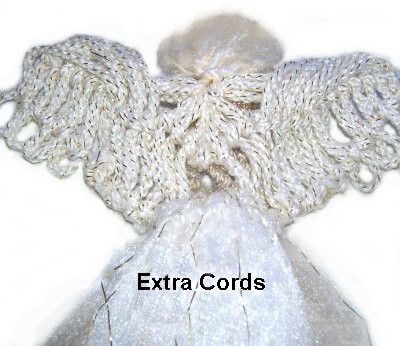
To make the lower
skirt, add extra cords (scraps) l
by pulling them through knots in the
body. Don't tie any knots.
Just unravel and brush the fibers.
Trim both parts of the skirt after all the
brushing is done. There should be a
short and a long skirt.
Trim and brush the hair of the Holiday
Angel.
By
using any text or images on Free Macrame
Patterns, you are agreeing to ourTerms
of Use