Description: This Hemp
Owl Necklace is a great project to help you gain
skill in Micro-Macrame.
This Micro-Macrame necklace does not have a
clasp, so must be at least 28 to 30 inches to
fit over most adult's heads. To double
check, place a cord around your neck and hold
the ends together. Take if off to check
the size, then measure the cord.
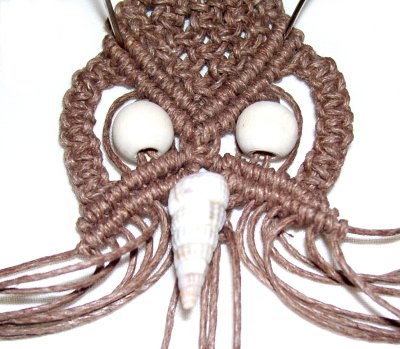
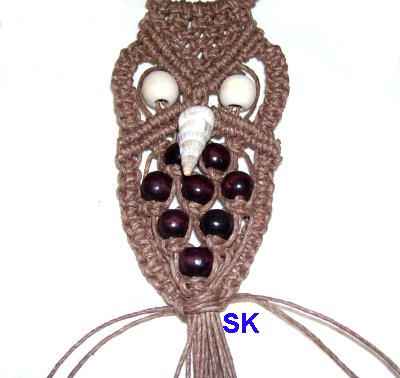
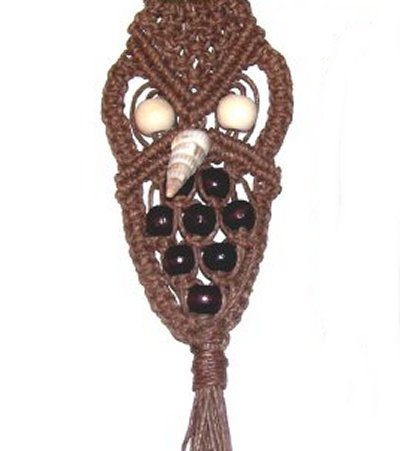
The Owl pendant is approximately 6 inches long
(including fringe). To make it shorter,
change the beads in the body
area to just 3 rows (see step
14).
Because you will be using fine material, this
Macrame pattern is rated moderate, suitable for
beginners who have experience with the knots
used in this pattern.
Jane Beeching provided the inspiration for this
Macrame pattern.
Supplies Needed:
1mm Hemp cord (20 yards)
25 - 30 Round Beads, 6mm size with 2mm holes
Two beads for the eyes, 8mm in size with 2mm
holes
One shell for the beak, or a long bead with
a horizontal hole (drop
bead)
Cut 2 cords, each 4.5 yards long (for 28 -
30 inch necklace)
Cut 8 cords, each 40 inches long (for Owl
Pendant)
Cut 1 cord, 24 inches long (For Wrapped
Knot)
Prepare the ends with glue
to prevent unraveling, and to make it
easier to add beads to the Hemp Owl Necklace.
Necklace Portion
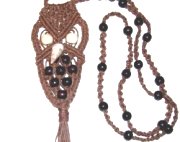
Step 1: Place
the two 4.5-yard cords on your board vertically,
so they rest side by side.
Locate the center of
them and secure the cords at that point.
Tie a sennit of Alternating Half
Hitches using both cords. The first knot
should rest at the center.
Design
Tip: To change this basic design,
simply use a different type of knot to make the
necklace portion.
Choose a knot that can be made with two
cords.
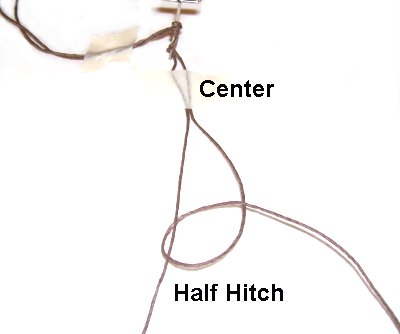
Stop when the sennit is 1.5 inches
long. Add a bead to both cords, and tie
another 1.5-inch sennit.
Continue this until the first half of
the Hemp Owl Necklace measures 14 to 15
inches.
Step 2: Turn the design
around, and repeat
step 1 on the other side of the center
point.
Start
by attaching a bead.
Stop when the entire necklace measures 28 to 30
inches, or is the size you want.
Important:
Check the size of the Hemp Owl Necklace by
putting it around your neck. Bring the last
knots at each end together.
Make sure you
can slide it over your head easily.
Add another bead at each end, followed by more
Half Hitches, if you need to make it larger.
Owl Pendant
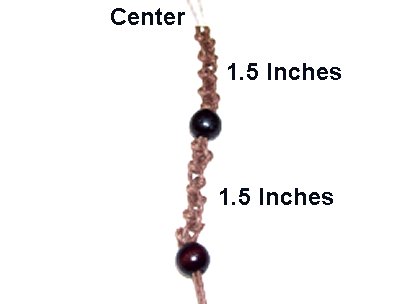
Step
3: Make a circle with the
necklace, and secure it so the ends are
crossed at the bottom. Leave
some space, since you will be mounting the
cords for the owlpendant to this area.
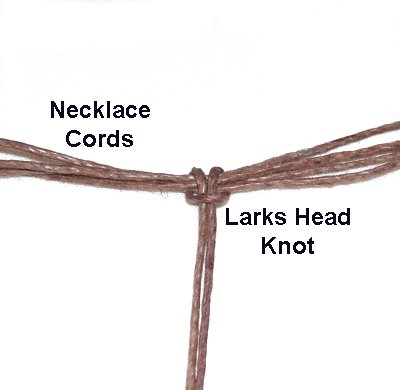
Step 4: Fold the
40-inch cords in half, and mount each of
them to all four ends of
the necklace cords, using Larks Head
knots.
Mount the first one at the
crossing point to hold the
four cords together. Add the others on
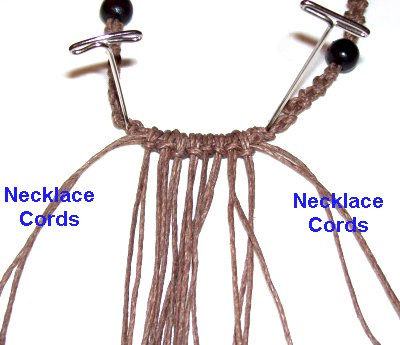
either side.
You will have 20 cords to make the
pendant for the Hemp Owl Necklace
(includes necklace cords).
Pull on the necklace cords
so that the mounted strands fit snugly
between the two halves of the necklace.
You should have a continuous
circle of knots, with no
gaps between the Larks Heads
and the Half Hitches.
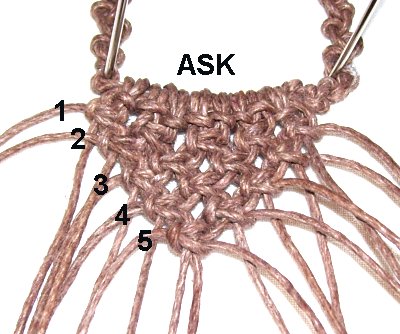
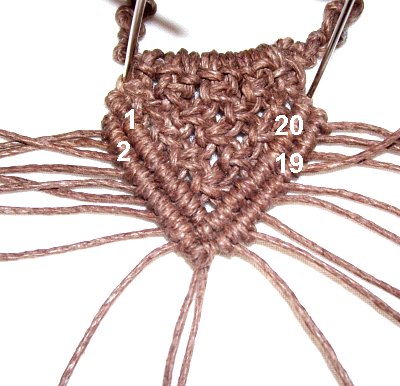
Step 5: Mentally
number the cords 1 - 20, moving left to
right. You'll now make the forehead
for the pendant of the Hemp Owl
Necklace.
Tie five rows of ASK to form a V
Pattern, following the instructions
below. Each Square Knot should be tied
with 2 working cords and 2 fillers.
Row 1: Use cords 1 - 4, 5 -
8, 9 - 12, 13 - 16, and 17 - 20 to tie 5 ASK.
Row 2: Use cords 3 - 6, 7 -
10, 11 - 14, and 15 - 18 to tie 4 ASK.
Row 3: Use cords 1 - 4, 5 -
8, 9 - 12, and 13 - 16 to tie 3 ASK.
Row 4: Use cords 3 - 6, and
7 - 10 to tie 2 ASK.
Row 5: Tie one ASK with
cords 9 - 12.
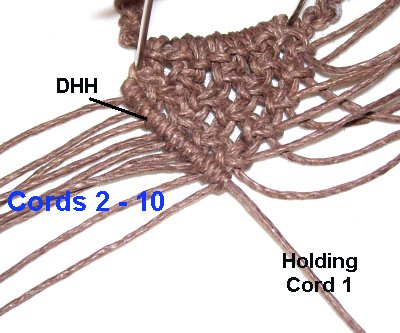
Step 6: Mentally
re-number the cords. Place cord
1 along the left
edge of the V shape, diagonally.
Secure it so its taut, since it will be
the first holding cord on the
left.
Attach cords 2 10 to it with Double
Half Hitches,
rotating
counter-clockwise.
The first holding cord on the right
is cord
20. Place it along the right
edge of the V shape.
Attach cords 19 - 11 to it with DHH, in
that order. Tie the knots in a
clockwise
direction.
Attach holding cord 1 to holding cord 20 with a
DHH, to form the point.
Step 7: For the next row on
theleft, use cord
2 to hold the knots. Attach working
cords 3 -
10 to it with DHH.
Also
attachholding cord 20(from the right).
Pull the knots tightly
so the two bars formed by the DHH are close
together.
The next holding cord on the right is cord
19. Attach cords 18 - 11 to it with
DHH, in that
order.
Also
attach holding cord 1(from
the left).
Step 8: The final step
is to attach holding cord 2 to holding
cord 19 with a DHH, to form the second
point.
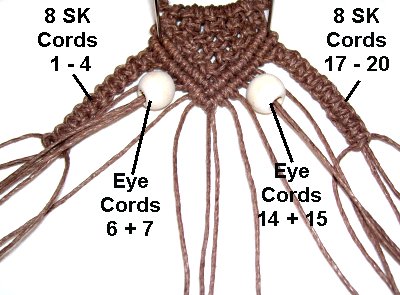
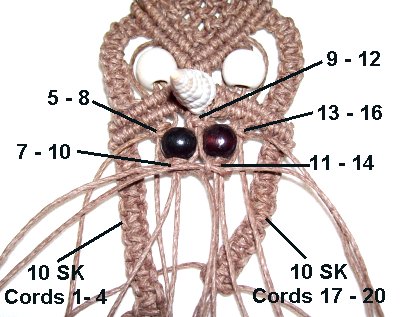
Step 9: Mentally
re-number all the cords 1 20.
Separate
the cords into groups, and complete
the following steps:
Cords
1 4 -- Tie a sennit of 8 Square
Knots *** See Important Information
Below
Cords
6 and 7 -- Attach a bead (left eye)
Cords
14 and 15 -- Attach a bead (right
eye)
Cords 17 -
20 -- Tie a sennit of 8 Square
Knots *** See Below
Cords
9 - 12 -- Tie a tight SK (see next
photo)
*** Important:The FIRST SK in
the sennits made with cords 1 - 4 and 17 - 20
need to be tightened so they rest AGAINST the
diagonal rows of DHH without any gaps(on an angle).
So as you tie the rest of the
knots, the sennit will be diagonal.
You can see this
in the image above.
This helps to create the rounded shape for the
face of your Hemp Owl Necklace. So tighten the
knots carefully in those areas.
Important:
The angle of the next two rows of DHH should not
be as sharp as the forehead area in the Hemp Owl
Necklace.
The sennits on the sides of the face should curve
outward slightly as shown in the image below.
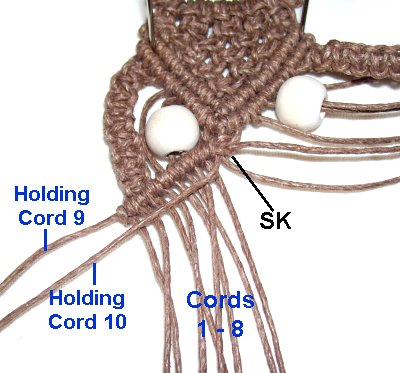
Step 10: Mentally
re-number the cords. Move cord
9 to the left, and secure it,
since it's a holding cord. Attach cords
8 - 1 to it with clockwise
DHH, in that order.
Move cord
10 to the left, to be used as
the next holding cord. Attach cords 8 -
1, as well as holding cord 9.
Step 11: The first holding
cord on the right is cord
12. Move it right, and attach
cords 13 - 20 to it with counter-clockwise
DHH.
The second holding cord on the right is cord
11. Attach cords 13 - 20 to it, along
with holding cord 12.
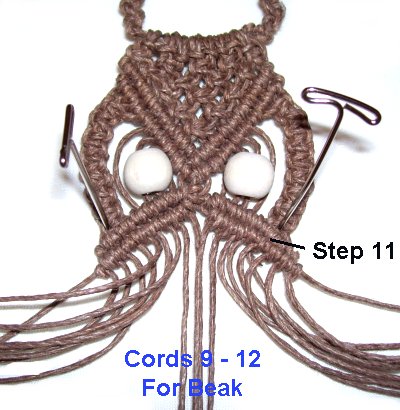
Step 12: Mentally
re-number the cords 1- 20.
Locate cords
9 - 12, since they are used to
secure the beak for
the Hemp Owl Necklace.
Slide cords
10 and 11 through the hole in
the shell or bead, heading in opposite
directions.
Pull on the two ends to position it as
high as possible.
Tie a tight Square
Knot with cords 9 - 12.
Step 13: Tie a SK with
cords
5 - 8. It should rest close to
the rows of DHH. Tie another one with cords
13 - 16.
Tie a sennit of 10 SK with cords 1 -
4,
and another one with cords
17 - 20.
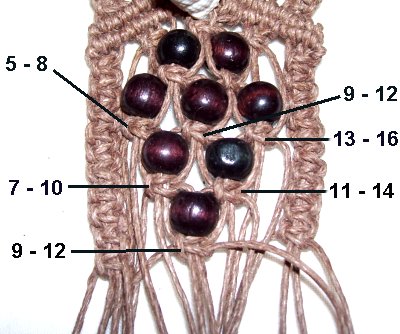
The body of the Hemp Owl Necklace is made with
rows of beads.
For the first row, slide one bead onto cords
8 and 9. Tie a SK just below, with
cords 7 - 10.
The next bead should be placed on cords
12 and 13. Tie the SK below it with
cords 11 - 14.
Step 14: There are
three beads in the 2nd row. Add the
first bead to cords
6 and 7, with a SK below, tied
with cords 5 - 8.
The second bead is placed on cords
10 and 11. The SK below it is
tied with 9 - 12.
Place the 3rd bead onto cords
14 and 15. Tie the SK below it with
cords 13 - 16.
For the 3rd row, there are two beads: The first
one on cords
8 and 9. The SK below it is tied with
cords 7 - 10.
The 2nd bead should be placed on cords
12 and 13. The SK below it is tied with
cords 11 - 14.
There is one bead at the bottom of the body.
Place it on cords
10 and 11. The SK below it is tied with
9 - 12.
To make the owl
shorter,
don't add this bead,
but make sure you still tie the SK.
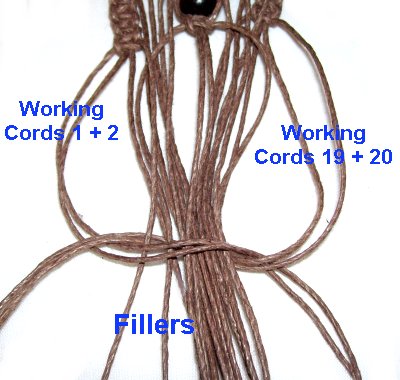
Step 15: Organize the
cords so that cords 1 - 2, as well as 19
- 20 are separated from the others.
Use them to tie a tight
SK around ALL the other cords, which are
the fillers.
You'll be using the two cordsworking
together on the
right and left to tie the knot.
Pull on the filler
cords as you tighten the knot, so thependant
for the Hemp Owl Necklace is as FLAT
as possible.
You can pull on these cords after the
SK is tightened, too.
Finishing Touches
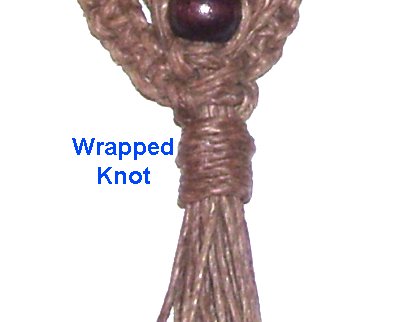
Step 16: Make a
Wrapped Knot around ALL the cords for
the Hemp Owl Necklace, using the 24-inch
cord.
After the knot is tightened, apply a
light coat of glue. When its dry,
cut off any extra material from the cord
used to make the Wrapped Knot.
Step 17: Trim the
remaining ends so they are even, and
apply glue to the tips to form the tail
for the Hemp Owl Necklace.
If you wish, you can add bead to the
tail cords, followed by Barrel
Knots to hold them in
place.
I recommend you place the beads on two
cords, rather than individually.
By
using any text or images on Free Macrame
Patterns, you are agreeing to ourTerms
of Use