|
|
| |
|
|
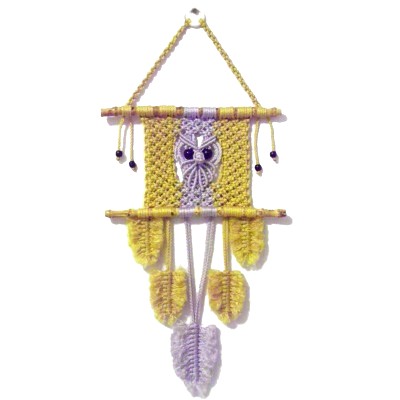
Description:
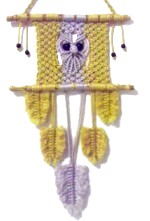
Grandfather Owl is a Macrame wall
decoration featuring a small gray owl in
the center of a panel that resembles a
window.
The most unique aspect is the fringe,
which is made by creating five Reef Knot
feathers.
Special thanks goes to Erika Armistead for
inspiring me to create this design.
Finished
Size = 27 x 15 inches |
|
|
|
|
Supplies
Needed:
- 4mm gray cord material for Owl (20 yards)
- 4mm cord material for panel (40 yards)
- Two 20mm round black beads (eyes)
|
| |
|
|
Knots Used:
|
|
| |
|
|
|
Hanger
|
|
Preparation:
Cut 2 cords (one color) 72 inches
long. Prepare the tips to prevent
unraveling.
These will be used to make the hanger to suspend
Grandfather Owl on a wall. |
|
| |

|
|
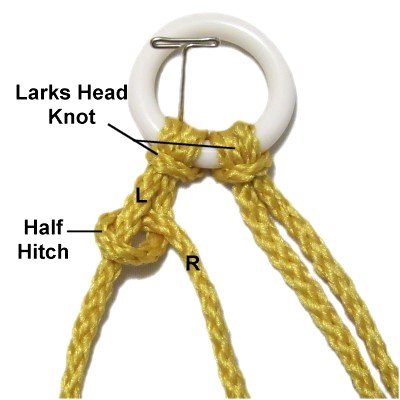
Step
1: Mount both cords to the ring
with Larks Head knots.
Mentally label each half of the cords
right versus left. Start with the
cord on the left.
Use the right
half to tie a clockwise
Half Hitch onto the left half.
Tighten firmly.
|
|
| |
| |
|

|
|
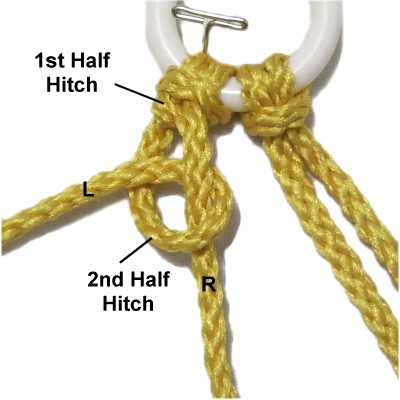
Tie a counter-clockwise
Half Hitch with the left
half of the cord onto the right.
Tighten firmly.
|
|
|
| |

|
|
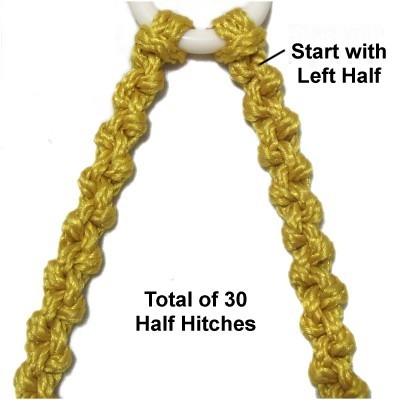
Step
2: Repeat
step 1 several times to
make the rest of the hanger.
Stop when you have tied a total
of 30 Half Hitches.
Make an alternating Half Hitch sennit with
the cord on the right. Start with
the LEFT half of the cord.
|
|
| |
| |
|
| |
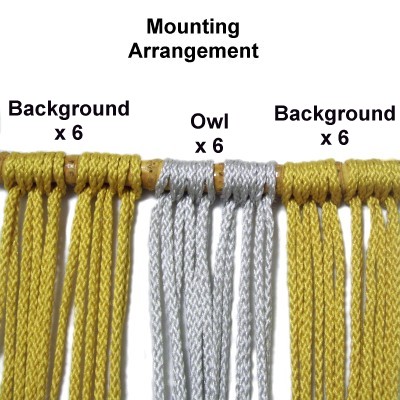
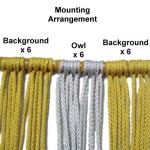
Mounting the Cords
|
|
Put the hanger aside for now, while you mount
the cords for the Grandfather Owl to the first
dowel.
Please note that any type of dowel can be
used. Bamboo was used in the example, which
is why the cords are mounted in sections.
Preparation:
Cut 6 gray cords (for the Owl), each 2.5 yards
long.
Cut 12 cords for the panel, each 2-yards long
(gold cords in images). |
|
|
| |
|
|
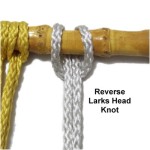
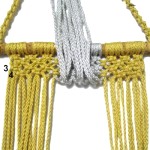
Step
3: Mount each cord to the dowel
with a REVERSE Larks Head knot.
You fold the cord and place it on
top of the dowel with the fold
forward. Bring the ends under
the dowel and over
the folded area, pulling them toward you.
|
|
| |
|
| |
|
|
The gray cords
for Grandfather Owl should be mounted near
the center
of the dowel.
On either side of them should be 6
background cords.
|
|
| |
|
| |
|
|
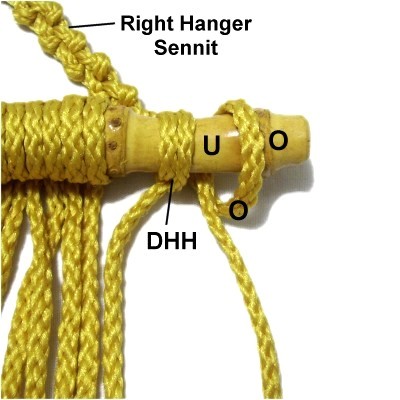
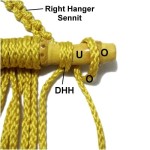
Step
4: Place the right hanger
sennit under
the dowel to the right of the mounted
cords.
Tie the first Half Hitch by moving one
half of the cord over
- under the dowel and over
the cord, pulling it toward the left.
Tighten the knot as much as possible.
|
|
| |
|
|
|
|
Tie another Half Hitch to the right of
the first, making it a DOUBLE Half Hitch
(DHH).
Tighten the knot as much as possible.
|
|
| |
|
|
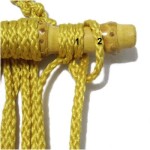
Step 5:
Repeat
step 4 to attach both halves of the left
hanger sennit to the left of the mounted cords.
You can make the Half Hitches right to left if you
wish. |
|
|
|
|
|
Top Section of Panel
|
|
Now it's time to make the rectangular panel for
the Grandfather Owl. You will start by
making the top section, which is just below the
dowel.
Mentally number all the cords 1 - 36. Do not
include the hanger cords. |
|
|
|
|
|
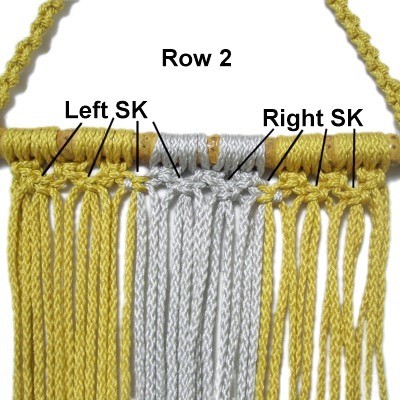
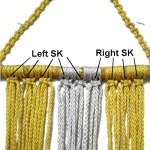
Step
6: Tie a row of Square knots with
the following groups of four cords:
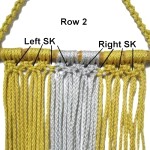
Left SK:
1 - 4, 5 - 8, 9 - 12, 13 - 16, 17 - 20
Right SK:
21 - 24, 25 - 28, 29 - 32, 33 - 36 |
|
|
|
|
Designer's
Tip: Tighten all the Square knots
firmly, pulling the fillers so that each row is
close together.
The first row should rest as close to the dowel as
possible. |
|
|
|
|
|
To make row 2,
use the following cords so they alternate:
Left SK:
3 - 6, 7 - 10, 11 - 14, 15 - 18.
Right SK:
19 - 22, 23 - 26, 27 - 30, 31 - 34
|
|
|
|
|
|
Step
7: Repeat step
6 to make rows
3 and 4.
Separate all the gray
cords, since they will be used to
make Grandfather Owl later on.
The side panels will be made with the other color.
|
|
|
|
|
|
Side Sections of Panel
|
|
|
|
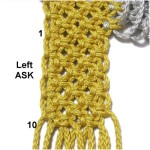
Step
8: Make the left
side section by tying 10 rows of
Alternating Square Knots (ASK). Make
sure you tie LEFT Square Knots.
Rows 1,
3, 5, 7, 9: Use cords 1 -
4, 5 - 8, 9 - 12
Rows 2,
4, 6, 8, 10: Use cords 3 - 6, 7 -
10
|
|
|
|
Step 8,
continued: Make the right
side panel by tying 10 rows of ASK, using RIGHT
Square Knots.
Rows 1, 3, 5, 7,
9: Use cords 25 - 28, 29 - 32, 33
- 36
Rows 2, 4, 6, 8,
10: Use cords 27 - 30, 31 - 34 |
|
|
|
|
|
Grandfather
Owl - Head
|
|
Now it's time to make Grandfather Owl using only
the gray cords. Mentally re-number them 1 -
12.
HC = Holding cord |
|
|
|
|
|
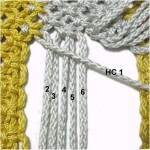
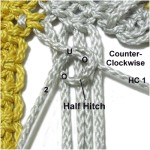
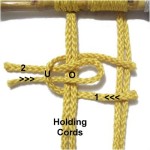
Step
9: Move cord
1 to the right
diagonally,
resting on top of cords 2 - 6.
It will be used as the holding cord for
the first row of Double Half Hitches
(DHH). |
|
|
|
Designer's
Tip: All the DHH in Grandfather Owl
should be as neat as possible.
This is easy to accomplish if you control the
holding cord in one hand while tightening the knot
with the other hand.
|
|
|
|
|
|
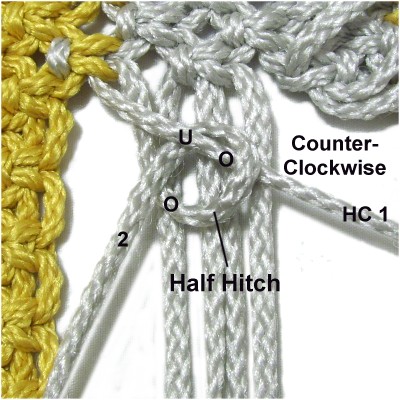
Use cord
2 to tie a DHH onto holding cord
1, rotating counter-clockwise.
Tighten the knot firmly.
This image shows a single Half Hitch. Be
sure to make a second Half Hitch to the right
of the first. |
|
|
|
|
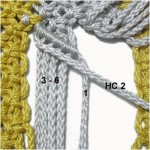
Step 9,
continued: Tie DHH with working
cords 3 - 6 onto the holding cord.
Make sure each knot is tight so the row is neat. |
|
|
|
|
|
Step
10: Move cord
2 to the right, and use it as the
next holding cord.
Use working cords
3 - 6 +
cord 1 to tie DHH onto
holding cord 2.
Tighten the knots firmly so the row is
neat, and make sure the two rows are close
together (more information below). |
|
|
|
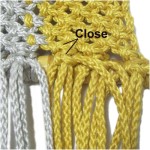
Designer's
Tip: To make sure the rows are
close together with no gaps, move the holding cord
toward the first
row while you tighten the first Half
Hitch.
Allow the knot to relax into place next to the
first row, then repeat when you tie the second
Half Hitch (same cord).
|
|
|
|
|
|
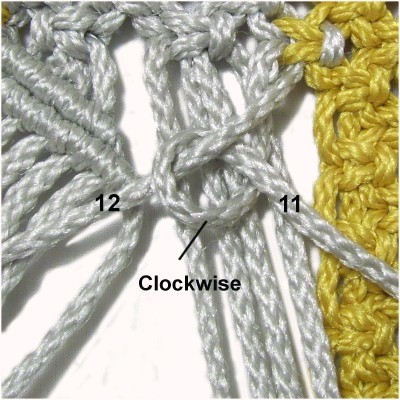
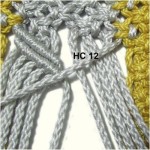
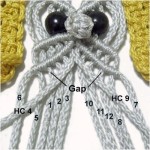
Step
11: Move cord
12 to the left
diagonally, resting on top of cords 7 -
11.
It should be on the same
angle as the rows of DHH on the
left.
|
|
|
|

|
|
Use
cord
11 to tie a DHH onto the holding
cord, rotating clockwise.
Repeat with cords 10 - 7 (in that order). |
|
|
|
|

|
|
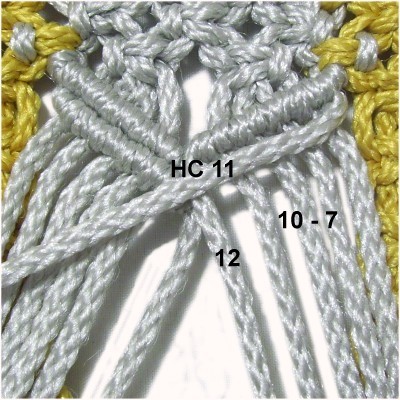
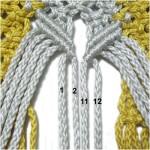
Step
12: Move cord
11 to the left, using it as the
next holding cord.
Use cords
10 - 7 + cord 12 to tie the DHH
onto the holding cord. |
|
|
|
|
|
|
Step
13: Locate the four holding
cords used to make the DHH in the previous
steps.
Grandfather Owl has a beak made with these
four cords. Tighten the following
knots more than usual so it's as narrow as
possible. |
|
|
|
|
|
|
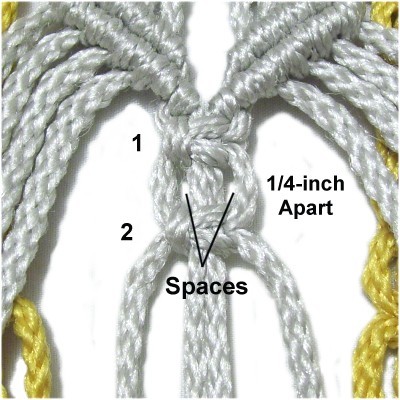
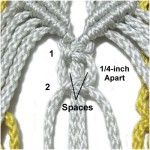
Tie one SK
with the four cords. Then tie
another SK 1/4-inch from the first, so
there are two spaces.
Tie 4 more SK close together. |
|
|
|

|
|
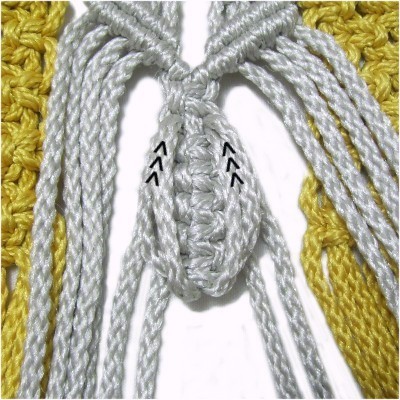
Move the cords
backward, then pass two through
each space in the area between the first
and second SK.
|
|
|
|

|
|
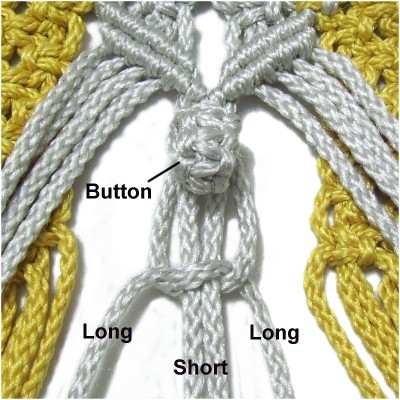
Pull the four
cords toward you, rolling the Square knots
into a button.
Re-arrange the cords so you use the longest
ones to tie a Square knot around the short
cords.
Tighten the knot firmly, so it rests under
the beak for Grandfather Owl.
|
|
|
|
|
|
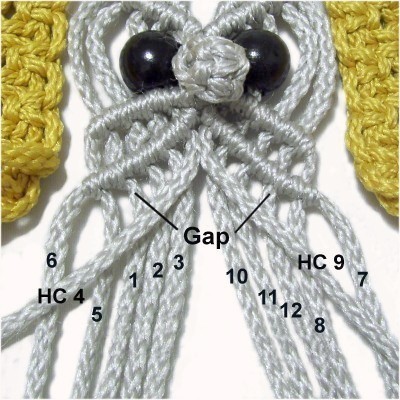
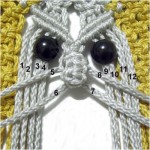
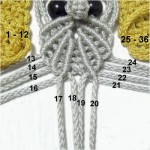
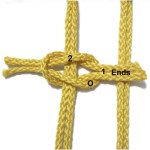
Step
14: Mentally number the
cords where they are resting now.
Cords 5 - 8 were used in step 13.
Slide a bead onto cords 3 - 4 and
9 - 10 (eyes).
Move cords
5 and 8 to the left and right
diagonally, resting on top of the other
cords. Separate cords 6 and 7 so you
do not use them for the next step.
|
|
|
|
|
|
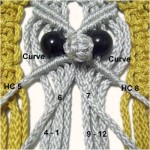
Tie DHH with cords
4 - 1 onto holding cord 5,
rotating clockwise
(in that order). Curve
cords 1 and 2.
Tie DHH with cords
9 - 12 onto holding cord 8,
rotating counter
clockwise. Curve
cords 11 and 12.
Do not attach cords 6 and 7.
|
|
|
|
|
|
Grandfather Owl - Body
|
|
The body for Grandfather Owl is made by tying
rows of DHH to represent the wings. The
holding cords for each row are the ones closest to
the center.
All the DHH on the left should be made clockwise.
The DHH on the right should be made counter-clockwise. |
|
|
|
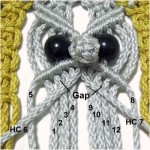
Step 15:
Move cords
6 and 7 diagonally to the right and
left. They will be the holding cords for the
next row of DHH.
As you tighten the following knots, leave a small
gap between this row of DHH and the one
made in the previous step. |
|
|
|
|
|
Tie DHH with cords 4, 3, 2, 1, 5 onto holding
cord 6.
Tie the DHH with cords 9, 10, 11, 12, 8 onto
holding
cord 7.
|
|
|
|
|
|
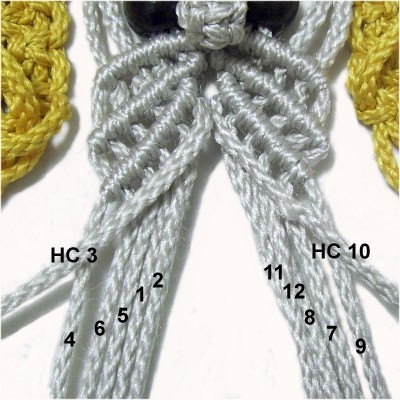
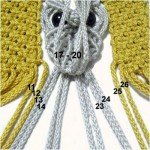
Step
16: Move cords
4 and 9 diagonally, leaving a gap
between rows.
Tie DHH with cords 3, 2, 1, 5, 6 onto holding cord
4.
Tie the DHH with cords 10, 11, 12, 8, 7
onto holding
cord 9.
|
|
|
|

|
|
Step
17: Move cords
3 and 10 diagonally.
Tie DHH with cords 2, 1, 5, 6, 4 onto holding cord
3.
Tie the DHH with cords 11, 12, 8, 7, 9
onto
holding cord 10.
|
|
|
|

|
|
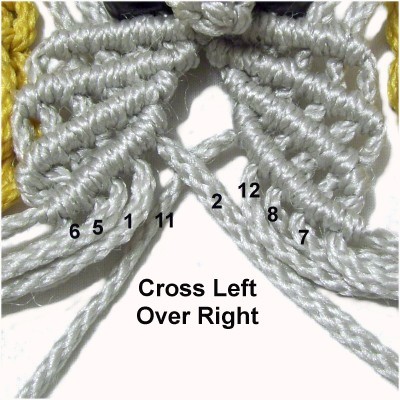
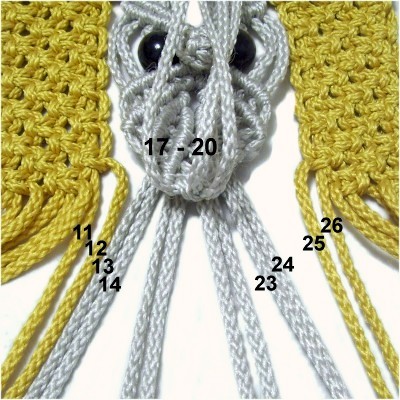
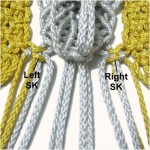
Step
18: Locate cords
2 and 11, which should be at the
center of the group.
Cross them left
over right (2 over 11), then pass
them under
the body diagonally (see next
image).
Do the same with these pairs: 1
+ 12, 5
+ 8, 6
+ 7
|
|
|
|
|
|
Step
19: Mentally re-number all the
cords as follows:
- Left side of panel = cords 1 - 12
- Owl = cords 13 - 24
- Right side of panel = cords 25 - 36
Tie a Square Knot with cords
17 - 20. These were the
cords you did not cross in step 18. |
|
|
|
|
|
Bottom Section of Panel
|
|
Now it's time to make the bottom section of the
panel, where you add in the cords used to make
Grandfather Owl.
Step 20:
Tie 2 more rows of ASK in the side panels.
The second row of knots should line up with the
third row of DHH in Grandfather Owl.
You can tie 2 more rows of ASK if needed, but try
stretching the panel first.
|
|
|
|
|
|
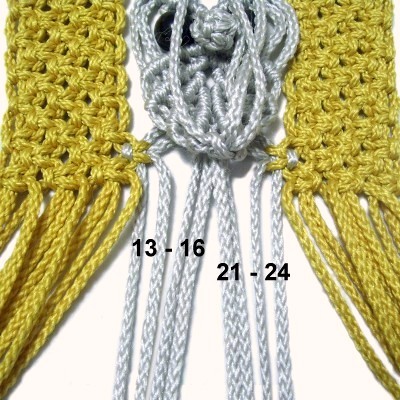
Separate cords
17 - 20, moving them out of the
way for now.
Arrange cords 11 - 12 from the left panel
next to gray cords 13 and 14.
Arrange gray cords 23 - 24 next to cords
25 -26 from the right side panel.
|
|
|
|
|
|
Step
21: Tie a left SK with cords
11 - 14.
Tie a right SK with cords
23 - 26.
Tighten these knots gradually,
keeping the side panels straight
(vertical). The knots should be
horizontal without tilting. |
|
|
|

|
|
Step
21: Tie the next row of ASK
with the following groups of cords:
Left SK:
Cords 1 - 4, 5 - 8, 9 - 12, 13 - 16
Right SK:
Cords 21 - 24, 25 - 28, 29 - 32, 33-36
Do not use cords 17 - 21. |
|
|
| |

|
|
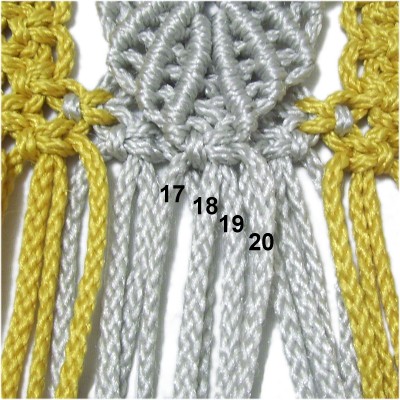
Step
22: Move the SK tied with cords
17 - 20 into position between
the SK tied with cords 13 - 16 and
21 - 24.
The knots in this area of Grandfather Owl
should all line up. Make adjustments if
they don't.
|
|
| |
|
| |
Step
22, continued: Tie four rows of ASK
as follows:
Rows 1 and 3:
- Left SK
with cords 3 - 6, 7 - 10, 11 - 14, 15 - 18
- Right SK
with cords 19 - 22, 23 - 26, 27 - 30, 31 - 34
Rows 2 and 4:
- Left SK
with cords 1 - 4, 5 - 8, 9 - 12, 13 - 16, 17 -
20
- Right SK
with cords 21 - 24, 25 - 28, 29 - 32, 33 - 36
|
|
|
|
|
|
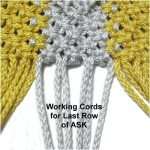
Step
23: Go to each knot made in
the last row of ASK and locate the
following working
cords:
1, 4, 5, 8, 9, 12, 13, 16, 17, 20, 21, 24,
25, 28, 29, 32, 33, 36.
Push the others (fillers) under the panel
to get them out of the way.
|
|
|
|
|
|
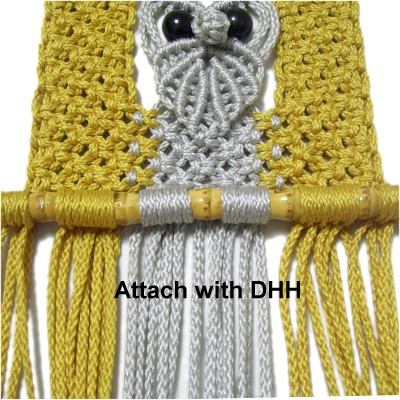
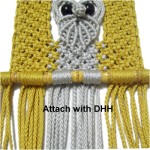
Place the
dowel on top of the cords
horizontally.
Attach all the working
cords to it with Double Half
Hitches.
Pull the cords firmly when tightening, so
there are no gaps between the SK and the
dowel. |
|
|
|
Step 24:
Turn Grandfather Owl upside down so you are
working in the back.
Straighten the fillers and place them between
the working cords, passing directly over
the back of the DHH. Make sure the cords are
in the same groups of four as the last row of ASK.
|
|
|
|

|
|
Tie tight
SK with each group of four cords.
Double check to make sure the working
cords you use are coming from the DHH on
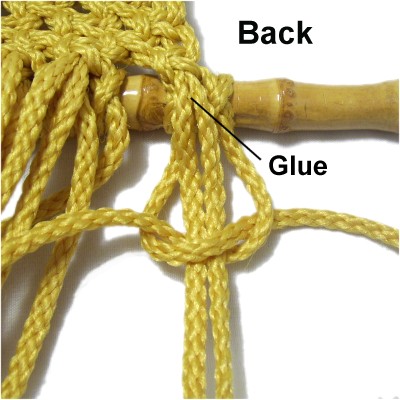
the dowel.
Apply glue to the fillers before
tightening, so it's inside
the knot.
Before it
dries, read
the following information: |
|
|
|
|
|
Make sure the
knots you just tied are close to the ones
in the last row of ASK (panel).
This will ensure the knots are well hidden
behind the dowel.
Adjust the knots if necessary. |
|
|
|
Step 25:
Cut off the excess material from the working
cords. Melt and fuse the stubs if
you are using material that can be finished in
this manner.
Save the scraps
to make the feathers.
Keep the following fillers
to be used for the fringe, and finish off the
rest:
- Cords 2 - 3 (1st SK)
- Cords 10 - 11 (3rd SK)
- Gray cords 14 - 15 (4th SK)
- Gray cords 22 - 23 (6th SK)
- Cords 26 - 27 (7th SK)
- Cords 34 - 35 (9th SK)
Designer's
Tip: You can change the fringe
design for Grandfather Owl by selecting cords in a
different arrangement, or by changing the number
of feathers than what is shown in the
example.
|
| |
| |
|
|
|
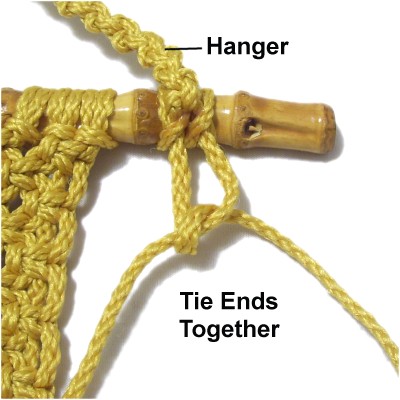
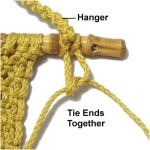
Tie off the
hanger cords behind
the first dowel.
Decorate the ends of the cords with the
small beads followed by Overhand knots
(optional). |
|
|
|
| |
|
| |
Feather Fringe
|
|
The fringe for Grandfather Owl is made with five
Reef Knot Feathers. Four will be the color
of the panel and one will be gray.
The instructions below are for the arrangement you
see in the image at the top of the page.
Step 26:
Cut 21 pieces of material 5 inches long for the
first feather, which will be made with the panel
color.
The filler cords you saved in step 25 will now be
called holding cords.
|
| |
|
|
|
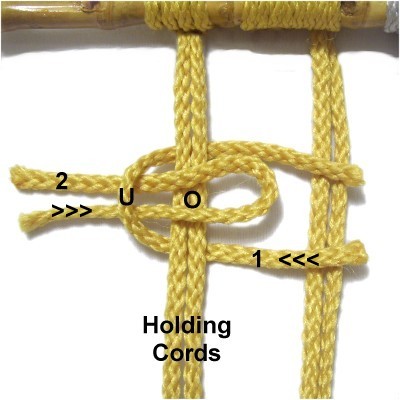
Fold cord 1 in
half and place it under
the first pair of holding cords on the
left (cords 2 - 3). They should be
arranged horizontally with the fold
heading left.
Fold cord 2, then place it under
the fold of cord 1 and over
the filler cords, heading right.
|
|
|
|
|
|
|
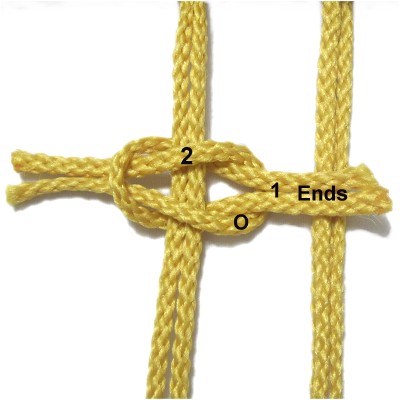
Pass the ENDS
of cord 1 through cord 2 and over
the fold.
Hold the ends of one cord in each hand,
then tighten the Reef Knot firmly.
Slide the knot closer to the dowel.
|
|
|
|
|
|
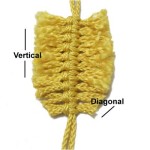
Step
26: Repeat the same process
with the other cords, until you have tied
10 Reef Knots.
Trim the feather so both sides are even,
and the feather is approximately 2.5
inches wide.
Cut cords 1 - 6 vertically,
and 7 - 10 diagonally.
|
|
|
|
|
|
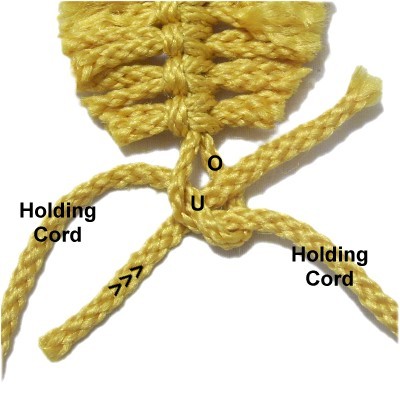
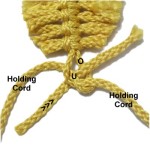
Step
27: Tie the holding
cords together loosely.
Pass the remaining cord through the knot under
- over (from below), arranged
diagonally.
|
|
|
|

|
|
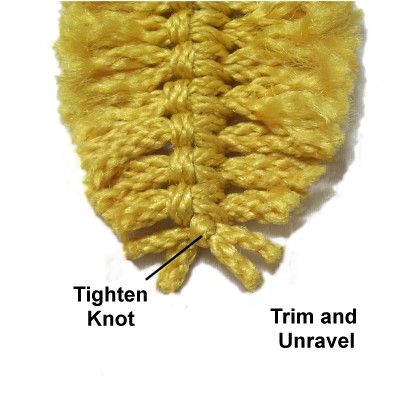
Tighten the
knot as much as possible. You can
add glue if you wish.
Trim and unravel all the cords to finish
the feather.
|
|
|
|

|
|
Step
28: Repeat
step 26 and 27, creating the
other three feathers in the panel
color. You need 21 pieces of
material for each one.
Two feathers should be positioned lower
than the other two, so they don't overlap. |
|
|
|
Step 28,
continued: For the gray feather,
combine all four holding cords and attach the
short pieces onto the group.
Cut
26 cords and tie 12
Reef Knots. The last two cords are
passed through the knot tied with the holding cord
(step 27). |
|
|
|
|
|
|
|
| By using any
text or images on Free Macrame Patterns, you are
agreeing to our Terms of Use |
|
|
|
| Have
any comments about Grandfather Owl? Contact Me.
|
|
|
|

|
|
|
|