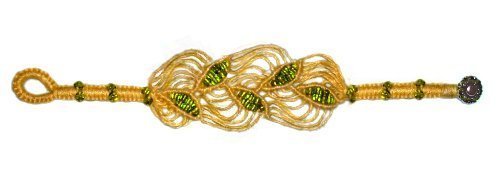
Description:
Golden Leaves is a Micro-Macrame bracelet
design featuring leaf shaped designs and wavy
sections. It has a Buttonhole Clasp, and
seed beads are used on the band and inside the
leaves.
You MUST
have experience in tying Double Half Hitches
without having to rely on pins, since it's easier
to control the holding cords in hand. Practice
doing so before attempting this project.
This Macrame pattern is rated Moderate,
due to the use of fine material.
When making a Golden Leaves bracelet more
than 7 inches in size, cut the cords
longer.
Buttonhole Clasp
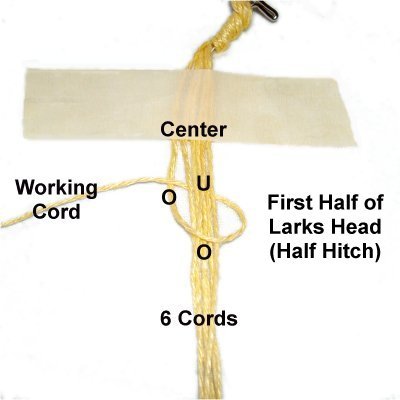
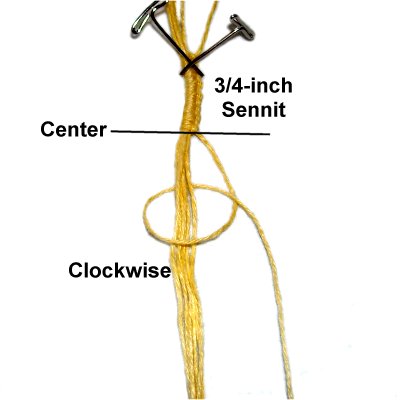
Step 1:
Arrange the cords vertically on your board,
securing them at the center
with tape and/or pins.
The long cord should be placed to the left of the
others. It will be the working cord for the
clasp of
the Golden Leaves bracelet.
A good way to secure the cords is to wrap them
around T-Pins and then secure them to your board
with tape.
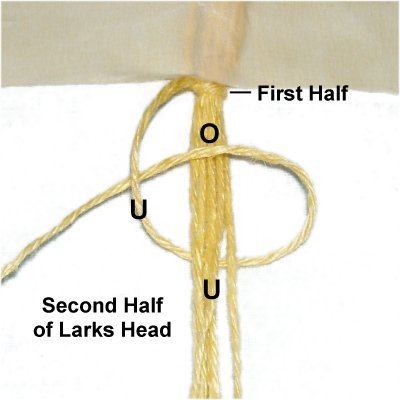
<<
Make a counter-clockwise
loop with the working cord,
passing over
- under the others, and over
the working cord.
The second half is tied passing under
- over the others, and under
the working cord. >>
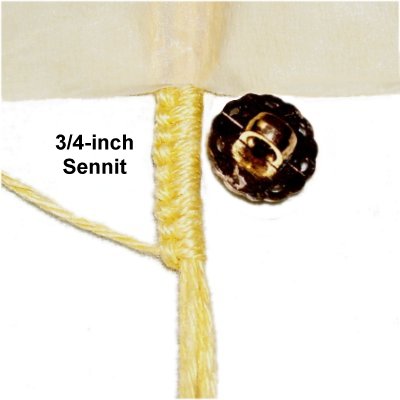
Tie several
more Larks Head knots (sennit).
Stop when the first half of the Buttonhole
Clasp measures 3/4
inches long.
Turn the
entire sennit around and secure it.
Go back to the center
and tie the same number of Larks
Head knots as the first half.
The only change is that you tie the knots
clockwise.
Fold the Larks
Head knots to form the clasp. Check
to see if the button fits through the
loop. Tie additional Larks Head knots if
necessary.
Place the group of cords from the right on
top of those from the left.
Tie one Square Knot using the two ends of
the long working cord, around all the
others.
First Band
The center section of the Golden Leaves Bracelet
should remain the size described, which is
approximately 3.5 inches.
To make changes to the length of this bracelet, do
so in this
section (band) and in the band on the other side.
Use the chart below to determine the size of the
bands, and the areas between the beads.
Do
not include the clasp when you measure.
Finished
Length
of Bracelet
Total Length
(One Band)
Length of
Each Section
(Between the Beads)
6
inches
1-inch
Two 1/2-inch
sections
7
inches
1.5 inches
Three
1/2-inch sections
8 inches
2 inches
Four
1/2-inch sections
For sizes between those
above, use this formula:
Finished length minus 4 = total length of
both bands
Divide by 2 = length of one band
Divide by 3 = length of each section between
the beads
You may not be
able to tie 1/2-inch sections. So adjust the
size as needed.
Step 2:
Tie the number of SK you determined will get you
the right size band for your Golden Leaves
bracelet.
Use the same
working cords as in the clasp.
The first Square Knot you tied is part of the
first section, so include it when you
measure.
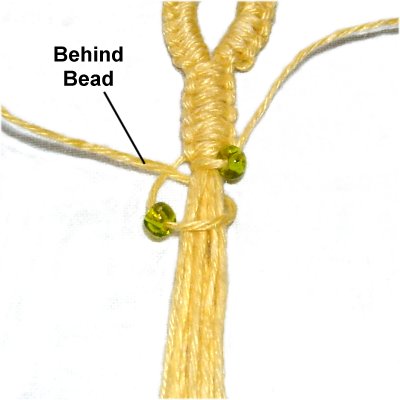
Slide one bead onto each working
cord.
<<
Tie a clockwise
Half Hitch with the right working
cord.
Use theleft
working cord to tie a counter-clockwise
knot. >>
Make sure the end rests behind
the bead prior to tightening.
Tie the next
section of Square Knots, followed by
beads. Repeat
this as many times as needed to get the
band length you determined in the chart
above. Measure
each section as you progress.
Tie one Square Knot to finish the band
for your Golden Leaves bracelet.
Center Area - Leaves
Step 3:
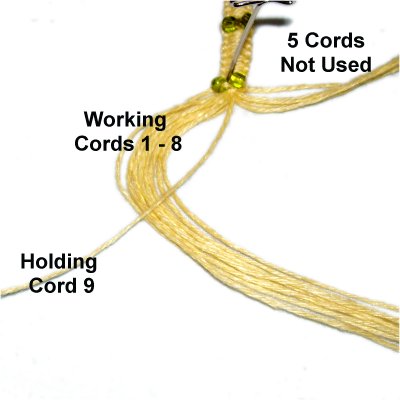
Mentally number the cords. Divide them into
two groups, with 1 - 9 on the left, and 10 - 14 on
the right.
Only the left9 cordsare
used for the first leaf, so move the others out of
your way.
You need to decide whether to control the holding
cord in hand, or to secure it, while making the
Golden Leaves bracelet.
I recommend holding it, so you can change the
angle as needed.
Use cord
9 as the holding
cord. Arrange it diagonally
towards the left. It should rest on
top of cords 1- 8, which should curve.
Attach cords 8 - 1 to it with Triple
(3) Half Hitches. The loops
should be made clockwise.
See tip below on curving the cords above
the knots.
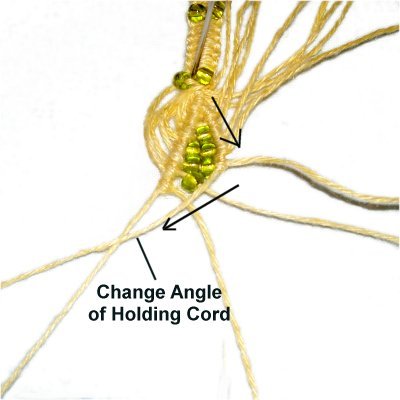
Curving
the cords:The first
three cords should be attached with the holding
cord arranged diagonally.
Change the angle so the holding cord is vertical.
Attach the remaining cords in that position.
When you move it back to diagonal
again, the working cords will have a gentle
curve.
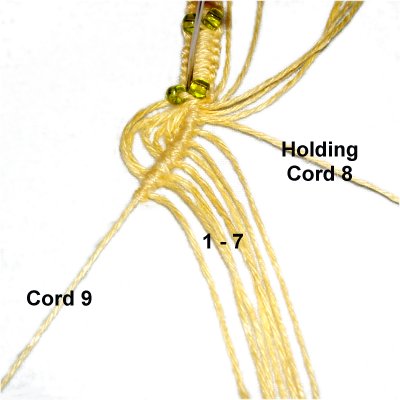
Cord
8 is the newholding
cord. It is the first one you
attached to cord 9 (at the top of the
group).
Cord 9 will now become a working cord,
along with cords 1 - 7.
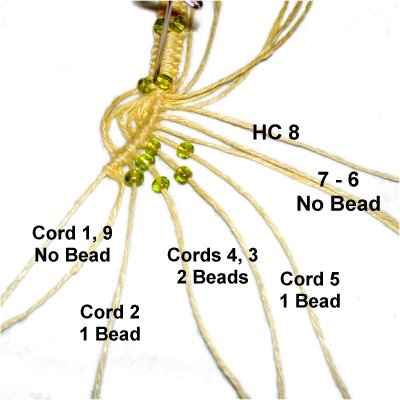
Step 3,
continued: The placement of the
beads is an important part of the Golden Leaves
Bracelet. They help form the curved shape.
The beads need to lie flat,
so you may need to move them around each other or
change the sizes to get the proper fit.
Here's the best arrangement for the beads:
Holding cord 8, Working cords 6 + 7
= No Bead
Cord 5 = 1 bead
Cords 4 and 3 = 2 beads
Cord 2 = 1 bead
Cords 1 and 9 = No Bead
Arrange
holding cord
8on a
diagonal angle to the right.
Attach cords 7 and 6 with clockwiseTriple
Half Hitches.
Move it slightly to the left,
curving it around the beads as you attach
cords 5 - 2.
Change the angle more to the left,
and attach cords 1 and 9.
Push cords 1 -
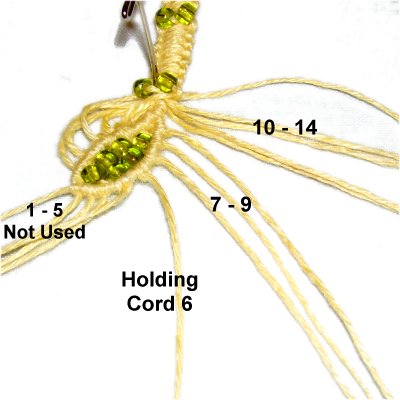
5 aside. Mentally number and organize the
remaining cords for the next leaf.
The
holding cord is 6. Working cords
7 - 9 are from the first leaf.
Working cords 10 - 14 were the ones not
used in the previous step.
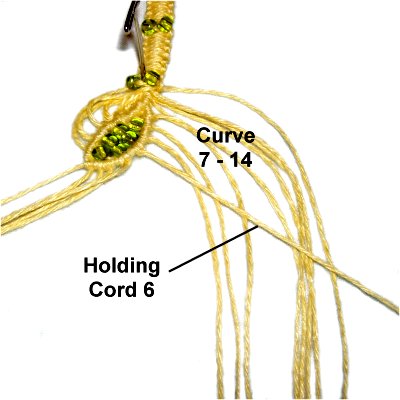
Step
5: Move holding cord 6 on
top of 7 - 14, on a diagonal slant to the
right.
Attach cords 7 - 14 to it with counter-clockwiseTriple
Half Hitches.
Make sure they are in order, and that they
curve (as in step 3).
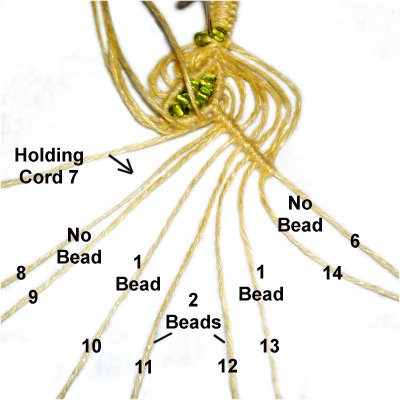
Here's the best arrangement for the beads:
Holding cord 7, Working cords 8
& 9 = No Bead
Cord 10 = 1 bead
Cords 11 and 12 = 2 beads
Cord 13 = 1 bead
Cords 14 and 6 = No Bead
Arrange
holding cord
7on a
diagonal angle to the left.
Attach cords 8 and 9, with counter-clockwise
Triple
Half Hitches.
Curve it around the beads as you attach
cords 10 - 13.
Change the angle to the right,
and then attach cords 14 and 6.
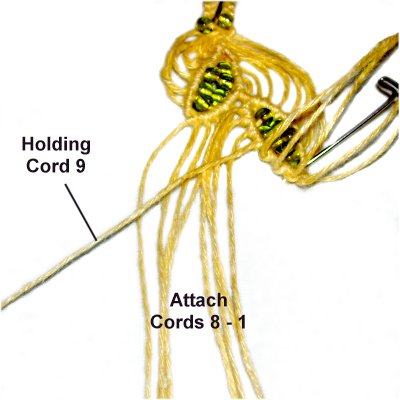
Step
6: Mentally re-number the cords.
Cord 9 is used to hold the knots
for the upper row of the third leaf.
Move it diagonally to the left,
and attach cords 8 - 1.
Curve the cords as you did previously
(step 3).
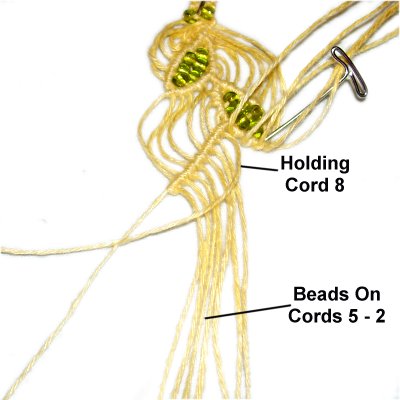
Here's the best arrangement for the beads, which
should be applied now:
Holding cord 8, Working cords 6 + 7 = No
Bead
Cord 5 = 1 bead
Cords 4 and 3 = 2 beads
Cord 2 = 1 bead
Cords 1 and 9 = No Bead
Arrange
holding cord
8on a
diagonal angle to the right.
Attach cords 7 and 6 with clockwiseTriple
Half Hitches.
Curve it around the beads as you attach
cords 5 - 2.
Change the angle to the left,
and then attach working cords 1 and 9.
Repeat
step 5 to make the 4th leaf for your
Golden Leaves bracelet.
Repeat
step 6 to make the 5th leaf.
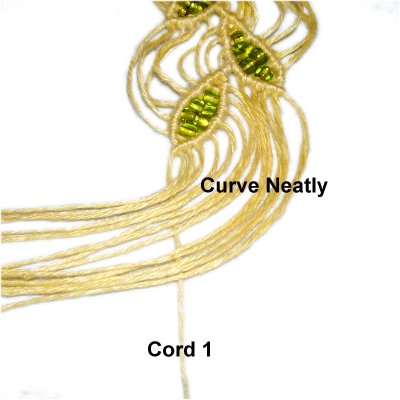
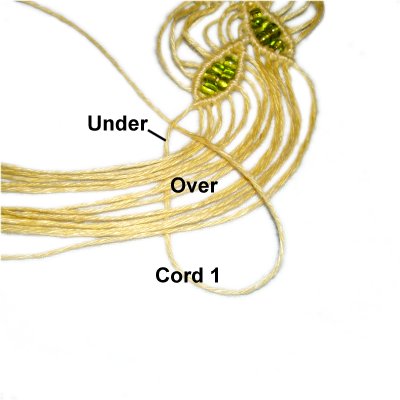
Step
7: The final curved area
is created differently than when you
started the center section, since
the cords are now on the inside.
Arrange cord 1 vertically. Neatly
curve the other cords over
it, heading left (almost
horizontal). Make sure they are
organized and don't crisscross.
Bring cord
1over
the other cords, forming a loop.
Pass the end under
the portion of cord 1 near where it comes
off the leaf (to your left).
Tighten the loop gradually
and gently, taking care not to disrupt the
arrangement of the other cords. You
can tie a second knot if you wish.
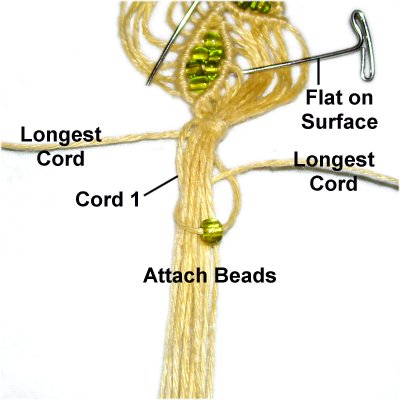
Second Band
Step 8:
Secure the curved area made in the previous step
by placing a pin on top of the cords.
Push it down so it rests flat on the surface of
the project board.
Select the two
longest
cords to make the second band for
the Golden Leaves bracelet.
Cord 1 should be brought down so it's on
the inside
(filler cord).
Start by attaching two beads the same way
you did in the first band, with Half
Hitches.
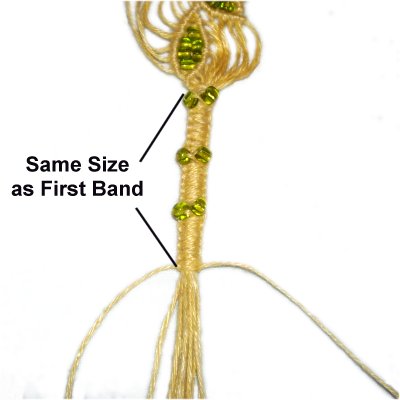
Create the
second band, so that the overall size is
the same as the first one.
Keep the same measurements between the
beads, so the Golden Leaves bracelet is
symmetrical.
There should beno beadafter the
third section.
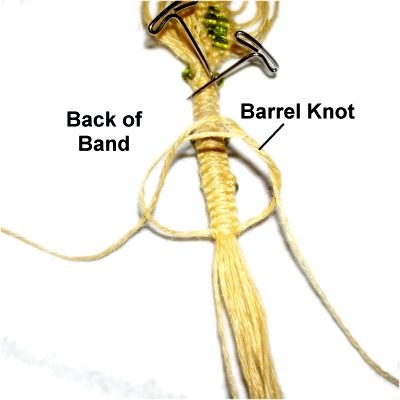
Finishing
Step
9: Bring the two working
cords you used for the band to the back
of it. Tie them together with a
Barrel knot.
Tighten the knot evenly so it is as flat
as possible, and apply glue. Do
not cut them off.
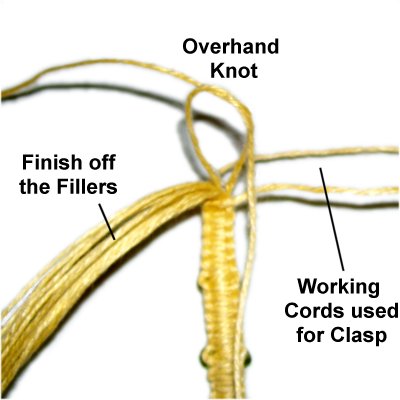
Finish off the
fillers
that the Square Knots were tied around.
Use two at a time and tie Overhand knots,
applying glue while tightening. Cut
off the excess material.
Be
careful -- do not pull the cords so
tightly that they slide through the
Square Knots.
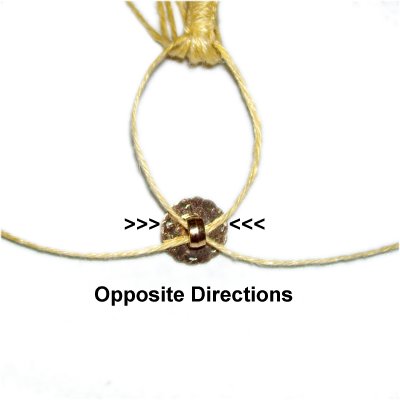
Pass
the two working cords from the band
through the shank of the button in opposite
directions. Pull the
ends to bring the button all the way
against the band.
Make sure the Golden Leaves bracelet fits
your wrist. Adjust the button placement if
necessary.
Tie off the cords with a Barrel
Knot. Add glue while
tightening.
I recommend you tie a
Wrapped Knot
around the end of the 2nd band for the Golden
Leaves bracelet, next to the button.
This will help to make the area as smooth as
possible, and secure the cords even better than
just the finishing knots.
By
using any text or images on Free Macrame
Patterns, you are agreeing to ourTerms
of Use