A Square Knot
is usually part of the design, but other knots can
be used to close the loop.
This clasp is mostly used for jewelry, using
material 1mm to 2mm thick. The images show
2mm size braided nylon material.
Please visit Jewelry
Clasps to see other types of
closures for Micro-Macrame designs.
To make a very nice belt buckle using a large
fancy button, all you need is 4mm material, to
make the clasp design larger.
Preparation: To practice
the Buttonhole Clasp, you need one holding cord 18
inches long. Cut one working cord, 36 inches
long. Secure both cords to your project board
vertically, and place a piece of tape across the
cords to mark the center. The working cord
should be on the right.
When using this technique in a Micro-Macrame
project, the cutting lengths are usually much
longer, since the cords are used to make the
bracelet or necklace after the clasp is
done.
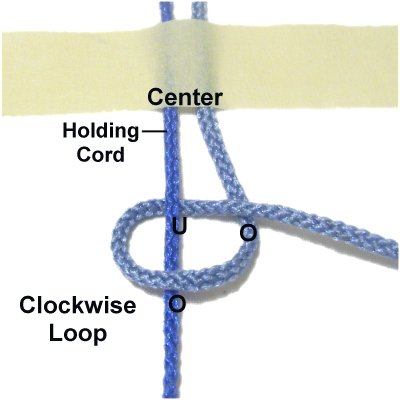
Step
1: Make the first loop for the
Vertical Larks Head by passing the working
cord over
- under the holding cord,
rotating clockwise.
As you bring it to the right, cross over
the working cord.
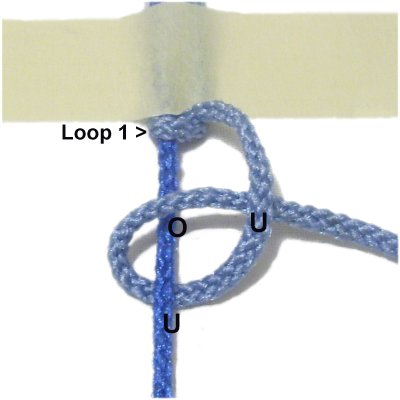
Step
2: Tie the second loop
for the Vertical Larks Head knotby passing the working cord under
- over the holding cord.
Pull it right, crossing under
the working
cord.
Steps
1 + 2 = one Larks Head knot.
Step 3:Repeat
steps 1 and 2 at least 3
times, until the sennit is 1.5
x the size of your button
or bead.
So for a 1/2-inch button, you need to
tie enough knots to get to 3/4-inches.
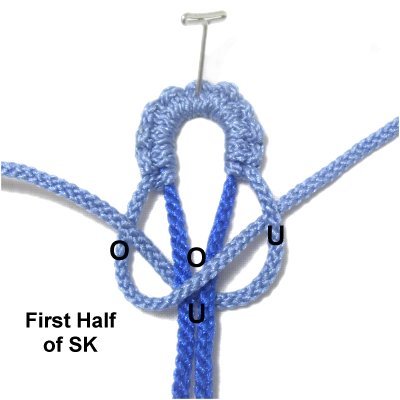
Step
4: Turn the first half of the
design around, so the working cord is on
the left.
Start at the center and tie the same
number of knots to make the
second half of the clasp.
Rotate counter-clockwise
to make the two loops.
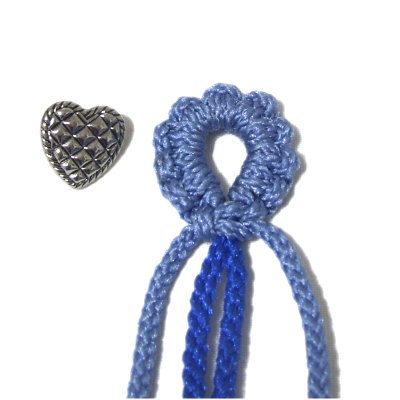
Step
5: Form the Buttonhole
Clasp by making a circle with the knots as
you bring the ends together.
Tie a the first half of a Square knot with
the two working cords, around the holding
cords.
Tighten it firmly.
Step
6: Tie the second half of
the Square knot with the working cords.
After you tighten the knot, pull on both
ends of the holding cord to remove the
slack between the knots.
Step
7: Make sure the button
fits through the opening, then attach it
to the other end of the design you are
making.
You can also use a bead or button knot to
form the closure.
By
using any text or images on Free Macrame
Patterns, you are agreeing to ourTerms
of Use