|
|
| |

|
|
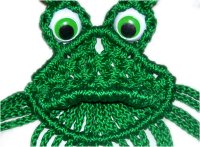
Description:
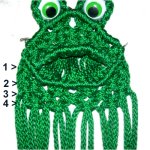
Far Away Frog looks like he is
shouting to something in the distance.
His comical appearance and unique
design will make all ages chuckle with
pleasure.
This Macrame Frog has webbed feet, a
wide mouth, and big googly
eyes. You have the option of
clipping the cords inside the mouth to
make an opening.
You can attach a ring to his feet to
make him into a towel holder, or
simply add a branch and a few silk
flowers for a wall decoration.
The finished size is
approximately 15 inches tall, with
the knees bent as shown.
|
|
| |
|
| |
|
Supplies Needed:
- 6mm Green Macrame Cord (54 yards total)
- Dowel, Ring or Branch (optional)
|
| |
| |
|
Knots Used:
|
| |
|
| |
| |
|
Cut the cords as follows:
- 10 Cords, each 2 yards long
- 10 Cords, each 3 yards long
|
| |
| Prepare the tips of
all the cords for the Far Away Frog, using one of
the methods described in Cord
Preparation. |
| |
|
|
|
|
| |
The Face
|
|
|
|
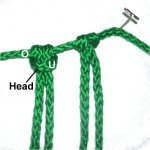
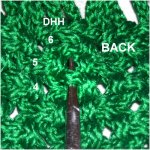
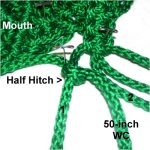
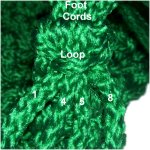
Step 1:
Secure a 60-inch
holding cord on your project
board. It should have an
upward curve.
Place a pin at the center.
In the images, this area rests below the
eyes of the Far Away Frog.
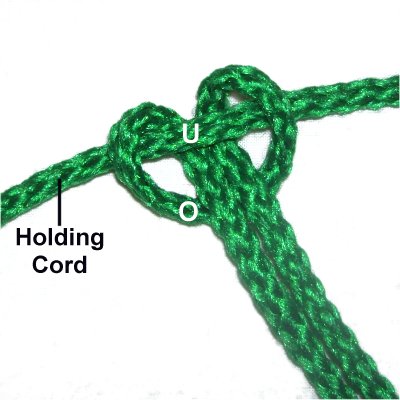
Step 2:
Mount one 3-yard
cord to the holding cord with a reverse Larks
Head knot.
It should rest 1-inch
to the left of the pin at the center,
as shown below:
|
|
|
|
|
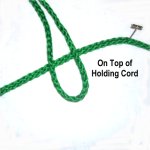
<<
Fold the 3-yard cord in half and place it
on
top of the holding cord as shown.
Move the ends under
the holding cord, and over
the folded area, as you pull them
forward. >>
|

|
|
|
|
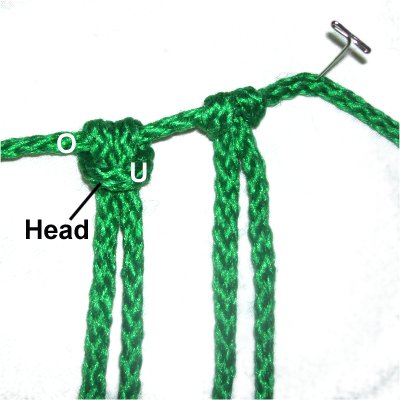
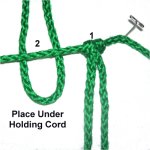
| Step 2:
Mount the second 3-yard cord to the left of the
first, with a regular
Larks Head knot, as shown below: |
|
|
| |
|
<<
Place the second cord under
the holding cord.
Bring the ends over
the holding cord and under
the folded area, as you pull them towards
you.
Tighten the knot firmly. >>
|
|
|
| |
| |

|
|
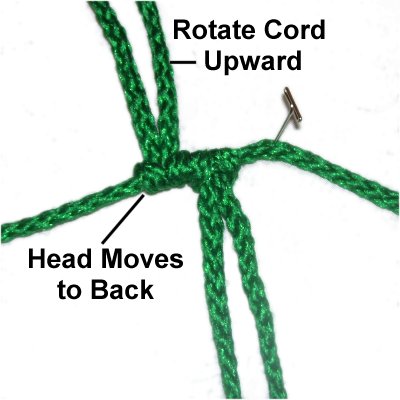
Rotate the
second cord upward, so the head of the
knot moves to the back.
This cord will be used to make the left eye
of the Far Away Frog.
|
|
| |
|
|
| Step 2,
continued: Attach three more cords
to the left
of the second, using reverse
Larks Head knots (see image below). |
|
|
|
|
|
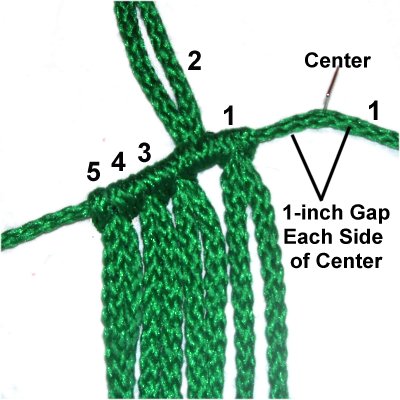
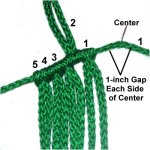
Repeat
step 2, adding the remaining five
3-yard
cords to the RIGHT of the pin at
the center.
The image shows where the first one should
be placed (#1), closest to the center.
There should be a 1-inch gap on each
side of the center (total of 2
inches). |
|
|
|
|
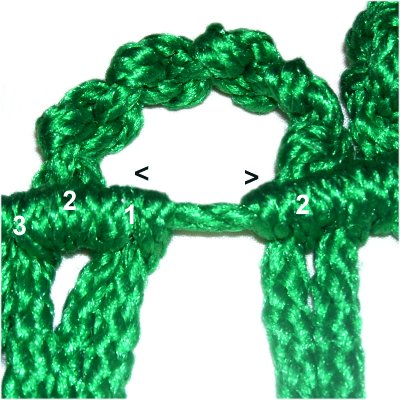
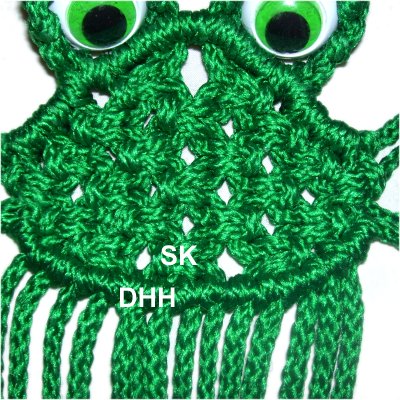
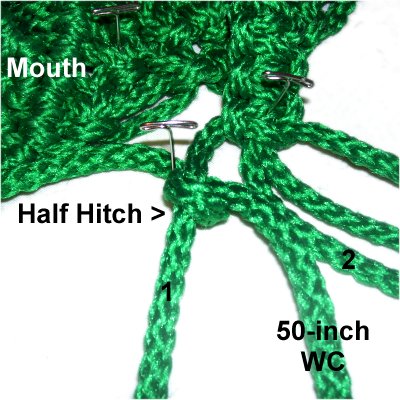
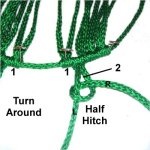
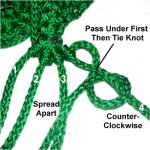
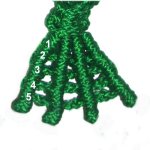
Step 3:
Mentally number the cords in the order they were
attached (see image above).
Turn
the design around, so cord 2 (on each
side) is in front of you. The remaining
cords for the Far Away Frog should be heading
towards the back of your project board.
Tie a sennit of Alternating Half
Hitches with the two halves of cord
2 on the right. Stop when it
measures 3
inches. Repeat with cord 2 on the
left.
Important: Make sure each
knot is tightened as much as possible, so there
are no gaps when it's pulled.
|
|
|
|
|
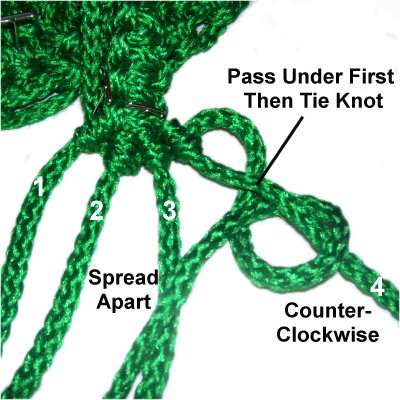
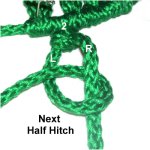
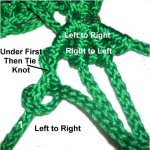
<<
Use the right
cord to tie a clockwise
Half Hitch onto the left.
Next, use the left
cord to make a counter-clockwise
Half Hitch onto the right. >>
Alternate back and forth to complete the
sennit.
|
|
|
|
|
|
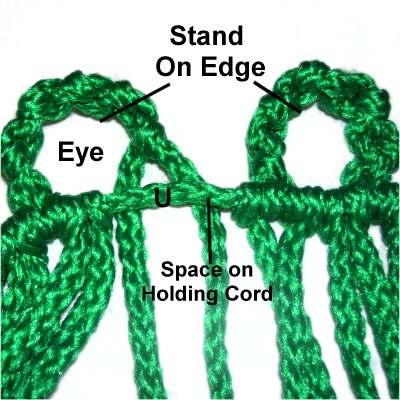
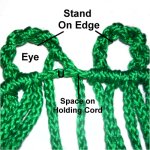
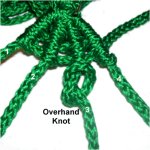
Turn the design again, to the original position
when you mounted the cords.
Form an eye loop with each sennit, and arrange
them standing on one edge.
(see image below)
The eyes of the Far Away Frog are surrounded by
these loops, so they have to be sideways rather
than flat.
Click on the
image below if you need to see a larger view. |
|
|
|
|
|
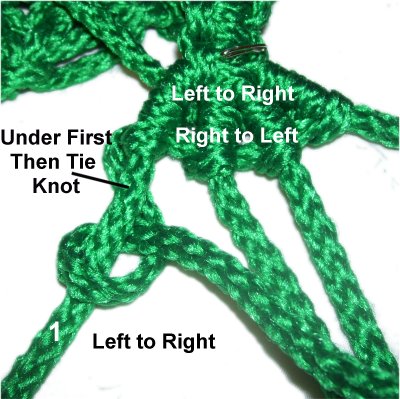
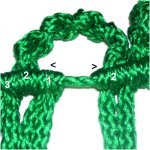
Pass the 2
ends of both cords under the holding cord,
in the 2-inch space you left in step 2
(center area).
Attach the cords with Double Half Hitches. |
|
|
|
|
|
|
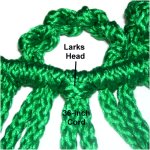
Step
4: On the left
eye loop, create some space between cord 1
and the DHH you just tied, by pushing the
knots left and right. |
|
|
|
|
|
|
Mount a
36-inch cord in the space, with a regular
Larks Head knot (head faces forward). |
|
|
|
|
|
|
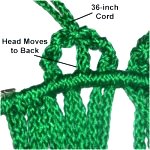
Rotate the
36-inch cord so the head moves to the back
and the ends are heading upward.
Pass the two ends through spaces at the
top of the eye loop, using tweezers or
pliers. |
|
|
| |
Pass the stem of one
eye between the 2 halves of the 36-inch
cord.
Important:
The eye loop should surround the eye
SNUGLY. You can adjust the size of the loop
if necessary, by untying the DHH (at the center)
and removing one or two knots.
Make sure the 36-inch cord is pulled taut, and
apply the washer.
When using eyes without washers, apply them in the
most appropriate way, using glue as needed.
Repeat step 4 to add the right eye for
your Far Away Frog.
When both eyes are in the position you want them
to be, add glue to the inside of the eye loops, so
they adhere to the eye. Do this in at least
4 areas.
|
|
|

|
|
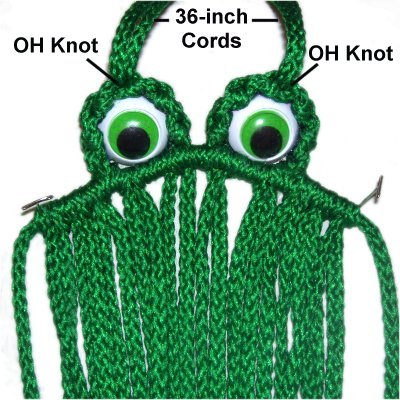
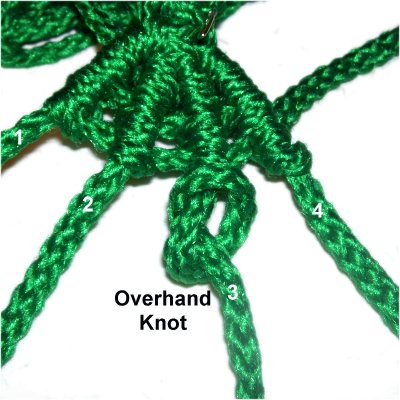
Tie Overhand
knots with the 36-inch cords, so the knots
rest against
the top of the eye loops.
When the glue is dry, tie the ends of both
36-inch cords together with a Overhand
Knot, to create the hanger for the Far
Away Frog. |
|
|
|
|
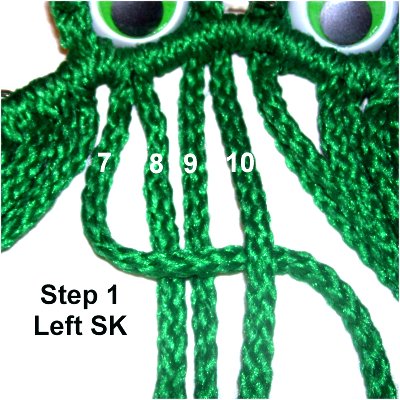
Step 5:
Mentally number the 3-yard working cords 1 -
20.
Do
not include the holding cord when counting.
|
|
|
|

|
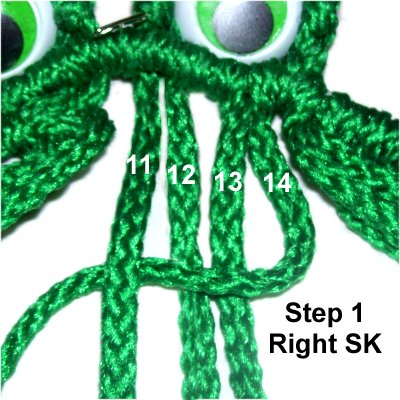
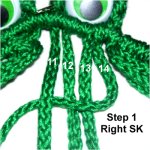
<<
Tie a Left
Square Knot with cords 7 - 10.
Tie a Right
SK with 11 - 14. >>
|
|
|
|
|
|
When making a Left SK,
the first working cord you move is always the left
one.
In the left image above, that's cord 7.
To make a Right SK,
you start with the working cord on the
right. In the right image, that's cord 14.
See the Square Knot
page for more details.
|
|
|
|
|
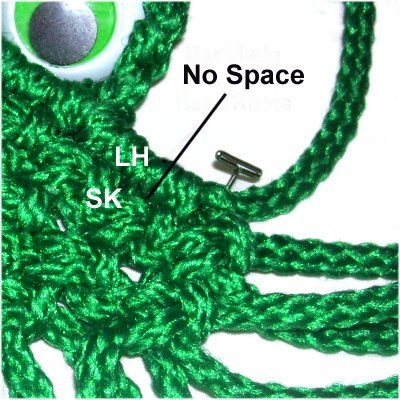
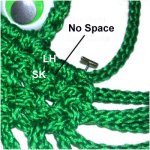
Important:
Tie all the following Square
knots firmly.
The first and last knots in each row
should be as close to the Larks Head knots
as possible, with no open space between
them. |
|
|
|
| |
|
Row 2: Tie
a Left
SK with cords 5 - 8 and 9 - 12, and a Right SK
with 13 - 16.
Row 3: Left
SK with cords 3 - 6, 7 - 10. Right
SK with 11 - 14, 15 - 18.
Row 4: Left
SK with 1 - 4, 5 - 8, 9 - 12. Right
SK with 13 - 16, 17 - 20.
Row 5:
Repeat row 3.
Row 6: Repeat
row 2.
|
| |
|
|
|
|
Step
6: Locate a space between
the 4th and 5th row of ASK, on the right
side of the Far Away Frog.
Cut one 15-inch piece of wire, and pass it
through the space.
Fold it in half, and twist the two halves
together several times. (see next image) |
|
|
|
|

|
|
Pass the ends
of the wire through a similar space on the
left side (between rows 4 and
5). The wire should arch
upward.
Do not secure the wire just yet, since you
may need to adjust it. |
|
|
|
|
|
|
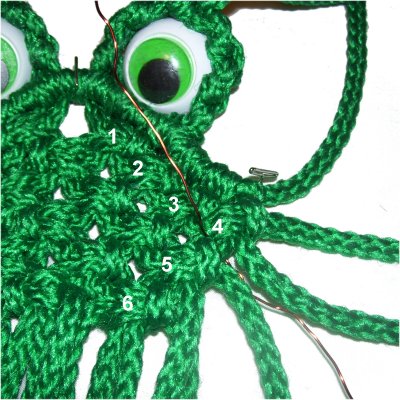
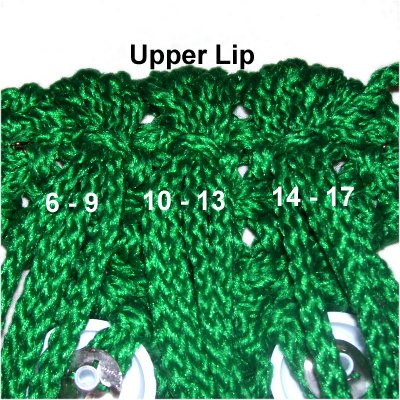
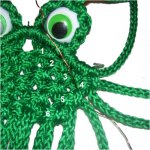
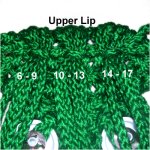
Step 7:
Mentally number all the cords, including
the ends of the holding cord,
1 -
22.
Attach cords
4 - 19 to the wire with Double
Half Hitches. (see details below)
This image shows the first
Half Hitch made by cord 4.
|
|
|
|
|

|
|
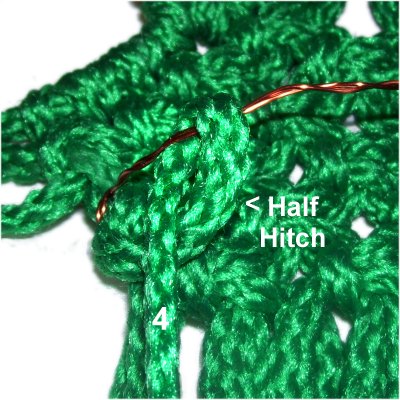
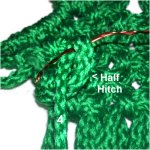
Important:
When attaching each cord to the wire, make
sure there are no gaps between the DHH and
the 6th row of ASK. So pull each
cord firmly before tightening the DHH.
In this image, the lip is flat on the
board to show the details. It's
better to attach the cords with the
wire arched upward. |
|
| |
|
|
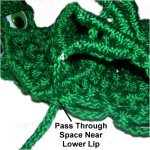
Once the upper lip is done, pull on the end of
the wire gradually,
to remove any slack. The knots should all be close
together.
Loop the wire and secure it to the back of the
face. |
|
|
|
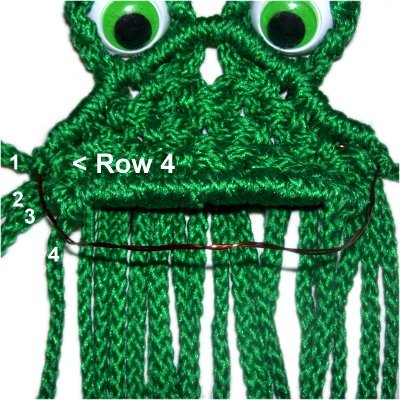
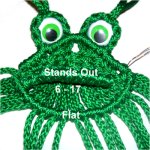
Step 8: Turn
over the Far Away Frog, so you are working in the
back. The eyes should be close to you, with
the unused portion of the cords at the back of
your board.
You will need to fold cords
6 - 17 so they attach to the back of the
face, pulling them towards
the eyes. This
is described below.
Start by dividing them up into three groups of 4
cords, passing each group under one SK in ROW
4.
There are a total of five SK in row 4. The
SK at the edges (1 and 5) are not used. The
three groups of cords pass under the SK numbered 2
- 4. |
|
|
|
|
|
Locate the
Square knot
at the center (#3).
Pass your pliers under one of the loops,
and then grab hold of cord 10. Pull
it under the loop (towards you).
Repeat this with cords 11 - 13, pulling
them under the same
loop. |
|
|
|
|
|
|
Pass cords 6 - 9 under a loop of SK #2.
Pass cords 14 - 17 under a loop of SK #4. |
|
|
|
|
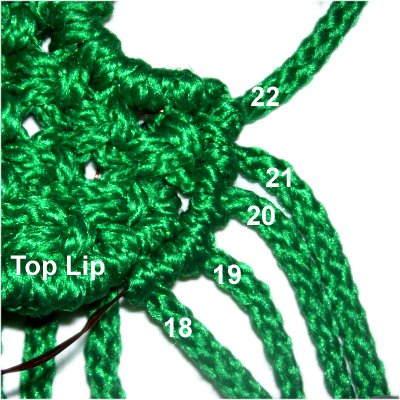
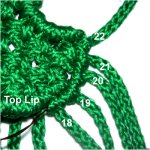
Step 9:
Cut another wire, 22 inches in length, for the
lower lip of the Far Away Frog.
Slide it through a space between rows 4 and 5, near
cord 1. It should rest against
the upper lip on the edges, and drop down in
front.
Twist the wire and then slide the
ends through a similar space on the right
edge. Do not secure the wire, since you will
need to make adjustments. |
|
|
|

|
|
Attach cords 1
- 5 to the wire with counter-clockwise
DHH, moving left to right.
Pull the cords firmly so that the upper
lip is close to the knots you are tying.
You can see this more clearly in the next
image.
|
|
|
|
|
|
|
Attach cords 22 - 18 to the wire with clockwise
DHH, moving right to left.
|
|
|
|
|
|
|
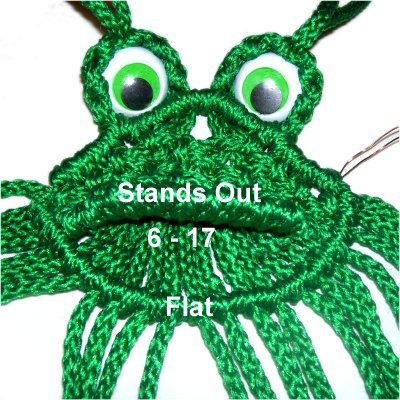
Complete the
lower lip by attaching cords 6 - 17.
Pull each one so it has tension, before
tying the DHH.
Make sure the lower lip is flat
on the board. Pull the ends of the
wire to remove any slack, making sure the
knots are close together.
|
|
|
|
Arrange the upper lip so it stands out, bending
the wire into a neatly rounded shape. The
lower lip should also be curved.
Loop the ends of the second wire and secure it on
the back of the face. |
|
|
| |
|
Step 10:
Finish off the holding
cord by moving the ends to the back
of the Far Away Frog, then weave them under one
or more loops.
Apply glue. When it's dry, cut off
the excess material.
|
|
|
|
|

|
| |
The Body
|
|
|
| Step 11: Mentally number
the remaining cords 1 - 20. Tie four rows of
ASK as described below: |
|
|
|
|
Row
1: Tie a Left
SK with cords 1 - 4.
Tie a Right
SK with cords 17 - 20.
These knots should rest close to the DHH
for the lower lip,
tilted on an angle. (see
image below)
|
|
|
|
|
|
Row
2:
Tie
a
Left SK with 3 - 6 and 7 -
10.
Tie a
Right SK with 11 - 14 and 15 -
18.
These knots should also be on an angle,
and as tight as possible. The lower lip
may pop outward slightly. |
|
|
|
|
Row 3: Left
SK with 1 - 4, 5 - 8, 9 - 12. Right
SK with 13 - 16, 17 - 20.
Row 4:
Tie a Left
SK with 3 - 6 and 7 - 10. Tie
a
Right SK with cords 11 - 14 and 15 -
18.
The knots for these two rows should be horizontal.
|
|
|
|
| Step 12:
You will now be adding
2-yard cords to make the body of the Far Away
Frog, as described below: |
|
|
|
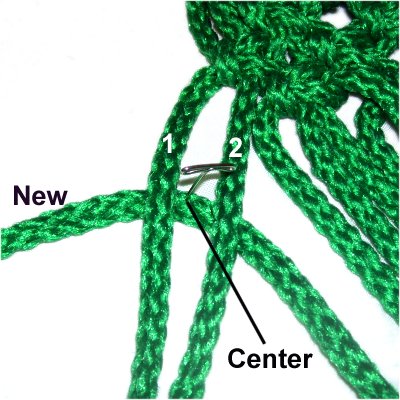
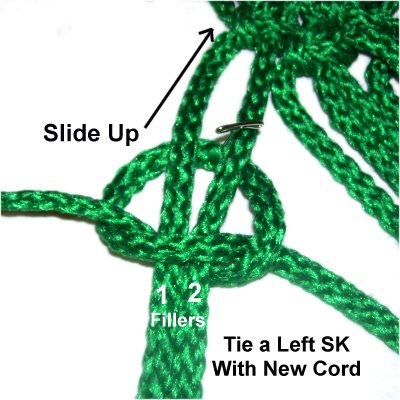
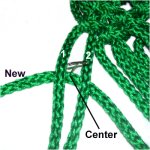
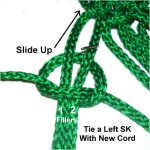
<<
Fold a new 2-yard cord in half, and secure it
under
cords 1 and 2.
Tie a left SK with the NEW
cord. The fillers are cords 1 and 2.
Slide it up so it rests against the knot
in the previous row. >>
|
|
|
|
|
|
| Repeat the process above, adding new 2-yard
cords, and knotting as follows: |
|
|
- Add to cords 3 - 4 (Left
SK)
- Tie a Left SK with cords 5 - 8 (do not add a
new one)
- Add to cords 9 - 10 (Left
SK)
- Add to cords 11 - 12 (Left
SK)
- Tie a Right SK with cords 13 - 16 (do not
add a new one)
- Add to cords 17 - 18 (Right
SK)
- Add to cords 19 - 20 (Right
SK)
|
|
|
|
|
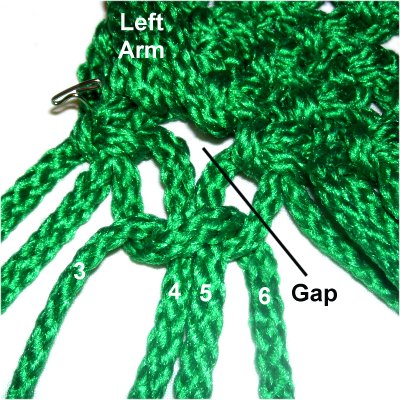
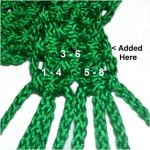
Step 13:
Mentally re-number the cords and tie a row of
ASK as follows:
- Left
SK with 3 - 6, 7 - 10, 11 - 14, 15 -
18
- Right
SK with 19 - 22, 23 - 26, 27 - 30
|
|
|
|
|
|
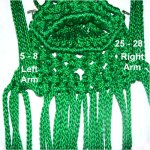
Step 14:
Separate cords 5 - 8,
and
25 - 28.
Secure them out of the way for now, since
they will be used for the arms
of the Far Away Frog (step 19). |
|
|
|
|
Step 15:
Mentally re-number the cords. Tie 5 rows of ASK,
with the cords described below.
In row 1, the first and last knots are tied across a gap,
in the areas where you separated the cords for the
arms.
Tighten the knots as much as possible, and pull
down on the fillers.
This may cause the body to pop outward slightly,
which is OK. The Far Away Frog is not supposed to
be completely flat. |
|
|
|
|
|
Row
1: Left SK with
cords 3 - 6. Pull down firmly on the
fillers (cords 4 - 5) after you tie the
knot.
Left
SK with cords 7 - 10
and 11 -14. Right
SK with cords 15 - 18.
Right
SK with cords 19
-22. Pull on cords 20 - 21
(fillers), after tying the knot. |
|
|
|
|
Rows
2 + 4: Left
SK with cords 1 - 4, 5 - 8, 7 - 12.
Right
SK with cords 13 - 16, 17 - 20, and 21
- 24.
Rows
3 + 5: Left
SK with cords 3 - 6, 7 - 10, 11 - 14.
Right
SK with cords 15 - 18, 19 - 22.
|
|
|
|

|
|
Step
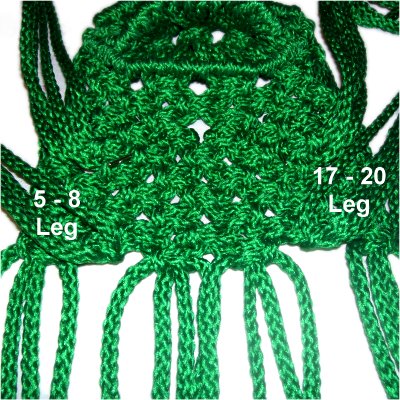
16: Separate cords 5 8 and 17
20 for the legs
of the Far Away Frog.
Secure these cords to the side, as you did
those for the arms. |
|
|
|
|
|
Step 17:
Re-number the cords 1 - 16. Tie the next
rows of ASK as follows:
Row 1: Left
SK with cords 3 - 6. Pull on the fillers
(4 and 5) to remove the slack, since you are tying
across a gap.
Left
SK with cords 7 - 10.
Right
SK with cords 11 - 14. Pull on the
fillers to remove the slack.
Tighten the knots in rows 2 and 3 as much as you
can, so the lower body begins to get rounder:
Row 2: Left
SK with 1 - 4, 5 - 8.
Right SK with 9 - 12, 13 - 16.
Row 3:
Left SK with 3 - 6 and 7 -
10. Right
SK with cords 11 - 14 |
| |
|

|
|
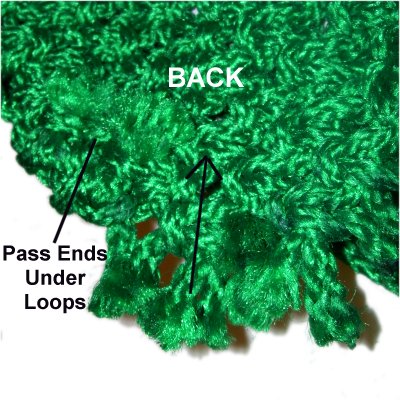
Step 18:
Trim the ends to 2 inches, and move them
to the back
of the Far Away Frog.
Pass them under a loop of
the Square Knots in row
2.
Apply glue to hold them in
place.
|
|
|
|
|
|
|
|
Arms, Legs, Feet
|
|
|
|
|
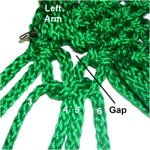
Step 19:
Locate the two groups of cords you
separated in step 14, for the
arms.
Tie 5 Square Knots with the left group, to
make the left arm for the Far Away Frog.
Make sure you identify the front
of the sennit,
which faces you when the arm is
bent towards the face. |
|
|
|
|
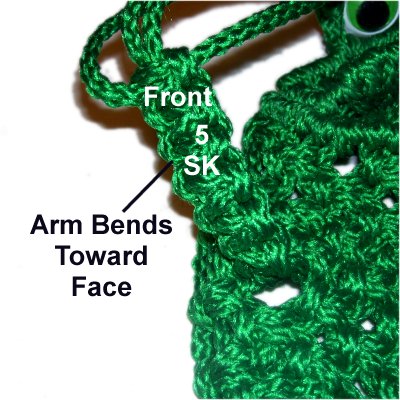
Step 20:
The next few steps will make more sense if you
turn the Far Away Frog so the top of the head is
on the left side of your board, with the left edge
close to you.
Bend the left arm towards the face, and then on an
angle (towards you), as shown below.
This ensures that the front of the arm is face up.
Mentally number the four cords. |
|
|
|
|
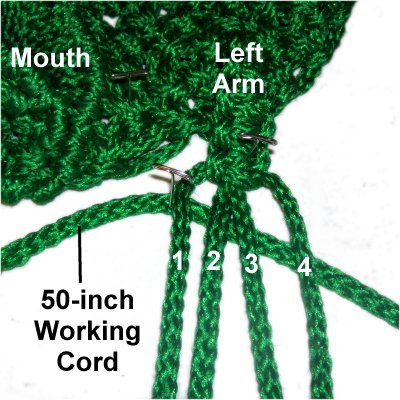
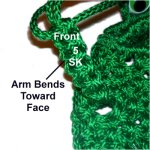
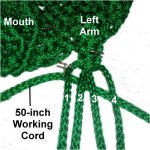
Secure one of
the 45-inch
working cords to your board, next
to cord
1 of the left arm.
Leave a 2-inch tail
at the left.
Cords 1 - 4 are holding
cords. Slide the working cord
under each one prior to tying the knots
onto them.
|
|
|
|
|
|
|
Use the
working cord to tie a clockwise
Vertical (Double) Half Hitch around
holding cord 1.
This image shows the first loop. The
second loop rests below
the first. Push the knot up as far
as possible.
The working cord should rest to the right
of cord 1 when you are through. |
|
|
|
|
Position the working cord under
cord 2. Tie a vertical (Double) Half Hitch
onto cord 2, as you did cord 1.
Repeat this two more times, tying the knots onto
cords 3 and 4. Make sure you move the
working cord under
the one holding the knot first, then tie the knot. |
|
|
|
|
|
For the second
row, you move right
to left, so all the loops are counter-clockwise.
Spread out holding cords 1 - 4 so there is
more space between them. They should
be diagonal. |
|
| |
| |
| |
|
|
Make 2 more
rows of knots in the same manner.
Spread the holding cords further apart, so
the space between them increases.
This image shows the start of row 3 (left
to right).
|
|
| |
|
|
|
|
Step
21: Tie tight Overhand
Knots in each of the
holding
cords, so they rest
against the Half Hitches in row 4.
Apply glue as you tighten, so it's on the
inside of the knot. |
|
|
|
|
Move both ends of the working
cord to the back
surface of the arm (includes
the 2 inch tail).
Weave them under any loops in the
area. Apply glue and trim as needed.
|
|
|
|
|
|
Bend the left
arm up to the mouth of the Far Away Frog,
and straighten it.
Pass cord
4 through a space next to the
lower lip, near the left edge of the face.
Secure it in the back of the design, by
sliding it under loops in the area.
|
|
|
|
|
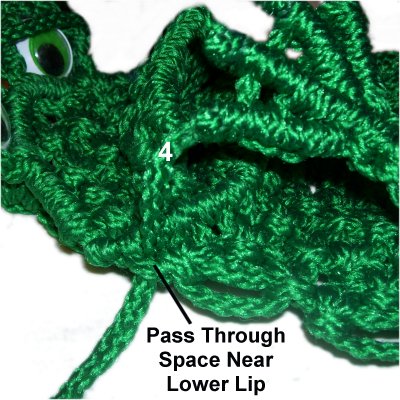
Once the left arm is positioned, you can finish
off the remaining three holding cords (1 - 3) by
cutting off the excess material.
Step 22: Repeat steps 19 - 21,
to make the right arm, using the other set of
cords separated in step
14.
It helps to arrange the head of the Far Away Frog
on your right.
The cord used to attach the arm to the face is the
one furthest to
the right when the arm is folded. |
|
|
|
|
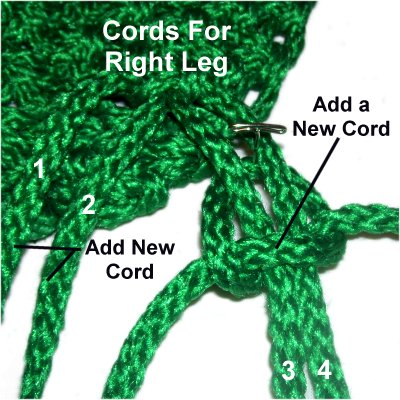
Step 23:
Locate the 4 cords you separated in step
16, to make the legs.
Mentally number the four cords for the right
leg. |
|
|

|
|
Add a new 2-yard cord to
cords 1 and 2 with a Left SK, as
described in step
12.
Add another 2-yard cord to cords 3 and 4
with a Right SK.
Mentally number the 8 cords. |
|
|
|
|
|
|
Tie 4 rows of Alternating
Square Knots:
Row 1: Tie a Left
SK with cords 3 - 6.
Row 2: Tie a Left
SK with cords 1 - 4, and a Right
SK with cords 5 - 8.
Row 3: Repeat row 1.
Row 4: Repeat row 2.
|
|
|
|
|
|
|
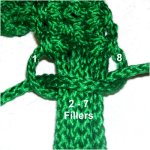
Step
24: Use cords 1 and 8 to tie four
SK
around cords 2 - 7, which are
fillers.
Tighten them as much as you can. |
|
|
|
|
|
|
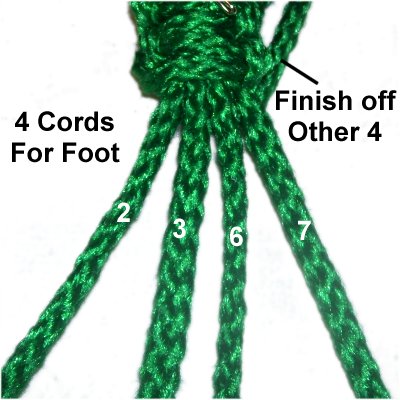
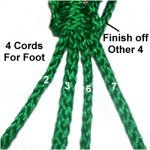
Secure cords
2, 3, 6 and 7 to your board. They
will be used for the foot.
Finish off the other 4, as described
below:
|
|
|
|
|
|
|
Bend cords 1,
4, 5, and 8 to the back
of the right leg.
Pass them under one loop of the third
SK you tied for the leg.
Apply glue to secure them. Cut off
the excess material from 3 of the
cords. Leave
one long, preferably cord 4 or 5. |
|
|
|
|
|
|
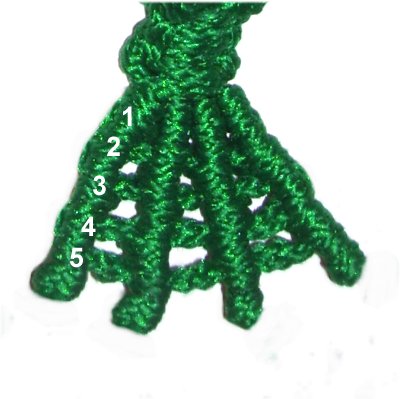
Step
25: Repeat step
20 to make the webbed
foot. Use a 60-inch
cord, and tie a total of 5 rows
of Vertical DHH knots.
Finish off all 4 of the
holding cords with Overhand knots, as
you did in step
21.
|
|
|
|
|
|
Bend the right
leg towards the body of the Far Away
Frog.
Use the long cord you did not finish off
(step 24) to secure the leg close to the
lower curve of the body.
The best way is to pass it through a space
in the body and then slide the end under
loops in the area. |
|
|
|
| |
|
Step 26:
Repeat steps 23 - 25 to make
the left leg for your Far Away Frog.
|
| |
|
|
|
|
| |
Finishing Touches
|
| |
|
Step 27: This
step is optional.
Clip 4 - 6 of the vertical cords
inside the mouth, if you want it to have an open
space.
Weave them under loops in the area
and apply glue.
You can secure a branch to the
bottom of the Far Away Frog using scrap cord.
Another option is to attach a
dowel or ring to his back feet and use him to
hang towels.
Straighten the mouth wires into a
nicely curved shape, and manipulate the knots so
the body is rounded.
|
| |
|
|
|
|
By
using any text or images on Free Macrame
Patterns, you are agreeing to our Terms
of Use
|
|
|
|
|
Have
any comments about the Far Away Frog? Contact
Me.
|
|
|
| |
|
| |
|
| |