|
|
| |
|
| |
| |
|
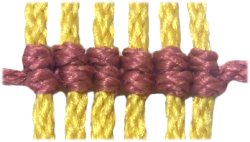
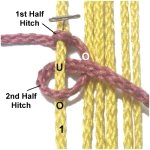
Description: The Vertical Half
Hitch (VHH) is a unique variation of the Half
Hitch. Since two knots are tied, it's
often called the Vertical Double
Half Hitch, especially in older Macrame books.
What makes it unique is that the two Half
Hitches are arranged vertically, with the
second Half Hitch resting in front of the
first (below in images). In a regular DHH,
the loops are side-by-side.
One
working cord is used to tie the knots onto several holding
cords.
With the regular Double Half Hitch, it's the
opposite: There are several working cords and
usually one holding cord.
|
|
|
|
|
|
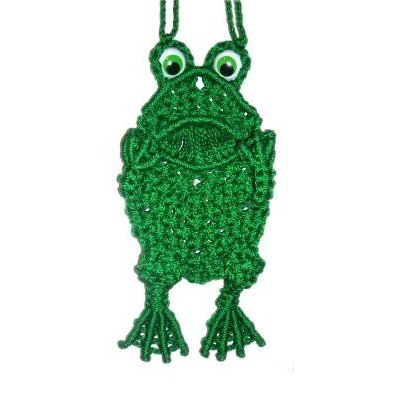
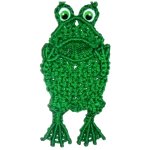
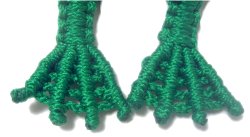
The Far
Away Frog has webbed feet
made with the Vertical Half Hitch.
Click on the link
if you wish to make this cute
decoration. |
|
|
| |
| |
| |
Basic Instructions
|
|
|
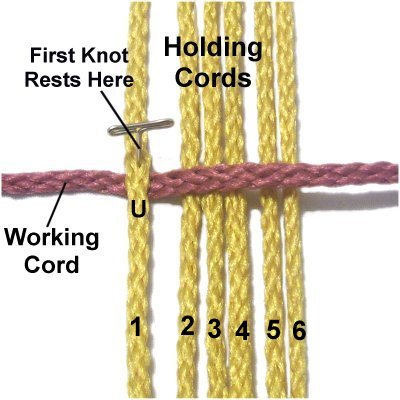
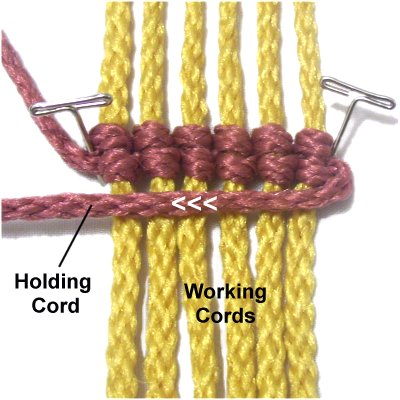
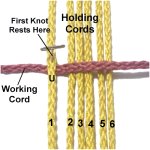
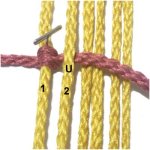
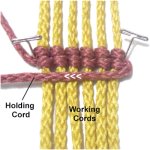
Step 1:
Fold three holding cords in half and arrange them
on your board vertically.
Secure the cords at the top and bottom, pulling
them so they have lots of tension and are
straight.
Mentally number the cords 1 - 6. |
|
| |
|
|
Secure a 36-inch working cord to the left
of the others, arranged horizontally.
Bring it under
holding cord 1, and place a pin where
you want the first knot to rest.
|
|
| |
|
|
Designer's
Tip: To form a straight line,
you can place a piece of masking tape across the
board (horizontally or diagonally).
When you tighten the knots, make sure they touch
the edge of the tape. |
|
|
| |
|
|
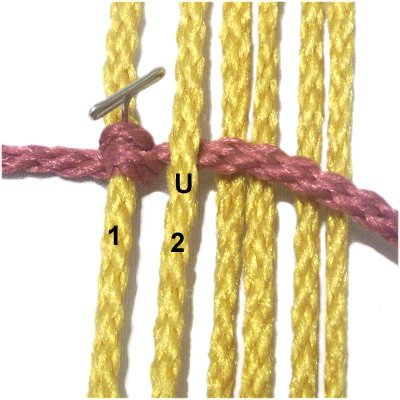
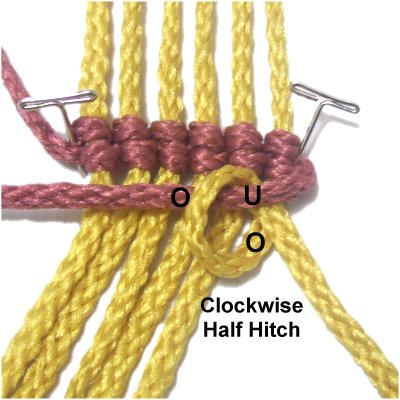
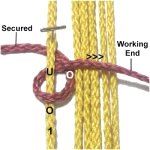
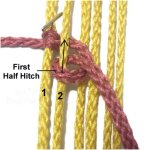
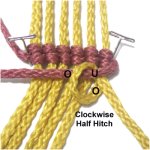
Step 2: Tie a clockwise
Half Hitch by moving the working cord over
- under holding cord 1.
As you pull the working end to the
right, pass it over
the working cord.
Tighten the Half Hitch firmly.
Slide it up to rest against the
pin.
|
|
| |
|
| |
|
|
Step 3: Repeat
step 2, tying a second Half
Hitch next to the first one.
Tighten this knot firmly while making
sure the first one doesn't loosen.
Steps
2 + 3 = One Vertical Half Hitch
|
|
| |
|
| |
|
|
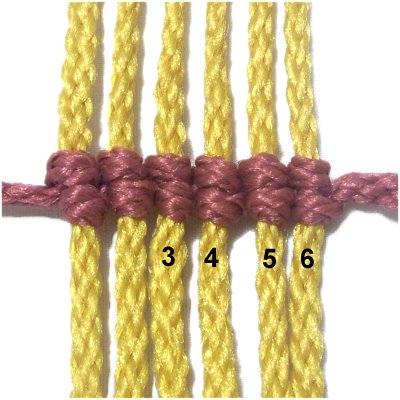
Step 4: Move the
working end under
holding cord 2.
|
|
| |
|
| |
|
|
Step 5: Repeat
step 2, tying a Vertical Half
Hitch onto holding cord 2. As you
tighten it, move the knot back so it
rests very close to the knots previously
tied.
Tie the second Half Hitch next to the
first, as you did in step 3.
|
|
| |
|
|
Designer's
Tip: The most challenging part to
this design is making sure the knots rest close
together. You should pull (or push) the
holding cord you are using towards the one holding
the previous knot, while tightening both Half
Hitches.
Make sure the FIRST Half Hitch in each pair
remains tight
as you construct and tighten the second
knot. |
|
|
| |

|
|
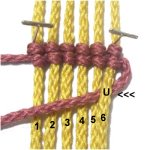
Step
6: Continue repeating the same
process, tying two Vertical Half Hitches
onto holding cords 3 - 6. |
|
| |
|
| |
|
|
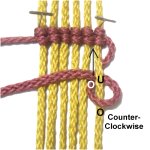
Step 7: Some Macrame
patterns require you to reverse
direction, so you should practice that
now.
Bring the working cord under
holding cord 6.
|
|
| |
|
| |
|
|
Step 8: Tie the Half
Hitches counter-clockwise,
so the working end is heading left.
Move the first Half Hitch before
tightening, so it rests
against
the knots in the previous row.
|
|
| |
|
| |
|
|
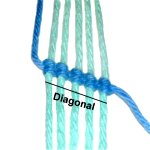
Designer's
Tip: Vertical Half Hitch
designs can be made diagonally. Just
position the knots so they have a gradual
downward slant.
Placing a piece of tape as a guide really
helps.
|
|
| |
| |
| |
 |
| |
Color Changes
|
|
|
|
| |
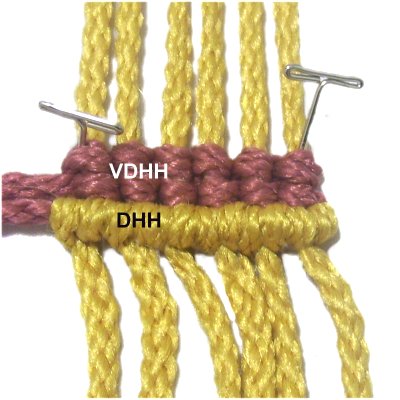
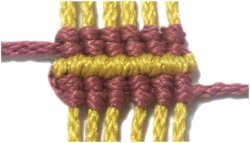
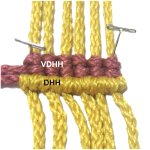
Many Macrame designs
feature both the regular Double Half Hitch as well
as the Vertical Half Hitch.
By using both variations, elaborate designs can be
made where the colors shift back and forth.
Here is the basic concept and one very simple
example: |
| |
|
| |
|
|
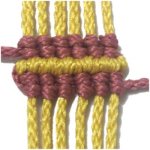
Step
1: Tie
a row of Vertical DHH moving left to
right, as described in steps 1 - 5 of
the basic instructions
above.
Move the working cord back to the
left, horizontally. It will now
be used as a holding
cord.
|
|
| |
|
| |
|
|
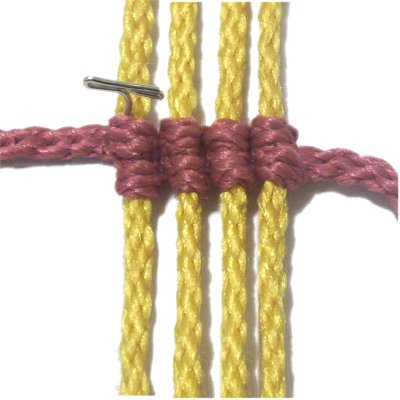
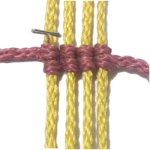
Step
2: Tie a row of Double Half
Hitches with the vertical cords onto the
new holding cord, beginning with the cord
furthest to the right.
They should be clockwise,
since you are moving right to left.
|
|
| |
|
| |
|
|
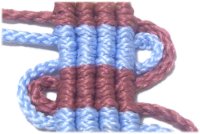
Make sure the
knots in the second row are touching the
knots in the first row, so there are no
gaps.
Tighten all the Half Hitches really well,
so the row looks neat. |
|
| |
|
| |
|
Designer's Tip:
When switching between two colors like this,
just remember that the
working cords determine the color for
that row.
The holding cord will not be seen, since the
knots cover it.
|
| |
|
| |
|
|
Practice
switching colors again, by repeating step
1, followed by 2 (optional). |
|
| |
| |
|
| |
|
| |
Webbed Feet
|
| |
|
| |
| |
|
Ever wonder how Webbed Feet
for Frogs and Birds are made?
You use the Vertical Half Hitch, positioning
the holding cords further
apart as you complete each row.
You can also make fans and other triangular
designs with this technique.
|
| |
|
| |
|
|
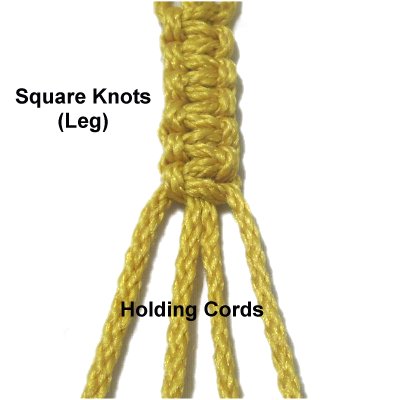
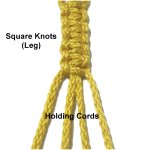
Step 1: Fold two
36-inch cords in half, and secure them
at the center.
Tie several Square
Knots to mimic the legs
of a bird or frog.
Secure the four cords with tension,
since they are the holding
cords for the foot.
|
|
| |
|
| |
|
|
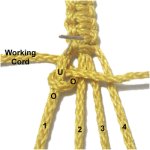
Step 2: Secure a
36-inch working cord to the left of the
holding cords. Mentally number the
holding cords.
Tie a Vertical Half Hitch with the
working cord, onto holding cord 1.
The Half Hitch should be tied clockwise,
since you are moving left to right.
|
|
| |
|
|
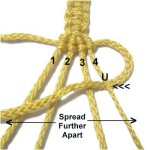
Step 3:
Complete the first row of Vertical Half Hitches as
described in the basic instructions (steps 4 - 6).
The knots should rest close together with no gap
between them. Slide the knots back, so they
rest against the Square Knot at the bottom of the
leg. |
|
|
|
| |
|
|
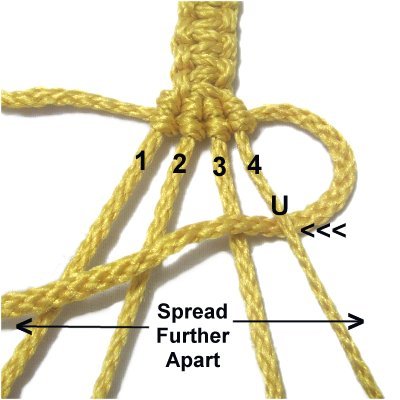
Spread the holding cords further
apart.
Move the working cord back towards the
left, passing under holding cord 4.
|
|
| |
|
| |
Designer's
Tip:
The knots on the holding cords are the
"toes" for the foot.
The webbing
between the toes is made by moving the holding
cords further and further apart. |
| |
|
|
|
|
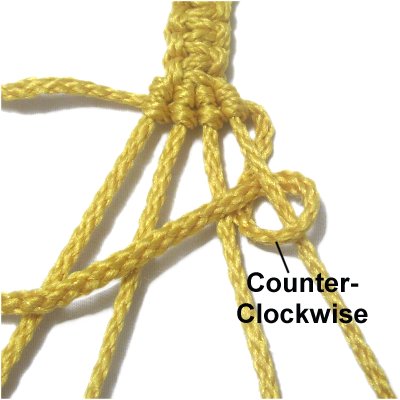
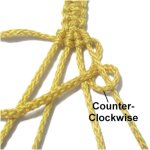
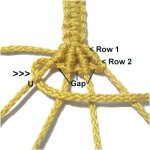
Step
4: Tie the 2nd row of
Vertical Half Hitches starting with
Holding cord 4, and ending with cord
1.
There should be a gap between the holding
cords, so you can see the working cord
(next image).
Since you are moving right to left, the
Half Hitches are tied counter-clockwise. |
|
|
|
| |
|
|
Step
5: Spread the holding cords
further apart. Tie the 3rd row moving left
to right, and tying the knots clockwise.
Spread the holding cords again, and tie
the 4th row moving right
to left. The knots should
be tied counter-clockwise.
|
|
| |
|
| |
|
|
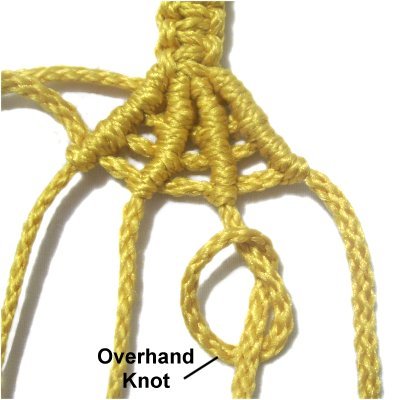
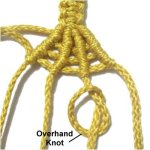
Step
6: Most Macrame patterns
will have you tie Overhand
Knots or
Barrel
Knots with the holding
cords, to prevent the knots from sliding
down.
They should rest against
the last row of Half Hitches. Apply glue
before cutting off the extra material. |
|
| |
| |
|
| |
|
|
Picot Design
|
| |
|
| |
|
|
This Vertical Half Hitch technique features two
sizes of picots on each edge. It
was found in an old Macrame book written in
1903.
Secure 4 holding cords vertically on your board,
so they have tension and are straight.
Cut two 36-inch working cords as well, preferably
two
different colors. |
| |
| |
|
|
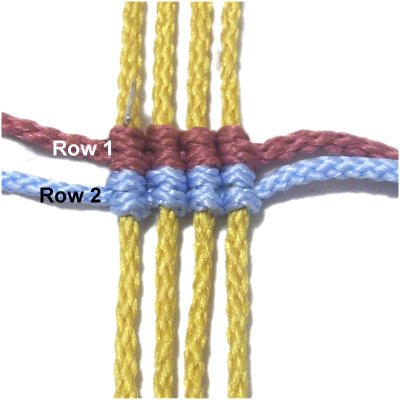
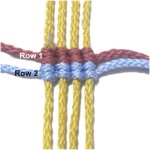
Step 1: Tie the first
row of Half Hitches moving left to
right, using one of the working cords
(Steps 1 - 6 of the basic instructions).
The knots are tied clockwise.
|
|
| |
|
| |
|
|
Step 2:
Tie the second row of knots using the
other working cord.
Move left to right, as you did in step 1. |
|
| |
|
| |

|
|
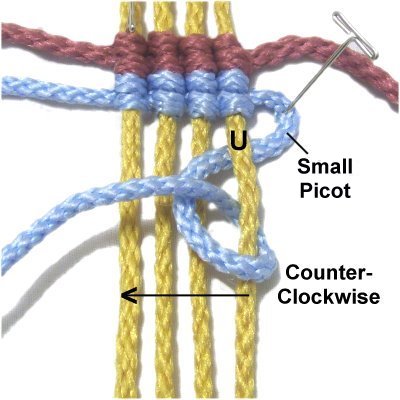
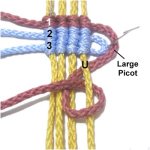
Step
3: To start row 3, move the
cord used in step 2 under
the 4th holding cord. Secure a small
portion to the right, forming a small
picot loop.
Tie counter-clockwise
Half Hitches onto holding cords 4 - 1 (right
to left).
|
|
| |
|
| |
|
|
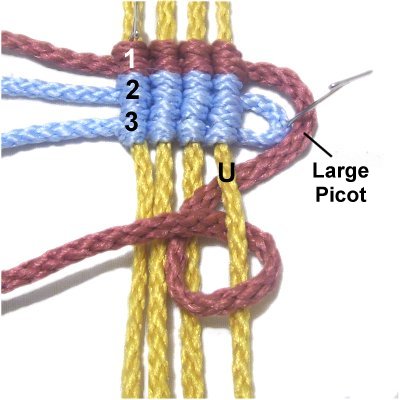
Step
4: Start row 4 by moving
the working cord used in row 1 around
the pin holding the small picot
loop.
Pass it under
holding cord 4, then tie the Half Hitches.
Tie the remaining knots onto the other
holding cords.
|
|
| |
| |
| |
|
|
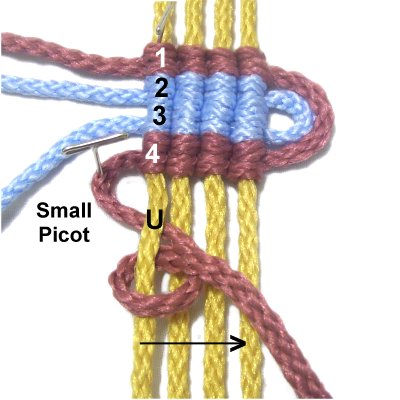
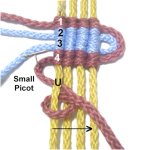
Step 5: Start
row 5 by moving the working cord used in
row 4 under holding cord 1.
Secure a small portion to the left to
form a small picot loop.
Tie clockwise
Vertical Half Hitches on cords 1 - 4
(left to right).
|
|
| |
|
|
|
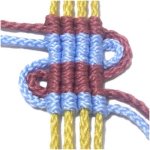
Step
6: Row 6 is made with the
working cord used in row 3. Move it
around the pin holding the picot from the
previous step.
Pass it under cord 1, then tie the Half
Hitches. Repeat with the other
holding cords. |
|
|
| |
| Designer's
Tip: The key to this Vertical Half
Hitch design is to tie two rows with each color,
alternating the direction every other row. |
|
| |
|
|
|
|
| By using any
text or images on Free Macrame Patterns, you are
agreeing to our Terms of Use |
|
|
|
|
Have
any comments about the Vertical Half Hitch? Contact
Me.
|
|
|
|
|
|
| |