Description:
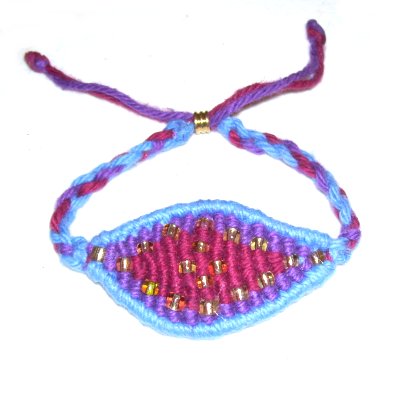
The Beaded Eye Bracelet features the
classic decorative knot called the Double
Half Hitch.
The strap
for this Micro-Macrame bracelet can be made with a
number of knotting techniques. Visit the Learn Macrame section
to find instructions for various knots to choose
from.
Use a knot that can be tied to produce either a
sennit, braid, or bar. Make sure it can be
tied with 4
cords.
The eye design shown above needs to be finished so
it's comfortable, since it's supposed to rest
against the skin. So make sure you use fabric
glue for this Macrame project.
In the example shown, I used cotton Crochet cord,
since you need flexible
material for this design. Glass
E-beads are part of the pattern, but you can
choose any style, as long as they are small.
The closure is a simple bead clasp, which can be
changed to a Sliding Clasp.
Supplies
Needed:
2 mm flexible
cord material
18 small beads
Project
Board and pins(small size that can be rotated
easily)
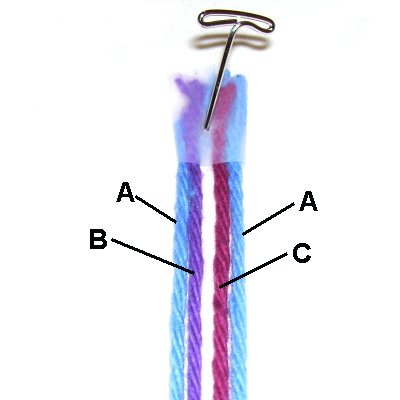
Cut four
cords, each at
least 36 inches long.
Secure them vertically to your board at
one end.
Increase this length if you choose to use
a decorative knot other than a simple
braid for the strap of the Beaded Eye
Bracelet.
In the example shown, color A is blue,
color B is purpleand color C is wine.
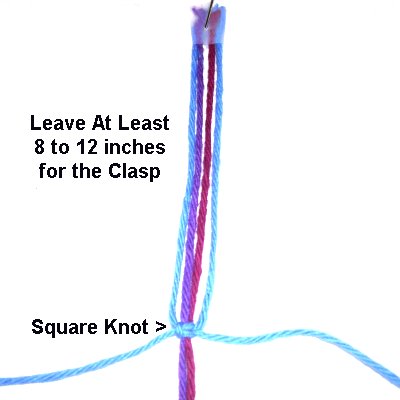
First Half of Strap
Begin the strap by tying a Square
knot at least 8 to 12
inches from the secured ends of the
cords. The portion behind it
(without knots) is for the clasp.
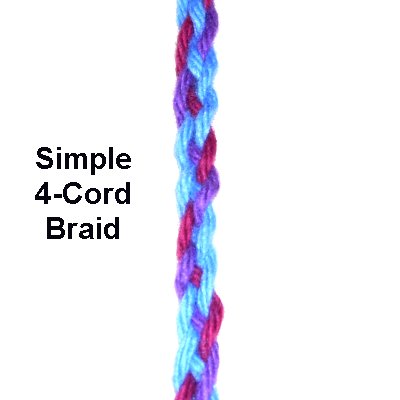
A simple 4-cord braid was tied for the
Beaded Eye Bracelet shown. See Interlaced
Plaits for braiding
instructions.
Determine your wrist size with a tape
measure. The bracelet fits against
the skin, so measure as if you
were wearing it.
Subtract2.5
inches for the
eye. Divide the result by two, and
tie the first half of the strap to that
size.
Tie a Square
knot to complete the strap.
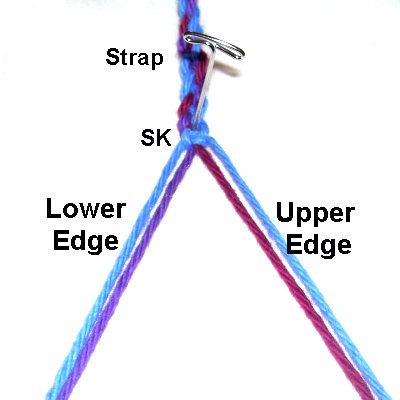
Secure the
strap to your board. Separate the
four cords as shown, and secure them so
they have tension.
These long cords form the upper and lower
edge of the eye. (Look at the image
at the top of the page, where you can see
the edges, which are blue).
From this point on I will call these long cords
the upperor
lower edge.
I'll be describing the cords attached to them as holding cords.
The working
cords and beads
will later be attached to the holding cords.
First Half of Eye Design
While working on the Beaded Eye Bracelet, you
should tryto
tie all the Double Half Hitches horizontally or
diagonally.
You do this by rotating
the board rather than the bracelet.
This is especially important when you attach a new
holding cord to the long cords for the upper and
lower edge.
Cut 17 cords of Color
A, each at least 8 inches long (holding
cords). Prepare the tips with glue and/or
beeswax.
Before it dries, roll the end between your fingers
to make the tip as small as possible (for
beading).
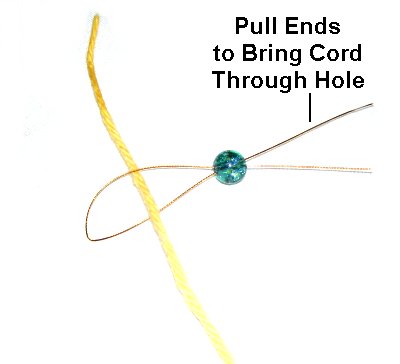
Another
option for threading beads is to use a wire
threader:
Fold a piece of wire in half and slide
both ends through the bead. Place
the end of the cord through the wire near
the fold. Pull the ends of the wire,
along with the cord, through the
bead.
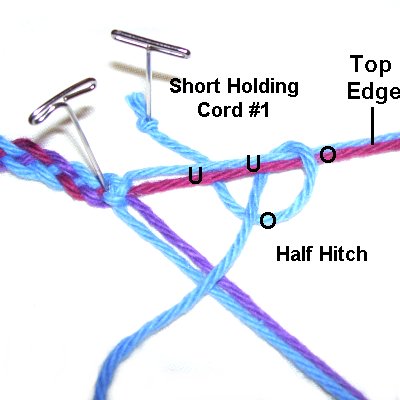
Step
1: Rotate the board as
shown, with the strap on your left.
Secure the 1st
holding cord to your board.
Slide it under
the two for the top edge.
Tie a Half Hitch by making a loop over
- under - over, using the
unsecured portion.
As you tighten it, move it as close to the
strap as possible (left).
Important
Tips:
Always
start by moving the short
holding cordsunder
those for the topedge.
When you attach the cords to the lower edge,
do the same thing.
Slide the knots close to the others just
before tightening.
When you tighten the first Half Hitch in
each pair, pull it firmly.
The second knot will be tighter if you do
this. The knots for the Beaded Eye
Bracelet need to be neat and this will help.
The arrangement of the beads can be
changed. In this example, they were
added every other row.
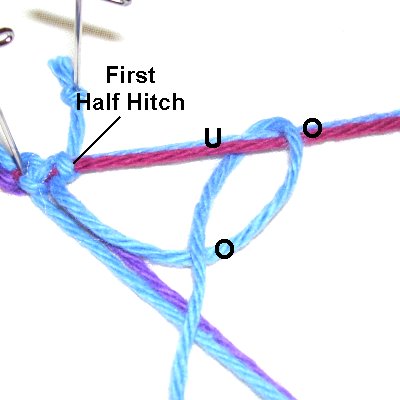
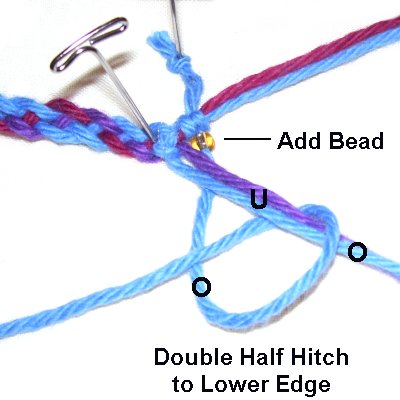
Tie another
Half Hitch, placing it to the right
of the first.
Two
knots = 1 Double Half Hitch (DHH)
Add one bead
to holding cord
1.
Move cord 1 under
the long cords for the lower
edge, and then attach it to them
with a Double Half Hitch.
Remember, you can turn the boardso the knots for the Beaded Eye
Bracelet are horizontal (optional).
Step 2: You
will now be adding the working
cords, by attaching them to the 8-inch
holding
cords with a reverse
Larks Head knot.
Cut 1 color
B cord, 38 inches long (purple)
Cut 2 color
C cords, 35 inches long (wine)
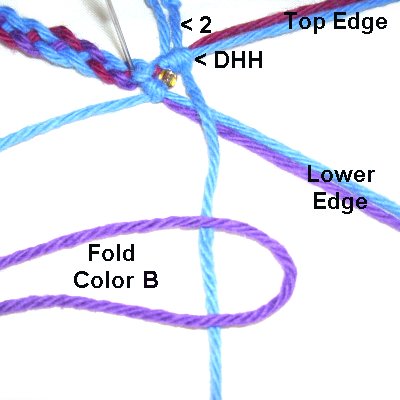
Attach the 2nd
holding cord to the top edge,
placing it to the right of the first one.
Fold the color
B cord in half and place it on top
of holding cord 2.
The folded area should be on the right,
with the ends on the left.
To complete
the reverse Larks Head knot, bring the
ends of the color
B cord underholding
cord 2. Pass them over
the folded area.
Before
tightening the knot, move it
between the cords for the top and lower
edges, next to the bead.
Step 3: Move
holding
cord 2under
the long cords for the lower
edge, then attach it to them with a
Double Half Hitch.
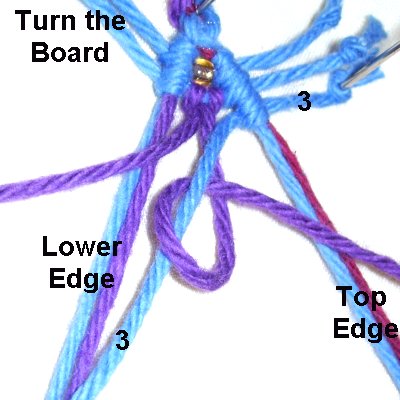
Attach the 3rd
holding cord, as you did the others, to
the top edge
of the Beaded Eye Bracelet.
Turn the board,
so the working
cord is vertical.
Attach the right
half of the working
cord to the 3rd holding cord with
a DHH.
Add a bead to the holding
cord,then attach the left half.
Important:
The holding cord is on an angle in this
image to show the details more
clearly. It should be horizontal
as you tighten the knots.
Designer's
Tip: You do not need to secure each
holding cord as you tie the knots for this area of
the Beaded Eye Bracelet.
You can simply hold them with your left hand,
while tying the DHH with your right. This
way you can control the tension.
Step 3,
continued: Turn the board to it's
original position, and attach the 3rd
holding cord to the lower edge with a
DHH.
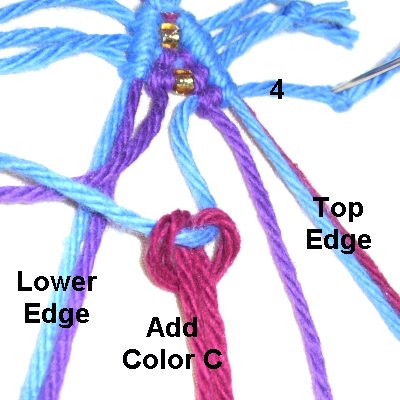
Step
4: Attach the 4th
holding cord to the top edge with
a DHH.
Turn the board and attach the rightcolor
B cord to the holding
cord with a DHH.
Add one color
C cord with a reverse Larks Head
knot.
Attach the leftcolor
B cord with a DHH.
Step 4,
continued: Slide the holding cord
under
the two for the lower edge.
Pull firmly on holding
cord 4 so it's straight.
In the image above, it's on an angle only to show
the details.
Turn the board and attach cord 4 to the lower edge
with DHH.
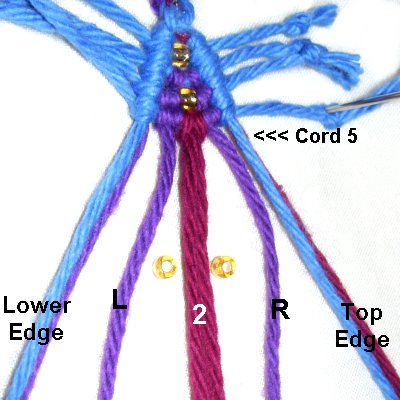
Step
5: Attach the 5th
holding cord to the top edge of
the Beaded Eye Bracelet.
Turn the board, attach the right color
B cord, followed by a bead.
Next are the 2Color
C, followed by a bead, then the
left color
B cord.
Turn the board and attach the holding cord
to the lower edge.
Step
6: Attach the 6th
holding cord to the top edge.
Attach the rightcolor
B cord and the rightcolor
C cord. Add a newcolor
C cord as you did in step 2
(reverse Larks Head).
Attach the left color
C cord, followed by color
B. Attach the holding cord
to the lower edge.
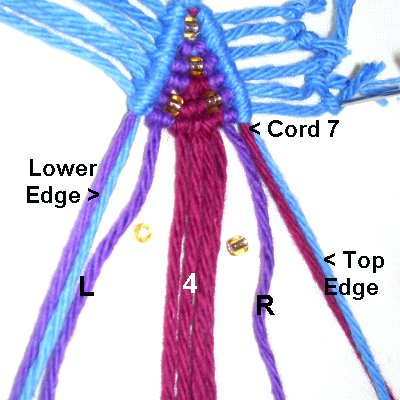
Step
7: Attach the 7th
holding cord to the top edge of
the Beaded Eye Bracelet.
Attach the right color
B cord, followed by a bead.
Next are the 4Color
C, followed by a bead, then the
left color
B cord.
Attach the holding cord to the lower edge.
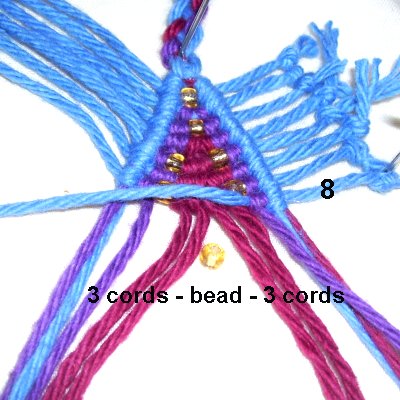
Step
8: Attach the 8th
holding cord to the top edge.
Attach the first
3 working cords to the holding
cord.
Add a bead, and then attach the other 3
working cords.
Attach the holding cord to the lower edge.
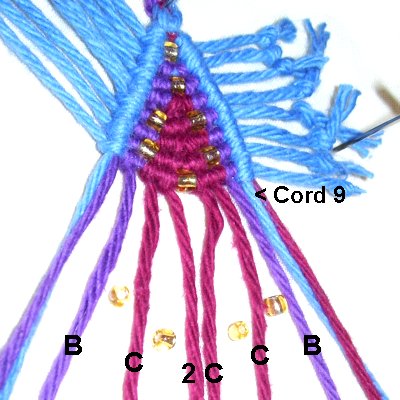
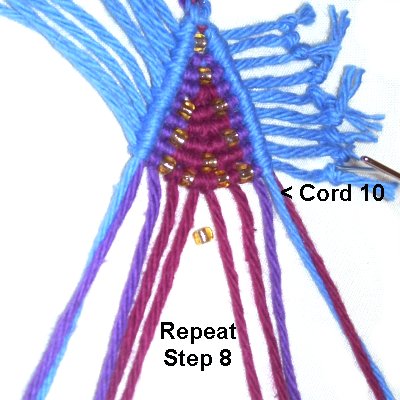
Step
9: Attach the 9th
holding cord to the top edge.
Attach the cords and beads as follows:
Color
B -- bead -- color
C -- bead -- 2
color C -- bead -- color
C -- bead -- color
B.
Attach holding cord 9 to the lower edge.
This completes the first half of the Beaded Eye
Bracelet. You will be dropping cords
to make the second half, so it resembles the first
half. The best way to drop cords is to cut each
one shorter. Push it under the knotted
portion of the eye. The rest of the cords
are used to tie the knots.
Second Half of Bracelet
Step
10: Attach the 10th
holding cord as you did the
others, to the top edge of the Beaded Eye
Bracelet.
Repeat
step 8, which is 3 cords,
followed by a bead, and then the other
three cords.
Important:
Remove the pins from the long cords for the top
and lower edge of the Beaded Eye Bracelet. You
will need to move them towards each other as you
progress.
The long cords for the top and lower edge have
been moved outward in the images below to show the
details.
They need to be moved towards
the inside
of the eye, so both edges will
curve. By the time you get to step 19,
the four long cords should be resting
side-by-side.
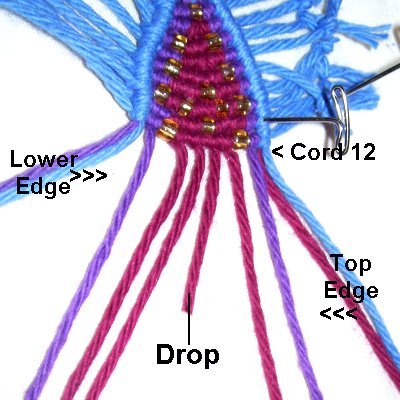
Step
11: Attach the 11th
holding cord to the top edge of
the Beaded Eye Bracelet. The long cords
should be vertical
at this point.
Repeat
step 7. Attach the holding
cords to the cords for the lower edge.
Step
12: Cut one color
C cord to 2-inches. Drop it from
the group by moving it
under the first half of the eye.
Attach holding
cord 12 to the upper edge, after
curving the two cords slightly to the
left.
The remaining 5 working cords should be
attached to the holding cord with
DHH.
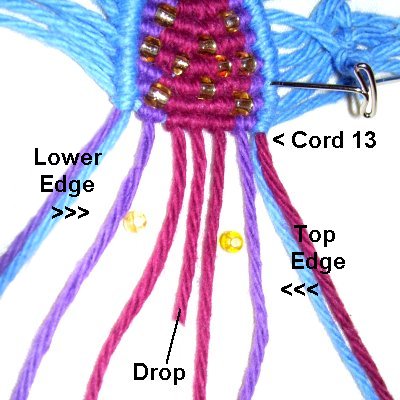
Step 12,
continued: Attach the 12th
holding cord to the lower edge, curving
the edge cords slightly to the right.
Step
13: Attach cord
13 to the upper edge, increasing
the curve by moving the long cords to the
left.
Cut 1 color
C cord to 2-inches, and drop it
from the group. Attach the remaining
working cords as follows:
Right color
B -- bead -- 2
color C -- bead -- left color
B
Step 13,
continued: Attach the holding cord
to the lower edge, moving the long cords to the
right to increase the curve on the left side of
the Beaded Eye Bracelet.
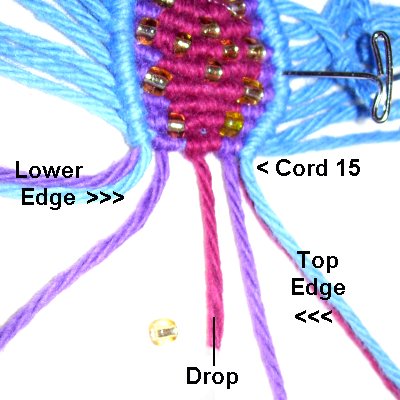
Step
14: This is where you need
to curve the top and lower edges inward sharply.
When you attach holding cord
14, arrange the long cords on a diagonal
slant towards the center of the eye.
Drop 1 color
C cord, and attach the remaining
three to the holding cord.
Attach holding cord 14 to the lower edge,
curving it inward sharply, too.
Step
15: Attach holding cord
15 to the cords for the top edge,
which should be diagonal.
Drop the last color
C cord as you did the
others. Attach the two color
B cords to cord 15, placing a
bead between them.
Attach the holding cord to those for the
lower edge, which should be diagonal.
Step 16:
Attach holding cord
16 to the top edge of the Beaded Eye
Bracelet.
Drop one color
B cord, and attach the other one to the
holding cord with a DHH.
Attach holding cord 16 to the lower edge.
Step 17:
Attach the
last holding cord (17) to the top
edge.
Drop the last color
B cord, and apply only abead.
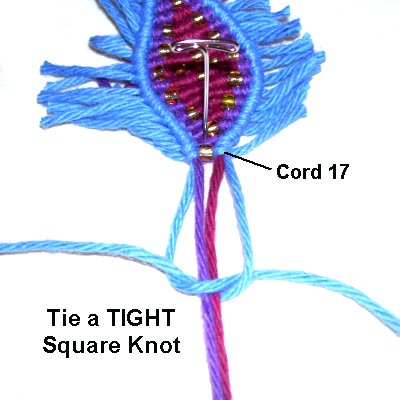
Attach holding cord 17 to the lower edge.
Step
18: Organize the four long
cords for the edges.
Use 2 of them to tie a Square Knot with
two fillers.
This will close the eye design.
Step 19:
Tie the second
half of the strap the same length as the
first half.
Measure carefully, so the Beaded Eye Bracelet will
be balanced.
Finish it by tying a Square Knot.
Finishing Process
Step
20: Turn the strap upside
down so you work in the back.
Finish off the two working cords from the
Square Knot by using them to tie a tight
Overhand knot.
Apply glue in the back of the Square Knot,
so it's on the inside when the knot is
tightened. Let the glue dry and cut
off the two ends. The
remaining two cords are used for the
clasp.
Step 21:
Trim the working
cords that were dropped to 1-inch.
Apply glue to each one and adhere them to theback of
the eye design. Hold them flat while the
glue dries.
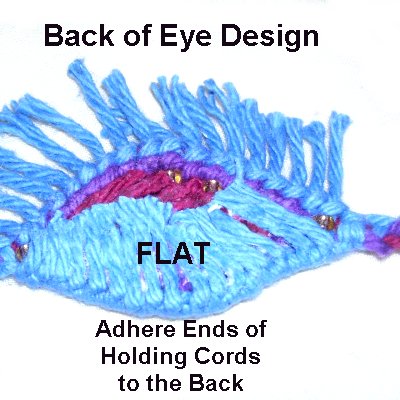
Trim the ends
of the holding
cords to 1-inch. Push those along
the lower
edge to the back
of the eye design.
Apply fabric glue to each one, and adhere
them to the eye so they are flat.
Press firmly while the glue dries.
They will rest on top of the working cords
already present. Make
sure they are arranged neatly.
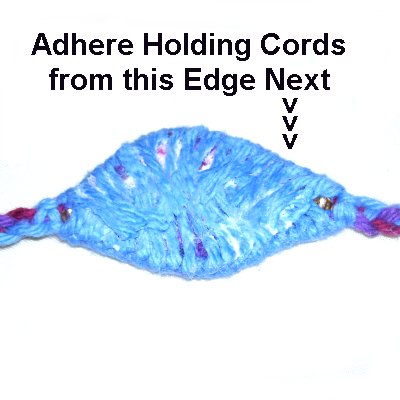
Step
22: Move the holding cords for
the top
edge to the back, and adhere them
with glue. They will rest partially
over the ends already present.
Add plenty of glue and press them down
firmly, so they are flat while drying. They should be
neatly arranged.
Let the
glue dry completely before moving on.
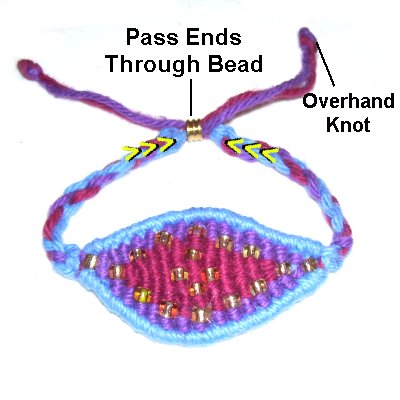
Step
23: To make a simple bead
clasp, pass the two cords from each end of
the strap through a bead.
Make sure they pass through in opposite
directions.
Pull the ends to close
the Beaded Eye Bracelet. Move down
at least 3 inches and tie Overhand knots
at the tips. Apply glue while
tightening.
By
using any text or images on Free Macrame
Patterns, you are agreeing to ourTerms
of Use