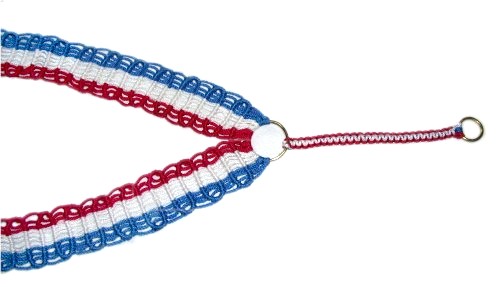
Description:
The American Guitar Strap is similar to
the strap Willie Nelson uses when he performs
music. It features a serpentine stitch made
with Half Hitches.
For those who live outside the USA, you can switch
to your own country's colors to make this unique
strap design.
The small strap in front passes around the sound
box of the guitar, then up to the hole in
front. A hook is then attached to the small
ring on the end in order to secure it in the
correct position. The hook is not
shown in the images.
The clasp at the neck is a simple clip, but that
can be changed to a sliding clasp if you want it
to be adjustable.
The straps are approximately 2 inches wide.
This Macrame pattern is rated Easy, but is very
time consuming.
Supplies
Needed:
2 mm size material in red/white/blue colors
(25 yards of each)
Step
1: Hold the guitar in your lap at the
position you ordinarily prefer it to rest.
Measure from your waist under
the side of the sound box and up to the hole in
the front.
The finished
length of the attachment band on the
American Guitar Strap is the size you measured,
which includes the ring and hook.
So when making your calculations, subtract 1-inch
for the ring, and whatever length your hook
happens to be. The result will be the length
of the knotted portion you will make next.
Cut one cord of each color, 8
x the finished length. Prepare the
tips to prevent unraveling.
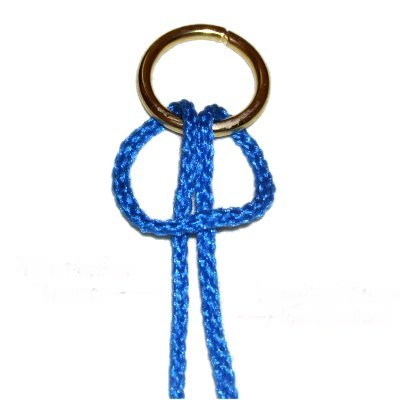
Step
2: Fold the blue
cord in half and attach it to the 1-inch
ring with a Larks Head knot.
The red and white cords should be placed
on either side of the blue one. Make
one half of these cords longer by folding
the cord off
center. The longest portion
needs to be on the outside
(see information below).
Designer's
Tip:
The off-center mounting for the American Guitar
Strap is easier if you actually measure
the cord:
Add
12 inches to the finished
length of the band
(step 1). Measure that distance from one end
of the cord, then fold it at that
position.
Mount it to the ring loosely. Gradually
tighten the knot, holding both halves together so
you don't pull one more than the other.
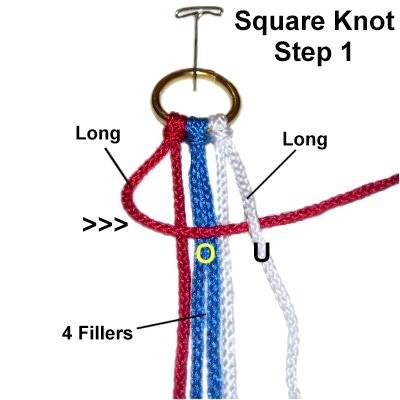
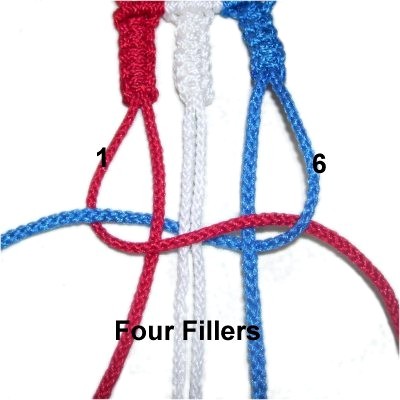
Step
3: Mentally number the
cords 1 - 6. The long portions
should be in positions 1 and 6, since they
are used to tie the Square Knots (working
cords).
Move working cord
1 to the right, passing over
the fillers (cords 2 - 5) and under
cord 6.
Move working cord
6 to the left, passing under
the fillers and over
cord 1 where it bends.
Tighten the knot firmly, so it rests close
to the Larks Head knots.
The working cords have now switched
places.
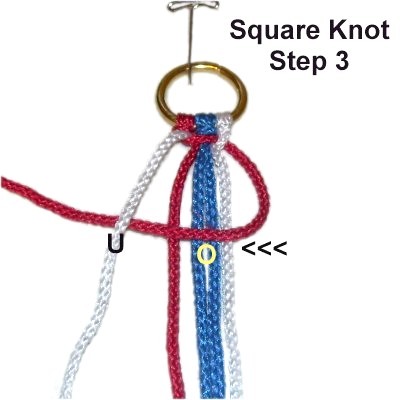
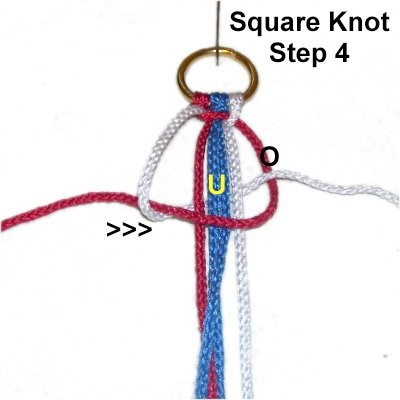
To make the
second half of the Square Knot, move
working cord
1 to the left, passing over
the fillers and under
cord 6.
Move working cord
6 to the right, passing under
the fillers and over
cord 1 where it bends.
Step 4:Repeat
step 3 several times to create the
attachment band for the American Guitar
Strap.
Stop when the band is the finished
length you need.
Important:
Attach the hook and re-measure to make sure the
entire strap is the finished size you were aiming
for.
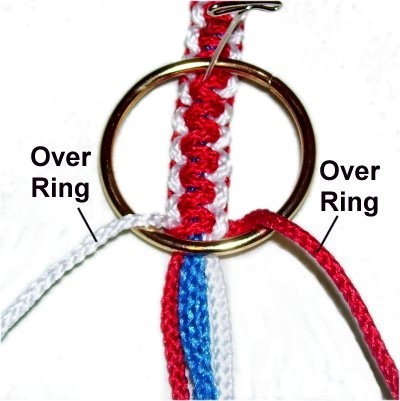
Step
5: Place the 2-inch ring on
top of the strap near the last SK
tied.
Pass the working cords (1 and 6) over
the ring and the rest under
it as shown.
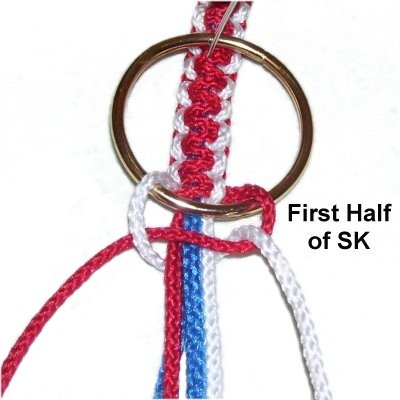
Step
6: Tie the first half of a
Square Knot with the working cords around
all 4 fillers.
Tighten it firmly so it rests against the
outside
of the ring.
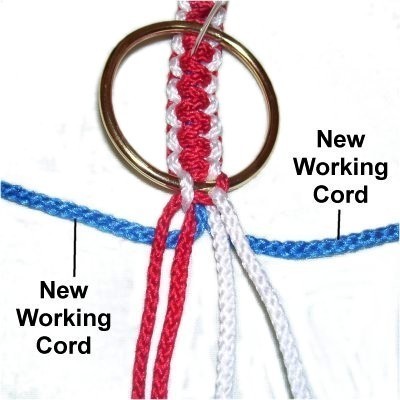
Step
7: Move the blue
cords to the outside
and use them as the new working cords for
the next knot.
Tie a tight
SK with the blue cords around the other
four, applying glue before tightening.
Step 8:
There are two finishing options for the attachment
band of the American Guitar Strap:
Option A:
You can trim the cords to 2 inches and leave them
as a fringe. Melt the tips if using NYLON cord to
prevent unraveling.
Option B:
Work the ends under one of the knots in the back of the
strap. This will anchor them in place.
Apply glue under them and use a clip to help
adhere them to the back of the strap.
When the glue is dry, trim off the excess
material. Melt the tips with a flame if using
nylon.
Wide Bands - Serpentine Stitch
Step 9:
Locate the area on your waist where you measured
for the attachment band. That's where the
2-inch ring will rest.
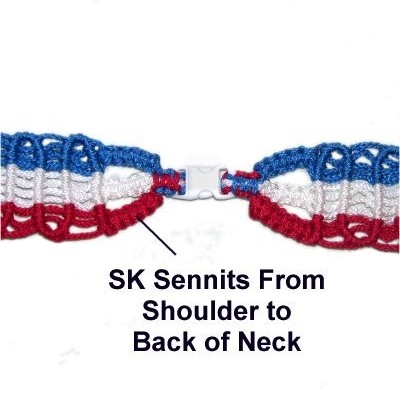
Measure from that spot up to the back
of your neck. That is the finished length of
each wide band for
the American Guitar Strap, which includes the SK
Sennits and clasp (see next image below).
Multiply
that length by 9, and cut four
cords of each color (6 for each strap).
Prepare the tips to prevent unraveling.
The wide band
with the serpentine design will stop at
the top of your shoulder. It's
best to try it on as you progress, and
stop when you like the fit.
You will then be tying short sennits of
Square knots, which will run to the back
of your neck. At your spine will be
the clasp.
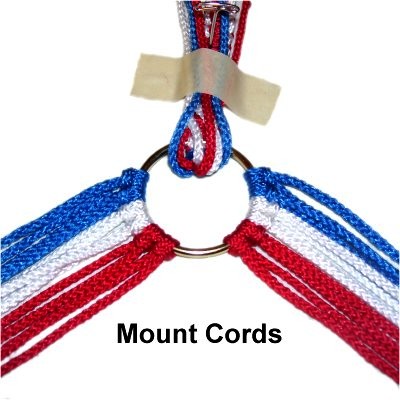
Step
10: Mount two cords of each
color onto the right
side of the ring with Larks Head
knots.
The colors can be arranged any way you
wish, but the best arrangement is shown in
this image(white in center).
Repeat this on the left
side with the remaining six
cords, which will be for the second
strap.
Step
11: Turn the ring and arrange it
so one group of cords are vertical.
Roll each cord and
secure it with a rubber band to keep them
organized.
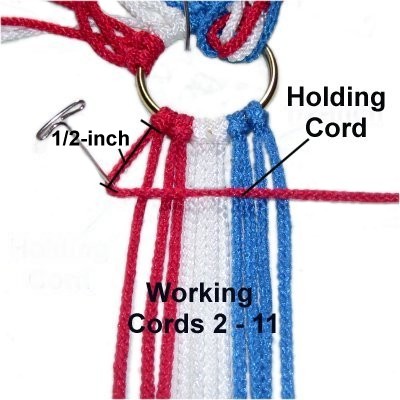
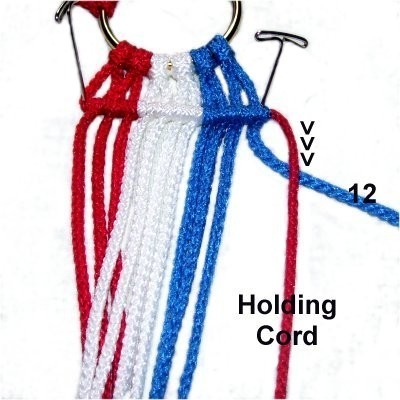
Mentally number the
cords 1 - 12. The cord holding the knots
is #1. You will tie the Double Half
Hitches (DHH) with cords 2 - 11 (working cords).
On holding cord 1, measure from the ring
to 1/2-inch and secure it to your board at
that point. That portion remains
vertical or diagonal.
Arrange the rest of the cord horizontally.
The American Guitar Strap will be neater
if this portion of the holding cord is
straight and has tension.
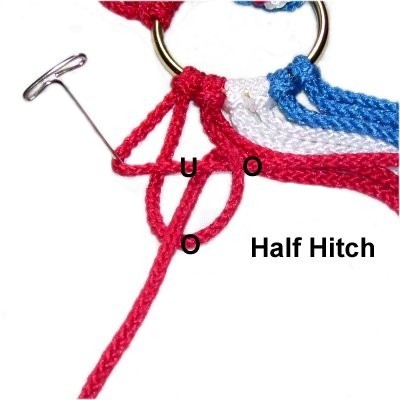
Starting with
cord 2, tie Double Half Hitches
with each working cord onto holding cord
1. The first one should rest next to
the pin used to secure the holding cord.
Since you are moving left to right, the
loops are tied counter-clockwise.
Tighten them firmly so they are neat.
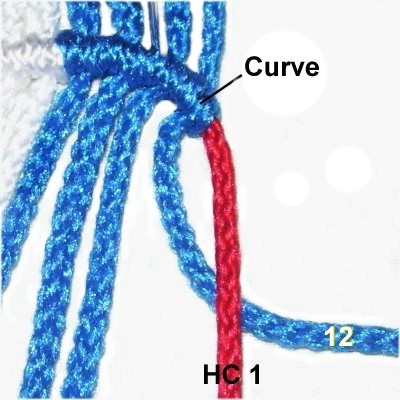
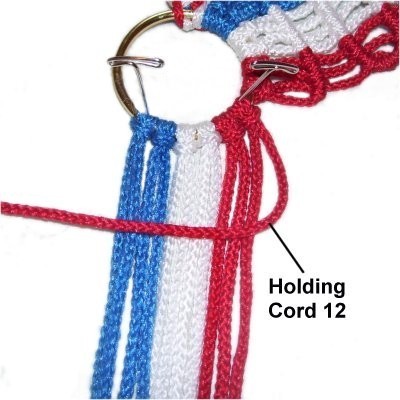
Step
12: Secure the last knot
tied (cord 12). Move the holding
cord to a vertical
position.
Move working cord 12 under
it, heading right. It will be used
to tie the Half Hitches at the
corner.
Important:Read the
information below.
As you are
tying the Half Hitches with cord 12 in the
next step, pull firmly on the holding
cord. The previous knots tied
with cord 12 should curve.
When you tie the new knots, they should
rest as close to the others as
possible. This will make the corner
more rounded, and will hide the holding
cord.
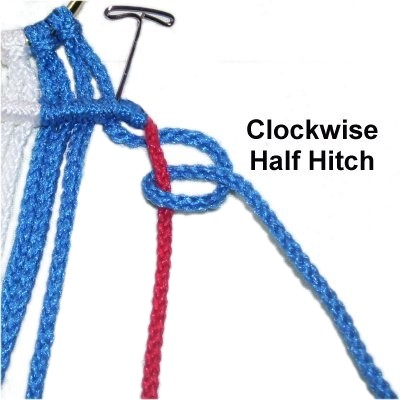
Step
13: Tie FOUR clockwise
Half Hitches with cord 12 onto the holding
cord. These need to be tightened as much
as possible to form the corner.
The American Guitar Strap features ROUNDED
corners, so pull and manipulate the knots
as needed.
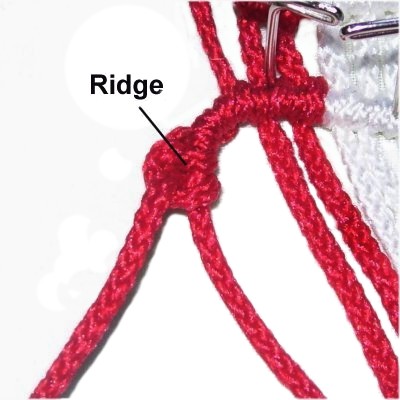
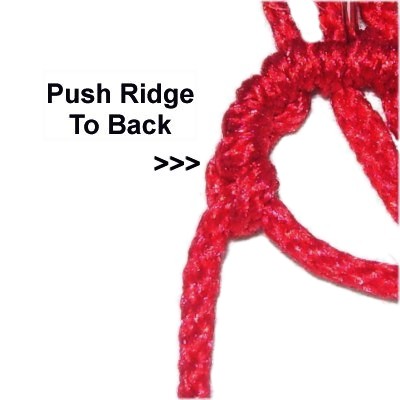
Important
Tip:
When tying more than two Half Hitches, a
ridge will form.
Push it to the
back of
the strap to hide it, rotating the knots
as needed.
The best time to do this is after tying
the 4th knot.
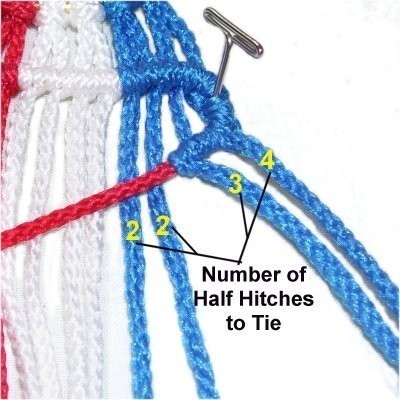
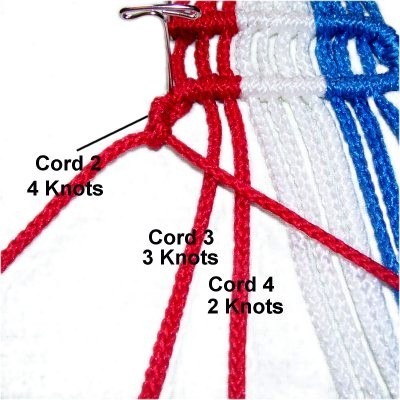
Step
14:Change
the angle of the holding cord so
it's diagonaland
heading left.
Attach cord
11 to it with TRIPLE (3) Half
Hitches.
Attach cords
10 and 9 with DOUBLE (2) Half
Hitches.
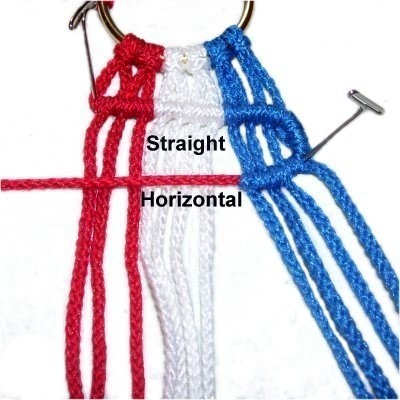
Step
15: Change
the angle of the holding cord so
it's horizontal
and heading left.
Attach cords
8 - 2 to it with Double Half
Hitches.
Keep the working cords between the two
rows as straight as possible so
they have tension.
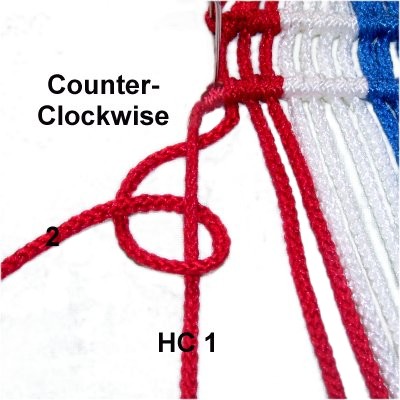
Step
16:Repeat
steps 12 - 13, beginning at the
corner on the left
side of the American Guitar Strap.
The loops should be tied counter-clockwise,
since
you are moving left to right.
The first cord you attach is cord
2, and you tie FOUR (4) Half
Hitches. The holding cord should
be vertical.
Step 17:
Repeat steps 14 - 15. Tie a
TRIPLE (3) Half Hitch with cord
3, and DOUBLE (2) Half Hitches
for the remainder.
The holding cord is diagonal
for cords 3 and 4, and horizontal
for 5 - 12.
Step 18:Repeat
steps 12 - 17 as many times as needed,
until the wide band is close to the finished
length you were aiming for.
Put on the first half of the American Guitar Strap
and make sure it reaches the top of the
shoulder.
Designer's
Tip: Try to finish with the holding
cord next to the working cords with the same
colors, so they are in matched groups of four (see
image for step 20).
This is optional if the size doesn't allow you to
do this.
Step 19:
Repeat steps 11 - 18 to make the
second strap.
Use cord
12 to hold the knots,
and start at the right
for the first row (cord 11).
The direction you progress should be the opposite
of the first strap.
Neck Design, Finishing, and Clasp
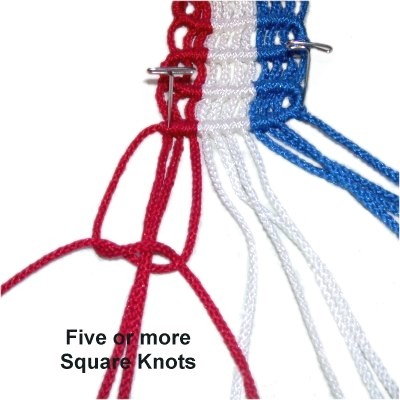
Step
20: At the end of one strap tie
at least 5 Square Knots with each set of
four cords.
You can measure from your shoulder to your
spine, or just try the strap on to get the
right length for this area. Take
into account the size of the clasp.
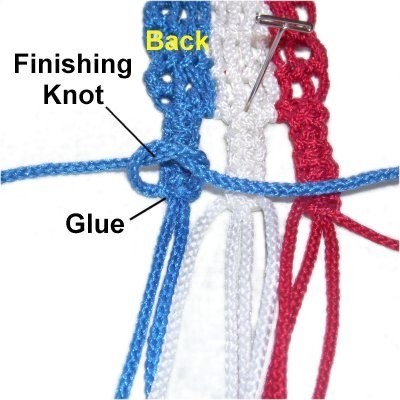
Step
21: Turn the American
Guitar Strap upside down so you are
working in the back.
Use the two working
cords from the previous step to
tie a tight Overhand knot. Do this
with each sennit.
Apply glue, and use a clip to hold the
knot on the glue while it dries.
Step 21,
continued: When the glue is dry,
cut off the extra material from the two
working cords only. You need the
fillers for the next step.
You can melt the tips of the cords with a flame if
using NYLON, to discourage the knot from
loosening.
Step
22: Mentally number the
remaining 6 cords after you turn the
American Guitar Strap over so you are
working in the front again.
Use cords
1 and 6 to tie a tight SK around
the other four cords.
You can tie more than one SK if necessary
to reach the back of the neck where the
clasp will rest.
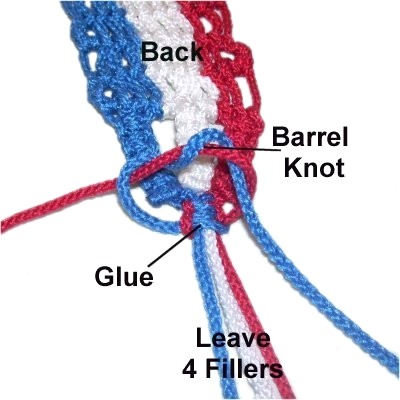
Step
23: Turn the strap upside
down again, and tie off the two working
cords with a Barrel Knot.
Apply glue under it and use a clip to hold
the knot on the glue while it dries.
Cut off the two working cords only,
leaving the four fillers for the clasp.
Follow steps
24 and 25 to use a 2-part clip style
clasp for your American Guitar Strap.
Another option is to make a Sliding Clasp.
Click on the link to get the instructions.
A third option is to pass the ends through a bead
in opposite directions, to make a simple bead
clasp. Try to use a small barrel or oval
shaped bead rather than a round one.
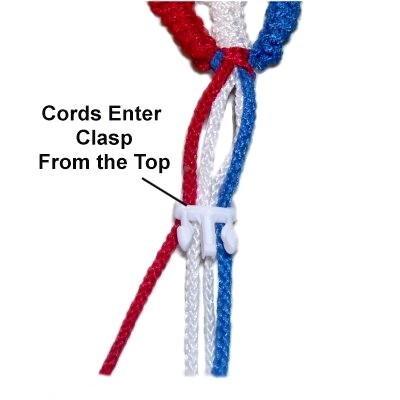
Step
24: Slide the four cords through
the opening in one part of the clasp from
top
to bottom.
Arrange them neatly side-by-side.
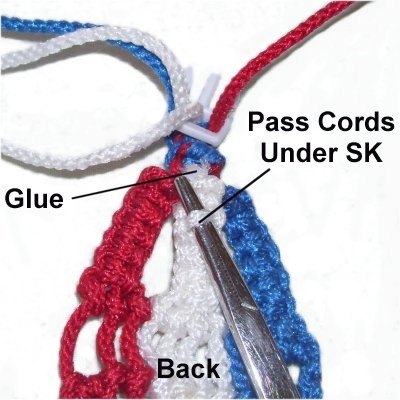
Step
25: Turn the strap upside
down so you are working in the
back. Pass each cord through a
space in the back
of one of the Square Knots. Add glue
under the area to secure the cords.
Use clips to hold them against the glue to
adhere them to the back of the
strap. Cut off the excess when it's
dry.
Step 26:
Repeat steps 20 - 25 to complete the
second strap.
By
using any text or images on Free Macrame
Patterns, you are agreeing to ourTerms
of Use