|
|
| |
|
 |
|
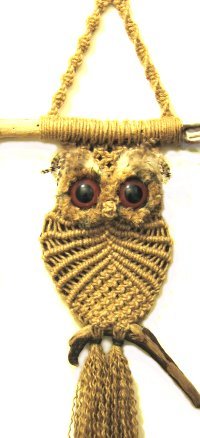
Description: This
All Natural Owl is made with Jute or
Hemp fiber rather than synthetic
materials.
It can also be made with cotton, which
will make it appear more delicate.
With the addition of driftwood along
with the plant-based fibers, this
Macrame Owl can truly be called a
creature of nature.
This Macrame project is rated Moderate,
which is suitable for crafters who know
how to make all the decorative knots
listed.
Jem Morrison created this Owl and
provided the photos. |
|
|
|
| |
|
Supplies Needed:
- 4 mm cord material (100 yards)
- 2 pieces of Driftwood (at least 12 inches
long)
- Two 25mm beads with 8mm holes, or plastic
animal eyes with
washers
|
|
| |
| Knots Used: |
| |
|
|
| |
| |
|
| |
Preparation
|
| |
- Cut 12 cords, each 6 yards long
- Cut 4 cords, each 3 yards long
- Cut 2 cords, each 36 inches long
- For the Eye Feathers, cut at least 20
cords, 6 inches long, along with any scraps
you have at the end.
|
| |
| |
|
Step 1: Prepare the ends
with tape, glue or wax to prevent
unraveling.
This is important, since most
of the natural materials are formed by twisting
the fibers, so they unravel easily.
|
| |
|
| |
 |
|
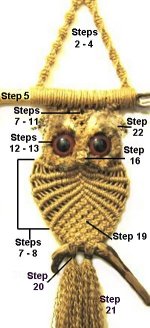
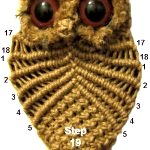
Use this diagram of the All Natural Owl
to visualize the different steps you
will be following as you make it.
I've also provided you with closer
views of each area (below).
Click on the small images to see larger
ones, which will come up in a new
window.
|
|
| |
| |
Hanger
|
| |
 |
| |
| |
|
Step 2: Fold the four 3-yard
cords in half, and mount them to the 2.5-inch
ring with Larks Head knots. You will end up with
8 cords to make the hanger.
Step 3: Divide the
cords into 2 groups of four. Tie a Spiral Stitch
sennit measuring 12
inches in each group.
These knots should have two working cords and
two fillers.
Step 4: Attach each cord
to the driftwood for the top
of the All Natural Owl design,
using Double Half Hitches.
Make sure you position the cords under
the driftwood before tying the knots.
Tighten the knots firmly so the wood rests
against the last knots in the Spiral Stitch
sennits. Leave space in the center
of the driftwood to attach the next set of
cords.
Step 5: Mount the
twelve 6-yard
cords to the center area of the
driftwood with REVERSE
Larks Head knots, folding them in half
first. These will be used to make the All
Natural Owl.
Push the cords from the hanger close to the new
cords, so they are all near the center of the
driftwood.
Step 6: Tie a tight Barrel
knot in each 3-yard
cord (from the hanger), placing it
close to the driftwood in the back.
Cut off any excess material.
|
| |
|
|
| |
The Face
|
| |
 |
| |
| |
|
Step 7: Mentally number
the cords 1 - 24 (left to right).
Tie the first row of Alternating Square Knots
using groups of four cords. Two are
working cords and two are fillers. They should
rest just below the Larks Head knots.
Fit them to the general shape of the driftwood,
even if it curves.
Step 8: Tie five more rows of
ASK, creating a V pattern for the forehead of
the All Natural Owl. The groups are described
below.
Add
space between rows 1 and 2 as needed so the
next row is straight.
|
| |
| Row 2:
Use cords 3 - 6, 7 - 10, 11 - 14, 15 - 18, and 19
- 22. |
|
| |
| Row
3: Use cords 5 - 8, 9 - 12, 13 - 16, 17
- 20. |
|
| |
| Row
4: Use cords 7 - 10, 11 - 14, and 15 -
18. |
|
| |
| Row
5: Use cords 9 - 12 and 13 - 16. |
|
| |
| Row
6: Tie the final SK with cords 11 - 14. |
| |
|
| |
|
Step 9: Mentally
re-number the cords, moving left to right.
Move cord
1 towards the center of the V shape, so
it rests diagonally along the left side
of the ASK. Secure it so its taut, since it's a
holding cord.
Attach cords 2 - 12 to it with Double Half
Hitches. Pull the knots firmly, so the bar
is against the Square
Knot V pattern.
|
|
|
| |
|
Step 10: Move cord
24 towards the center of the V shape,
along the
right side of
the ASK. Attach cords 23
- 13 to it with DHH (in that order).
Important:
Attach holding cord 1 to holding cord 24 with a
DHH.
Step 11: Tie a Square
Knot with the two holding cords (1 and 24) along
with two more adjacent to them (total of four).
The fillers
for this knot should be the holding
cords, and the knot should rest
directly under the point of the
V design.
|
|
|
| |
|
Step 12: Mentally
re-number the cords before you work on the eyes
for the All Natural Owl.
Move cords 7 and 8 under
the top
portion of a 2-inch
ring, and then attach each of them to it with a
DHH.
Attach cords 5 and 6 to the left
edge of the ring. Attach
cords 9 and 10 to the right
edge.
These DHH should
be vertical.
Tie a sennit of SK with cords 1 - 4, so the
last knot lines up with
the bottom of the ring.
Repeat this step on the right side of the face,
attaching cords 17 and 18 to the top of
the ring.
Cords 15 and 16 should be attached to the left
edge. Cords 19 and 20 should be on the
right
edge of the ring. The SK sennit is made
with cords 21 - 24.
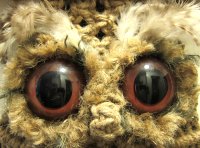
Step 13: Slide a bead
onto cords 7 - 8 on the left, and 17 - 18 at the
right. The eyes of the All Natural Owl should
rest in the center of the rings.
Designer's
Tip: You can use plastic
eyes that are actually made for this type of
project. You fit them between
the two cords and apply washers behind the cords
to hold the eyes in place.
Step 14: Attach cords 7 - 8
to the bottom
of the left ring with DHH, after pulling the cords
taut.
Attach cords 17 - 18 to the bottom
of the right ring.
|
| |
|
| |
|
Step 15: Mentally
re-number the cords 1 - 24, to work on the
remaining part of the face for the All Natural
Owl.
Move down to the area just below
the rings. Tie one row of
Square Knots using all the cords.
Step 16: To make the
beak for the All Natural Owl, use cords 11 - 14
to tie one Square knot.
Leave
a 1/4-inch space and tie 3 more SK.
Make a Square Knot Button by pulling all 4
cords through the 1/4-inch space. Pass the cords
through spaces on each side of the
fillers. Pull all four cords firmly so the
three SK roll into a round shape.
Tie one SK below the button to secure it.
|
| |
|
| |
Body and Wings
|
| |
 |
| |
| |
Step 17: Locate
cords 12 and 13, and crisscross them.
Move cord 13 to the left
horizontally, and use it as a holding cord. Attach
cords 11 - 1 to it with DHH, in
that order.
Move cord 12 to the right
horizontally, attaching cords 14 - 24. |
|
|
| |
|
Step 18: The next 5
rows of DHH need to be slanted
diagonally to form the "wings" of
the All Natural Owl.
Be careful not to make the angles too sharp in
the first 4 rows. Refer to the image above to
determine the angle.
The bars should be approximately 1.5
inches apart at the left and right
edges of the body.
When tying the 5th row, you can make the V
shaped design a little narrower.
|
|
| |
|
Row 1: Start by mentally
re-numbering the cords 1 - 24.
Locate cords 12 and 13, and crisscross them.
Move cord 13 to the left,
as a holding cord. Attach cords 11 - 1 to
it with DHH.
Move cord 12 to the right,
attaching cords 14 - 24 to it.
Row 2: Mentally
re-number the cords again, including
the previous holding cords, which are
now at the edges. Repeat the directions for Row
1.
Rows 3 - 5: Repeat
row 2.
Important:
This mental re-numbering ensures that
you always use the two cords in the center of
the All Natural Owl as the holding cords.
|
| |
|
| |
|
Step 19: The lower body area
of the All Natural Owl is made with ASK.
The knots should be tightened firmly,
so there is very little space between them and
the last row of DHH.
Mentally re-number the cords 1 - 24.
Row 1: Tie one
ASK with cords 11 - 14.
Row 2: Tie one ASK with
9 - 12 and with 13 - 16.
Row 3: Tie one ASK with
cords 7 - 10, 11 - 14, and 15 - 18.
Row 4: Tie one ASK with
cords 5 - 8, 9 - 12, 13 - 16, and 17
- 20.
Row 5:
Tie one ASK with cords 3 - 6, 7 -
10, 11 - 14, 15 - 18, and 19 - 22.
Row 6:
Tie one ASK with cords 1 - 4, 5 - 8, 9 -
12, 13 - 16, 17 - 20, 21 - 24.
Row 7:
Repeat Row 5.
Row 8: Repeat Row 4.
Row 9: Repeat Row 3.
|
| |
| |
| |
Fringe and Eye Feathers
|
| |
 |
| |
| |
|
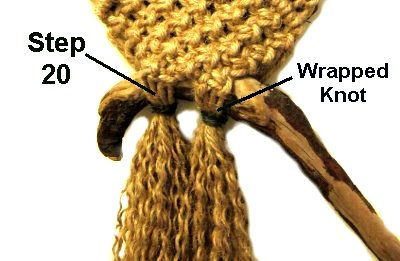
Step 20: Hang the All
Natural Owl by the ring at the top. Bring
all the cords together in two bundles of 12
cords.
Select 4
cords from each bundle and pass them in
front of the second piece of wood.
Place the rest behind
it.
Make a Wrapped Knot around each bundle, using
a 36-inch cord. It
should be at least 1.5 inches long.
Apply glue beneath both ends, slightly inside
the knot. When it's dry, trim off the
excess material, and save the scraps for the eye
feathers.
Step 21: Trim the ends
so they are even. Unravel each cord all
the way to form a wavy fringe for the tail.
|
|
|
| |
|
Step 22: To decorate the
rings around the eyes, attach the 6-inch cords
to the rings with reverse Larks
Head knots. Unravel each cord,
trimming them as needed.
|
| |
| |
|
|
By
using any text or images on Free Macrame
Patterns, you are agreeing to our Terms
of Use
|
|
|
|
|
Have
any comments about the All Natural Owl? Contact
Me.
|
|
|
|

|
|
|
| |