Description:
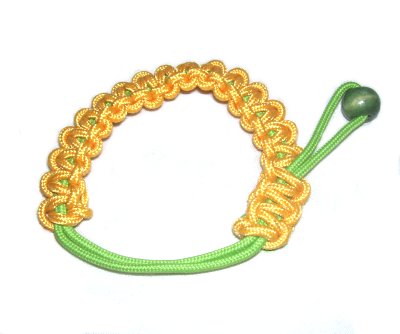
The Zip Clasp is a unique way to form a
Micro-Macrame jewelry closure. The advantage
to using it is that it's very easy to open and
close.
It's a great clasp for Paracord bracelets, and can
be used for a necklace or belt as well.
When making something with this technique, you
should use 2mm size materials like Hemp, Nylon, or
Satin.
Materials easily compressed and flexible, such as
cotton, are not the best choices for this type of
clasp.
In the example, Square Knots
were tied for the entire bracelet. The first knot
should be a Square Knot, but the rest can be
changed if you prefer something else.
Here are some options, if you want to experiment
with other Macrame knots:
Important:
Make sure the knot you choose is the type
with fillers
(or holding cords), since they are an
important part of this clasp design.
The credit for this Macrame pattern goes to
Christine, who plans to make free bracelets for
the elderly in her community.
Preparation
Determine your wrist
size and multiply
it by 2. Add
16 inches. Cut one filler
cord to this length.
Cut one working
cord, yourwrist size x
12.
Prepare the ends to prevent unraveling, using
tape, glue or wax. For Paracord, heat the
ends to seal the outer material, and then apply
tape to the tips.
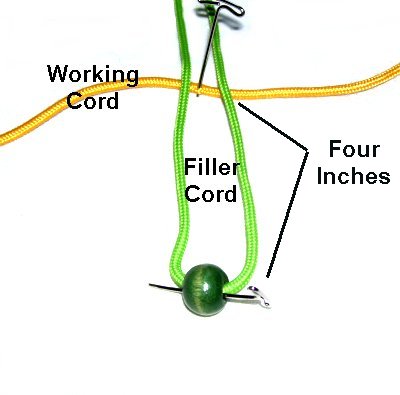
Filler
Cord = Green Working
Cord = Yellow
Step
1: Place a bead (or tie an
Overhand
knot) in the center of the
filler cord.
Secure it to your board.
Place the working
cordunder
the filler horizontally. It should rest 4
inches above the bead or
knot.
Match the ends so it's centered, and then
secure it to the board.
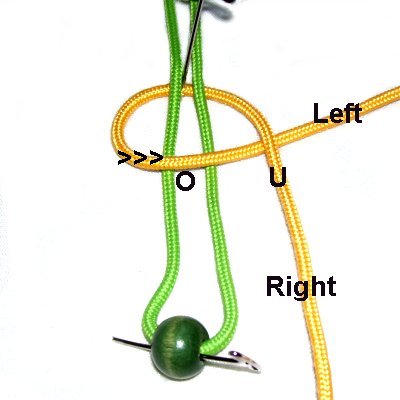
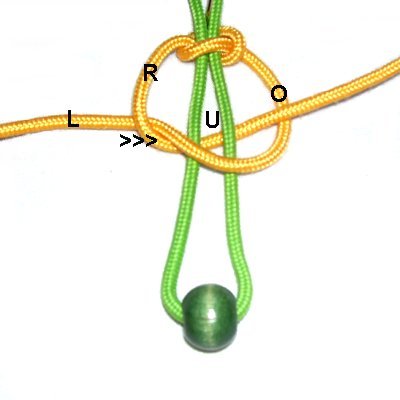
Step 2:
Below are the four steps to make a Square
Knot.
Important:
Tighten the knots completely, but becareful
not to make them too tight, or the Zip Clasp won't
be able to open and close easily.
The fillers
need to be able to slide through the knots with
very little effort.
<<
Move the left
half of the working
cord to the right, over
the fillers and under
the right half.
Move the right
half to the left, under
the fillers and over
the left half of the working cord. >>
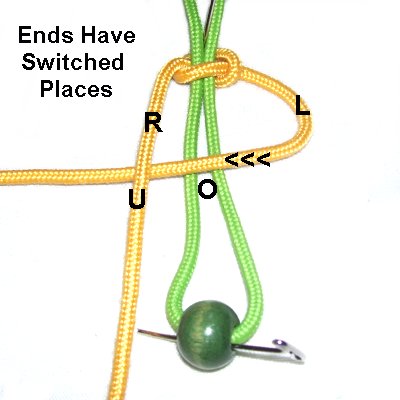
The ends of the working cord have switched
places. So the second half of the Square
knot is tied in reverse:
<<
Move the left
half over
the fillers and under
the right half, heading left.
Move the right
half to the right, under
the fillers and
over the left half of the working
cord. >>
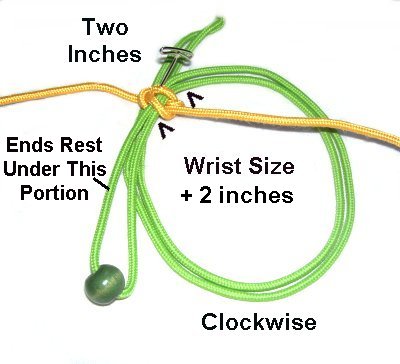
Step
3: Make a clockwiseloop
with the filler
cord, so it's your wrist
size + 2 inches.
Measure from just above the Square knot,
all the way around to the area below the
knot.
Make sure there is at
least two
inches in the portion sticking out above
the SK, to tie the finishing knots, as shown in
the image above.
Near the Square knot, the ends should rest under
the folded
portion (with the bead/knot).
Secure the loop well, so it doesn't change size as
you tie the knots for the bracelet. It helps
if you can rotate
the entire board so you can change the
angle as needed.
From here, you can switch to using other types of
knots, if you prefer something other than the
Square Knots shown.
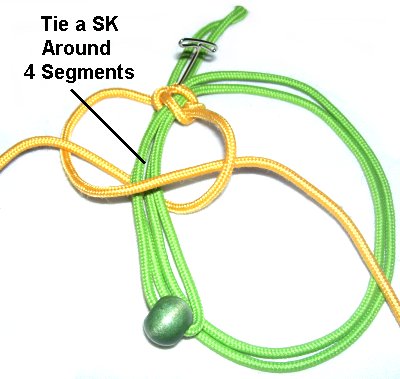
Step
4: Tie the next knot with
the working
cord, just below the first
one.
The knot should be tied around all
4 segments of the filler
cord in that area.
Tighten completely, but gently, so it's
not too tight.
Step
5: Repeat step 4, tying 2 -
5 knots.
You can tie more knots in this area of the
Zip Clasp, depending on the thickness of
the material you use.
Make
sure you stop 2-inches
before
you reach the end of the folded
segment(with
the bead).
Step
6: Move the folded segmentout
of the way, by bending it backwards,
towards the knots.
Continue tying knots to make the rest of
the bracelet, around the 2
filler cords that are left. Stop
when you reach the size you want.
There may be some space between the first
and last knots.
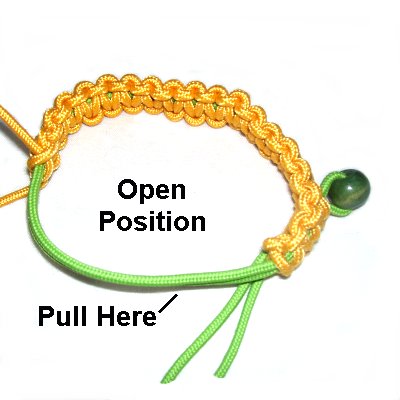
Step 7: Beforefinishing
off the ends, make sure the Zip Clasp works and
the bracelet is the right size. (see below)
Add or remove knots as needed.
<<
To open
the Zip Clasp, pull on the fillers
in the area between the first and last
knots.
Pull on the bead when you want to close
the clasp, after you put your hand through
the loop. >>
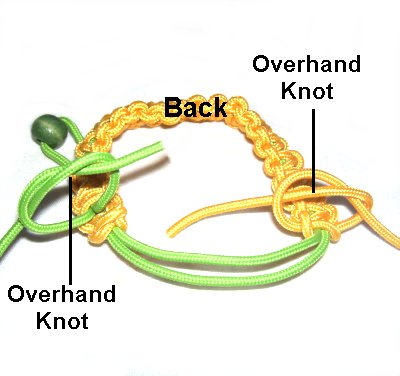
Step
8: Finish off the ends by
tying Overhand knots, at each end of the
bracelet.
Make sure the knots are in the back
of the bracelet before you apply glue.
When the glue is dry, cut off the excess
material.
By using any
text or images on Free Macrame Patterns, you are
agreeing to ourTerms of Use.