Prepare the tips to prevent the cords from
unraveling while you make the Two Tone Planter.
Step
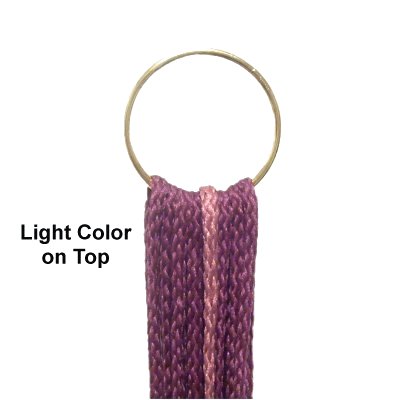
1: Pass each of the7-yarddark
cords through the 2-inch ring,
folding them over the bottom. The
ring should be upright as shown.
Match the ends to balance each cord.
Roll up the
two halves of each cord into one bundle.
This will help you identify the two halves
when you pull on them later on.
Place the 6-yardlight cordson
top of the dark cords.
Fold each one, matching the ends so they
are balanced. Roll the two halves of
each cord into one bundle.
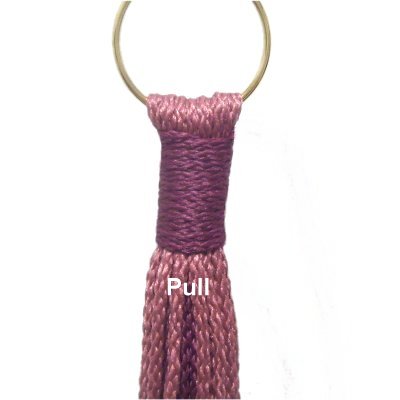
Step
2:Use the 36-inch
dark
cord to make a1.5-inch
Wrapped Knot around the long
cords.
Wrap firmly and evenly, so the knot is as
neat as possible.
Step 2,
continued: Starting with the dark
cords, unroll each cord and pull downward
on both
halves at the same time. This
tightens the cords around the ring at the top of
the Two Tone Planter.
Make sure the ends still match and the cords stay
balanced.
Do the same with the light
cords.
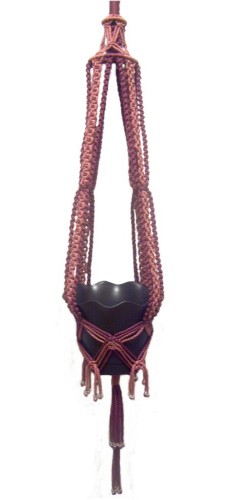
Crown Knot and Cage
The top area of the Two Tone Planter features a
Crown knot, which is made with the dark
cords.
Step 3:
You can either hold the cords between your knees
or secure them to a board upside
down.
Separate the light and dark colors, then secure
the light
cords with masking tape, so they are out
of your way.
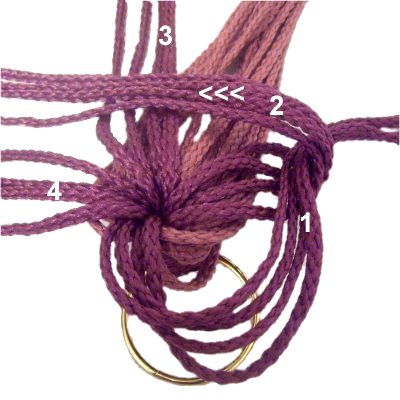
Divide the dark
cords into four groups of 4 cords
that rest next to each other.
Mentally number the groups, starting on
the lower left and moving
counter-clockwise.
Important:
Arrange the cords as neatly as possible
while you construct the knot in the steps
below.
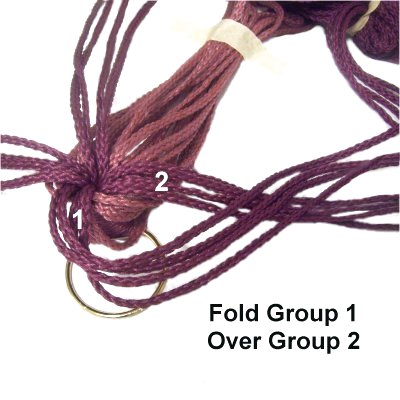
Step
4: FOLD the cords in group 1 to
the right so they rest on
top of group 2.
Then pull them back slightly, so there is
some space between the two groups.
Step
5: Fold group 2 to the left,
resting on top of group 3.
Make sure the cords in group 1 remain in
place.
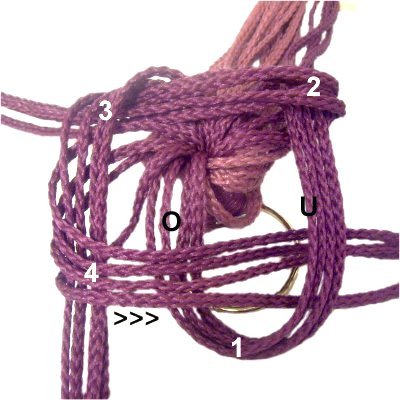
Step
6: Fold group 3 forward, so
they are resting on top of group 4.
Step
7: Fold group 4 to the
right, passing through
the space you created with group 1.
Make sure group 4 passes over
- under group 1, as shown in this
image.
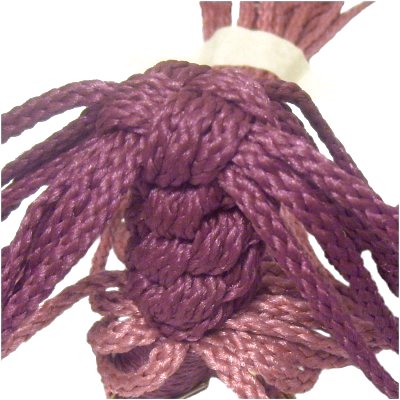
Step
8: Tighten the Crown knot
slowly, pulling on all the cords
in each group until it's square.
Make sure the cords are neatly arranged.
Keep tightening until the knot measures 1-inch
in both directions.
Step
9:Repeat
steps 4 - 8 several times.
The knots will stack on top of each other.
Stop when the design measures 4
inches.
Step 10:
The rest of the Two Tone Planter will be easier to
make while dangling from the ring at the top.
Measure
one light
cord starting at the bottom of the
Wrapped Knot, moving down 1-inch. You can
place a pin to mark the spot or use tape.
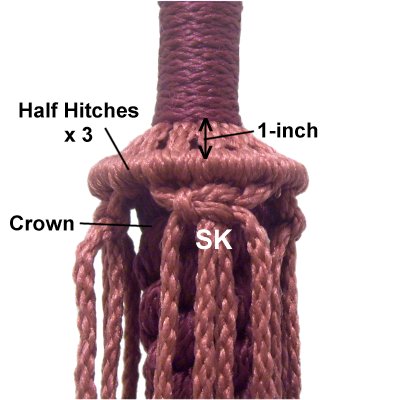
Pass it through the other 2-inch ring and attach
it with 3
Half Hitches. The ring should
touch the pin (or tape) when you tighten the first
knot.
Repeat this process with the remaining light
cords.
Step
11: Select 4 light
cords and use them to tie a
Square Knot below the ring.
It's important to tighten it firmly, so it
rests as close to the ring as possible.
Repeat with the remaining light cords.
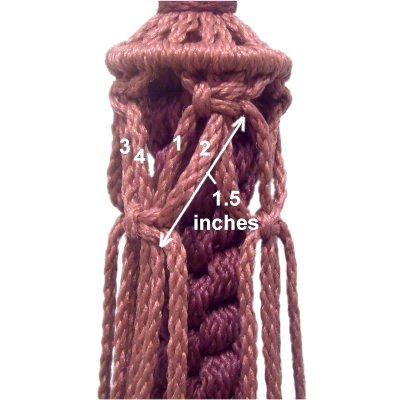
Step
12: Mentally number the
cords coming from two knots resting next
to each other. Combine cords 3 - 4
from the left SK with 1 - 2 from the right
SK.
Use them to tie a new SK. The bottom
of it should rest 1.5
inches below the knots tied in
step 11.
Repeat with the remaining light cords.
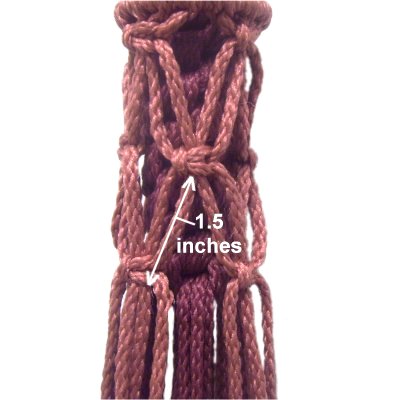
Step
13:Repeat
step 12, alternating the cords
again.
Tie the third row of SK, placing them 1.5
inches below the previous
row.
These knots should line up with the bottom
of the Crown knot. Make adjustments
as needed.
Step
14: Attach the cords coming
from one SK to the 4-inch ring with 3
Half Hitches.
Pull each cord as much as possible, so the
SK is touching the ring.
Step 14,
continued: Repeat with the
remaining light cords.
Position the four groups evenly around the ring,
and make sure the rings are level.
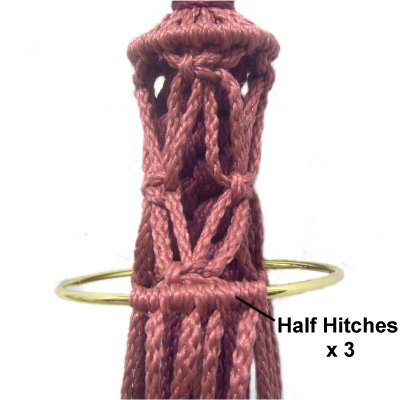
Step
15: Attach each of the the
dark
cords to the 4-inch ring with 3
Half Hitches, placing each group of four
between the light cords.
The cords should measure 1.5 inches
between the Crown knot and the ring.
Make sure the cords have tension, so the
Crown knot is balanced inside the ring.
Long Sennits (Posts)
The long sennits, also called posts, form the
middle section of the Two Tone Planter.
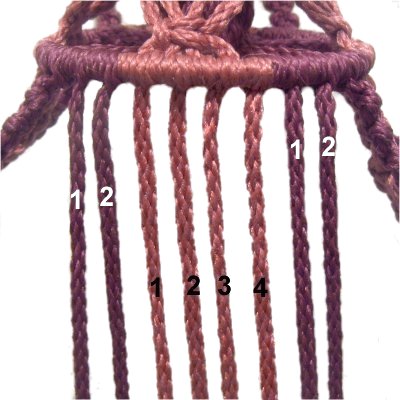
Step
16: Each post is made with
2 dark cords, followed by 4 light cords,
then 2 dark cords.
Select those cords now to make the first
post.
Mentally number the dark cords 1 and
2. The light cords should be
numbered 1 - 4.
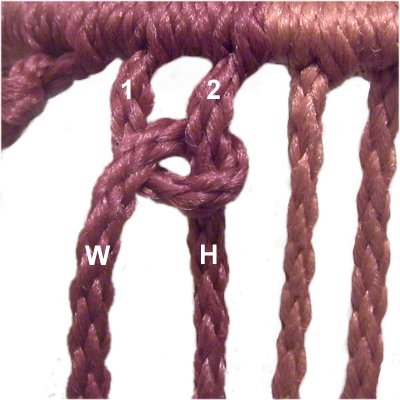
Step
17: Start with the dark
cords on the left.
Make a Half Hitch with cord 1 (W) onto
cord 2 (H), rotating counter-clockwise.
Tighten the knot as much as possible, so
it rests against the ring.
W = Working cord
H = Holding cord
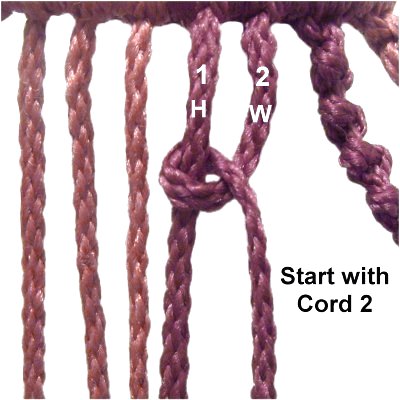
Step
18: Alternate the
cords by tying the next Half Hitch with
cord 2 (W) onto cord 1 (H), rotating clockwise.
Tighten this knot firmly.
Step
19:Repeat
steps 17 and 18 over and over to
create the rest of the sennit.
Tighten each knot firmly, but make sure
they can stretch apart when pulled.
Stop when you have tied 48
Half Hitches.
Step
20:
Repeat steps 18 and 17 with the
dark cords on the right.
Start with step
18, so the first Half Hitch is
made with cord 2 onto cord 1.
Repeat
step 19.
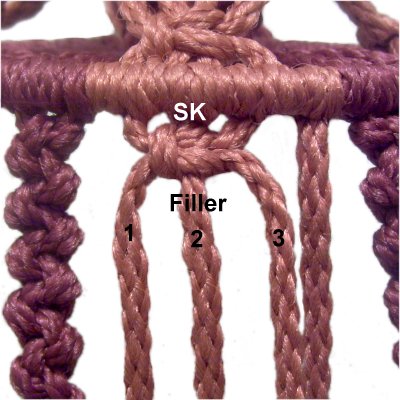
Step
21: Now it's time to use
the light cords to make the center of the
post for your Two Tone Planter.
Tie a Square Knot with cords 1 and 3, onto
cord 2 (filler).
Tighten it firmly while pulling on the
filler, so it's as close to the ring as
possible.
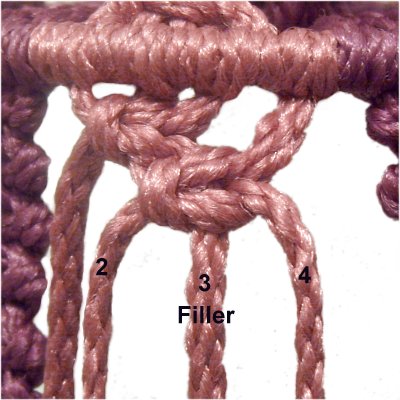
Step
22: Tie the next SK witch
cords 2 and 4 onto cord 3 (filler).
Tighten firmly, so the two knots are close
to each other.
Important:
Make sure the knot is horizontal, and does
not tilt.
Step 23:
Repeat steps 21
and 22 over and over to complete
the upper post for the Two Tone Planter.
Stop when you have tied 31
Square knots. The last knot you tie
should be with cords 1 - 3.
Step 24:
Organize the 8 cords so there are 4 light cords
between the two pairs of dark cords.
Mentally number them 1 - 8.
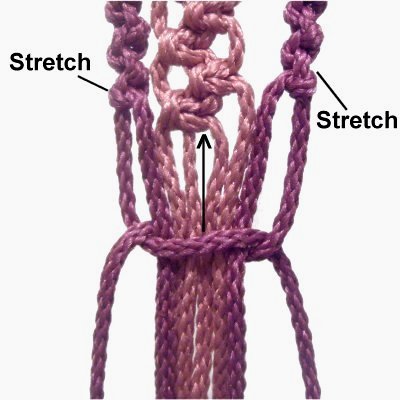
Step
24: Pull downward on
the Half Hitch sennits, stretching
them to line up with the last SK made in
step 23.
Use cords 1 and 8 (dark
cords) to tie a SK around all the
others. It should rest just below
the last SK tied with the light cords
(arrow).
Step 24,
continued: The SK should be
tightened completely, but make sure the light
cords don't overlap too much.
When you're done, it should be about 1-inch
wide.
Step
25: Repeat
step 17 - 20 to start
the lower post for your Two Tone Planter.
Repeat
step 22, followed by 21, so the
first SK tied with the light cords is made
with cords 2 - 4.
Repeat
steps 23 and 24.
Step 26:Repeat
steps 16 - 25 with the remaining cords,
creating three more posts.
Cradle
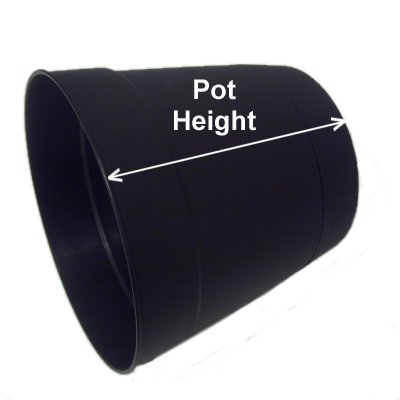
Step
27: Measure the pot you
will be using in the Two Tone Planter, or
one of similar size.
The length from the top edge to the bottom
edge is called the "pot
height" in the instructions
below.
Measure across the bottom as well (bottom
width).
Step 28:
Arrange two posts (long sennits) in front of you,
resting side by side.
Mentally number the cords from each post (1 - 8).
Important:
Tighten the following knots loosely, since you
will need to make adjustments.
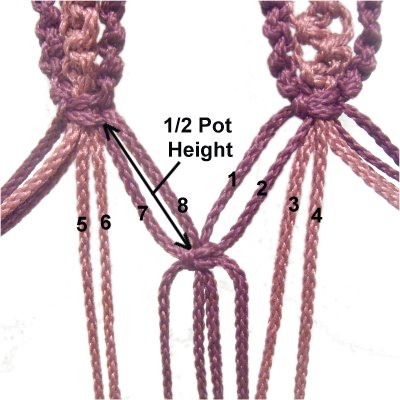
Step
29: Combine cords 7 and 8
from the left post with cords 1 and 2 from
the right. Use them to tie a Square
Knot. The fillers are cords 8
and 1.
The
distance between this knot and the last
SK in the posts should be 1/2
the pot height.
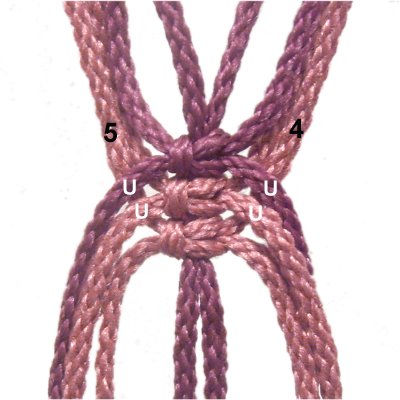
Pass cord 6
from the left and cord 3 from the right under
cords 7 and 2.
Use them to tie the next SK around the
same filler cords (8 and 1).
Pass cord 5
from the left and cord 4 from the right under
the previous working cords.
Use them tie to tie the next SK around the
same fillers.
Step 30:Repeat
steps 28 - 29 with the remaining cords,
connecting all 4 posts.
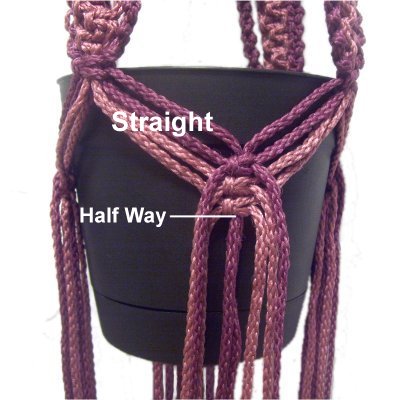
Step
31: Place the pot inside the
cradle, so the last knot in the posts are
near the top edge.
The third knot you tied in step 29 should
rest close to the half way point between
the top and bottom.
Step 31,
continued: The cords should be
straight in the area between the SK.
Make adjustments to the placement and tension of
the cords as needed, then tighten the SK firmly.
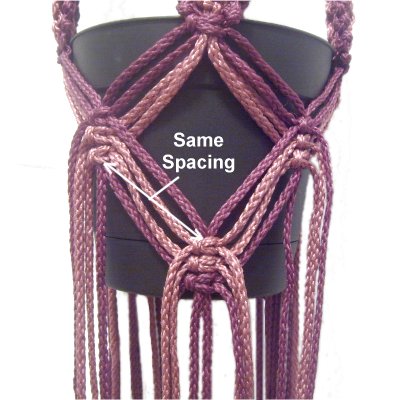
Step 32: Mentally re-number the 8 cords
associated with the triple SK designs you just
made.
Repeat
steps 28 - 31 using the same
spacing (1/2 pot height).
Measure from the bottom of the third knot
down to the top of the first SK you tie.
The cradle for the Two Tone Planter looks
better if the last SK rests near the lower
edge of the pot.
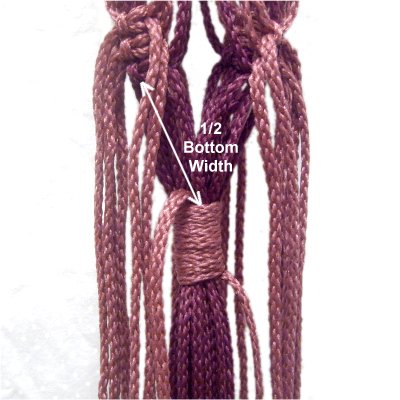
Step
33: Gather the dark
cords together, making sure they
are organized neatly.
Measure from the last SK tied in the
previous step, moving down 1/2
the bottom width of the
pot.
Step 33,
continued: Tie a Wrapped Knot
around the group, using the 36-inch light
cord. The top of it should be at
the point measured.
Important:
Do not cut off the two ends of the 36-inch cord
until you complete the next step.
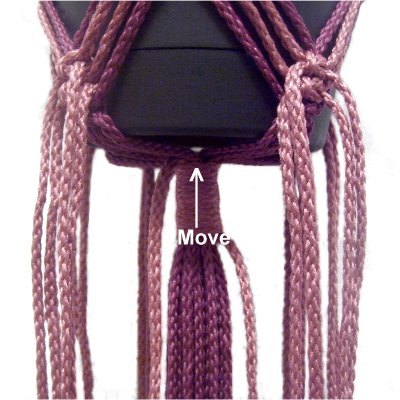
Step
34: Place the pot inside
the cradle of your Two Tone Planter, and
put something inside to give it some
weight.
Move the Wrapped knot as close to the
bottom of the pot as possible. Make
sure the last SK tied in the posts are
still resting near the top edge of the
pot.
Triple Beaded Fringe
I chose a triple Beaded Fringe for the Two Tone
Planter, but you can create a brushed fringe if
you wish.
I recommend layering it, so it's not too bulky.
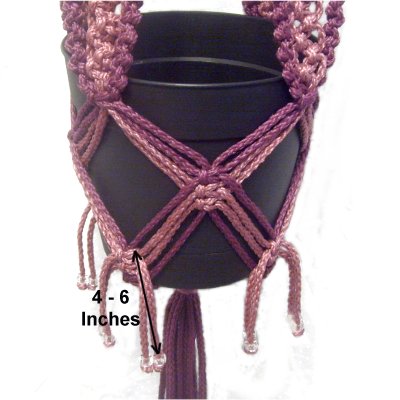
Step
35: Place beads onto the
ends of the light
cords, arrange at least 4 to 6
inchesbelow
the bottom of the pot.
Measure carefully, so all the beads are at
the same level.
Tie TIGHT Overhand knots below the beads.
Do
notcut
off the extra material yet.
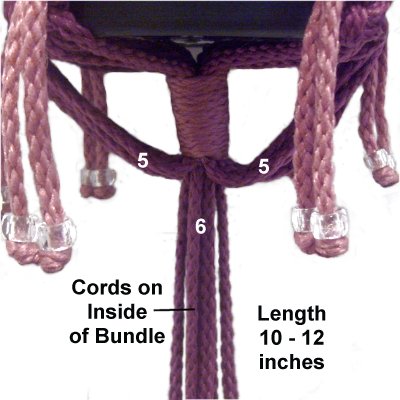
Step
36: Look at the bundle of dark
cords near the bottom of the
Wrapped Knot. Separate the 10 cords
on the outside
of the group. The remaining 6 cords
on the inside
of the bundle are used to make the longest
fringe.
Attach the beads at least 10 - 12 inches
below the Wrapped knot, then tie Overhand
knots below them.
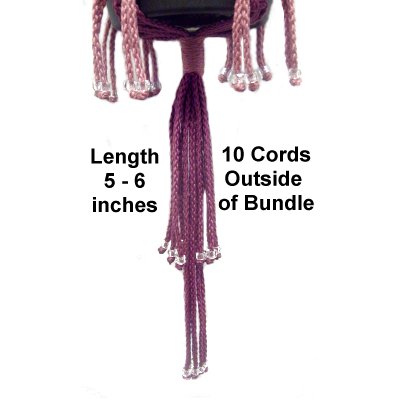
Step
37: Apply the beads to the
10 cords you separated (outside of
bundle), then tie Overhand knots below
them.
The beads should rest 5 to 6 inches below
the Wrapped knot.
Step 38:
When all the bead are in place, cut off the excess
material close to each Overhand knot.
When using Bonnie Braid or nylon material to make
the Two Tone Planter, you can melt the stub with a
flame, pressing it against the Overhand knot.
By
using any text or images on Free Macrame
Patterns, you are agreeing to ourTerms
of Use