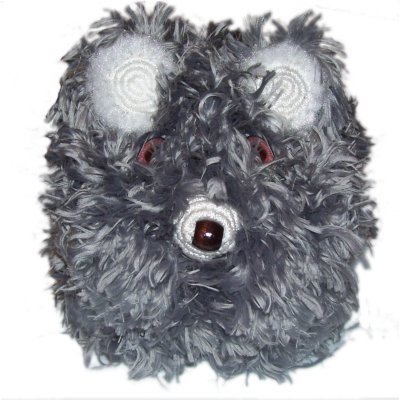
Description:
The Shaggy Dog features the use of "Fur
Yarn" to make the curly coat. You can also use
twist style Macrame cord for the fur, if you can't
find the yarn in your area. The fur is
arranged in two layers to form the head and short
body.
For a decoration, use a foam ball. When
making this design as a toy, use a sock filled
with stuffing to form the base, making it as round
as possible.
The nose and ears are made with a spiral design,
which is the most challenging part of this Macrame
Project. For that reason, this project is
rated moderate, but if you have experience, this
animal decoration will be easy for you to
make.
Beginners should practice all the knots before
making this design.
Step 1:
To mount the cords for the Shaggy Dog, you first
make a Lanyard knot with 4 cords, which looks like
a star with 8 segments:
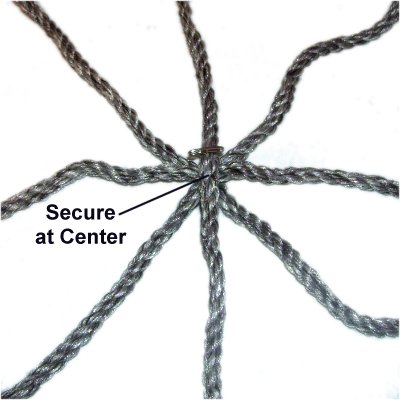
Cut
4 cords, each 60 inches long.
Arrange two in an X shape (diagonal),
securing them at the center.
Place the other two on top, so one runs
top to bottom and the other side to side
(+ shape). Match up the centers and
secure all 4 cords with one pin.
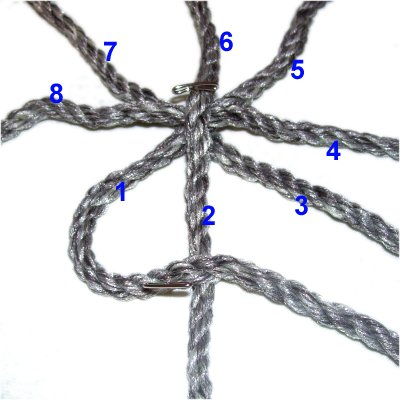
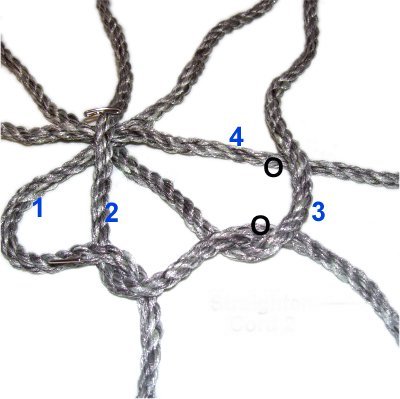
Mentally number
the 8 segments as "cords 1 - 8", beginning
with the lower diagonal segment on the
left.
Move cord
1 to the right, placing it on top
of cord 2. Secure it in the curved
position shown.
<
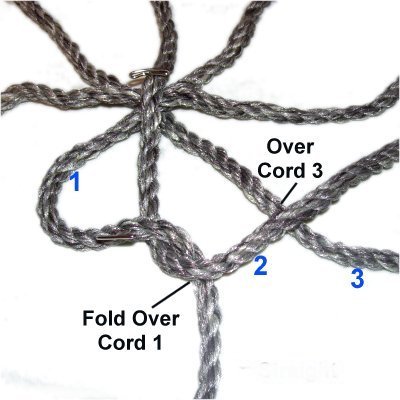
Fold cord
2over
cords 1 and 3.
Fold cord 3 over
cords 2 and 4. >
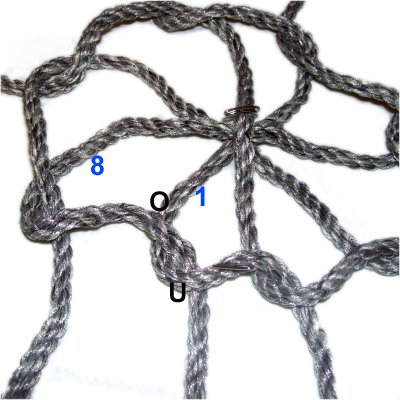
To create the rest of the Lanyard Knot for the
Shaggy Dog, you pass each cord over the one before
it, as well as the next one.
Stop after you have moved cord
7 over cord 8.
Fold cord
8 over cord 7.
Pass it over
- undercord
1, in the area where it curves.
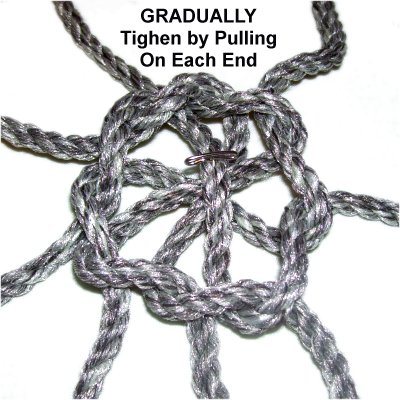
Tighten the
Lanyard Knot slowly and gradually, by
pulling on each end.
Remove all the slack so it's as small as
possible.
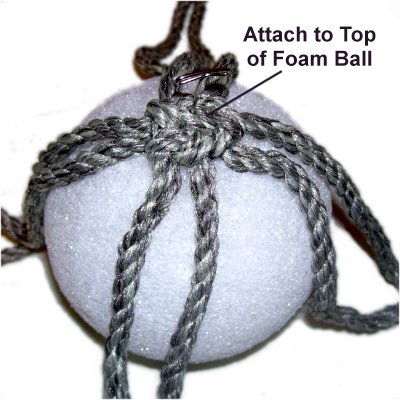
Attach the
Lanyard Knot to the top of the foam ball
with glue. Arrange the cords as
shown, in four groups of two cords.
Secure it with a pin while the glue dries.
The Nose
Step 2:
The nose for your Shaggy Dog is made with Double
Half Hitches arranged in a spiral design. It's
attached to the Lanyard Knot.
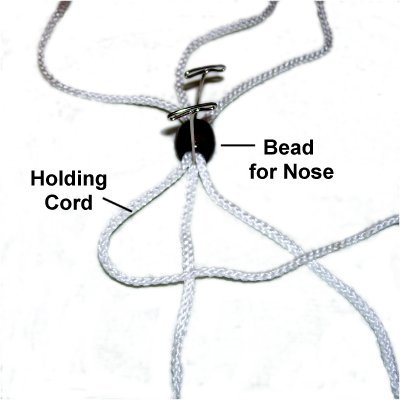
Cut
3 cords, each 36 inches long (2mm
material). Place them
through the bead for the nose, and slide
the bead to the center of the cords.
Secure it on both sides.
Arrange the cords vertically. The
one furthest to the left
will be the holding cord. Move it right,
placing it on top of the two closest to
it.
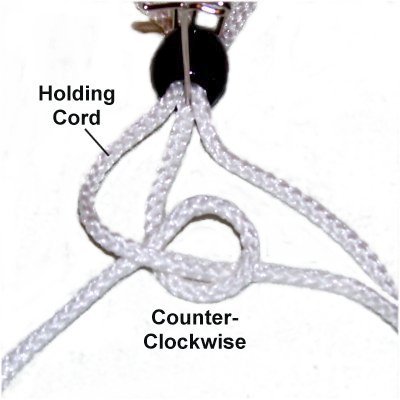
Attach the two
working cords (middle and right) to the
holding cord with Double Half Hitches.
Since you move left to right, the loops
are made in a counter-clockwise
direction.
Tighten the knots firmly so they rest next
to the bead (see next image).
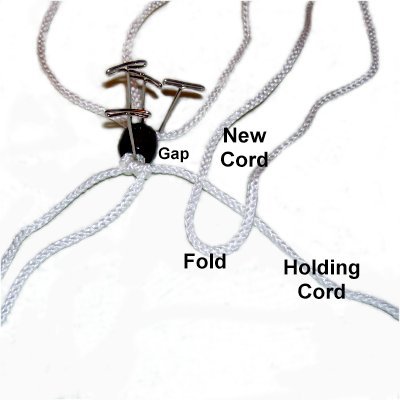
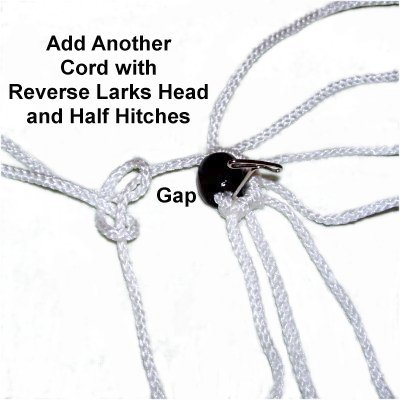
There is a
large gap between the two cords you just
attached and the three on the other side
of the bead.
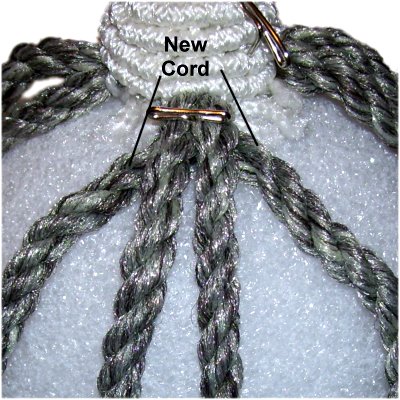
So you must add a new cord to fill that
space.
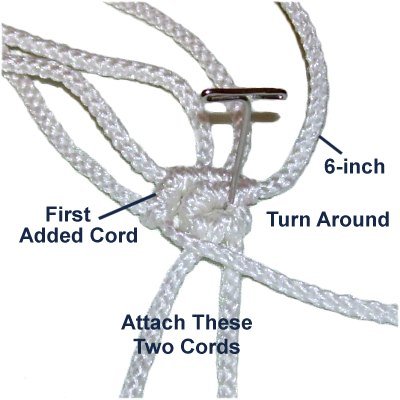
Cut
two cords 20 inches long.
Fold one in half and place it on top of
the holding cord, with the ends heading
towards the back of your board.
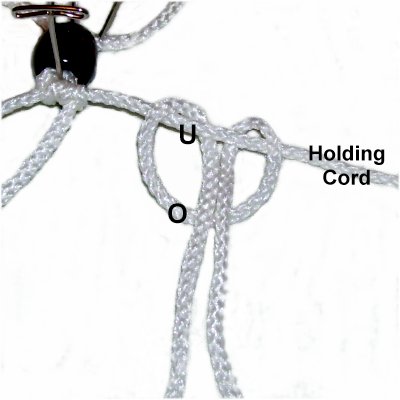
To complete
the reverse Larks Head knot, move the ends
of the new cord under
the holding cord, pulling them toward you.
Pass them over
the folded portion. Match the ends
and tighten firmly.
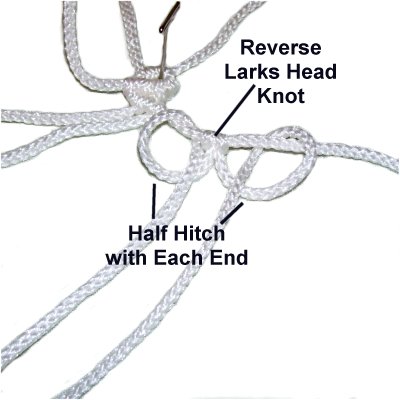
Since the gap
is so large in row 1, you will need to add
Half Hitches with both halves of the new
cord.
Turn the board so you are working on the
other side of the bead. Attach all
three cords to the holding cord with DHH.
Turn the board
again, to the original position. Add the
second 20-inch cord with a reverse Larks
Head plus a Half Hitch with each end.
This will rest on the left side of the
bead, covering the gap on that side.
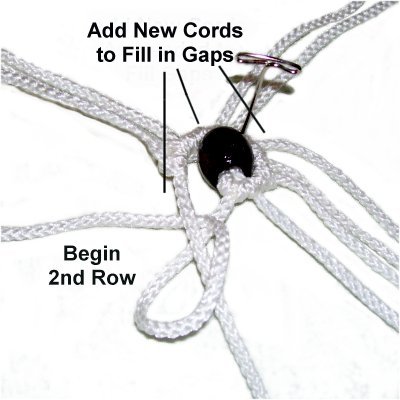
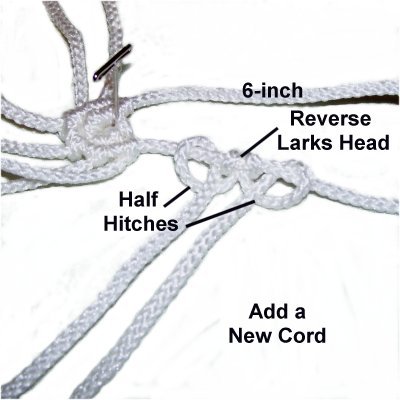
Make the second
row by attaching all the
working cords to the holding cord with
DHH (clockwise circle).
Cut and add 3 new18-inch
cords to fill in the gaps.
Attach them to the holding cord with
reverse Larks Head knots only (No
extra half hitches).
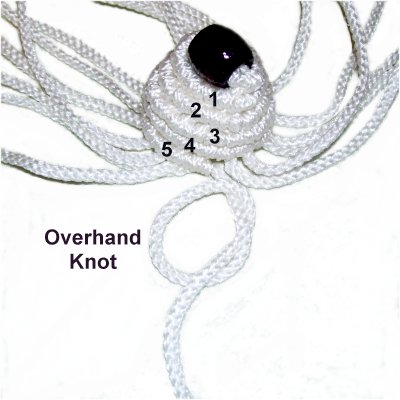
You should have16
cordswhen
you are through (includes
holding cord).
Tie 3 more
rows of DHH (total of 5) working in a
circle.
Do not
add any more cords.
Tie an Overhand Knot with the holding
cord, so it rests next to the
last DHH tied.
Verify that the Lanyard knot is attached to the
foam ball, and remove any pins. Place the
nose around
the Lanyard knot to make sure it fits.
Stretch the nose slightly if needed.
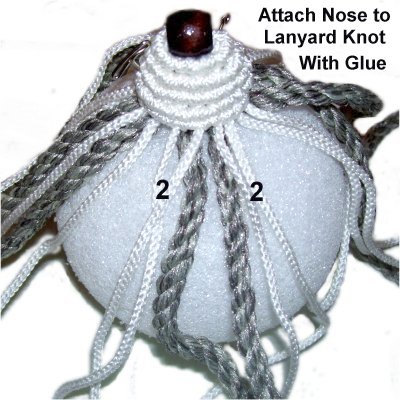
The last row of DHH should rest as close to the
surface of the ball as possible.
Remove the nose,
apply glue, and then put it back into
place. Temporarily secure it with
pins while the glue dries.
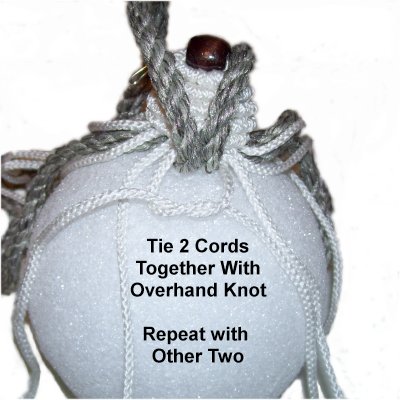
Locate the 4 pairs of 6mm cords coming
from the Lanyard knot. Arrange two
nose cords on either side of each pair.
Flip the 6mm
cords out of the way, and tie 2 of the
nose cords together, so the knot will rest
under
the 6mm cords. Repeat with the other two
nose cords.
Repeat this with the other cords coming
from the Lanyard knot.
Trim the nose cords (2mm) to approximately
1/2-inch.
Do not cut the 6mm cords, as they will be used to
create the net design around the ball. The
fur for the Shaggy Dog is attached to the net.
Net Design
Step 3:
To create the net design surrounding the ball, you
must first add some cords to those already
present.
Cut
four cords of 6mm material, each 45 inches
long. These are considered "new"
cords.
<<
Place one of them under a set of two
cords, balance it, and secure it to the
ball.
Tie a Square Knot with the two halves of
the NEW cord. Those already present
are fillers. >>
Add a new cord the same way, onto each of the
remaining 3 pairs coming from under the nose of
the Shaggy Dog.
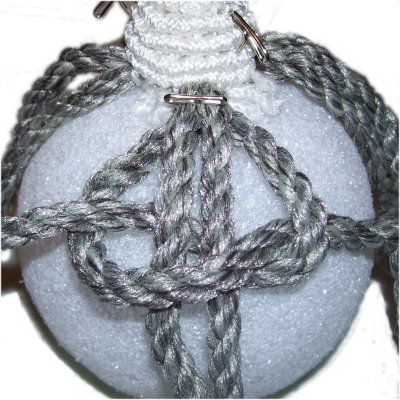
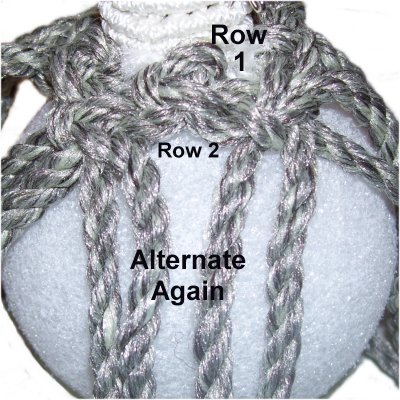
These four Square Knots are considered the first
row of the net design.
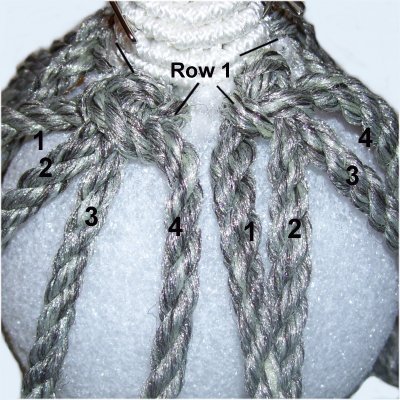
Mentally
number the cords coming from two SK (1 - 4
for each knot).
Use cords 3 - 4 from the left knot with 1
- 2 from the right knot, to tie a SK for
the second row (alternate). It
should rest close to the SK in row 1.
Repeat this process with the remaining
cords to complete row 2.
<<
For row 3, alternate again and
tie one ASK with each group of four cords.
Tighten
the knots they rest 1-inch below those
in row 2. >>
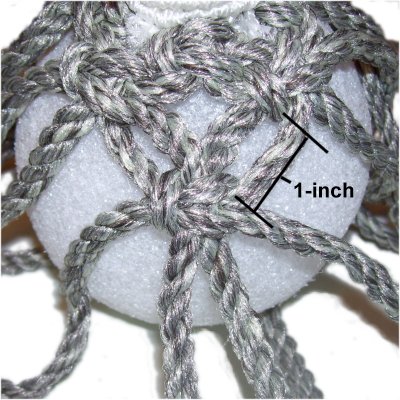
Tie at least 2 more rows of ASK to cover the
ball of the Shaggy Dog. Alternate the cords each
time. The rows should be around 1-inch
apart, with the last row about 1-inch from the
bottom.
You can change the spacing as needed, but make
sure the net fits snugly
around the ball.
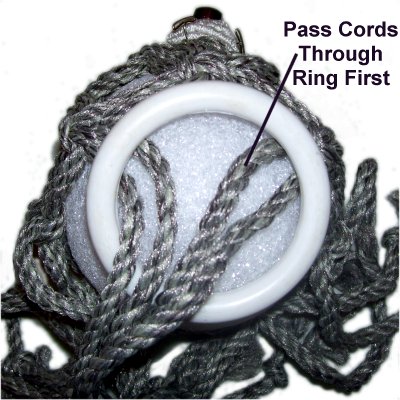
Place
the ring on the bottom surface of the
ball, positioning it so the ball does not
tip over. Once you have the right
placement, slide 4 cords through the ring.
Attach them with Double Half
Hitches.
Repeat with the remaining cords.
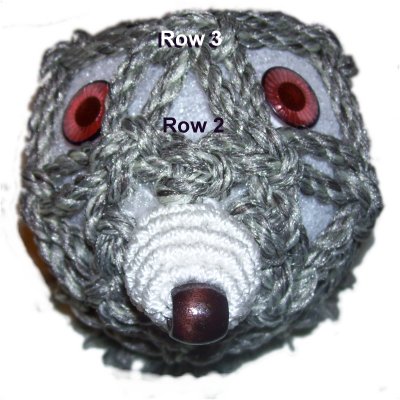
Eyes and Ears
Step
4: Place the eyes for the
Shaggy Dog between rows 2 and 3, making
sure there is equal distance between them
and the nose.
For eyes that have stems, cut a small hole
in the ball, add glue, and place the stem
inside.
For flat back eyes, apply glue and place
them on the surface of the ball.
Step 5:
The ears for the Shaggy Dog are made with a
circular Spiral Design. These can be changed
if you prefer a different shape.
Cut
3 cords, each at least 24 inches long.
Secure one to your board horizontally, to be used
as a holding cord.
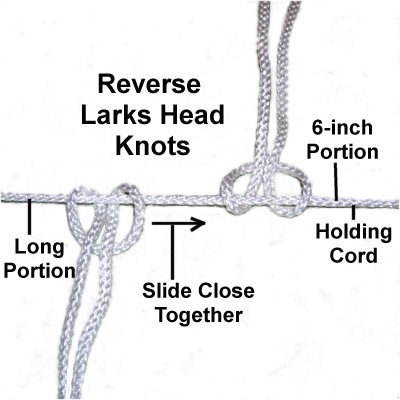
Attach a
working cord 6 inches from the right end
of the holding cord, with a reverse Larks
Head knot. The ends should be
heading toward the back of your board.
Attach another working cord to the left of
the first, sliding it so the two cords
rest close together. The ends should
be heading towards the front of your
board.
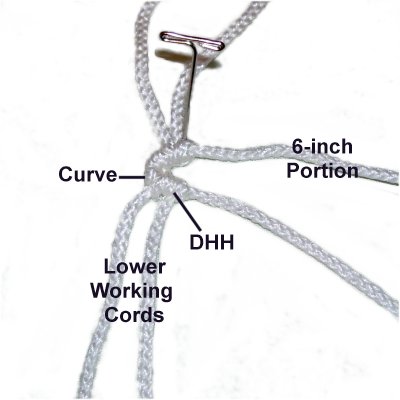
Curve the long
portion of the holding cord to the right,
so it rests below the 6-inch portion.
Attach the lower
working cords (near front of board) to the
holding cord with DHH. Slide these
knots close to the ones above them,
forming the curved angle.
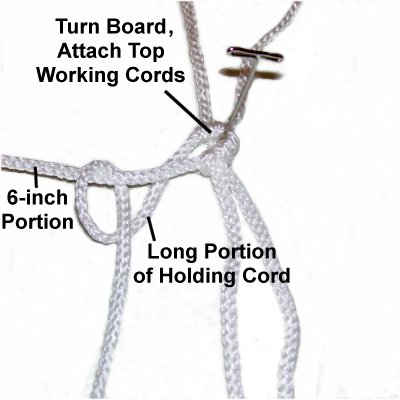
Turn the entire board around. Position the
long
portion of the holding cord over the second set of
working cords (top pair), and then attach them to
it.
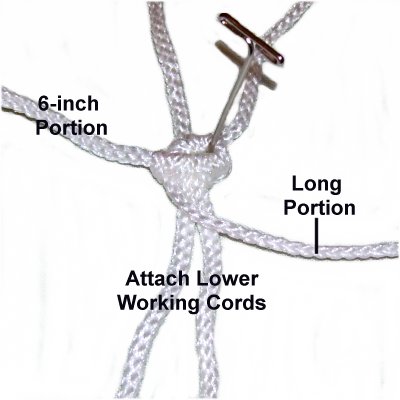
Turn the board back to its original
position, with the 6-inch portion of the
holding cord on the left.
Attach the long portion of the holding
cord to the short portion, with a
DHH. This
completes the first row.
Design
Tip: When making the spiral ears
for the Shaggy Dog, each row ends with the step
above, which is to attach the long portion of the
holding cord to the short portion.
The short portion should always be on the left
prior to starting the next row.
To start the
2nd row, move the long portion of the
holding cord to the right. Attach
the lower working cords to it with DHH.
Cut
2 cords, at least 18 inches long.
Attach one to the long portion of the
holding cord, with a reverse Larks Head
knot.
Then tie a Half Hitch with each end.
Turn the ear
so the cord you just added is on the left.
Attach the next two working cords to the
holding cord with DHH.
Add the second 18-inch cord you cut
earlier, attaching it to the holding cord
with a reverse Larks Head.
Use each end to tie a Half Hitch.
Finish the
second row by attaching the long portion
of the holding cord to the 6-inch portion.
For the third row, repeat the same process,
adding cords to fill in spaces.
Attach the new ones with ONLY the reverse Larks
Head knots. You
do not need the extra Half Hitches, since the
spaces are smaller.
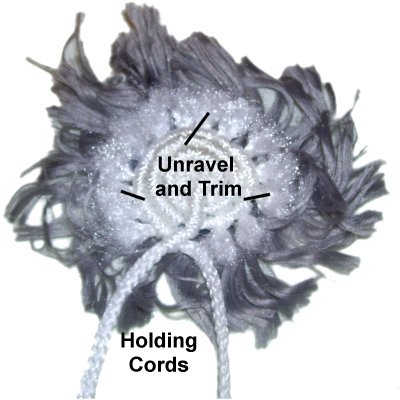
Tie a final row without adding any new cords.
Trim and
unravel the working cords. Do not
cut the two ends of the holding cord,
since they are used to attach the ears to
the Shaggy Dog.
Make a circle with the fur yarn and attach
it to the back
of the ear with glue.
Step
6:Repeat
Step 5to
create another ear for the Shaggy Dog.
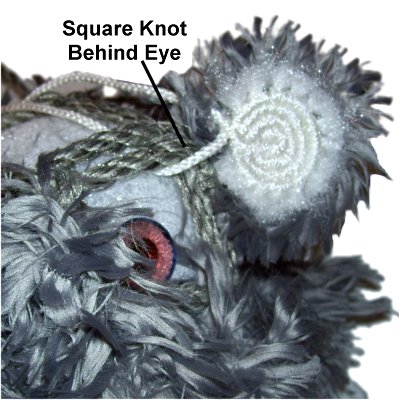
Step
7: Place one ear in
front of the Square knot just behind the
eye, and slide one of the holding
cords from the ear under two cords in that
area.
Tie both holding cords together with an
Overhand knot to secure it. Trim off
the excess material.
Repeat with the second ear.
Add the Fur
Slide one 5-inch piece of fur yarn under one
portion of the net surrounding the ball. Tie the
two ends together with an Overhand knot to secure
the yarn.
Repeat this process until the Shaggy Dog is
completely covered.
Attach all the
fur before doing any trimming.
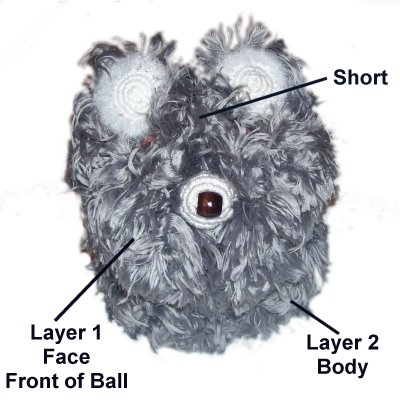
Shaggy
Dog Haircut: The area between the
eyes should be very short.
The area between the ears and just below
the nose is one layer, representing the
head. Trim that area so it's shorter
and stands out.
The second layer is the bottom as well as the
back of the ball, which should be longer.
In the center back, keep one piece long for the
tail.
By
using any text or images on Free Macrame
Patterns, you are agreeing to ourTerms
of Use