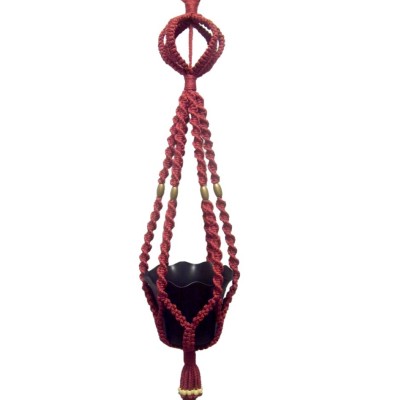
The
Royal Hanger features long Spiral sennits,
along with a unique Macrame design at the
top. The Square knot designs in that area
curve outward, which is called a Royal
Crown.
The cradle is made with two types of
decorative knots.
The custom design allows you to use any
size plant pot or bowl, but you will have
best results if the pot is at least 10
inches wide.
This Macrame project is rated Easy to
Moderate, suitable for beginners.
Make sure you are able to tie all the
knots used in the design, listed below.
The finished size for this plant hanger is
45 inches, which includes a double length
beaded fringe at the bottom.
Step
1: Cut the cords for the Royal
Hanger as follows:
Cut
12 cords, each 8 yards long.
Prepare the tips with tape, compressing the
material so the area is as narrow as possible.
Cut
1 cord, 2.5 yards long.
Cut
3 cords, each 40 inches long.
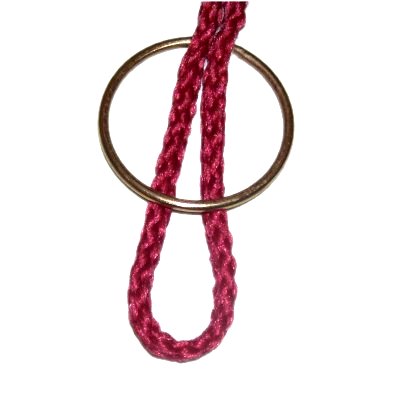
<<
Fold the 2.5-yard
cord in half, and place the
folded area under
the ring, and the rest through
it.
Bring the ends towards you, passing over
the ring and under
the folded area of the cord. >>
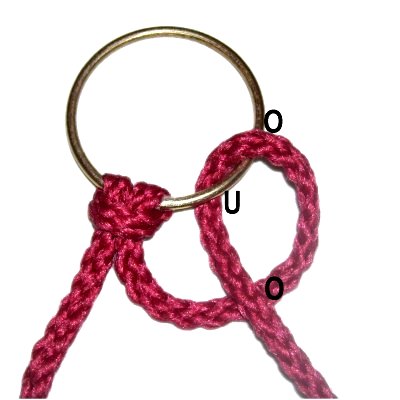
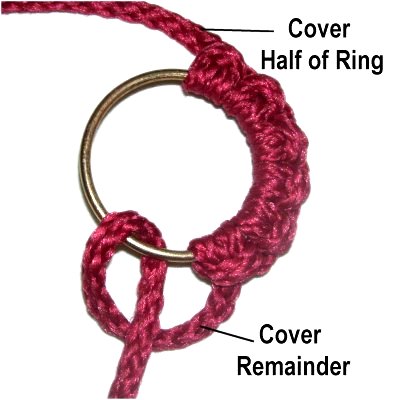
Step 2:
Now you will cover the ring at the top of the
Royal Hanger, using each half of the cord.
These Larks Head knots are made with twoloops, as
described below:
<<
Pass the right half of the cord over
- under the ring, and over
the cord, counter-clockwise.
The second loop is made by passing the
cord under
- over the ring, and under
the cord. >>
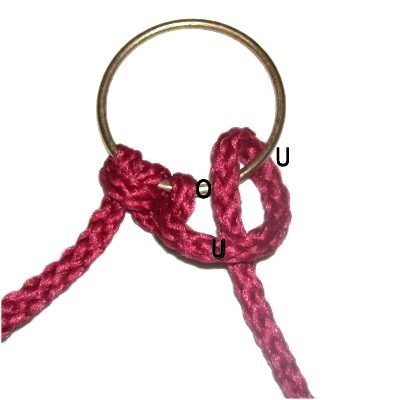
Tie several
more Larks Head knots with the right half
of the cord, covering 1/2 of the
ring. Push
the knots close together as you
progress.
Then use the left half of the cord to
cover the remainder of the ring. The
only change is that the loops are made
rotating clockwise.
Make sure there
are no gaps between the knots.
Add more knots if needed.
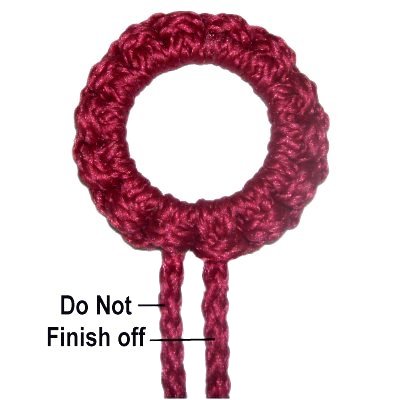
Important: Do not finish
off the two ends of the cord, just let
them dangle freely.
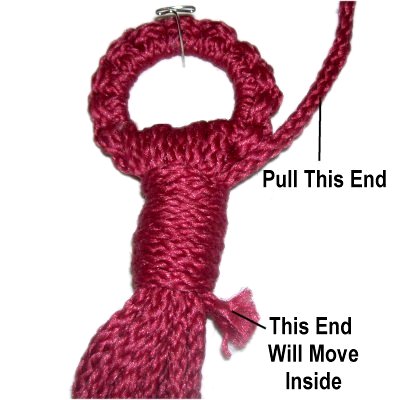
I will now refer to it as the "ring
cord" in the following
instructions.
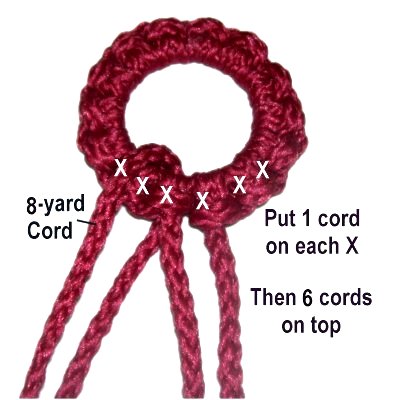
Pass 6 of the
8-yard
cords through the ring,
positioned in the areas marked with an
(X). Some will rest on top of the
ring cord.
Match the ends and adjust each cord separately,
until it's balanced.
Then place the remaining 6 cords on
top of the others, and balance
them, too.
Wrapped Knot
Instructions
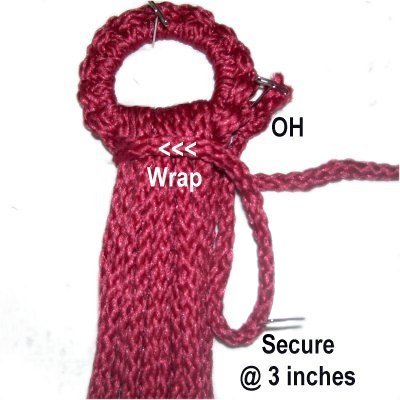
Step 3:
Tie the first Wrapped Knot for the Royal Hanger,
as described below:
Tie an Overhand knot at one end of a 40-inch
cord. Secure it to the right of the
cords on the ring. Move the cord down 3
inches and secure it. Then bring it back up
to the ring. The longest portion of the cord
is considered the working end.
Wrap the
working end around the group of long
cords, passing over the secured portion,
too.
You'll be moving right to left in front,
and left to right in back.
Continue to
wrap firmly and evenly, making sure the
coils don't overlap.
You have enough material to wrap for
approximately 1.5 inches.
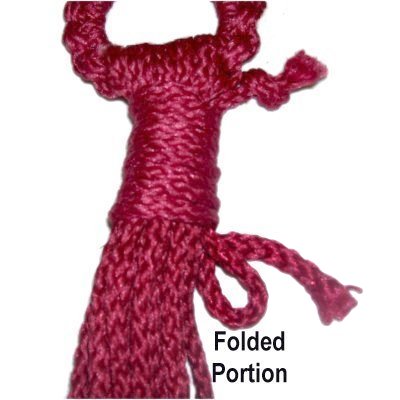
The folded
area of the cord now looks like a small
loop.
Pass the working end through it, back to
front (towards you).
Pull the secured
end (with the Overhand knot). The
working end and loop will move inside the
wrapped portion. Try to pull it half
way through if you can.
Cut off the excess and tuck the stubs
inside the Wrapped Knot.
Make sure
you don't cut the long cords!
Step
4: Organize the 8-yard cords into 6
groups containing 4 cords.
It helps if you can secure the cords on a Project
Board, with the Wrapped Knot upright, as shown in
the images below. Your other option is to
create the rest of the Royal Hanger while it's
suspended from a hook in a wall or ceiling.
Royal Crown Design
Next you will make the Crown at the top of the
Royal Hanger.
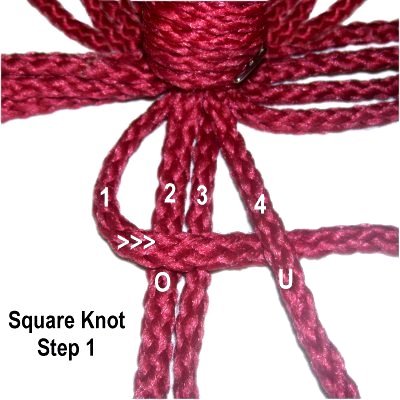
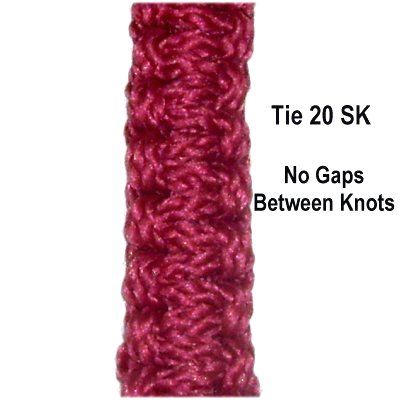
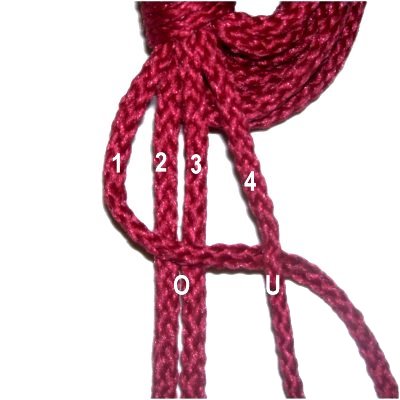
Step 5:
Using one group of four cords, tie the first
Square Knot as described below. Start by
mentally numbering the cords 1 - 4.
Square knot Instructions
<<
Curve cord
1 to the right, passing over
cords 2 - 3 and under
cord 4.
Move cord
4 to the left, under
cords 2 - 3, and over
cord 1. >>
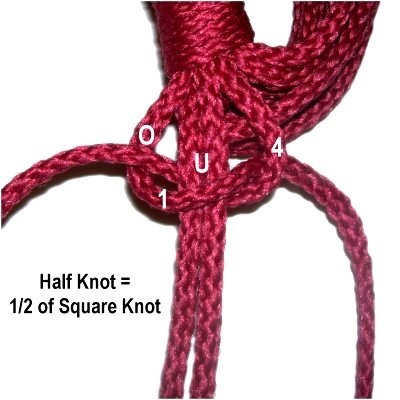
Pull both ends firmly
to tighten the first half of the SK.
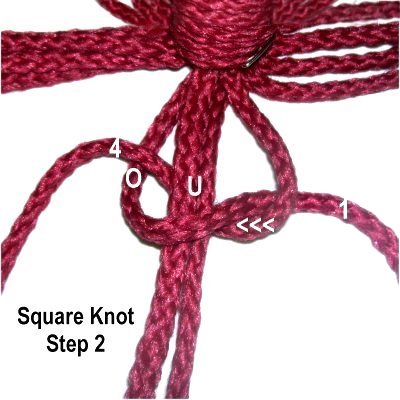
<<
Curve cord 1 to the left,
over
cords 2 -3 and under
cord 4.
Move cord 4 to the right,
under
cords 2 - 3 and over
cord 1.
Tighten firmly. Make sure the SK
rests against the Wrapped knot.
Step
6:Repeat
step 5, tying a total
of 20 knots (includes the
first one already tied).
Bundle up the four cords so they are
separate from the others.
Important:
Make sure the knots are close together
with no gaps between them, or the Royal
Hanger will be lopsided.
Step 7: Repeat
step 6 with the other five groups.
Bundle each group of cords separately, after you
finish.
Important:
Measure to make sure all the sennits are the same
length. Push the knots closer together as
needed.
Step 8:
Organize the sennits and make a bundle with all
the cords. Make sure nothing is twisted and
the two ends of the ring cord are in the center of
the bundle.
Repeat
step 3, tying a second Wrapped Knot
around all the cords.
Important:
Make sure you wrap as tightly as you can.
Step 9: Hold both ends of
the ring
cord firmly while you slide the
Wrapped knot upward. The SK sennits
will bulge, forming the crown for the
Royal Hanger.
Measure from the bottom of the first
Wrapped Knot to the top of the second
one. They should be 4 - 5 inches
apart. Make adjustments to the
placement as needed.
Step 9,
continued: Pull on all the long
cords firmly, below the second Wrapped Knot.
There should be no gaps between the SK and the
Wrapped Knot.
Make sure the sennits are all curved the same and
are evenly spaced.
Step
10: Using both ends of the
ring
cord, tie an Overhand knot.
Make sure you tighten the knot so it rests
against
the bottom of the second Wrapped Knot.
Apply glue if you wish, then cut off the
excess material. When using nylon or
Bonnie Braid, apply a flame to the stub to
melt the material.
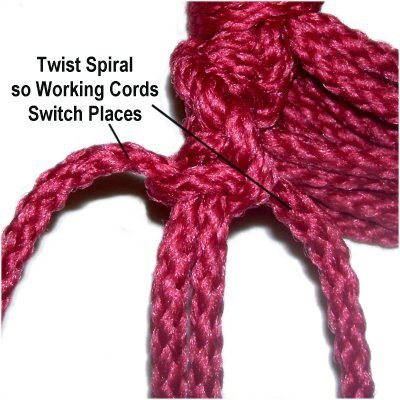
Spiral Sennits
The long sennits for the Royal Hanger are made
with the Spiral Stitch, which is a series of Half
Knots (1/2 of SK), as described below.
Important:
You need to use the same groups as you did for the
crown, which is why you bundled them separately.
Use the same
working cords and fillers, too. The
working cords are shorter than the fillers.
Step 11:
Mentally number the four cords in one group.
Half Knot Instructions
<<
Move cord
1 to the right, passing over
cords 2 - 3 and under
cord 4.
Move cord
4 to the left, under
cords 2 - 3, and over
cord 1. >>
Pull both ends firmly
to tighten the Half Knot.
The
knots will begin to spiral on their own,
but if you tie a total of 5 - 7 knots,
then twist the sennit so the working cords
switch places, the sennit will be more
attractive and evenly spaced.
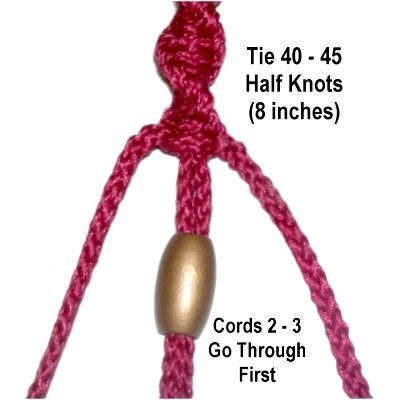
Step
12:Repeat
step 11, tying a total of 40 - 45
Half Knots, until the Spiral sennit is 8 inches long.
Slide a bead onto cords 2 - 3.
Slide cords 1
and 4 (working cords) through the bead,
positioned in front of cords 2 and 3
(fillers).
This
is important, since you will be
switching cords to make the next section
of the Royal Hanger.
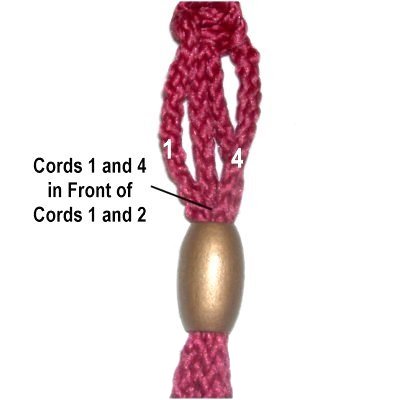
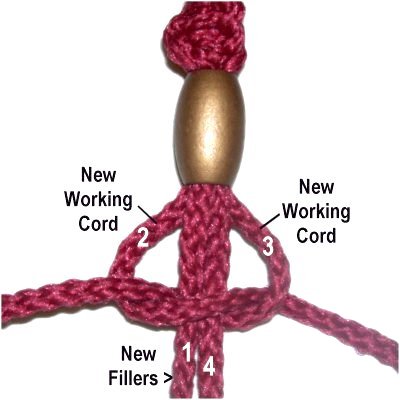
Step
13: Cords 2 and 3 are the
longest of the group, so they now become
the new working cords.
Cords 1 and 4 are the new fillers.
Tie the same
number of Half Knots you did in Step
11. Do not add
another bead.
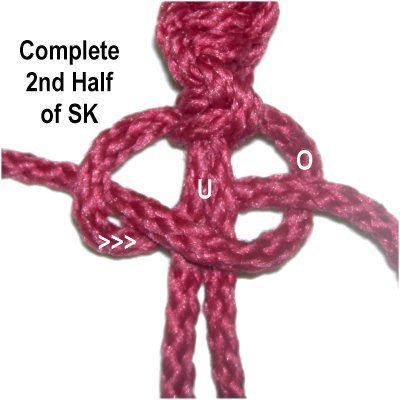
Step 14:
Complete the Spiral sennit by tying the second
half of the SK, as described below:
<<
Curve the right working cord to
the left,
over
the fillers and under
the left working cord.
Move the left working cord to the right,
under
the fillers and over
the other working cord.
Step 15:Repeat
steps 11 - 14 with the other five groups
of bundled cords.
Make sure you use the same working cords for the
top portion of the Spiral (shorter than the
fillers).
Then add the bead and switch cords so you use the
longest ones for the lower portion of the Spiral.
The Cradle
The Cradle for the Royal Hanger is made
specifically for the size pot you plan to put
inside it.
So you must measure the pot before you get
started.
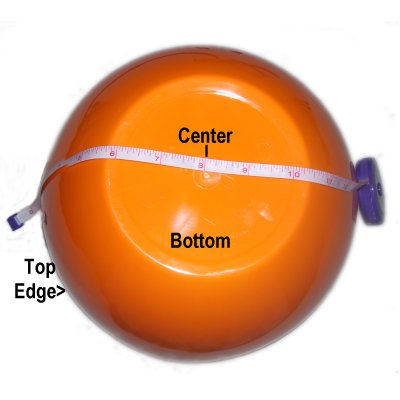
Step
16: Measure the pot or bowl
starting from the top edge, along the
side, all the way to the bottom.
Stop in the center of the bottom area.
The result is the cradle
length.
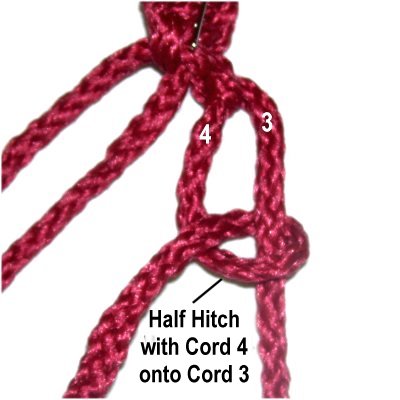
Step
17: Mentally number the 4 cords
for one Spiral Sennit.
Important:
Pass cord 3 under
cord 4, so the longest cord (4) will be in
the correct position for step
22.
Step 18:
Make a clockwise
Half Hitch with cord 3 onto cord 4.
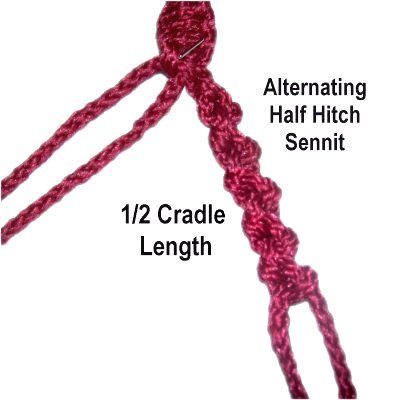
Step
19: Use cord 4 to tie a counter-clockwise
Half Hitch onto cord 3.
Step
20:Repeat
steps 18 and 19 several times,
alternating between cords 3 and 4.
Stop when the sennit is 1/2
the cradle length.
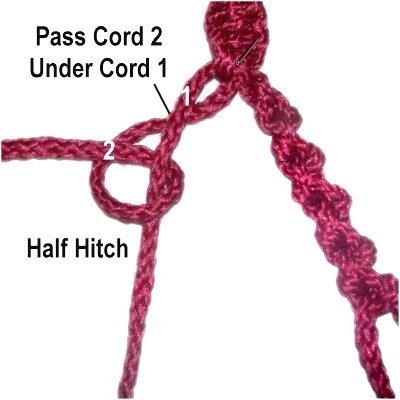
Step
20: Next you will use the other
two cords from the same Spiral sennit.
Pass cord 2 under
cord 1.
Tie a counter-clockwise
Half Hitch with cord 2 onto cord 1.
Then you switch and use cord 1 to tie a clockwise
Half Hitch onto cord 2.
Make it the same length as the other
sennit.
Step 21:Repeat
steps 17 - 20 using the cords from the
remaining five Spiral sennits.
Place three Spirals on your board. Mentally
number the six Half Hitch sennits.
Step
22: Combine the cords from
sennits 2 and 3, tying a series of Square
knots. Push them close together.
Stop when you have reached the appropriate
cradle length (pot size).
Do the same with sennits 4 and 5.
Step 23:Repeat
step 22 with the cords from the other
three Spirals.
Then combine the remaining cords from Half Hitch
sennits 1 and 6 (both groups), and repeat the same
process. This is easier to accomplish with
the hanger suspended.
Make sure nothing is twisted and the cords are all
combined properly. Gather all the cords
together, holding them near the last SK
tied.
Place the pot in the Royal Hanger to see if the
cradle is the appropriate size. The bowl or
pot should be touching
the cradle at the bottom where the cords
are gathered together.
Make adjustments as needed by adding/removing
Square knots, or by pushing them closer together.
Step 24:
Tie a Wrapped Knot around all the cords.
Pull each cord downward to eliminate any
slack. The Wrapped Knot should be touching
the SK.
Step 25:
The final step for the Royal Hanger is to make a
fringe with the ends of all the cords.
My favorite technique is a double length beaded
fringe shown below. You can also unravel and
brush the fibers, or just add finishing knots.
When using Bonnie Braid or nylon, you can simply
melt the tips with a flame. Test the
material before you attempt this.
Double Beaded Fringe
Separate the
cords into two groups, those on the outside
of the bundle, and those on the inside.
Create the longest fringe first, applying
beads to the group from the inside.
The beads should rest at
least 10 inches below the Wrapped
knot.
Tie an Overhand knot below each bead.
Create the short fringe in the same manner,
applying beads at least 5 inches below the Wrapped
Knot.
After all the beads are in position, compare them
to each other to make sure they are at the same
level. Make adjustments as needed.
Cut off the excess material close to the
knot. When using Bonnie Braid or similar
material, melt the stub and press it against a
surface so it rests flat against the knot.
By
using any text or images on Free Macrame
Patterns, you are agreeing to ourTerms
of Use