|
|
| |
 |
|
| |
|
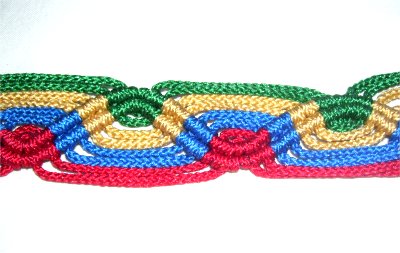
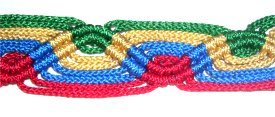
Description: The Rainbow
Bracelet features the use of multiple colors to
produce an interesting wavy design. You
can use any combination of colors, and as many
cords as you wish.
The width
of this Macrame bracelet is determined by how
many cords you are using.
In the example shown, two cords of each color
(8 cords) resulted in a bracelet 1-inch wide
(2mm size material).
This Micro-Macrame pattern uses basic knots, so
is a great project for beginners. You can make
this jewelry design with 2mm cord first, and
then try it with more delicate materials.
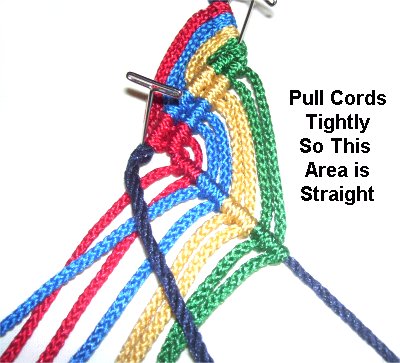
Important:
Use a project board and pins, to help you
stretch the cords so they are straight.
|
| |
| |
|
| |
| Supplies
Needed: |
| |
- 1mm to 2mm Cord material (several colors)
- One bead for clasp (hole suitable for 4
cords)
|
| |
|
| |
Knots
Used:
|
| |
|
|
|
|
|
| |
Preparation
|
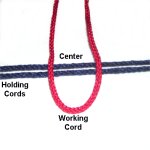
|
Holding
Cords: Cut 2 cords (any color),
each 36 inches long
Working Cords: Cut 1 cord of each
color, at least 70 inches long (for
bracelets up to 8
inches in size).
Prepare the ends using one of the techniques
described in Cord
Preparation.
|
| |
|
|
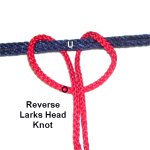
Step 1: Secure
both holding
cords to your board, so they are
horizontal.
The working cords should be mounted 8
inches from one end of the holding cords,
as follows (reverse Larks Head knot): |
|
|
|
<<
Fold one working
cord in half, and place it on top
of the two holding
cords.
Bring the ends under
the holding cords and over
the folded area of the working
cord.
>>
|
|
|
|
|
|
|
|
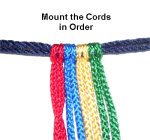
Mount the working cords
in the order you want the colors to be
arranged in the Rainbow Bracelet. |
|
|
| |
|
|
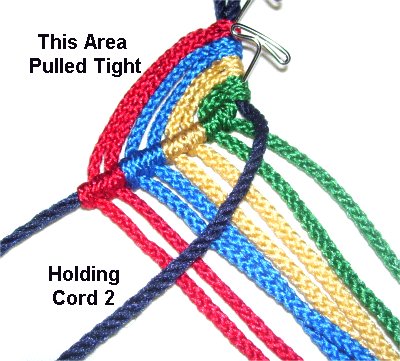
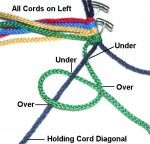
Step 2: Turn
the design so it is resting vertically.
Secure it at the top, so it can't move.
Bring all the working
cords to the left
of the holding cords. There
will be two
of each color,
since you folded them in half.
Move the left
holding cord on a gentle
diagonal slant towards the left.
Secure it well.
|
|
| |
|
|
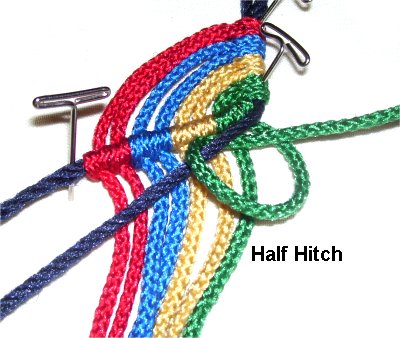
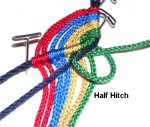
Pass the working cord at the
bottom of
the group
(green)
under
the holding cord.
Make the first Half Hitch by rotating the cord clockwise,
over -
under the holding
cord.
As you pull it to the right,
pass it over
the working
cord. |
|
|
| |
|
|
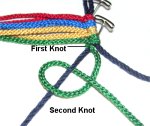
Step
3: Tie another Half Hitch
with the same working cord, after the
first one is tightened FIRMLY.
All the Double Half Hitches tied in the
Rainbow Bracelet need to be tight, so the
areas between them are straight.
|
|
| |
|
|
Repeat steps 2 and 3,
attaching the remaining working cords to the same
holding cord.
So the next one used in this example was green,
followed by 2
yellow, 2
red, and 2
blue (from the bottom up).
Important:
Pull each working cord taut as you bring it straight
down to make the Double Half Hitches. The
cord will be straighter if you tie the first Half
Hitch firmly and eliminate any slack.
One method for keeping the cords straight is to
pull them down with one hand, and tie the Half
Hitch with the other. Be sure to
continue to hold the cord while tying the second
knot. |
| |
|
| |

|
|
Step 4: Move the
second holding
cord to the left,
passing it over all the working
cords.
You can either secure it so it has tension,
or control it with your hand while tying
the next set of DHH.
|
|
| |
|
|
|
|
Step
5: Attach the working
cords with DHH, in the same
order as the first row.
Push
the knots close together, so the
holding cord doesn't show, especially at
the top. |
|
|
|

|
|
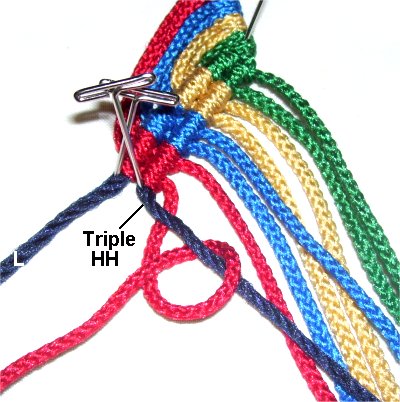
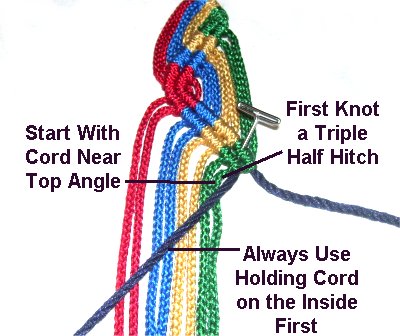
Step
6: Move the holding
cord on the
right the other direction
(right), and secure it.
Bring the first working
cord (at the bottom) under the
holding cord, and then tie the first Half
Hitch (counter-clockwise).
Tie 2 more knots, to make it a Triple Half
Hitch.
|
|
|
|
|
| The third knot will make the angle a little
rounder, so the Rainbow Bracelet has curved
edges. |
|
|
|
|
|
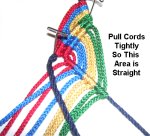
Step
7: Attach the remaining
cords with Double Half
Hitches, pulling each one tightly.
The area between the rows of DHH should be
as straight as possible.
Bring the second
holding cord to the right
and tie the next row. The first knot
should be a Triple
Half Hitch. |
|
|
|
|
| Step
8: As you continue to make the
rest of the Rainbow Bracelet, here are some
important tips: |
| |
| |
|
|
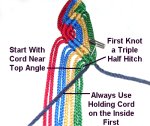
Always use the
holding
cord on the inside
first.
Start the row of Half Hitches with the
working cord closest to the holding cord.
The knot you tie with the first working
cord should be a Triple
Half Hitch. |
|
|
| |
| Step
9: Measure the Rainbow Bracelet
frequently, and stop when it's the length you
need. It's more comfortable if you leave it
a little loose. |
| |
|
|
| |
Finishing Touches
|
| |
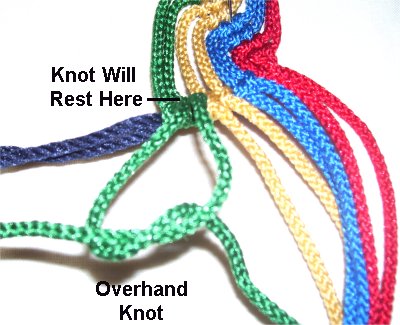
| Step 10:
Turn over the Rainbow Bracelet, so you are
working at the back. |
|
|
|
|
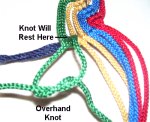
Tie very
tight Overhand knots with each
pair of two working
cords (same color).
Position them so they rest against the
back of the last row of DHH. Apply
glue on the inside
of the knot as you tighten them. |
|
|
|
|
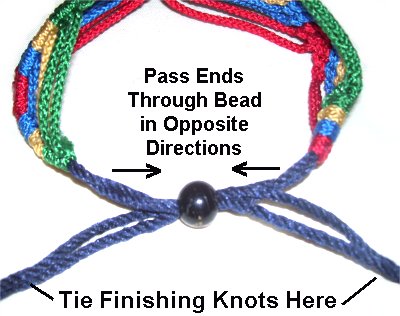
Step 11:
When the glue is completely dry, cut off
the excess material.
You will use the holding
cords to make the clasp.
You can make a Sliding Clasp,
or a simple Bead
Clasp, which is shown below.
|
| |
|
|

|
|
Bead
Clasp: Pass
the 4 ends of the holding cords though the
bead in opposite
directions. Close
the clasp by pulling on the ends.
Move down at
least 2 inches and tie Barrel
knots (or other finishing knots). |
|
|
|
Can't pass the 4 cords
through the hole? Try
using a wire threader:
Fold a piece of fine wire in half and pass it
through the bead. Put one cord through it
near the fold.
Pull on the ends, which will bring the cord
through the bead. Repeat with the
remaining three cords.
|
|
|
|
|
|
By
using any text or images on Free Macrame
Patterns, you are agreeing to our Terms
of Use
|
|
|
|
|
Have
any comments about the Rainbow Bracelet? Contact
Me.
|
|
|
|

|
|
| |
| |