Use three 5-inch rings if you don't have a wire
ball frame. Place them inside each other,
bending them slightly as needed. Wrap the top
andbottom
areas with cord, tape, or wire, right where the
three rings meet.
When using a wire
ball, push down on the top of it until
it's the shape you like.
Cutting
Instructions for 5-inch Size:
Pumpkin: Cut 20 cords, each
2 yards long (Color
A)
Top: Cut 12 cords, each 50
inches long (Color
B)
Stem: Cut 2 cords, each
36 inches long (Color
B)
Preparation:
Since you will be deliberately
unraveling the cords in some areas of the
Pumpkin decoration, temporarily wrap tape
around the ends of all the cords.
For
a Pumpkin Decorationmore
than 5 inches:
Size
of ball x 4 = Minimum number of cords
to cut for the pumpkin
(you can cut more).
Make sure the final number can be
divided by four (24, 28, 32, etc.).
The cords should be at least 90 inches long.
Cords for top:
Increase
the length to 60 inches or more.
Cords for stem:
Increase the length to 45 inches or more.
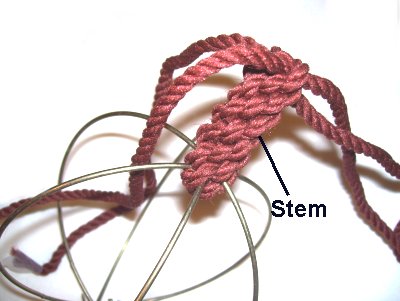
The Stem
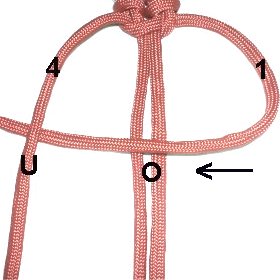
Step 1:
You will be making a Crown knot sennit for the stem
of the Pumpkin Decoration.
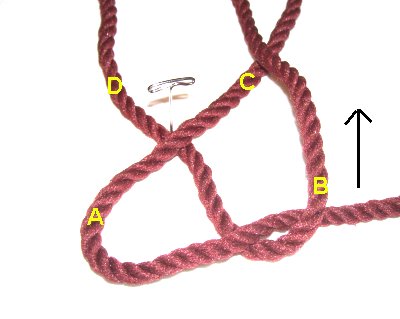
Cross the two 36-inch Color B cords, forming an X
shape. Secure them to your work surface, at
the center.
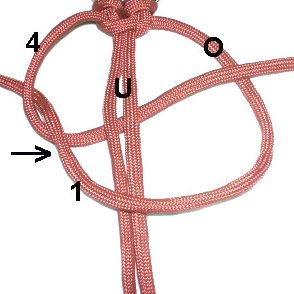
Mentally number the segments A - D, as shown in
the images.
<<Move segment
A to the right,
over segment B. There should be a slight
curve.
Move segment
Bvertically,
passing over segment C. >>
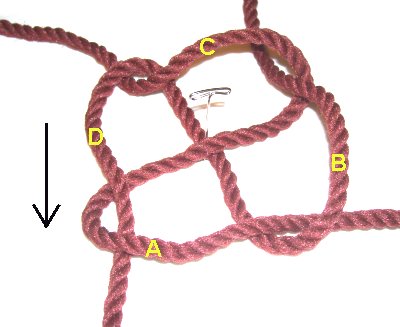
<<
Move segment
C to the left,
over segment D.
Move segment
Dforward,
passing through the curved area of
segment A. >
>
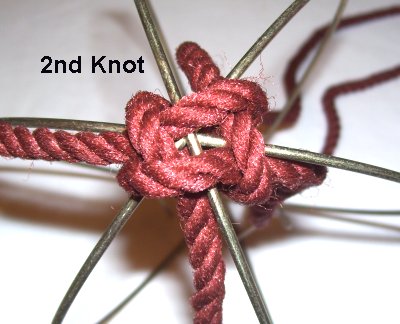
Step 2: Place the
first Crown knot under
the wires at the top
of the frame, where they connect.
Hold it in place while you tie the
next Crown knot above
the wire. You can apply glue if
needed.
Tighten the
second knot as much as you can, so it
holds to the frame firmly.
Step 3: Tie additional
Crown knots until the stem measures 2
- 3 inches.
You need at least 4
inches of material to finish
the stem at the top of the Pumpkin
Decoration, so don't make it too long.
Mentally number the cords 1 - 4. Tie
cords 1 and 2 together with an Overhand
knot. Tie cords 3 and 4 together as
well.
Apply glue before
you tighten the knots, so it's on the inside.
Tie cords 1 and 4 together. Do the same
with cords 2 and 3. Apply glue inside
these knots as well.
After the glue is dry, cut off the
remaining material, as close to the
knots as possible. You can add a little
extra glue to the outside if you wish.
The Pumpkin
Step 4: Mount the 20
Color A cordsfor
the main area of the Pumpkin Decoration, to the
2-inch ring. Attach them with Larks Head
knots, as shown below.
It's a tight
squeeze, so push the knots closely
together.
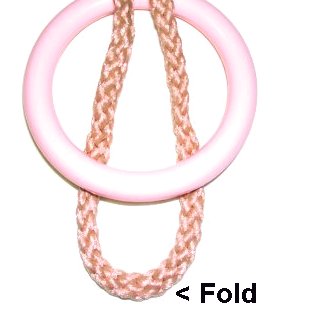
<<
To tie Larks Head knots, fold the cord and
place it beneath the lower edge of the
ring.
Bring the ends over
the front of the ring, and under
the folded portion of the cord. >>
Slide the ring over the stem
so it rests at the top
of the wire ball.
Arrange the cords into groups of four (2
working cords, 2 fillers).
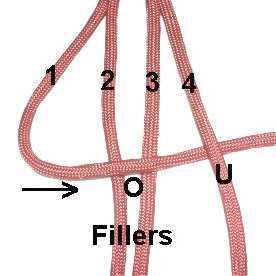
Step 5:
Select a group where the four cords rest directly
over one of the wires, to tie the first
Square Knot (SK).
Square Knot
Instructions
<<
Mentally number the cords. Move cord
1 to the right, over
the fillers (2 - 3) and under
cord 4.
Move cord
4 to the left, under
the fillers and over
cord 1. >>
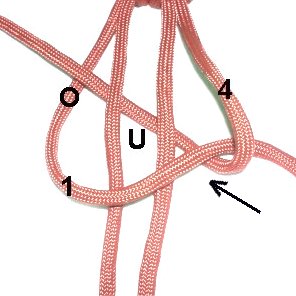
This
is the
first half of the SK.
The two working cords (1 and 4) have now
switched places. So the second half of the
SK is tied the opposite direction:
<<
Move cord
1 to the left, over
the fillers and under
cord 4.
Bring cord
4under
the fillers and over
cord 1, heading right.
>>
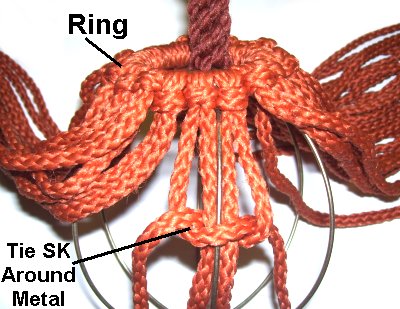
Tie the first halfof the Square Knot around the
filler cords and the wire.
This will anchor the ring to the ball.
Tie the second
half of the SK around thefiller
cords only.
Step 6:Repeat step 5on the opposite side of the Pumpkin
Decoration.
Make sure the ring is balanced.
Use the remaining cords, in groups of 4, to tie
the first row
of ASK.
Tighten the knotsfirmly
so they rest very close to the 2-inch ring.
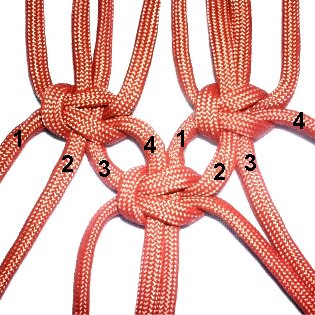
Tie the second
row of SK, alternatingthe cords:
Mentally number the cords from 2
knots in row 1.
Use cords 3 - 4 from the left SK, with 1 -
2 from the right SK. Tie the
new knot with those four cords.
(see important information below)
Important:
In the image above, the two rows have space
between them.
When you make the Pumpkin Decoration, the knots
should be firmly
tightened so they are as close as possible.
Step 7: Continue on, tying
more rows of Alternating Square Knots, until you
reach the bottom of the frame for the Pumpkin
Decoration.
Tie the knots around the filler
cords only (not the metal).
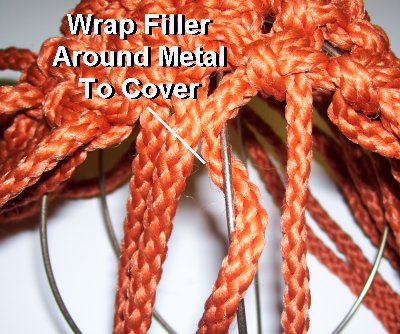
Important:
Whenever you reach spots where the four cords
are over the wires, the metal will easily be
seen in the space between the knots.
Here's
what you do to hide the metal:
Wrap one (or both) filler
cords around the wire at least once.
Tie the Square Knot. When you tighten
it, push upward slightly.
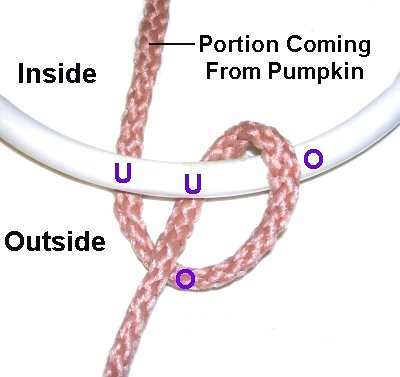
Step 8: Pass all the
cords through the 4-inch ring. Attach
the cords to the ring with either single
or Double Half Hitches. (see
image below).
The workingcords
for the last row of ASK must
be attached with Double
Half Hitches. The fillers should be
attached with a single
Half Hitch.
To make a Single
Half Hitch, make sure the portion coming
from the pumpkin is under
the ring.
Bring it over
- under the ring. As you
pull it down, pass it over
the cord.
For a Double
Half Hitch, tie another one to the right
of the first.
Leaf Design (Top)
The top of the Pumpkin Decoration is supposed
to resemble leaves. So you will be making picots.
Each of the 6 leaf designs for the top will fit
in the areas between
the metal rings.
Step 9: Start by mounting the
50-inch
cords (12) to the 1.5-inch ring with
Larks Head knots. (see step 4 for photos)
Divide the cords into 6 groups of four (2
working cords, 2 fillers).
Design Tip: It's best to make
the following design with the cords secured to a
work surface.
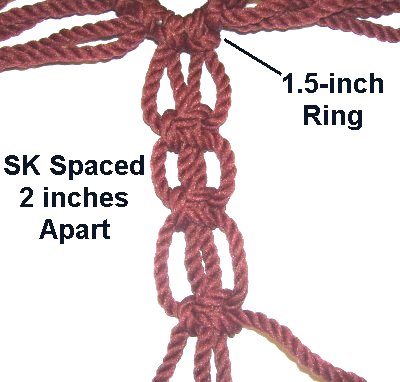
Step 10: Tie 3 Square
Knots 2
inches apart.
Slide the knots upward, so the first
one is next to the ring, and the others
just below.
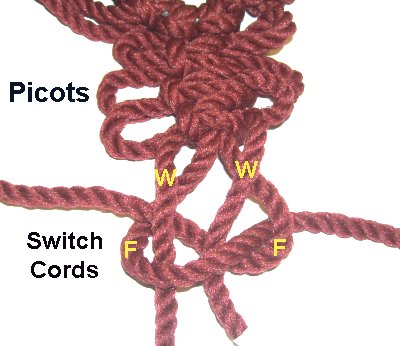
Step 11:Switch
the cords, so the working
cords become the fillers, and vice
versa.
Tie a tight Square
Knot with the switched cords. It should
rest close to the one above it.
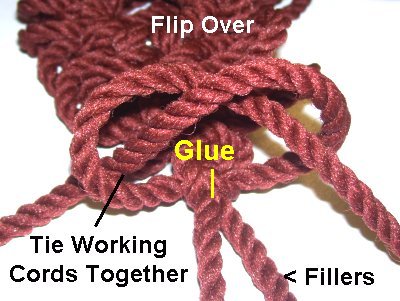
Flip
over the Picot design.
Step 12: Tie the
two working
cords together with an Overhand
knot.
Apply glue to the fillers,
so when you tighten this new knot, it
rests on the glue.
Step 13:Repeat
steps 10 - 12 with the remaining 5 sets
of cords (total of 6 picot designs).
Place the ring over the stem, so it fits inside
the 2-inch ring at the top of the Pumpkin
Decoration.
Make sure the picot designs rest between
each metal segment, before completing
the following step.
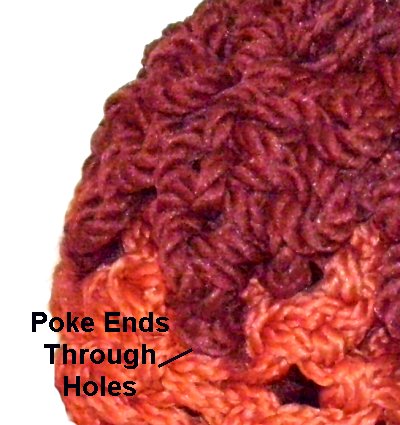
Step 14: Trim the ends
so they are approximately 2 inches long.
Poke the ends through a space between
the Square Knots, using fine tip pliers.
You can add glue to hold them in place
if you wish.
Finishing Touches
Trim the cords at the bottom of the Pumpkin
decoration to 2 - 3 inches. Separate the fibers
and brush them one
at a time.
Don't want a
fringe? Just push all the cords
to the inside of the metal frame, and apply glue
to hold them in place.
Decorate the bottom area with
artificial leaves, flowers, pine cones,
or other small items.
You can apply glue to the brushed
fibers, or the lower ring, to hold the
decorations in place.
By
using any text or images on Free Macrame
Patterns, you are agreeing to ourTerms
of Use