Description:
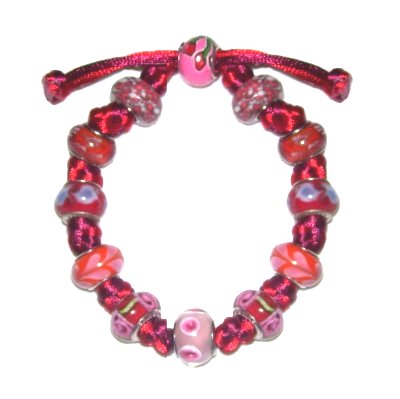
The Pandora Bracelet pattern is a Macrame
design that features European beads, which often
have metal grommets lining the inside of the
hole.
When using these types of beads, you need button
knots between them, since they have large
holes. You can also use spacers and charms
on either side of the beads.
In this Micro-Macrame design, the Oysterman
knot is featured, but there are
other button knots suitable. Here are three you
can try, if you want to experiment:
You must
use two cords if you are tying Oysterman
knots. For the button knots listed above,
which are larger, you may be able to use just
one cord.
In the Macrame bracelet shown, 2mm Satin
material was used.
Supplies
Needed:
2mm cord material
Pandora beads
Project board, pins, tape
Fabric glue that dries clear
Step
1: Cut 2 cords for the Pandora
bracelet, at least 72 inches long (finished size up to
8 inches).
Prepare the ends with glue
to prevent unraveling.
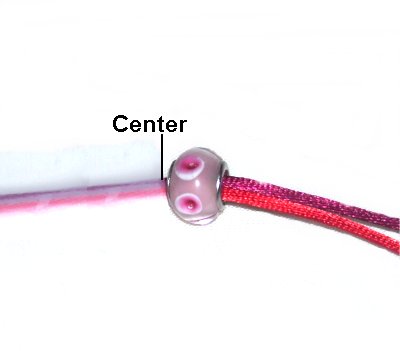
Arrange the
cords horizontally and secure them near
the center. Apply a piece of tape to
mark the center.
Slide the first bead onto both cords, so
it rests against
the tape.
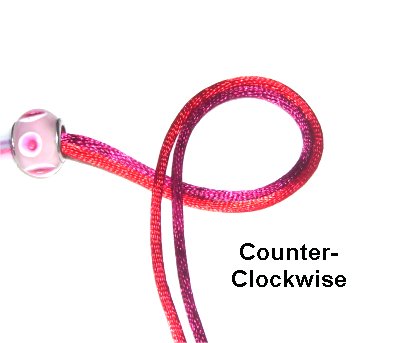
Step
2: Make a
counter-clockwise loop using both
cords working together.
Design Tip:
The best way to secure Satin and other delicate
cords is to LEAN
the pins over them, or use the Cross
Pin Technique.
Placing pins through the material will damage the
delicate fibers.
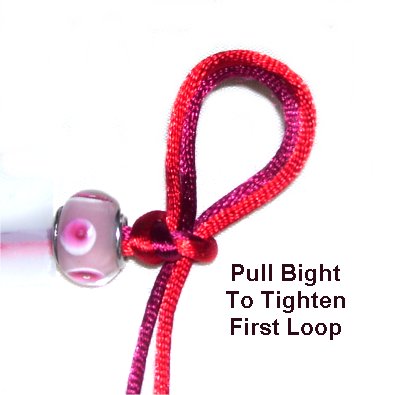
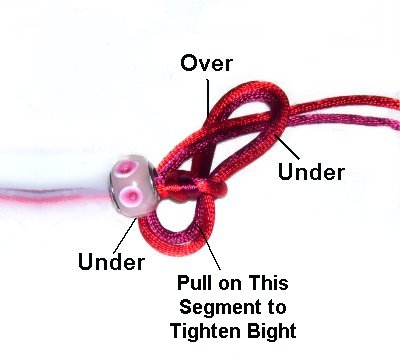
Step
3: Make a bight
by folding the free end.
Pass it through the loop under
- over (from below).
Pull on the
bight to tighten the first loop.
As you do so, remove the slack from the
segment coming from the bead, so the
tightened loop is againstthe bead.
This is an important part of the design,
so tighten carefully.
The
reason the Oysterman knot was chosen for
the Pandora Bracelet is because they are
easy to tie, and you can move them into
position with little effort.
Another option is a SlidingCeltic
Button Knot. You tie
the knot with one cord, placing it onto
the other.
Step
4: Rotating clockwise,
pass the free end under
the bead.
Make sure you don't twist
the knot.
It helps if you hold it steady on the
board with one hand and complete the knot
with the other.
Step 4,
continued: Pass the endthrough the bight over
- under (from the top).
Pull on the segment near
the bead to tighten the bight.
Then pull on the end
to tighten the remainder.
Step 5: Repeat
step 2 - 4several times, adding more beads. You
should end with a KNOT
rather than a bead.
Stop when the Pandora Bracelet is Halfthe
size you intend to make. So for a 7-inch
bracelet, stop at 3.5 inches.
Make
sure each Oysterman knot isas
close to the beads as possible. It's hard to backtrack
and remove knots where there is too much
space.
Turn the bracelet around and go back to the
center.
The first thing you do is tie a button knot next
to the bead, with the other half of the cords.
Then continue on, adding more beads and knots
until the bracelet is the size you need. Make
sure you end with a KNOT.
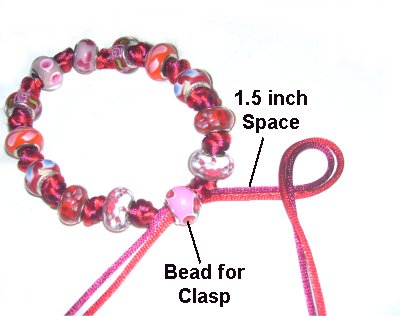
Step 6: To
form the clasp, pass two cords from one end of the
bracelet through a bead. Do the same at the
other end, but pass them through in the opposite direction.
Put the bracelet on your wrist to check the
size. It should be comfortable with the ends
pulled so it's in the closed
position.
You may need to add or remove knots if it's not
the right size. Be sure to do so at both
ends, so it's balanced.
When you take it off, note how far back the bead
for the clasp needs to slide to open the
bracelet.
If it's more than 1.5 inches, place the knots
further down on the ends as you do the next step.
Step
7: Leave at least 1.5
inches of space and tie an Oysterman knot
with two ends.
Apply glue as you tighten it, so it's on
the inside
of the knot.
You can add more glue on the outside, but some
types of glue will darken
the material.
You should
test the glueon a piece of scrap
material before using it.
Step
8:Repeat
step 7 with the other two ends.
Wait until the glue is dry, and cut off the extra
material.
By
using any text or images on Free Macrame
Patterns, you are agreeing to ourTerms
of Use