|
|
| |
|
|
|
|
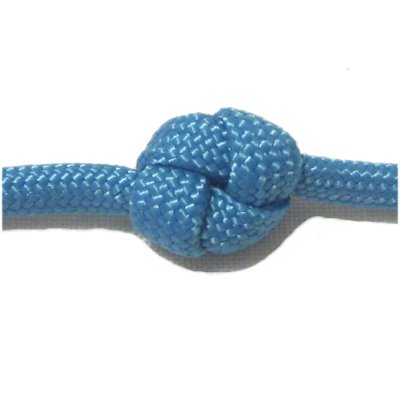
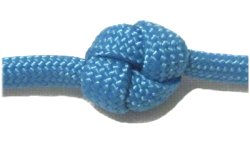
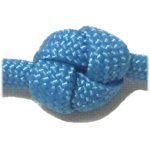
Description: The Oysterman
Knot, also called the Ashley Stopper
Knot, forms an attractive button
anywhere on a cord. On this page are
two methods for tying this interesting knot.
Developed in the early 1900s by Clifford W.
Ashley, it is a relatively easy decorative knot
to make. It's based on the Slipknot,
but has an extra step.
Most button knots are easy to tie, but
complicated to tighten. Not so with this one,
which makes it very appealing for many types of
Macrame projects.
Below are two projects that feature this
knot. Click on the links or images to
visit the pages described.
|
| |
| |
|
|
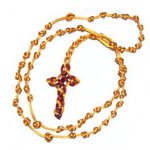
The Satin
Rosary has Oysterman and
Celtic button knots instead of
beads. |
|
| |
| |
|
|
|
|
| |
| |

|
| |
Tying Method A
|
|
| |
The Oysterman knot can
be tied in two ways. This method is used if
you are tying this knot first,
before any others are tied.
You can make the knot on a project board or while
holding the cord. |
| |
| |
| |
|
|
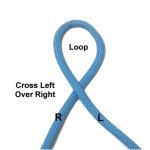
Step
1: Make a loop at the
center of an 18-inch cord.
Make sure you cross left over right.
|
|
| |
|
| |
|
|
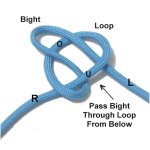
Step
2: Fold the left
half of the cord to form a bight.
Pass it through the loop from below, which
is under
the right half and over
the left.
Pull on the bight
to tighten the loop around it.
|
|
| |
|
| |

|
|
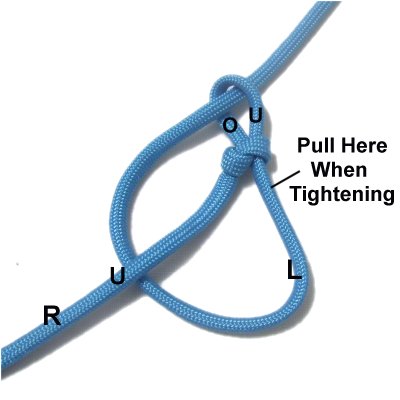
Step
3: Arrange the Slipknot
vertically. Move the left
half of the cord in a clockwise
direction, passing under
the right half of the cord.
Bring it to the bight and pass it
through from the top, which is over
- under.
|
|
| |
|
|
Step 3,
continued: Tighten the Oysterman
Knot by pulling on the left
half of the cord in the area just below
the Slipknot.
That will tighten the bight.
Then pull the left half of the cord to tighten the
rest of the knot. |
|
|
|
|
|
This is front
of the completed knot, which resembles a
rounded square, with four
segments.
The back has three segments.
|
|
| |
|
|
|
|
|
Tying Method B
|
| |
| |
This method is the most common way the Oysterman
knot is tied.
It's used when you have other knots present, or
when you are placing it near the end of a cord.
This method is easier to tie if you use a project
board.
|
| |
| |
| |
|
|
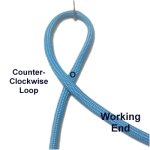
Step
1: Make a counter-clockwise
loop with an 18-inch cord.
The working end will be on the right when
you are finished.
|
|
| |
|

|
|
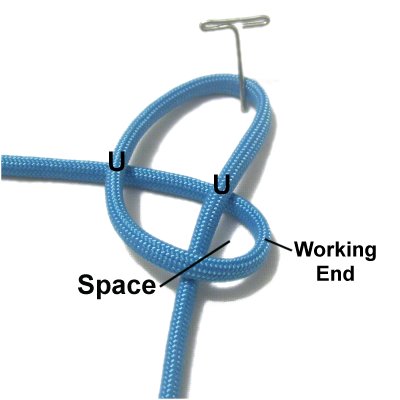
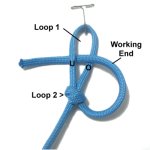
Step
2: Bring the working end under
both sides of the first loop, heading
right to left.
Locate the space indicated next to the
working end, in the area where it
curves.
|
|
|
|
|
|
|
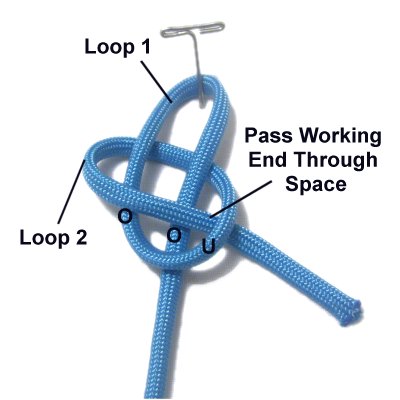
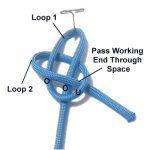
Step
3: To complete loop 2, move
the working end over
both sides of loop 1, heading left to
right.
Pass it through the space, coming out from
under
the curved segment.
Pull the working
end to tighten loop 2 around loop
1.
|
|
|
|
|
|
Step
4: To complete the
Oysterman knot, pass the working end
through loop 1 (over
- under), heading right to left.
Pull on the working end in the area below
the tightened portion (loop 2). That
will tighten loop 1. Then pull on
both ends of the cord to tighten the rest.
|
|
| |
|
| |
| |
|
|
| By using any
text or images on Free Macrame Patterns, you are
agreeing to our Terms of Use |
|
|
|
| Have
any comments about the Oysterman Knot? Contact
Me. |
|
|
|
|
|
|
|