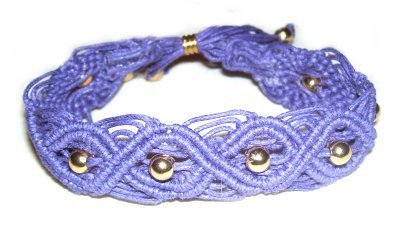
Description:
The Oval Bracelet is a Micro-Macrame
design featuring oval shaped diamonds, and wavy
bars that crisscross.
There are only 3 Macrame knots used in this
pattern, but the process can be a challenge.
So make sure you have experience
with the knots before making this custom bracelet.
The beads inside each oval design are
optional. The bead clasp can be changed if
you prefer to use a Sliding Clasp
instead.
Do
notuse waxed material, since
the wax makes it difficult to tighten the knots
completely.
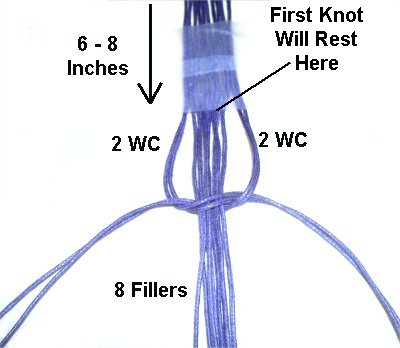
Cut 8 working cords, each 2 yards long (for
sizes up to 8.5 inches)
Prepare the ends with glue
to prevent unraveling.
Place a piece
of tape at the bottom of each holding
cord, so you can identify them more
easily.
They can get mixed up with the other cords
used in the Oval Bracelet.
Place a piece
of tape around the top
of 4 working cords. Repeat with a
second set. Secure them to your
board vertically, with pins pushed through
the tape.
Do the same with the 4holding cords, placing them between
the two sets of working cords.
Top of Bracelet
Move down 6 to
8 inches from the top
of the cords, and apply a piece of tape across
them horizontally.
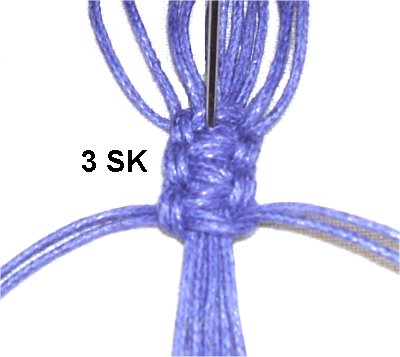
Locate the 2
working
cords furthest to the right and
left.
Use them to tie a Square knot around the
other 8 cords, which are the fillers.
The knot will rest against the tape when
it's tightened.
Tie a total of
3 Square Knots.
You can now remove the tape and secure the
knots, which makes the Oval Bracelet more
stable.
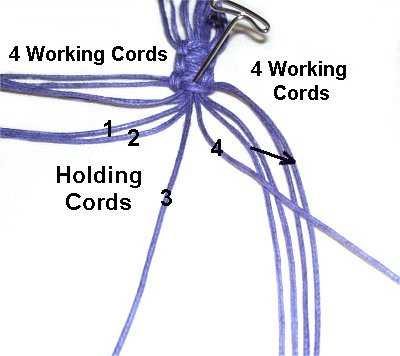
Upper Half of First Oval
Step 1:
Arrange the cords so that you can easily identify
the holding cords, as well as the working cords.
Since the holding cords have tape on the ends, you
can write the numbers on them. This helps to keep
the four cords organized, which makes the Oval
Bracelet easier to create.
You will be creating diamonds
withrounded
corners for the Oval Bracelet.
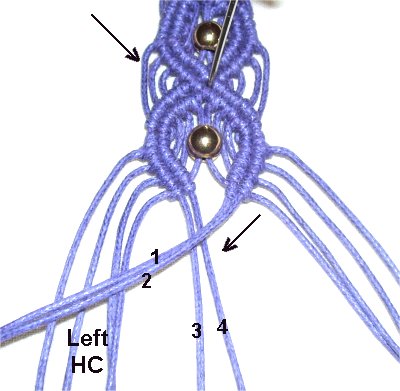
Mentally number the holding
cords 1 - 4, moving left to right.
Mentally number the working cords 1 - 4 on the
left, and 5 - 8 on the right.
Move holding
cord 4 to the right
and secure it so it's pulled taut.
It should rest on top of the four working
cords to the right (5 - 8).
Important:Since you moved the holding cord from left
to right, you attach the working cords to it
progressing the same direction (small arrow in
photo above).
This way the first cord you attach is the one closest to the
holding cord.
This applies when working on the other side of the
Oval Bracelet, too.
Attach working
cords 5 - 8 (right)
to holding cord 4 with a Double Half Hitch (the
instructions are below).
Rotate counter-clockwiseasyou
tie the knots. Tighten each one firmly.
A Half Hitch
is tied by passing the working cord over
and under
the holding cord.
As you pull it to the side, is should pass
over
the working cord.
Double Half Hitch = TWO
Half Hitches
Move holding
cord 3 to the right, placing it
to the inside
of the first row of knots you
just tied. Secure it so it's
taut.
Attach the same four working cords to it
with DHH.
Pull each cord firmly as you
tighten the knots, so the two rows are touching
each other.
Important: When creating the top
half of each oval, you will always use
the holding cord on the outside
first.
So in this area of the Oval Bracelet, the first
two used are holding cord 4 (right) and holding
cord 1 (left).
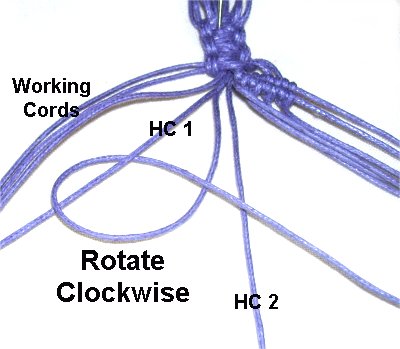
Step
2: Move holding cord 1 towards the left.
It should be the same
angle as holding cords 3 and 4.
Attach working cords 1 - 4 (left)
to it with Double Half Hitches.
Rotate clockwise
as you create these knots.
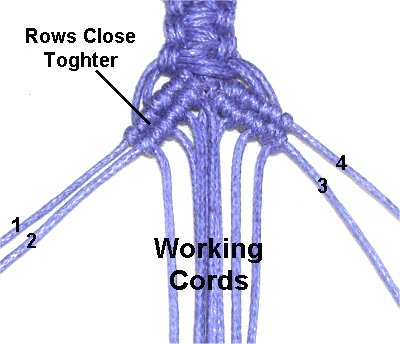
Move holding
cord 2 to the left,
on the inside
of the first row of knots. Attach
the same four working cords to it with
DHH.
Pull the cords firmly as you tie each
knot, so the two rows are touching.
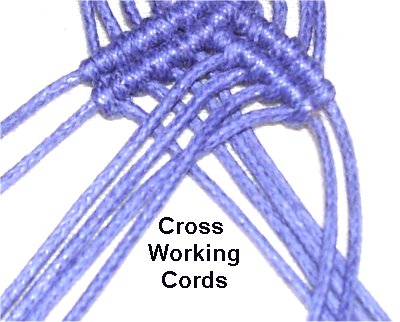
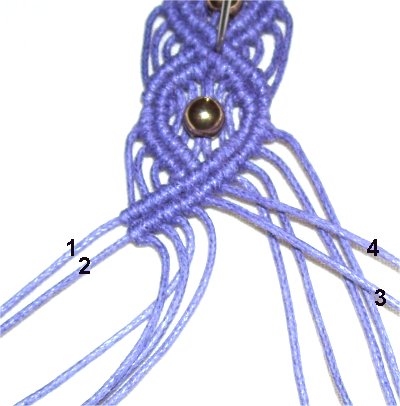
Lower Half of Diamonds
You have
options for decorating the center of the
designs in the Oval Bracelet.
You can add one or more beads, or cross
the working cords as shown here. You
can weave 4 cords through the other four,
or even tie a knot in this area.
Important:
For the lower
half of each oval, you use the holding
cord that's on the inside
first (cords 2 and 3).
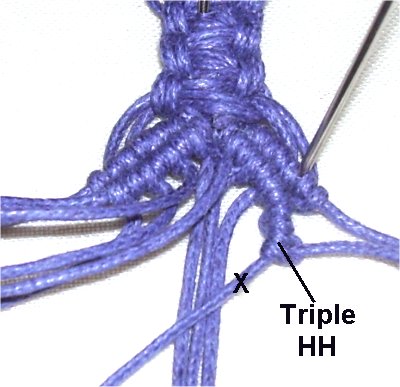
Step
3: Move holding
cord 3 to the left
and secure it. Attach working cords
5 - 8 to it, progressing right to left.
Tie the knots clockwise.
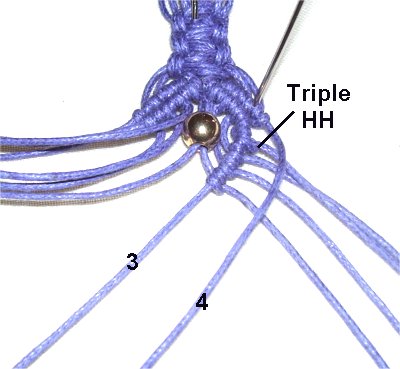
Tie a Triple Half Hitch
with working
cord 8, to make the corner more
rounded (X).
A
Triple Half Hitch is simply three knots
instead of two.
To make the Oval Bracelet design the
proper shape, this is a very
important step.
You will do this every timeyou create the bottom
half of each oval.
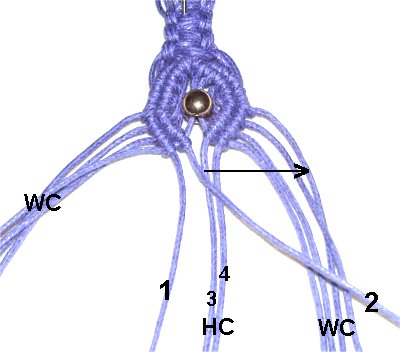
Now is the last chance you have to add a
bead.
It needs to be placed onto working cords 4 and 5,
at the center
of the oval shape.
Once the bead is in place, attach working
cord 5 onto holding
cord 3.
Working cord 4 will be attached to holding
cord 2, so move it aside for now.
Move holding
cord 4 along the outside of the
previous row of knots (towards the
left). Attach working cord 8 to it
with a TripleHalf Hitch.
Attach working cords 7 - 5 with Double
Half Hitches. Pull firmly while
tightening, so the two rows are touching
each other.
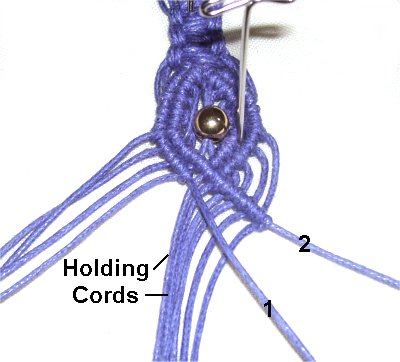
Step
4: Move holding
cord 2 to the right. Attach
working cord 1 with a Triple
Half Hitch, and tie the knots counter-clockwise.
Do the same with holding
cord 1. Pull firmly when
tightening, so the two rows are touching.
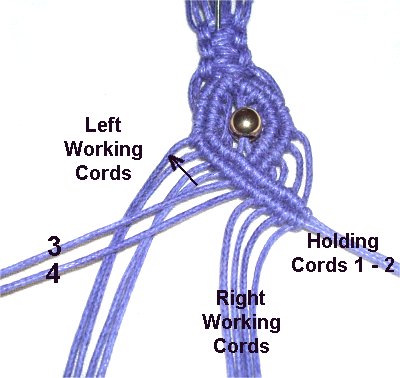
Closing + Top of Next Oval
Now you will close the bottom
of the first oval shape and create the top
of the next one at the same time.
Step 5:
Move holding
cord 2 to the right.
Attach holding
cords 3 and 4 (from the right)
to it withDHH. Tie the knots counter-clockwise.
Attach working cords 5 - 8 as well.
Move holding
cord 1 to rest beside the row of
knots you just tied, heading right.
Attach the same 6 cords to it with
DHH. The two holding cords are
first, followed by 4 working cords.
Make sure the knots are tight, so the two
rows are touching each other.
Design
Tip: By attaching the four working
cords, you begin the top
half of the next design for the Oval
Bracelet.
It's easier to do this while you are closing each
oval shape, since the holding cords will be in the
right position.
Locate holding
cords 3 and 4, which come off the bars you
made in the last step. Move holding
cord 3 to the left.
Attach working cords 1 - 4 to it
with DHH. These knots are tied clockwise.
Move holding
cord 4 to the left, beside the
row of knots you just tied (inside).
Attach the same four working cords with clockwise
DHH.
Pull them tight so the two rows are
together.
Second Oval, Bottom and Closure
The top
portion of the second
design in the Oval Bracelet is done, so now you
will create the bottom portion.
You can add the bead or decoration now.
Step 6: Repeat steps 3 and 4
to make the lower
half of the second oval shape.
The holding cords
have switched places, but the
process is the same.
On the right,
use holding cord 1 first, followed by
holding 2 (clockwise DHH). Triple
Half Hitches are tied with working cord 8.
On the left,
use holding cord 4 first, followed by
holding cord 3 (counter-clockwise
DHH). Triple
Half Hitches are tied with working cord 1.
Step
7: Now you will close the bottom
and start the top of the next design, as
in step 5, but in the opposite
direction(right to
left).
Move holding
cord 1 first, to the left.
Attach holding cords 3 and 4 to it, along
with working cords 1 - 4, with clockwise
DHH.
Repeat
withholding
cord 2.
Move holding
cord 4 to the right,
and attach working cords 5 - 8 with counter-clockwise
DHH.
Do
the same with holding
cord 3.
The top half of the third
design for the Oval Bracelet is finished,
so now you would make the bottom half (repeat
steps 3 and 4).
Step
8: When you finish the
bottom portion, the closing is done left
to right, same as step
5.
The 4th oval is closed right
to left, as in step
7.
Keep alternating directions, and stop when
the Oval Bracelet is the size you
want.
Important:
When measuring the bracelet, make sure you take
into account the three Square Knots you still have
left to tie.
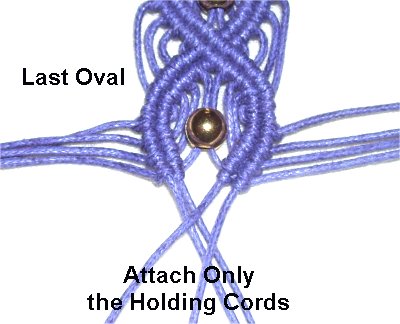
Step
9: For the last
oval shape, you need to attach two holding
cords to the other two. Determine
the proper direction by looking at the
previous design.
Do
not attach any of the working cords.
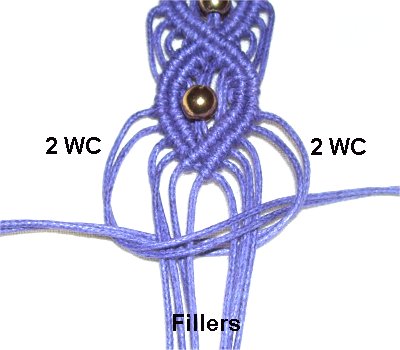
Bead Clasp for Oval Bracelet
Step
10: Use the two
working cords furthest to the left and
right to tie three Square knots. The
remaining cords act as fillers.
Tighten it so it rests at the lower
"point" of the oval shape.
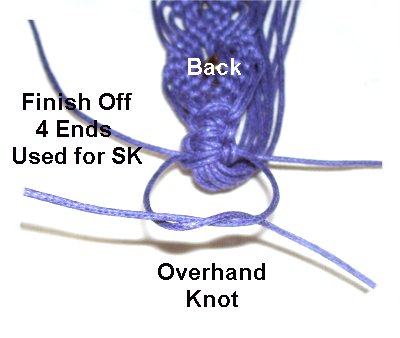
Turn over the
Oval Bracelet, and finish off the 4 ends
you just used for the SK by tying tight
Overhand knots with two at a time.
Position these knots at the back
of the Square knots.
Apply glue as you tighten them. When
it's dry, cut off the excess material.
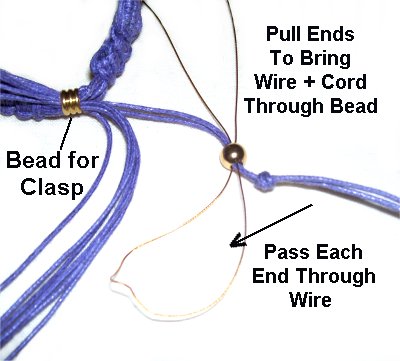
Step 11:
Remove the tape from the remaining cords at
each end of the bracelet. Trim to neaten the
tips . Pass all 8 cords through the bead for
the clasp.
Go to the other end of the bracelet, and pass
those 8 cords through, in the opposite direction.
It will be tight squeeze.
You
cancut
off a few cordsif
there is no way to get them all through the
bead, but make sure you finish them off with
Overhand knots anduse
glue.
Use a wire threader as shown in the next image. It's
best if you slide them through one
at a time.
Once the clasp is done, pull the ends to close
the Oval Bracelet.
Move down at
least 2 inches, to allow the Oval
Bracelet to open wide enough for your hand to pass
through easily.
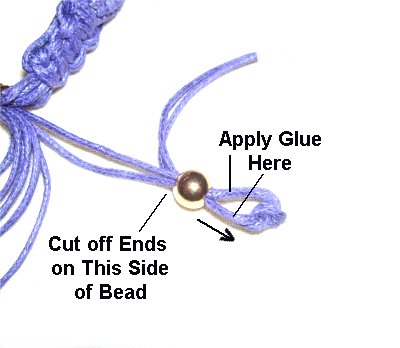
Step
12: Add a small bead to two
ends, and tie a tight Overhand
knot. Fold a wire threader and
pass it through the opening of the bead.
Pass the end of one cord through the wire,
near the folded area. Pull on the ends of
the wire, and the cord will pass through
the hole. Repeat with the
second cord.
Slide the bead
back slightly, and apply glue next to the
Overhand knot. Slide the bead
forward, so it rests against the
knot.
When the glue is dry, cut off the excess
material flush with the surface of the
bead.
Repeat step 12with the other
cords (in sets of 2).
By
using any text or images on Free Macrame
Patterns, you are agreeing to ourTerms
of Use