Description:
The Natural Wreath features a tree shape
with unique leaf shaped designs made with Double
Half Hitches.
It's attached to a grape wreath frame, but a
different type of large ring can be used as a
substitute.
The material used in the example was Cotton
Cable Cord, a natural material.
This Macrame pattern is rated moderate, so be sure
to practice the knots before starting.
You must know how to tie Double Half Hitcheswithout
a project board. The leaves are
easier to make if you can move the holding cord as
you progress, and controlling it in your hand
really helps.
When cutting the cords, choose the appropriate
cord length for the ring you are using (see
chart). The total amount of material needed
is based on these cord lengths, so use the chart
for that as well.
Cut the
primary cords to the lengths shown in the chart
below.
For rings larger than 18 inches, multiply the
diameter of the ring by 8, and divide by 36 to get
the yards. Cut each cord to that
length.
Ring Diameter
Length of
Each Cord
Material Size
x Number of Cords
Total Yards
to Purchase
Under
12 inches
2 yards
2mm
x 40 cords
80 yards
12
- 13 inches
3 yards
3mm
x 40 cords
120 yards
14
- 16 inches
3.5 yards
3mm
x 40 cords
140 yards
17 - 18
inches
4 yards
4mm x
40 cords
160 yards
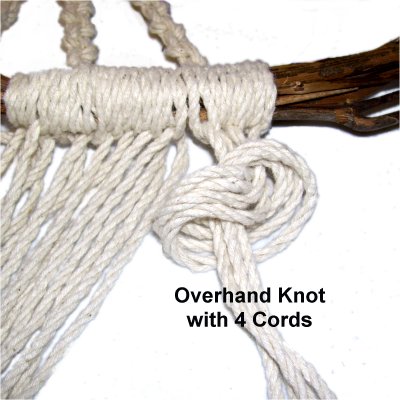
Prepare all the cords to prevent
unraveling.
For twist style
material use masking tape or Overhand
knots.
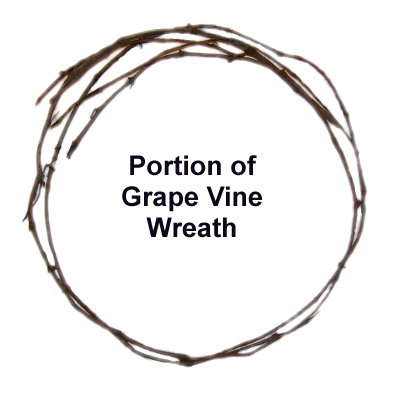
When using a
Grape Vine Wreath, make sure you use only
a small portion of it.
The top and lower areas, where the cords
will be attached, should have only two to
four rows and be as thin as possible.
Weave the ends into the overall shape to
keep it stable.
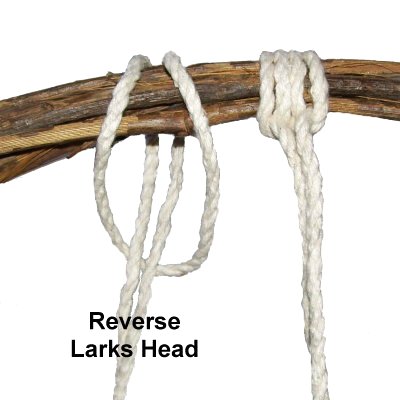
Step
1: Determine which portion
will be the top, and begin mounting the
cords.
Fold one cord in half and place it on the
front of the ring. Bring the ends
behind the ring, and pull them toward you,
passing over the folded area.
This is a REVERSE Larks Head knot.
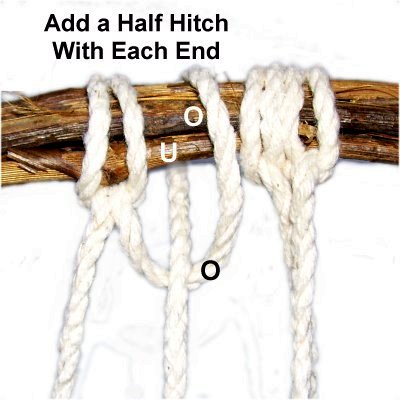
Step
2: Add a Half Hitch by
passing one of theends over
- under the ring, and over
the cord as you pull it down to tighten.
Do the same with the other end. The
resulting knot will look like the one on
the right.
Step 3:Repeat steps 1 - 2
until all the cords are mounted to the top of the
ring.
Organize the cords into groups of 10, keeping them
bundled when not in use.
Leaf Designs -- Row 1
The top area of the Natural Wreath is made with
leaf shaped designs. The following steps
show you how to make the leaves for the first row,
just below the mounting knots.
To create the curves you must be able to movethe holding cord.
For that reason, it's easier to make this design
WITHOUT securing the holding cords to a project
board. Control the holding cord in one hand
as you tie the knots with the other.
Step 4:
Mentally number the first group of 10
cords on the left.
The cord furthest to the left
is the holding cord (1), and the others are tied
to it with Double Half Hitches (DHH).
The Half Hitches in this area of the Natural
Wreath are tied rotating in a counter-clockwise
direction, since you are moving left
to right.
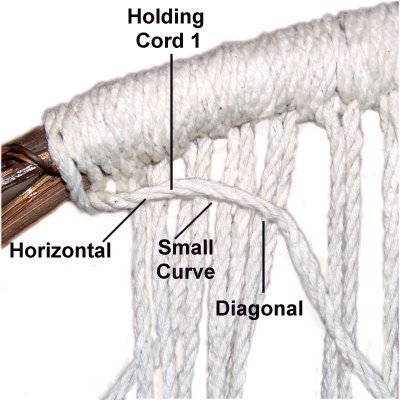
Step
5: The holding cord should
be horizontal
when attaching cords
2 - 4.
Reposition it so it's slightly
curved,and
then attach cords
5 - 7.
Move it again, so it's diagonal.
Attach cords
8 - 10.
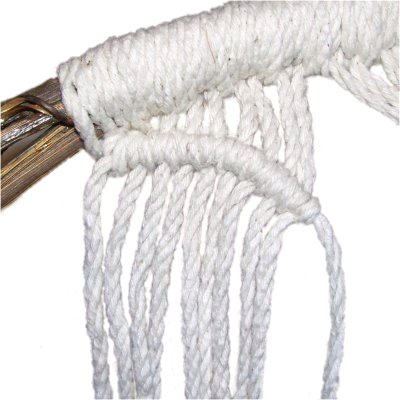
This is what the topedge
of each leaf should look like after
working cords 2 - 10 are attached to the
holding cord.
Push the knots close together before
moving on.
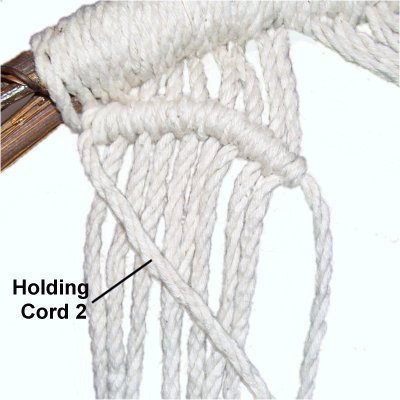
Step
6: For the lower portion of
the leaf design, use the cord furthest to
the left
(cord 2), as the holding cord.
This image shows the angle the holding
cord should rest as the first 4 cords are
attached (see below).
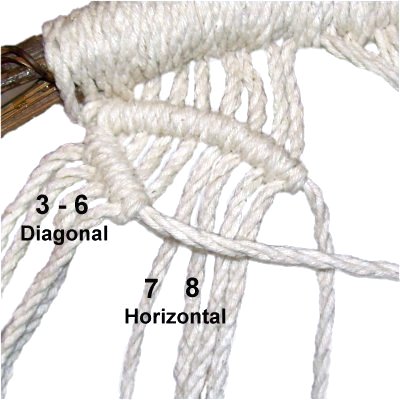
Step
7: Attach
Cords 3 - 6 to the holding cord
which should be positioned diagonally.
Move the holding cord so it rests horizontally
and then attach cords
7 and 8.
Step
8: Move the holding cord on
an upward
diagonal slant.
This is necessary so you don't cause the
cords in the center of the leaf to curve;
they should remain straight.
Attach cords
8 and 9, as well as
holding cord 1, to holding cord
2.
Step
9: Repeat
steps 5 - 8 with the next three
groups:
Cords 11 - 20
Cords 21 - 30
Cords 31 - 40
Mentally re-number the cords 1 - 10 as you start
each leaf, so the instructions are the same.
Cord 1 is
always the holding cord for the top
of each leaf, and Cord
2 is for the bottom.
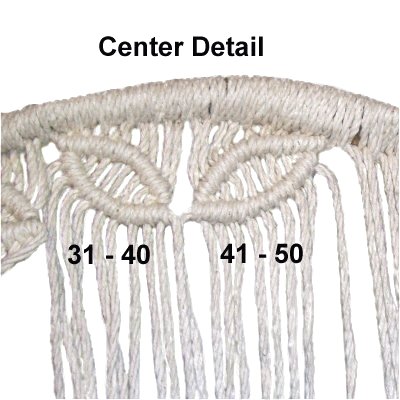
Step 10:
To keep the Natural Wreath is as symmetrical as
possible, the leaves on the righthalf of
the design are made right to left.
Organize the remaining cords in groups of ten.
Cords 41 - 50 are shown in the next image.
Make sure the Half Hitches are tied rotating clockwise.
Step
11: Mentally number the
cords 1 - 10 each time you use a new
group.
The holding cord for the top of the leaves
is cord
10.
For the lower row, use cord
9 as the holding cord.
The curves are
made as in steps
5 - 8, but in the opposite
direction.
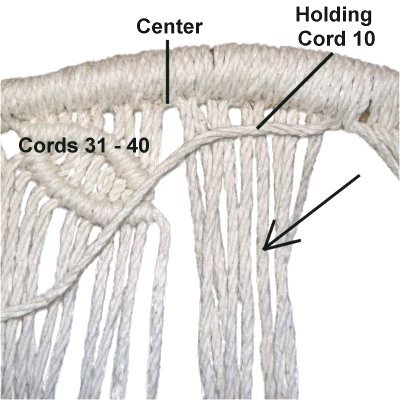
This
image for the first row of the Natural
Wreath shows the two leaves closest
to the center.
You can clearly see they are arranged in
opposite directions, and slant downward.
Leaf Designs -- Rows 2 - 4
For the second row of leaves for the Natural
Wreath, you will alternate
the cords and reverse the direction of the leaves.
Refer tosteps
5 - 8if you need more help
forming the
curved shape.
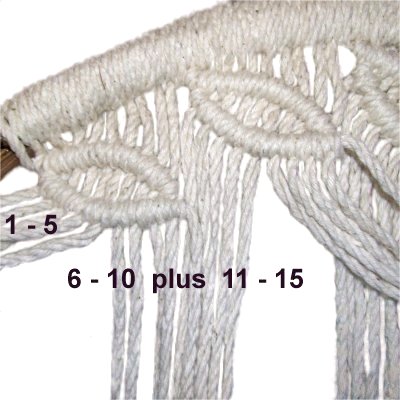
Step 12:
Mentally re-number the cords. Do not use
cords 1 - 5.
Locate cords 6 - 10 and 11 - 15.
These are combined to make the first leaf
design in row 2.
The knots are tied right
to left (opposite of row 1).
The
holding cord for the upper portion of the
leaf is cord
15 (furthest to the right).
Start with the holding cord horizontal,
and then change to a diagonal
slant to form the curve.
The holding cord for the lower portion is
cord 14.
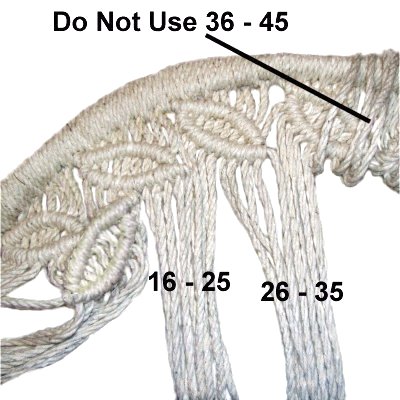
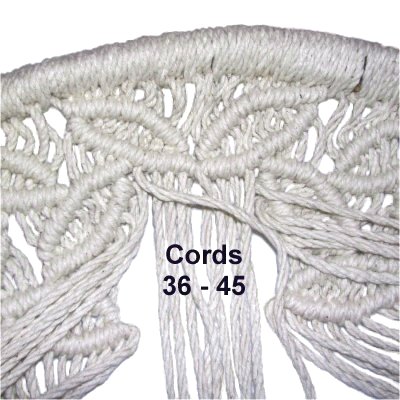
Step
13: Tie two more leaf
designs with cords 16 - 25 and 26 -
35.
Do
not use cords 36 - 45, which are
at the center
of the Natural Wreath design.
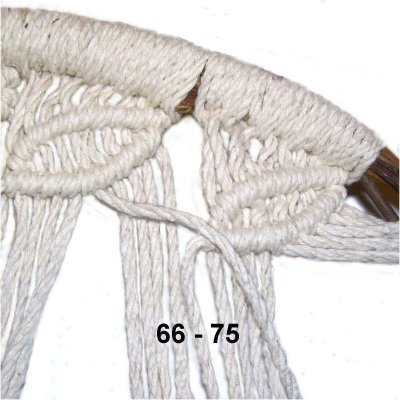
Step
14: For the righthalf
of the Natural Wreath, do
not use cords 76 - 80.
Create 3 leaves with the remaining cords,
moving left to
right.
The image shows cords 66 - 75.
The holding cord is furthest to the left
(cord 66 for the top and 67 for the
bottom).
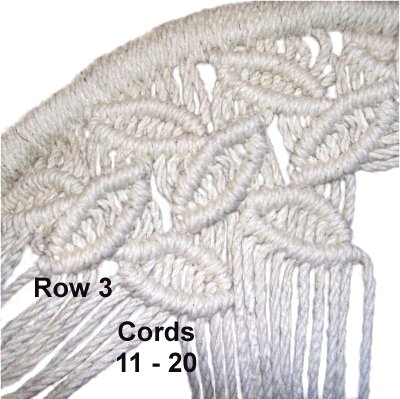
Step 15:
For Row 3
of the Natural Wreath, you skip past 5 more cords
(total of 10), on both sides.
Do
not use cords 31 - 50,at
the center of the design.
Tie 2 leaves in the same direction as row
1.
On the left you use cords 11 - 20 and 21 -
30.
On the right, you start with cords 61 -
70, and tie the next leaf with 51 - 60.
Step
16: For row
4, you make one leaf on each half
of the Natural Wreath design.
Use cords 16 - 25 on the left. Use cords
56 - 65 on the right.
Create the leaves the same direction as row 2.
Step
17: Create one more leaf
in the center of the Natural Wreath
design, using cords 36 - 45.
It should be made left
to right.
Branches and Trunk
The branches for the Natural Wreath are made
with a simple wrapping process.
You can use other techniques if you wish, such as
a Half Hitch
Spiral.
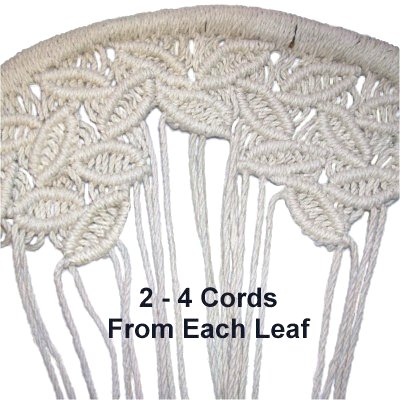
Step
18: Select 2 - 4 cords from
each leaf to form the branches.
Do not select cords from the first
and last
leaves in rows 1 and 2.
Move the other cords to the back of the design
and hold them out of the way with clips or
tape.
Make a written
plan as to how you want the branches
arranged. You will intertwine them as you
progress with the wrapping, so decide now which
cords are best for your design.
The goal is to have all the branches meet together
in the center to form the trunk.
Once you are certain which cords you will use for
the branches of the Natural Wreath, you can cut
and finish off the other cords.
Finishing:
Move each cord to the back of the leaf it comes
from and adhere it to the back with glue.
You can also work the ends through the back of the
knots to hold them in place.
Save
any scraps over 36 inches in length.
Step
19: Make the first branch
with one set of two cords.
Wrap the right cord around the left, to
the length you need to reach the area
where the branches will begin to join
together.
Secure the wrapped portion with a Half
Hitch after you are finished (when not in
use).
Step 19,
continued: Create a branch with
each set of two cords.
You will be able to change the size of the wrapped
area as needed, so just focus on wrapping them ALL
right now.
Step
20: Follow your written
plan and intertwine the branches before
joining two together.
When you connect the branches, remove
the Half Hitches.
Wrap 3 cords with one that was previously
used to wrap. This will make the
joint neater.
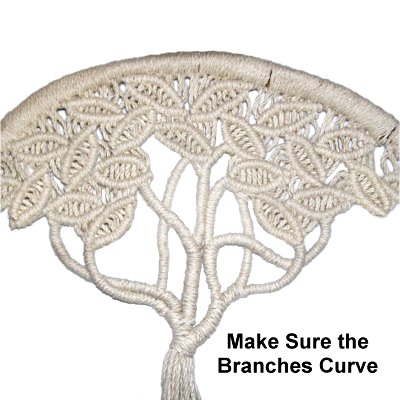
Step
21: Link all the single
branches following your design.
Progressively connect them with other
groups, moving towards the center,
eventually gathering the cords into one
bundle.
Make sure ALL the branches
curve.
Wrap one cord around the entire bundle a
few times and secure it with a Half Hitch.
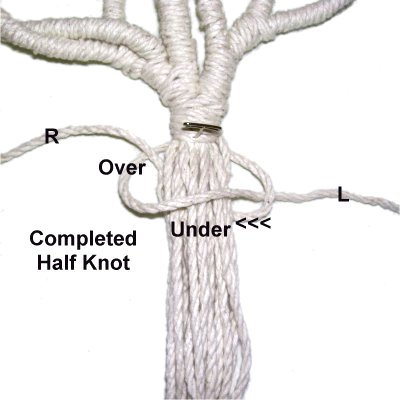
Step 22:
Place a 3-yard cord under the bundle and secure
it.
To make the trunk for the Natural Wreath, tie the
Spiral Stitch as described below.
<<<
Move the left end over
the bundle and under
the right end.
Move the right end under
the bundle and over
the left end, as you pull it out on the
left.
>>>
Tie at least 9 more knots as shown above, and
then twist
the design so the ends switch places (1/2 turn).
Count the number of cords in the bundle. Cut
off any that are shorter
than the others.
Make sure you end up with an even
number (10, 12, 14, etc.).
Then continue on, repeating the Spiral Stitch so
it twists at least one more time.
Stop when the trunk for the Natural Wreath is the
length you want.
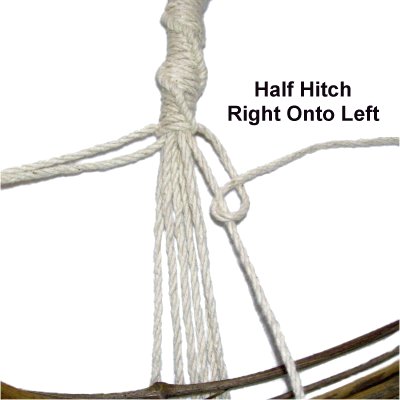
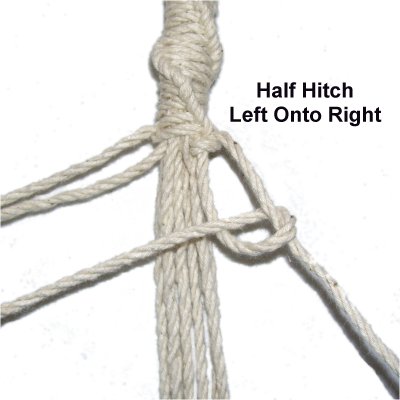
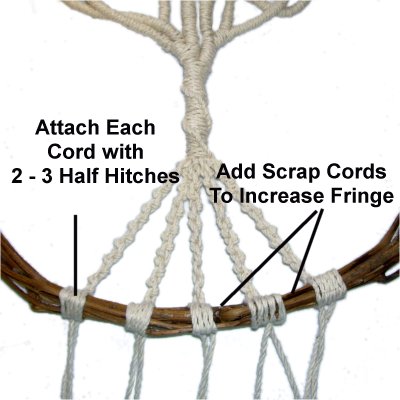
Lower Area and Fringe
Step 23:
The lower area is made with short runs of
Alternating Half Hitches.