Free-Macrame-Patterns.com Logo
Free Macrame' Patterns Home Page
Macrame' Essentials
Learn Macrame' Knots
Micro-Macrame': Jewelry
Free Macrame' Patterns
Macrame' for Kids
Advanced Macrame'
Macrame' Dictionary
Contact Free-Macrame-Patterns.com
Etsy Shop

Free-Macrame-Patterns.com Left Side Background Image
 
Custom Search

 Macrame Hanger


Macrame Hangers

 
Description:   This Macrame Hanger is fun to make and is a great project for beginners and children.  

This Macrame pattern features the Spiral Stitch, also called the Half Knot Spiral.   The decorative knot used for mounting and finishing is the Overhand knot.  Please be sure to practice both knots prior to starting this Macrame project.

To change the design, you can use a different type of knot to cover the metal hanger, or add beads, charms, or other small decorations to the cord as you progress.


Supplies Needed:
  • 3mm - 4mm cord material (12.5 yards)
  • One metal hanger (standard size)
  • Fabric glue that dries clear


Step 1: Cut one cord, 12.5 yards long.  Prepare the ends with tape or knots to prevent unraveling.
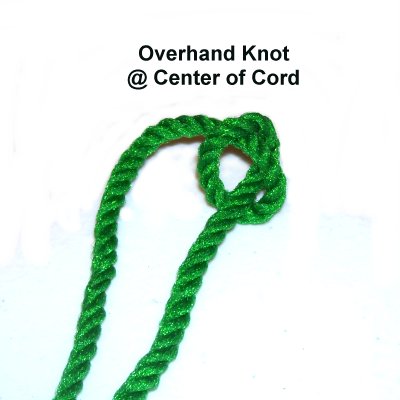


Overhand Knot

Tie an Overhand knot in the center of the cord.  Don't tighten it completely, but make sure it's small.
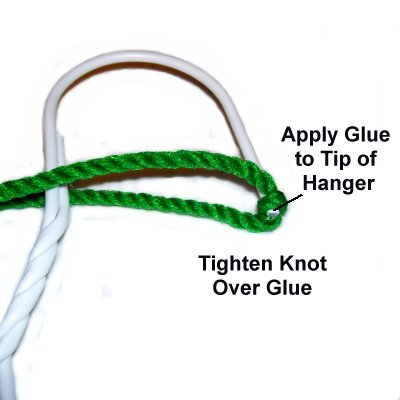


Attach Cord

Step 2:  Slide the tip of the hanger through the Overhand knot.  Apply glue to the tip, and slightly beyond it. 

Slide the knot over the glue and tighten it as much as you can.  Allow the glue to dry for 1 hour before moving on.


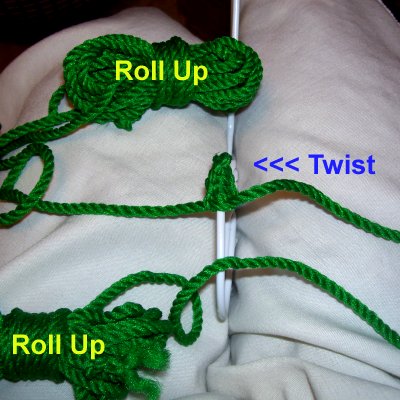
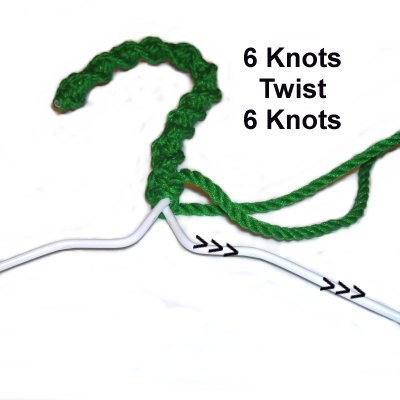
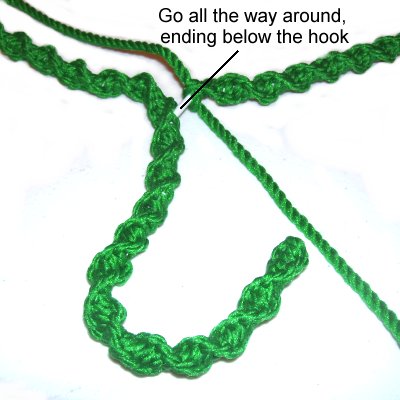
The steps below show you how to tie the Spiral Stitch. Other knots can be used if you want your Macrame Hanger to look different than what is shown. 

Here are some options:


The metal hanger acts as the filler (or holding cord) for these knots. 

Other knots can be used, but make sure they can be tied with the two ends, and can be arranged around the metal.


Right Half

Step 3:  Hold the hanger by placing it between your thighs.  The tip of the hook should be facing outward (near your knees).

Move the right half of the cord over the hanger, heading left.


Left Half

Step 4:  Move the left half of the cord over the right half and under the hanger.

As you pull it out on the right, it should pass over the right half of the cord, where it curves. 

Pull both ends firmly to tighten the knot.


Roll Up Ends

Step 5:  Roll up both ends into bundles, to make the cord easier to work with.

Repeat steps 3 and 4 five more times. 

Twist the sennit so the cord on the left moves to the right.  Make sure you twist right to left.


Spiral Pattern

Step 6:  Repeat steps 3 - 5 as many times as necessary to cover the metal. 

It's important to tie 6 knots, and then twist the sennit, so the spiral design is even. 

Push the knots close to one another as you progress.


Step 6, continued:  After the hook is covered, tie the knots all the way around the metal, to complete the Macrame Hanger. 

Start on the right, as shown by the arrows in the image above.


End Near Hook

Step 7:  Stop when the last knot reaches the hook, where the metal separates.

Push the last few knots back slightly, and apply glue to the metal.  Slide the knots back into place over the glue.


Finishing

Step 8:   Use tweezers to pull the two ends through the knots directly across from them. The best place is along the raised edge of the spiral.

Apply more glue to adhere the ends to the surface of the knots.  Make the area as neat as possible, as you trim off the excess material.


By using any text or images on Free Macrame Patterns, you are agreeing to our Terms of Use


Have any comments about the Macrame Hanger? Contact Me.


divider


Free-Macrame-Patterns.com Footer