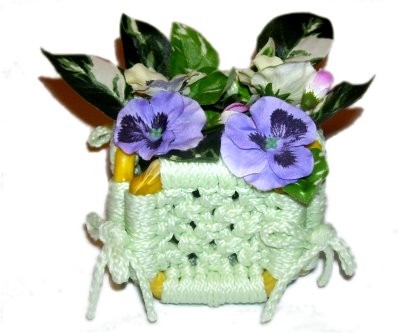
Description:
The Macrame Container features the use of
either regular plastic squares or contoured ones,
as in the example.
When this decorative box is completed, the size is
4 inches wide and 3.5 inches tall. It's
perfect for holding small potted plants or
household items.
The sides of the box are tied together with shoe
tie bows. This can be changed if you prefer
something else.
The Macrame design is made with Square Knots and
Larks Heads, which are both basic knotting
techniques. For that reason, this is a great
project for beginners. Make sure you know how to
tie all the knots in the list below.
Squares are sometimes hard to find, so please
visit ourAcajou Crafts
store in Etsy, by clicking on the green banner to
the left. The same contoured squares you see
in use here are with the other rings and frames.
Each piece of the Macrame Container is made
following steps 1 - 13. It's best to cut the
cords prior to making each piece.
Step 1:
Cutting Instructions
(one square)
Cut 4 cords, each 36 inches long (1 yard)
Cut 2 cords, each 45 inches long
Prepare the tips of the cords to prevent
unraveling -- tape works well.
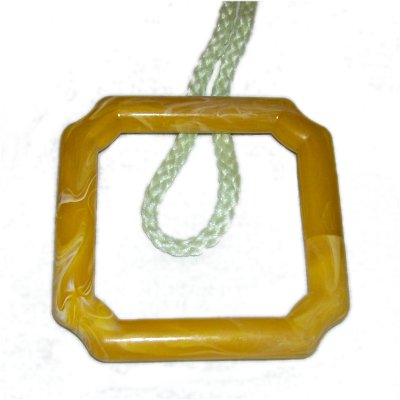
Fold one of
the 45-inch
cords in half and place it under
the top portion of one square.
To complete
the Larks Head knot, bring both halves over
the square, and under
the folded area.
Mount the remaining cords in the same manner, to
the right of the one you just mounted. The next
one should be a 36-inch
cord, followed by three more of that
size.
The cord furthest to the right needs to be the
other 45-inch
cord.
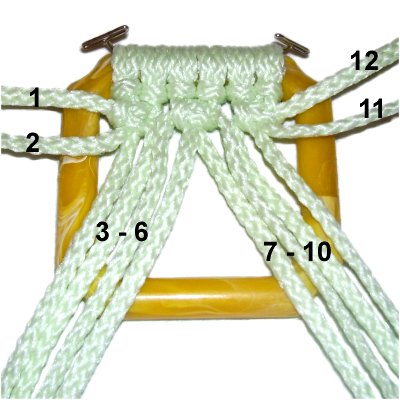
Square Knot Design
Step
2: Mentally number the cords 1 -
12.
Tie a Square knot with cords 1 - 4,
another with 5 - 8, and the third with 9 -
12.
Tighten the SK as much as you can, so the
Larks Head knots tighten around the
square. Pull firmly on the fillers,
too.
Designer's
Tip: When tying the first few rows in
each piece of the Macrame Container, the cords
will have a tendency to sink downward, making
tying awkward.
Lift up the cords
when tying the knots, so they don't rest on the
board. They should be level with the surface
of the square.
Step
3: Move cords 1, 2, 11, and
12 to the sides.
Tie a Square Knot with cords 3 - 6 and
with 7 - 10.
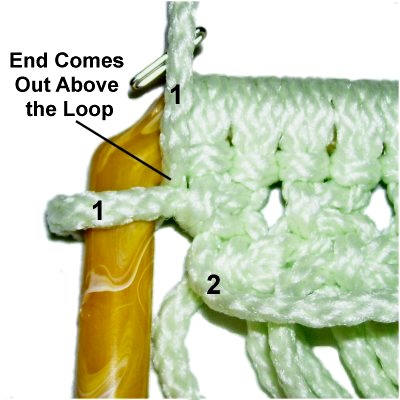
Step
4: Vertical Larks Head
knots are used to cover the sides and
bottom of the square.
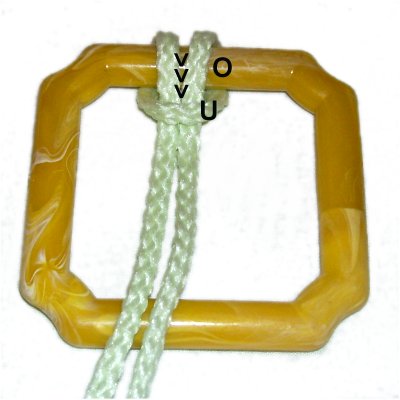
Pass cord
1over
- under the left side of the
plastic square. Bring the end out above
the loop, close to the corner (clockwise
loop).
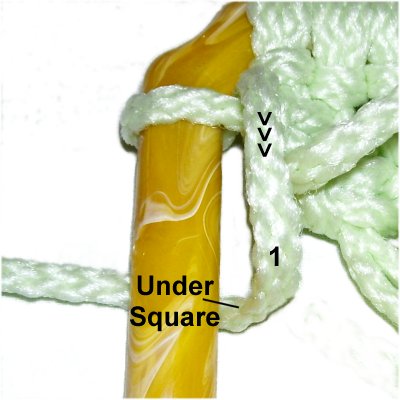
Pull cord 1
down towards the bottom of the square,
then under
the left side of the square.
To complete
the second loop for the Larks Head, move
cord 1 to the right, over
the frame.
Pass it under
the vertical portion you pulled towards
you in the last step.
Tighten both loops as
much as possible.
Designer's
Tip: When using contoured
squares to make your Macrame Container, the Larks
Head knots can slip into the corner easily and
become unbalanced.
So it's very important to tighten all the Larks
Head knots as much as you can. You can even
add glue to help hold the knots in place.
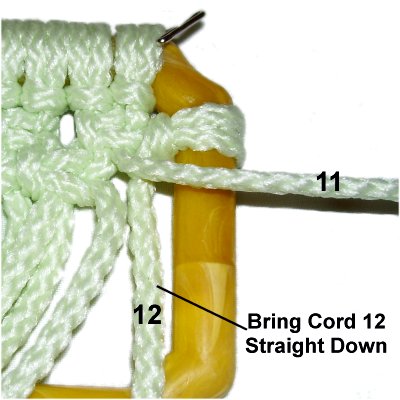
Step
5: Bring cord 1 straight
down to the bottom of the square.
Repeat
step 4 using cord
2.
Be
careful you do not go around cord 1 when
you make the second loop.
Cord 2 should rest to the left of cord 1
when you are through.
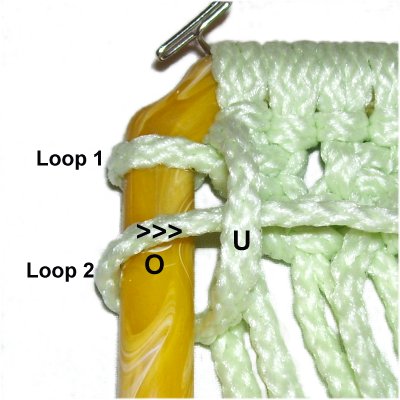
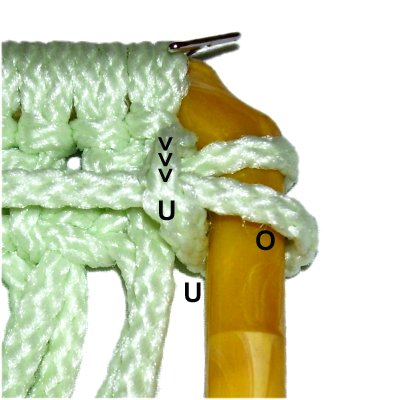
Step
6:Repeat step 4using cord
12, tying the Larks Head knot
onto the right
side of the square.
The only change is the direction
(counter-clockwise). This image
shows the first loop.
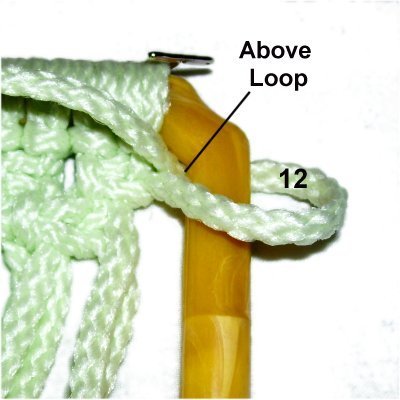
The second
loop is tied by moving cord 12 down
towards the bottom of the square.
The bring it under
- over the frame, and under
the vertical portion of the cord.
Step
7:Repeat
step 5withcord
11.
Move cord 12 straight down before you get
started, and don't go around it when you
make the second loop.
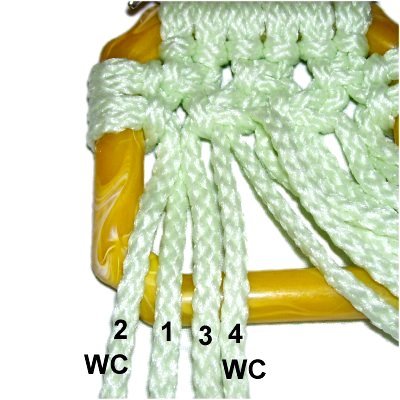
Step
8: Note that cords 1 and 2
have switched places.
To start row 3, tie a Square Knot with
cords 1 - 4, using cords
2 and 4 as the working
cords. The fillers are cords 1 and
3.
Tie a Square
Knot with cords 5 - 8.
Tie the next SK with cords 9 - 12.
Cords 11 and 12 have switched places, so
be sure to use 9
and 11 as the working cords.
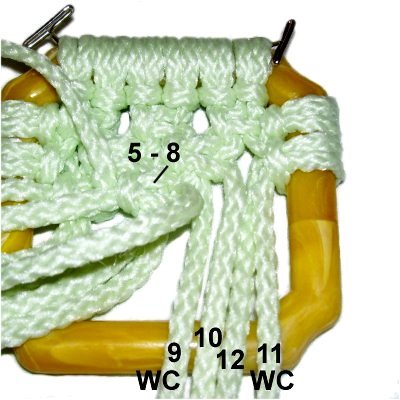
Step 9:
Mentally re-number the cords.
Repeat
steps 3 - 7, tying the 4th row of Square
Knots, along with the next pair of Larks Heads on
each side.
Repeat
step 8to
tie the 5th row of Square Knots for your Macrame
Container.
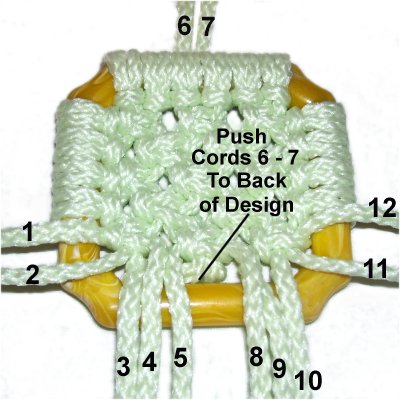
Step
10: Mentally re-number and
organize the cords:
Cords 1 and 2 to the left
Cords 11 - 12 to the right
Cords 3 - 5 and 8 - 10 at the bottom
Push cords 6 - 7 to the back
of the Square Knot design, since you do
not use them for the next steps.
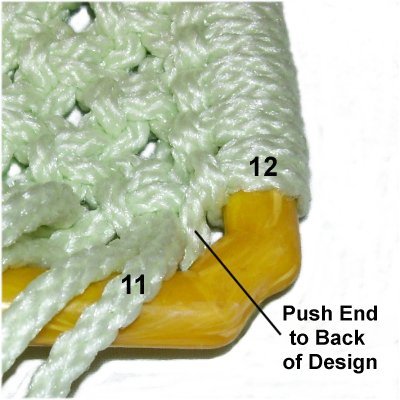
Step 11: Repeat
steps 4 - 7, attaching cords 1 -
2, along with cords 11 - 12, to the sides
of the square.
After you attach each cord, push the end
to the back of the design, where it will
be tied off.
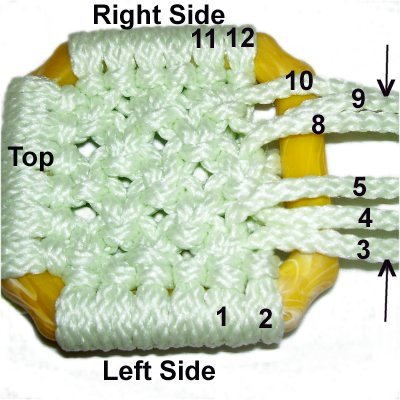
Step
12: Turn this piece of the
Macrame Container so the top is on your
left. Attach cords 10 - 8 to the
bottom of the square, with Larks Head
knots.
Then turn the whole square around so the
top is on your right. Attach cords 3
- 5 to the bottom.
In other words, work from the corners
towards the center of the square.
Designer's
Tip: You may need to stretch
the SK design to bring it closer to the bottom of
the square.
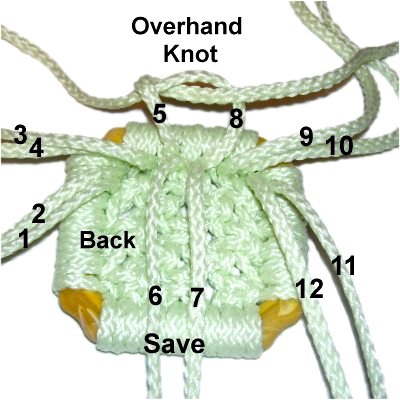
Step
13: Turn the square upside
down so you are working in the back.
Do
not finish off cords 6 - 7, since
they are used to construct the Macrame
Box.
Tie Overhand knots with the remaining
cords, in sets of two. Apply glue as you
tighten each knot.
Cut off the excess material when the glue
is dry, and melt the tips if using Bonnie
Braid or nylon.
Step 14:
Repeat steps 1 -
13 four times, to make the other
pieces for the Macrame Container.
Choose one square for the bottom. When you
get tostep
13, finish off ALL the cords, including6 - 7.
Create the Container
Step 15:
Now it's time to construct the Macrame
Container. The back
of each piece is the surface where you finished
off the cords.
For the side pieces, make sure the area where you
tied off is at the bottom, since that's where
cords 6 - 7 will be.
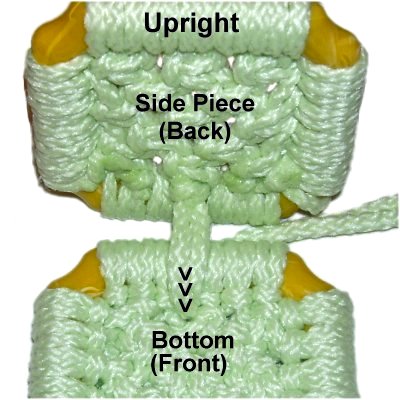
Place the bottom piece flat on your board, with
the FRONT face up.
Place a side piece next to it, holding it
upright. The BACK of the piece
should be facing you, so it's on the inside of the
box.
Place pins behind the side piece for support.
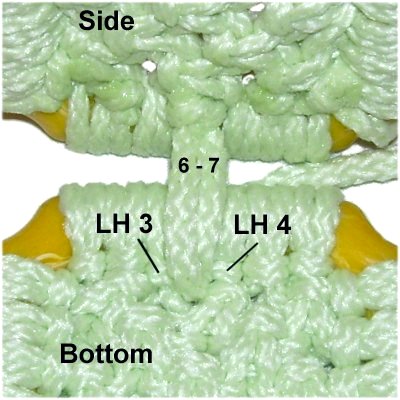
There are six
Larks Head knots on each area of the
square.
Find the space between
knots 3 and 4 on the bottom
piece.
Slide cords 6 and 7 (from the side piece)
through that space.
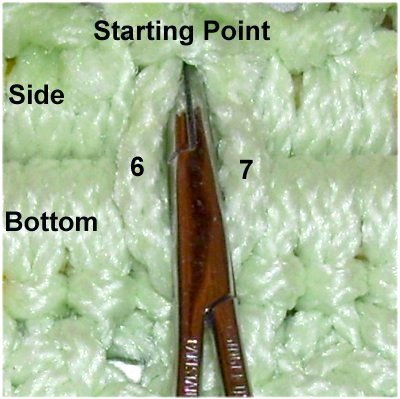
This is a
closer view of the space cords 6 and 7
pass through.
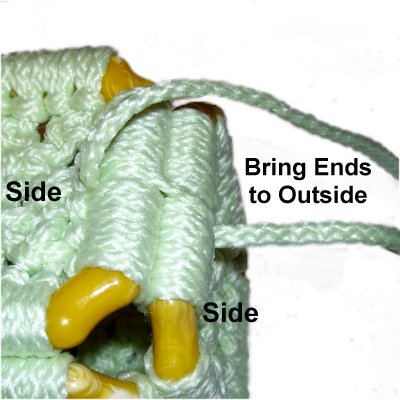
Bring cords 6
- 7 through the side piece from
outside to inside.
The best space
to pull them through is between
the two cords, just below their starting
point on the square.
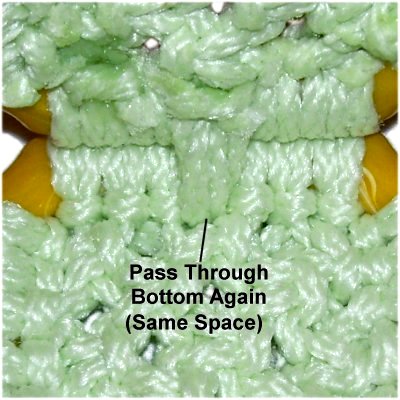
Step 15,
continued: Pull firmly on the two
cords. Lift the bottom area of the side
piece so it rests on
top of the bottom piece, and pull them
again.
The bottom area of the Macrame Container needs to
be as tight as possible, and lifting will increase
the tension. You will move the side piece
down slightly later.
Pass the two cords through the bottom
piece again, through the same space they
went through the first time.
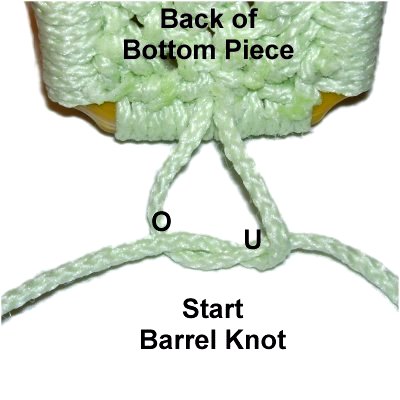
Step 16:
Turn over this portion of the Macrame Container so
you are working in the back
of the bottom piece, where cords 6 and 7 are
dangling. This was the area resting on the
board.
Pull firmly on both cords, and then tie a Barrel
knot, as described below:
Pass the cord
on the right under
- over the one on the left
(Overhand knot).
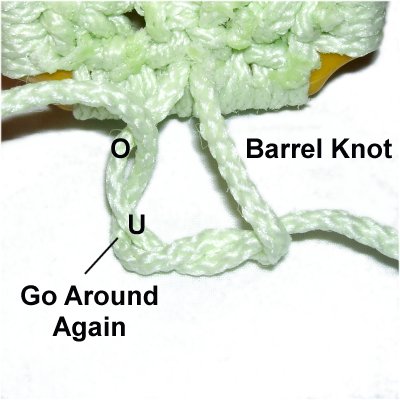
Move the right
cord around the left cord again, passing
it under
- over.
Pull both cords gradually, tightening the
knot as much as possible. You can
add glue to secure it.
Step 17: Repeat
Steps 15 and 16 to attach the other three
side pieces to the bottom piece.
When you get to the end of step 15, you may need
to move the side pieces down slightly. Just
re-arrange the pieces so they all line up evenly.
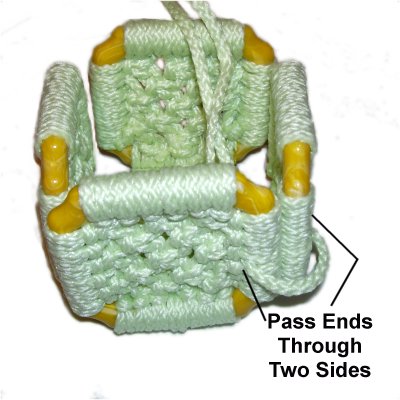
Step 18:
Now it's time to connect the sides
of the Macrame Container. The instructions
below are for one area.
Cut 1 cord (or use scrap), at least 25 inches
long.
Fold one cord
in half and pass the two ends through
openings in two side pieces (outside to
inside).
The best place
is between Larks Head knots 3 and 4.
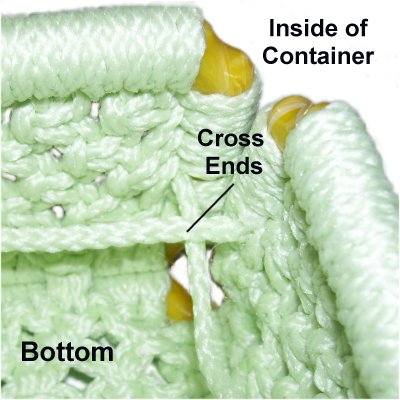
Match the two
halves so the cord is balanced.
Cross them on the inside
of the box.
Bring them to
the outside again, through the same
openings they went through before (on
opposite sides, since they are crossed).
Pull them tightly, so everything holds
together.
The next step is to make a bow, but if you
prefer something else, skip past step 19.
Step
19: To start the bow on
one corner of the Macrame Container, tie a
very
tight Overhand knot with the two
halves.
Fold the left
half of the cord to form a
bight.
It should be arranged sideways, heading
right.
Bring the right
half towards you, then over
the bight, heading towards the Macrame
Container.
Leave a little space below this loop
(arrows <<<).
Fold the right
half to form a bight, and push it
under
the loop made in the previous step, via
the space you left for it.
Make sure this takes place under
the left half of the
cord.
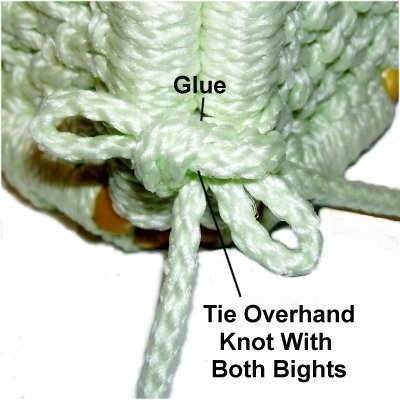
Pull both bights to tighten the bow.
Tie an
Overhand knot with both bights, and
tighten firmly.
Apply glue behind the knot, and push the
bow back to rest against the box.
Use masking tape to hold it in place while
the glue dries.
Step 20: Repeat
steps 18 and 19 to connect the other
three sides of the Macrame Container.
Adjust the squares as needed so all four sides are
the same height, BEFORE you tie the bows in step
19.
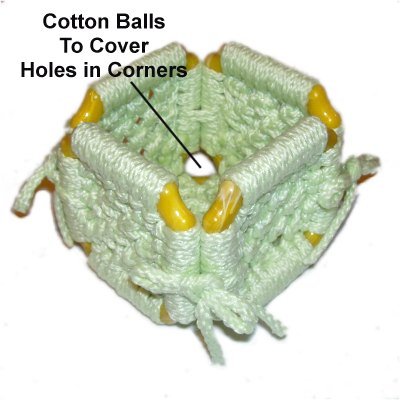
Use cotton
balls to cover the holes in the corners if
you plan to place small items in the
container.
By
using any text or images on Free Macrame
Patterns, you are agreeing to ourTerms
of Use