Description:
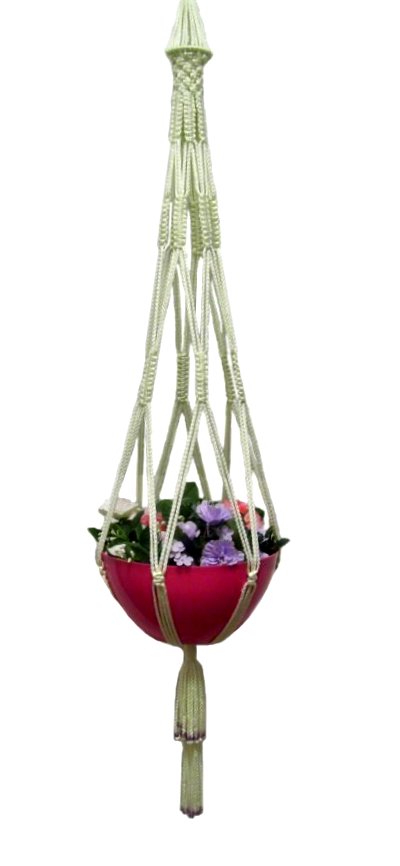
The Lace Planter has a delicate
appearance. It features short
sennits of Square knots as well as areas
without knots.
This plant hanger design looks better
with plant pots or bowls that are at
least 10 inches wide. The cradle
portion at the bottom can be adjusted
for any height.
This Macrame pattern is easy to make,
but fine tuning the position of the
knots takes extra time.
The finished size is approximately 50
inches, which includes the fringe at the
bottom.
To lengthen this plant hanger, you can
tie extra knots in the sennits, or
increase the spacing between them.
Make sure you cut the cords longer if
you make adjustments to the size.
Step 1:Cut
12 cords, each 6 yards long.
Prepare the tips with masking tape to prevent
unraveling. As you apply the tape,
compress the end to make it as narrow as
possible (for beading).
Cut
2 cords, each 36 inches long (for
Wrapped Knots).
Step 2: Fold the 6-yard cords
in half and position them over the bottom of the
2-inch ring, while holding the ring
upright.
Important:
After you arrange each cord onto the ring, match
the ends to center it. Then roll up the
cord and secure it with a rubber band. Do
this with every cord.
Carefully place the mounted cords on your
project board, as shown in the image
below. The Wrapped Knot at the top of the
Lace Planter is easier to make on a surface, so
you can use pins.
Secure a
36-inch cord to the right of the
ring. Bring it down 3 inches, then
fold it and move it back up. Secure
it at the fold.
This cord is used to make the Wrapped
knot, described below.
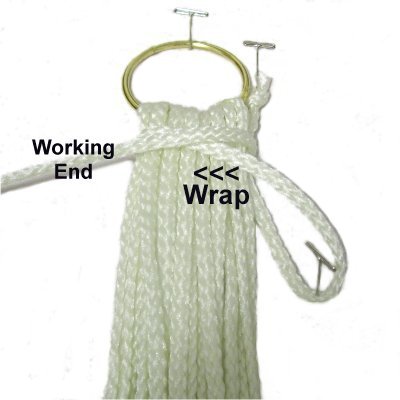
Move the
36-inch cord (working end) to the left,
over the front of ALL the cords.
Bring it under all the cords, then back to
the front.
Wrap several
more times, moving downward, until the
knot is at least 1.5 inches long.
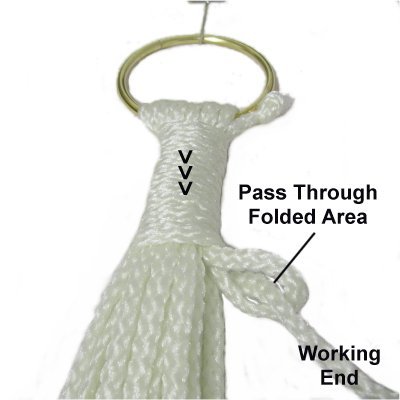
Pass the working end through the folded
area, which looks like a loop.
Remove the pin
from the secured
end of the 36-inch cord.
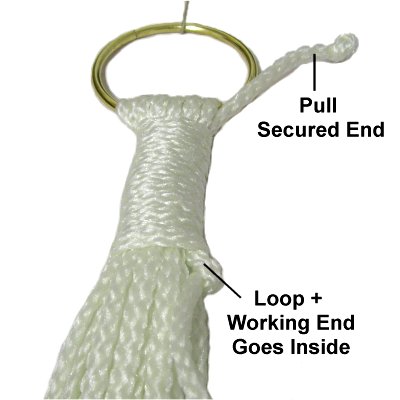
Pull it gradually,
so the loop and working end move into the
Wrapped Knot. Stop pulling when the
loop is about half way through the
knot.
Cut off the two ends flush with the top
and bottom of the knot. Use tweezers
to push the stubs inside the wrapped
portion.
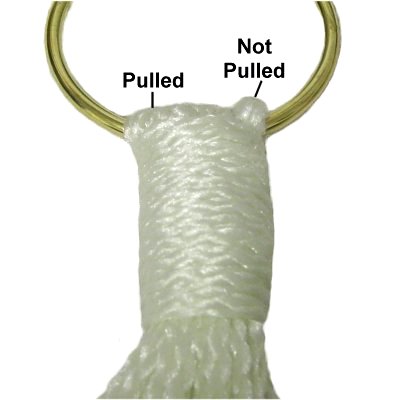
Step
3: Unroll each of the long
cords and pull BOTH
HALVES at the same time, so the
cord tightens around the ring above the
Wrapped Knot.
This image shows most of the cords already
done, but I left one so you could see how
loose it would be if you did not pull the
cords.
Top Area
Hang up the cords by
the ring at the top. The remainder of
the Lace Planter is easier to complete with the
cords dangling.
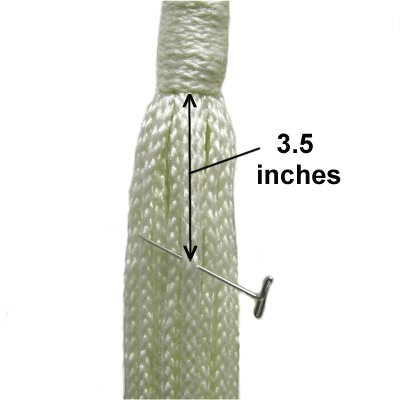
Step
4: Select one of the long
cords and measure from the Wrapped Knot
down 3.5
inches.
Place a pin (or tape) horizontally, to
mark that spot.
Pass ALL the cords into the 2.5-inch ring,
while holding it level with the floor (see
next image).
Find the marked cord, and attach it to the ring
with a Double
Half Hitch.
The pin should be as close to the ring as possible
before you tighten the two Half Hitches (see image
below).
Step
5:
Repeat step 4 with all the other
cords, attaching them to the same ring one
at a time.
Measuring each cord is necessary to make
sure the Lace Planter is level, so take
your time and be accurate.
When you are finished, you can add extra Half
Hitches if the ring is not completely covered.
Step
6: Tie 6 rows of Alternating
Square Knots, placing the first row as
close to the ring as possible.
Each knot should have 2 working cords
and 2 fillers.
Make sure you tighten each knot firmly
so they are close together. This
will cause the top portion of the Lace
Planter to curve inward slightly.
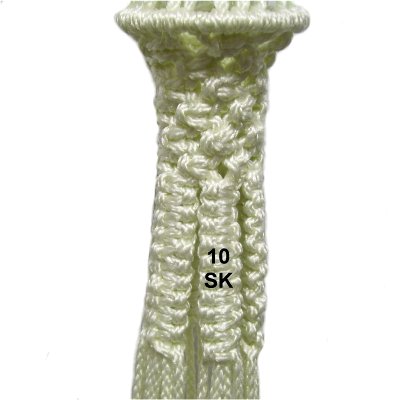
Step
7: Divide the cords into 6
groups of 4 cords.
With each group, tie a sennit of 10 Square
Knots. Push them close together as
you progress, so there are no gaps.
Important:MEASURE each sennit to be sure
they are the same length.You
can make adjustments by pushing the knots closer
together or moving them apart slightly.
Measure from the top
of the first knot to the bottom
of the last.
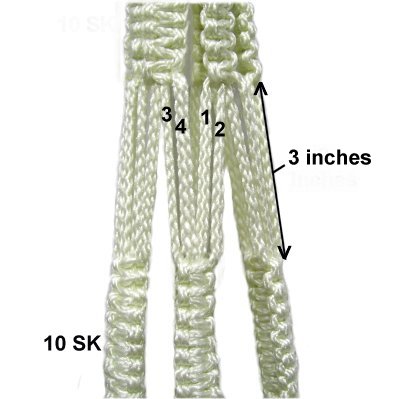
Step
8: Select two sennits that
rest next to each other and mentally
number the cords in each 1 - 4.
Alternate by combining cords 3 - 4 from
the sennit on your left, with 1 - 2 from
the one on the right.
Step 8, continued:
Move down 3 inches, and tie another
sennit with 10 SK.
Hold the fillers while tightening each knot, so
the tension in all four cords is the same.
Push the knots close together, but be careful you
don't change the position of the first knot.
Step 9:Repeat
step 8 with all the other
sennits. Measure
to make sure they are all 3 inches below the
sennits made in step 7.
Important:
MEASUREeach sennit and adjust them as needed,
so they are all the same length.
This is one of the most important parts to
successfully making the Lace Planter, so measure
carefully.
Step
10: Repeat
step 8, alternating the cords
again.
Move down 6
inches, then tie the SK sennit
with 10 knots.
Repeat
with the remaining cords.
Step
11: Create the next section
for the Lace Planter by repeating step
8 (alternating the cords).
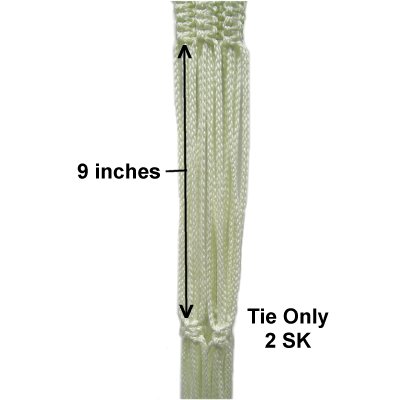
Move down 9
inches, and tie 2
SK.
Repeat with all the remaining cords.
Cradle
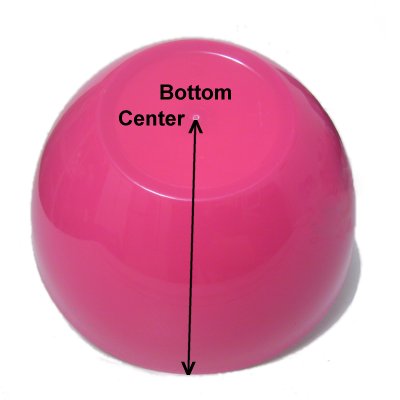
Step
12: Measure the bowl or pot
you plan to use in your Lace
Planter. Start at the top edge, and
bring the tape measure to the bottom
center point.
The cradle needs to be close to that
measurement.
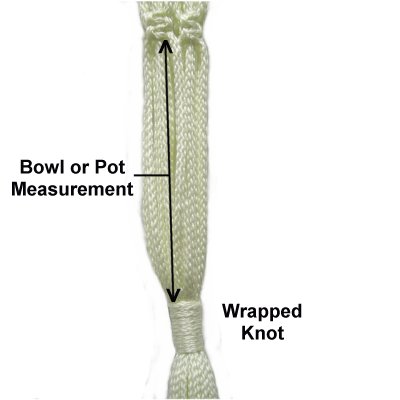
Step 13:
The cradle for the Lace Planter is the area
between the two SK you tied in step 11, and the
Wrapped Knot you will now tie.
Organize all the cords so they are not
twisted. They should dangle straight down
from the SK. It helps if you arrange 3
groups in the front and 3 behind them.
Move down the
same distance as the pot measurement you
got in step 12.
Tie a Wrapped Knot using the other 36-inch
cord. It should be at least 1.5
inches long. Make sure you wrap firmly, so
it's tight.
Do not
cut off the ends after it's
tightened.
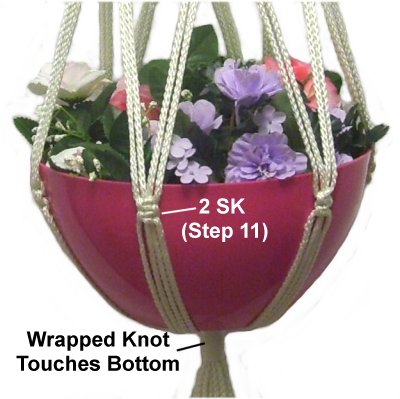
Step
14: Place the pot or bowl
inside the cradle. The bottom should
rest against
the Wrapped knot.
The two SK you tied in step 11 should be
close to the upper edge of the pot or
bowl.
You
can GENTLY slide the Wrapped Knot up or down
as needed to obtain the best placement.
Important: Do not pull the cords,
or the cradle will become crooked.
Once you like the fit, you can complete the
Wrapped Knot by cutting off the ends flush with
the top and bottom of the knot. Tuck
the stubs inside the wrapped area.
I
recommend you complete the Lace Planter by
creating a beaded
fringe as described below.
It's important that you do
not pull the cords, or the cradle will
become deformed. For that reason, a brushed
fringe is not recommended.
No matter what type of fringe you make, you need
to finish off the cords in some manner to prevent
unraveling. You can apply finishing knots,
or paint the tips with glue or nail polish.
When using Bonnie Braid or similar synthetic
material, you can MELT the tips with a flame. Test
the material first to make sure it does not
BURN.
Beaded Fringe
Step
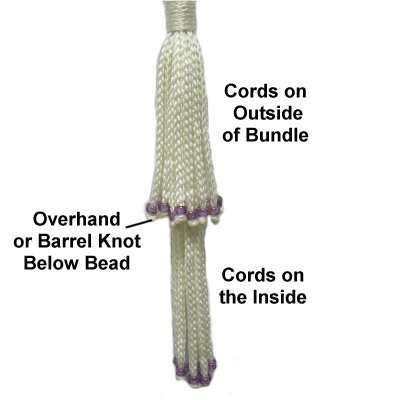
15: Take a look at the bundle of
cords coming from the Wrapped Knot.
Some are on the outside of the group and
others on the inside.
Mark the cords on the outside
with tape, since they will be used for the
short fringe, which you create
first.
Step 15,
continued: Measure one marked cord
from the Wrapped knot down at
least 4 inches.
Slide a bead onto the cord, and tie either an
Overhand or Barrel Knotbelow it. Be very careful when
tightening, so you don't pull the cord downward
too much.
Repeat the same process with the remaining marked
cords. By measuring each one, the beads
should all be at the same level. Make
adjustments if needed.
Step 16:
Now you make the long fringe with the remaining
cords on the inside
of the bundle. Measure one cord from the
Wrapped Knot down at
least 8 inches. Apply the
bead, followed by the knot. Repeat with the
other cords.
Step 17:
Once all the beads are on and where you want them,
cut off the excess material. For Bonnie
Braid or Nylon, you can melt the stub with a
flame.
By using any text
or images on Free Macrame Patterns, you are
agreeing to ourTerms of Use