Description:
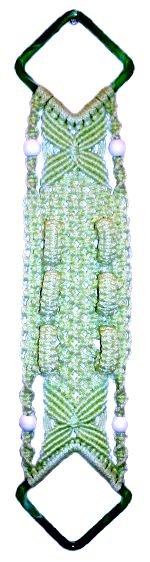
This Kitchen Tool Holder has several
interesting features. There are wing
designs at the top and bottom, which look
somewhat like butterflies.
At the top and bottom are squares arranged
in a diamond shape. You can use
rings if you wish, or you can turn the
squares so the top and bottom edges are
horizontal.
The center section features three pairs of
loops. You slide kitchen tools,
towels, or bottles through them
horizontally.
This Macrame pattern is rated moderate,
which means beginners should have
experience with the knots prior to
creating it. The finished
length is 23 inches, which includes the
squares.
Step
1: Cut 12 cords, each at least 5
yards long. Prepare the tips of the cords to
prevent unraveling (tape works well).
The loops in the Kitchen Tool Holder will hold
something 1.5 inches in size. Increase the
length of the cords if you need to make the loops
larger to fit your kitchen items (in step 9, row
10).
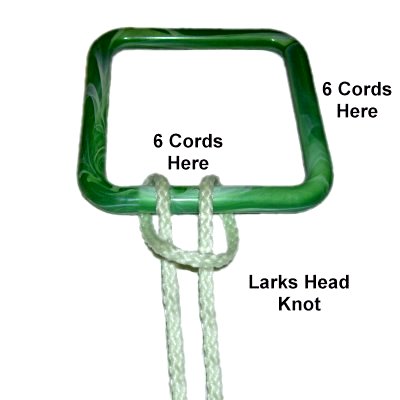
For a diamond
shaped square arrangement, mount 6 cords
on two
sides of the square with Larks
Head knots (see next image).
For a ring or horizontal square
arrangement, attach all 12 cords on one
side.
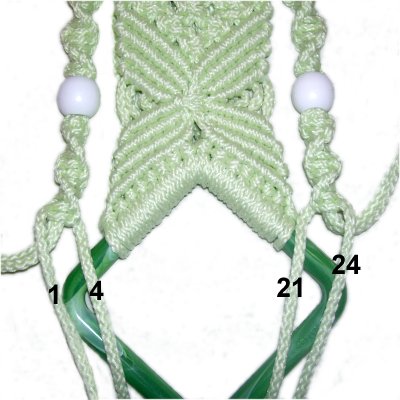
Mentally number
the 24 cords. Move aside cords 1 - 4
and 21 - 24, since they will not be used
for awhile.
Cords 5 - 20 are for the wing design.
Top Section - Wing Design
The Wing Design in the Kitchen Tool Holder is
made with 4 diagonal rows of Double Half Hitches
(DHH) on the left and right. A Square Knot
is tied in the center, then there are 4 more rows
on both sides.
The key to neatness is to make sure the knots are
tightened completely, resting next to each other
without overlapping.
Because the square is arranged in a diamond shape,
the rows will be at the proper angle. Should
you decide to use a ring or arrange the square
differently, make sure the diagonal slant is as
close to 45 degrees as possible.
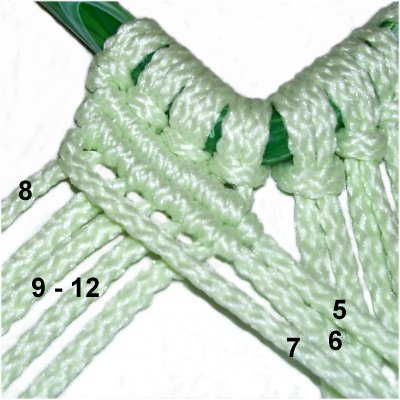
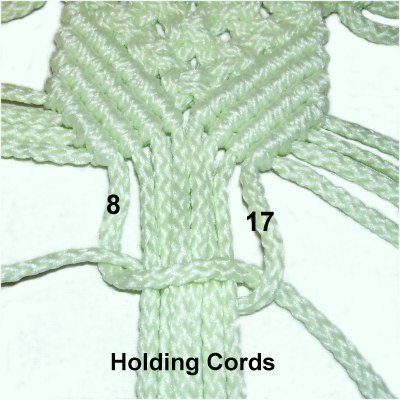
Step
2: Organize cords 5 - 12, which
are on one side of the square.
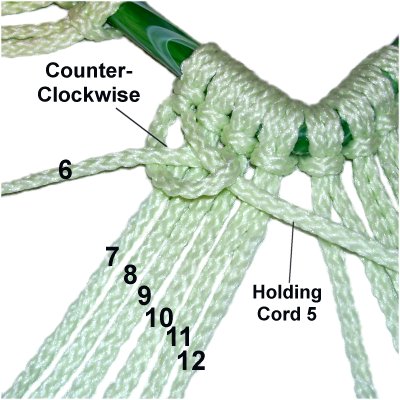
Row 1:
Move cord
5 to the right, to be used as the
holding cord. It should rest close
to the Larks Heads.
Attach cords 6 - 12 to it with DHH.
The knots are tied counter-clockwise,
since you are moving left to right.
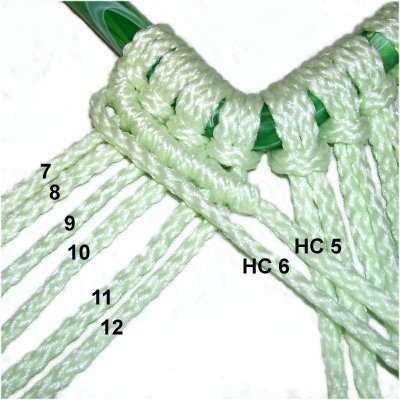
Row
2: Move cord
6 to the right, to be used as the
next holding cord.
Attach cords 7 - 12 to it with DHH.
Do
not attach holding cord 5.
It's important to keep the rows of DHH as close
as possible, so the Kitchen Tool Holder looks
neat.
Try to control the holding cord in one hand while
tying the knots with the other. This way you
can change the angle of the holding cord as shown
in the next image.
Keep the rows
close to each other by moving the holding
cordupward
while tying the DHH with one of the
working cords.
Then you bring the holding cord back down,
and let the knots relax.
Do this with every knot in the row.
Row
3: Move cord
7 to the right, as the next
holding cord. Attach cords 8 - 12 to it
with DHH.
Row
4: The holding cord for the 4th
row is cord 8.
Attach cords 9 - 12 to it with DHH.
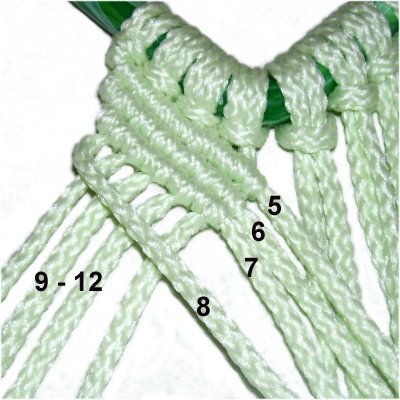
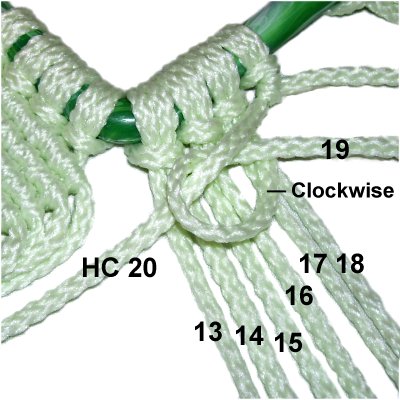
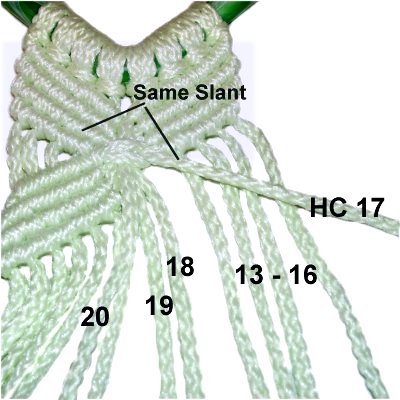
Step
3: Now it's time to make the ring
upper wing for your Kitchen Tool Holder.
The holding cord used for the first row is
cord 20.
Attach cords 19 - 13 to it with clockwise
DHH, in
that order.
Tie the remaining rows as follows:
Row 2:
Holding cord 19. Attach cords 18 - 13
to it with DHH.
Row 3:
Holding cord 18. Attach cords 17 - 13.
Row
4: Holding cord 17.
Attach cords 16 - 13.
Step 4:
The wing design for your Kitchen Tool Holder has a
Square Knot (SK) in the center.
The image below shows only the first step of the left SK, so
you know which cords to use.
Organize the HOLDING CORDS into a group (5 - 8 on
the left and 17 - 20 on the right). Make
sure the cords are neatly arranged.
Use cords
8 and 17 to tie the SK, which
were the holding cords for the 4th
row of DHH on both sides.
The remaining six holding cords are the
fillers for the SK.
Tighten the knot so it rests close to the
4th row of DHH, and is as wide as
possible.
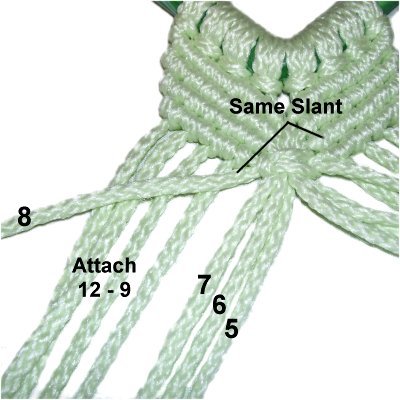
Step
5: Now it's time to create the
lower pair of wings for your Kitchen Tool
Holder.
Row 1:
Moveholdingcord
8 to the left, on the same
diagonal slant as the 3rd
row of DHH on the right upper
wing. Attach cords 12 - 9 to it with
DHH, in
that order.
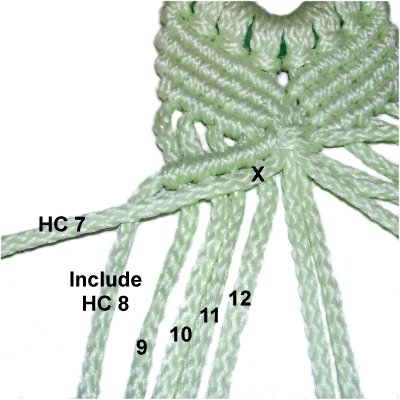
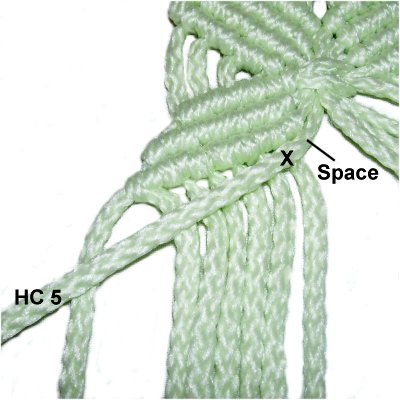
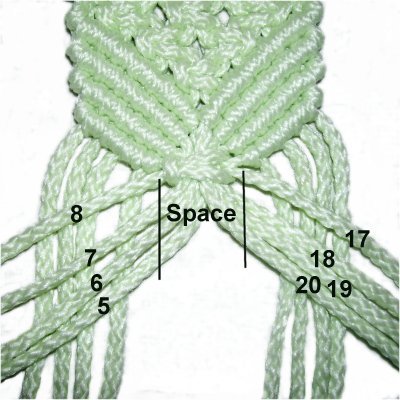
Row
2: Move holding
cord 7 to the left, and attach
cords 12 - 9 with DHH. Attach
holding cord 8 as well.
Notice the X in the image? You need
to leave some space in the center of the
design.
(Read information below)
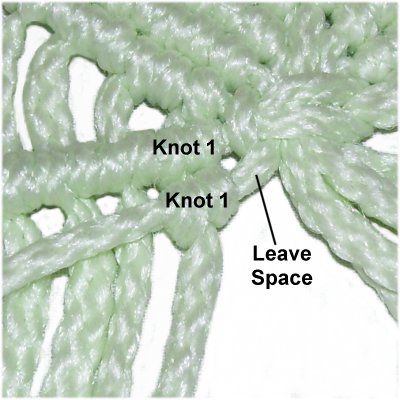
The best way
to increase the spacing near the center is
to place the DHH made by cord 12 directly
under the one in the previous
row.
You can even move that knot further to the
left if you feel the need to do so.
Do this for the next two rows as well.
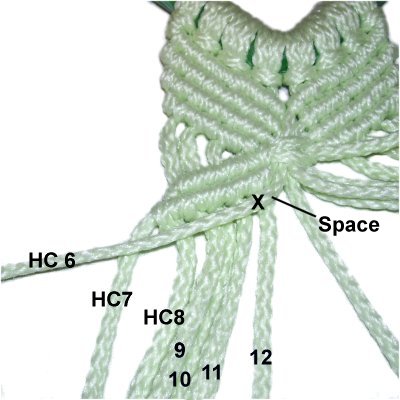
Row
3: Move holding cord 6 to
the left. Attach cords 12 - 9, along
with holding cords 8 and 7, with DHH.
Don't forget the added space in the
center.
Row
4: The final holding cord
is #5. Attach all the other cords to
it with DHH, which includes the previous
holding cords. Make sure there is
added space.
Step
6: To make the right wing,
move cord
17 to the right. The
diagonal slant should match the 3rd
row of the upper left wing.
Attach cords 13 - 16 to it with DHH.
The remaining rows are tied as follows.
Don't forget to add space near the center, so
everything lies flat:
Step 7:
Now it's time to make the Spiral Stitch designs
for your Kitchen Tool Holder. They fit beside the
Wing Design you just made.
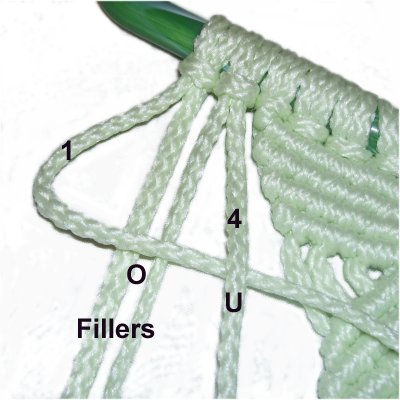
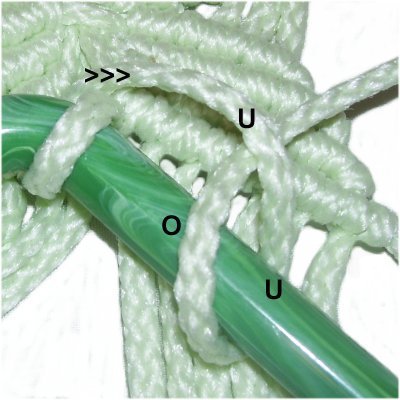
You make the Left
Half Knot (1/2 of SK) on the left with
cords 1 - 4:
<<
Move cord
1 to the right, passing over
cords 2 - 3 (fillers), and under
cord 4.
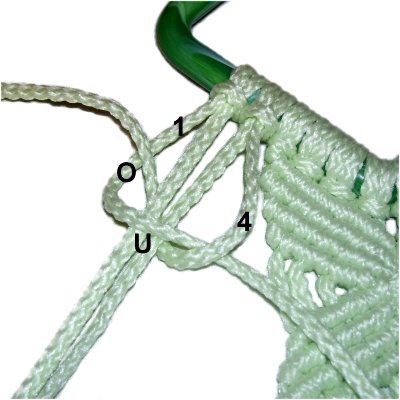
Move cord
4under
the fillers and over
cord 1 on the right. >>
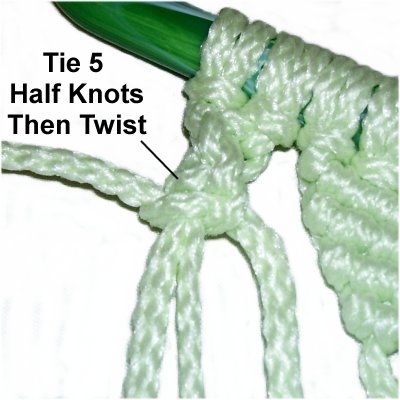
Tie a total of
five Half Knots, then twist the sennit to
the right, so the two working cords switch
places.
Continue on, tying 5 more knots, then
twist again.
You may need to tie a couple more knots so
the center of the bead lines up with the
SK in the wing design.
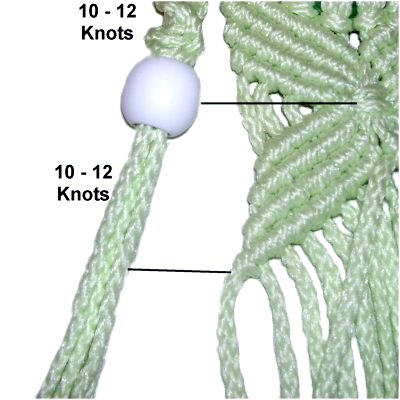
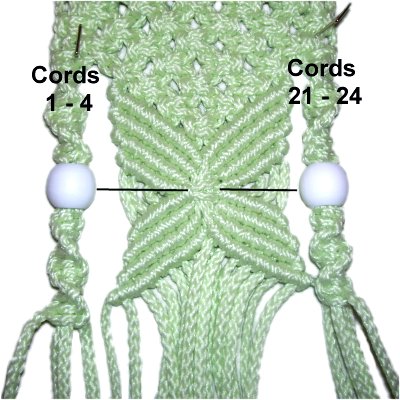
Slide all 4
cords through the bead.
Select the two longest
cords and use them as the working cords to
make another Spiral Stitch sennit.
Tie 10 - 12 knots (or more) so that the
last Half Knot tied lines up with the tip
of the left lower wing.
Step 8: Repeat
step 7
with cords 21 - 24, to make the Spiral Stitch on
the right.
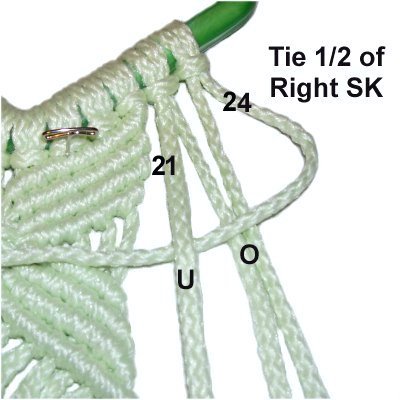
Tie Right
Half Knots as shown below.
<<
Move cord
24 to the left, passing over
the fillers (22 - 23) and under
cord 21.
Move cord
21under
the fillers and over
cord 24 on the right. >>
Center Section - Loops
Step 9:
Now it's time to make the center section of your
Kitchen Tool Holder, which contains the
loops.
The loops are made in rows 10, 16, and 22, so it's
important to keep track of which row you are on.
You must know how to tie both RIGHT and LEFT
Square knots (SK).
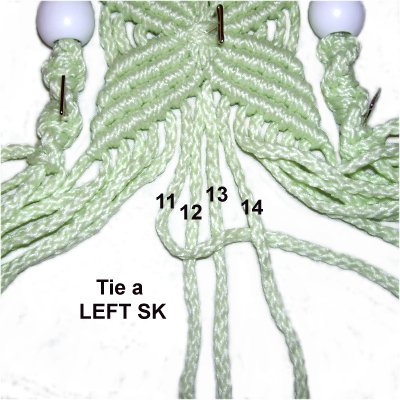
Row 1:
Mentally number ALL
the cords 1 - 24.
Tie one LEFT SK with cords 11 - 14, which
are in the center of the group.
A left SK begins by moving the left
working cord, which in this case is cord
11.
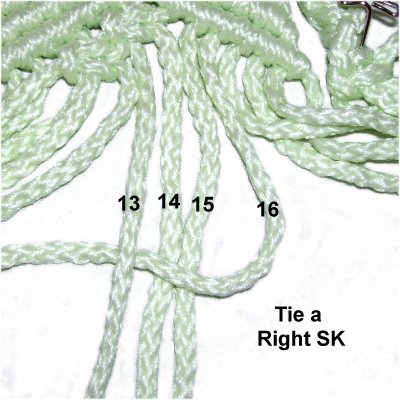
Row
2: Tie a LEFT SK with cords
9 - 12.
Tie a RIGHT SK with cords 13 - 16 (see
below).
A right SK is
tied by moving the right working cord
first, which in this case is cord 16.
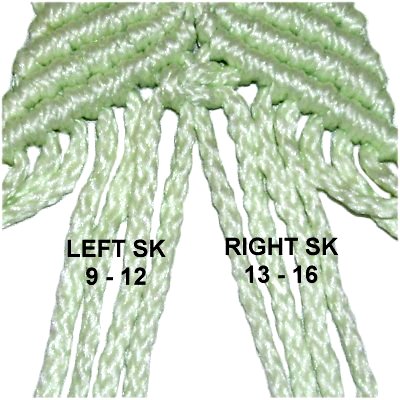
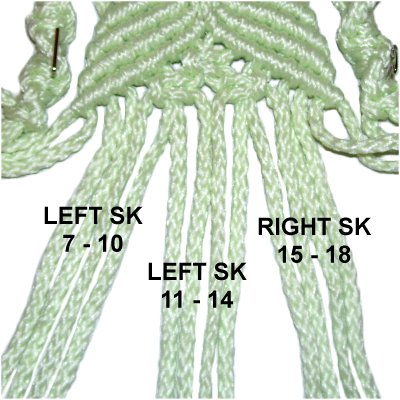
Row
3: Tie a LEFT SK with
cords 7 - 10, and another with cords 11 -
14.
Tie a RIGHT SK with cords 15 - 18.
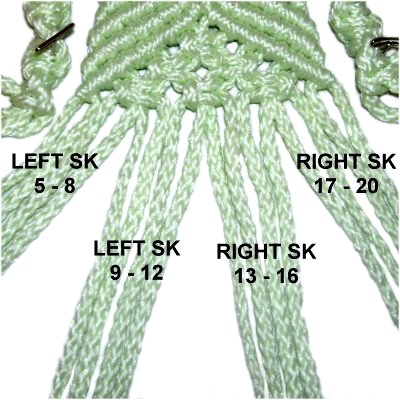
Row
4: Tie LEFT SK with cords 5
- 8 and 9 - 12.
Tie RIGHT SK with cords 13 - 16 and 17 -
20.
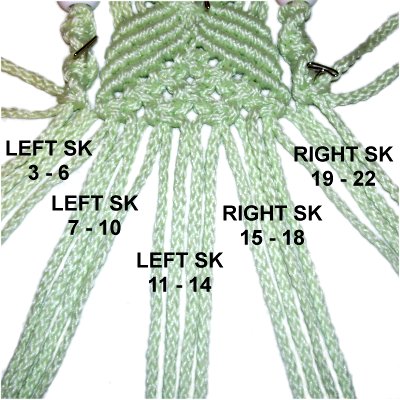
Row
5: Tie LEFT SK with 3 - 6,
7 - 10, and 11 - 14.
Tie RIGHT SK with cords 15 - 18 and 19 -
22.
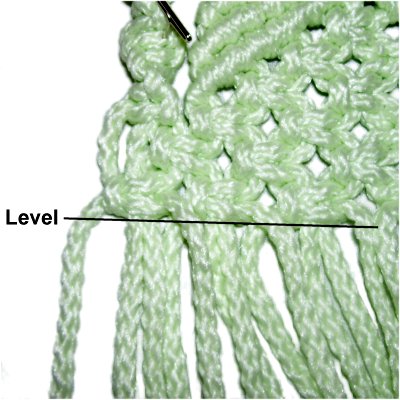
Row
6: Make sure the knots on
the outside edges are level with the
others (cords 1 - 4 and 21 - 24).
Left SK: Cords 1 - 4, 5 - 8, 9 - 12
Right SK: Cords 13 - 16, 17 - 20, 21 - 24
The next 3 rows for this area of the Kitchen
Tool Holder are tied as follows:
Row 7:Repeat
Row 5
Row 8:Repeat
Row 6
Row 9:Repeat
Row 5
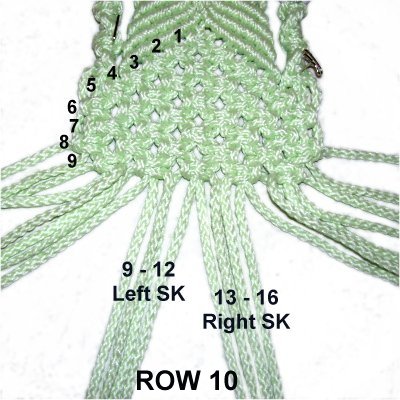
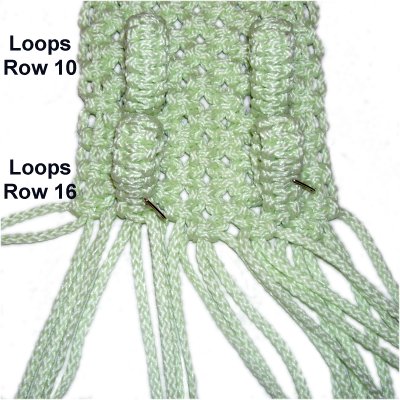
Row
10: This is where you make
the first two loops for your Kitchen Tool
Holder.
Start by tying a LEFT SK with cords 9 -
12, and a RIGHT SK with cords 13 - 16.
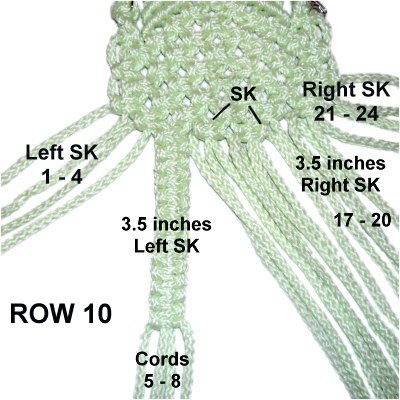
Row
10, continued: Tie a LEFT
SK with cords 1 - 4, and a RIGHT SK with
cords 21 - 24.
Tie a series of LEFT SK, using cords 5 -
8. The sennit should 3.5 inches long
(for a 1.75-inch loop). See Design
Tip below.
Tie a series of RIGHT SK using cords 17 -
20, making it 3.5 inches, too.
Design
Tip: You can make the loops for the
Kitchen Tool Holder any size by tying a different
number of knots than this
example. Fold the sennit and see
if it needs adjusting to fit your utensils.
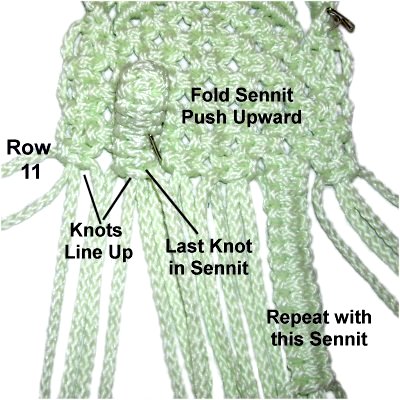
Row
11: Fold the left sennit of
SK and push it upward so it rests on top
of the panel you are making.
The last knot tied should line up with the
other knots in row 10.
Repeat with the right sennit.
Row 11,
continued: Tie LEFT SK with cords 3
- 6, 7 - 10, 11 - 14.
Tie RIGHT SK with cords 15 - 18 and 19 - 22.
Row 12: Tie
LEFT SK with cords 1 - 4, 5 - 8, 9 - 12.
Tie RIGHT SK with cords 13 - 16, 17 - 20, 21 - 24.
Row 13: Repeat Row 11. Row 14: Repeat
Row 12.
Row 15:Repeat
Row 11.
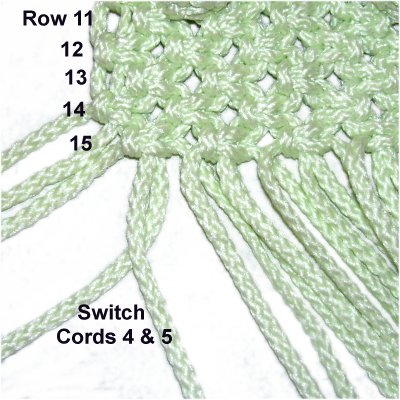
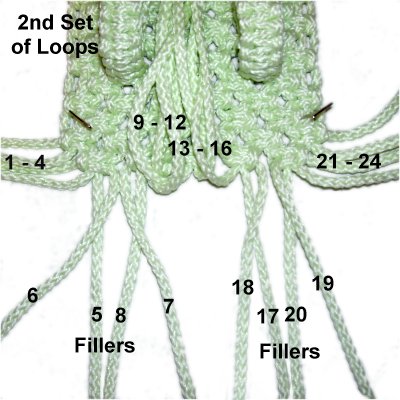
Before you
make the second set of loops for your
Kitchen Tool Holder, you need to switch
cords around.
This is so the working cords for the
sennit will be the longest ones in the
group.
Start by switching cords 4 and 5 (cord 5
goes left).
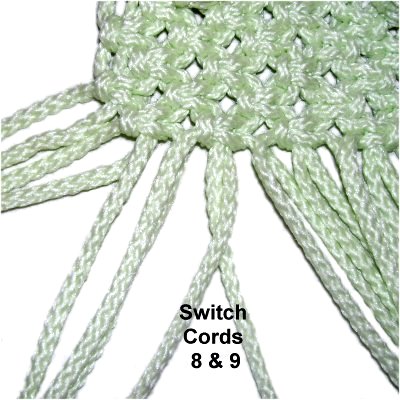
Switch cords 8
and 9.
Test the sizes by putting cords 4, 6, 7, 9
in a group. Those are the cords used
to make the sennit.
The working cords are 4 and 9, which
should be longer than the others.
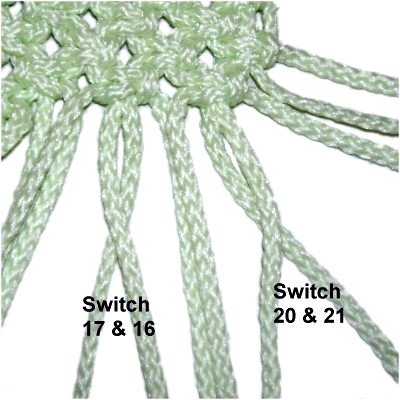
Switch cords
16 and 17 as well as 20 and 21.
Put cords 16, 18, 19, 21 together and
check to make sure the working cords (16
and 21) are long.
Row
16:Tie LEFT SK with
the following groups:
Cords 1, 2, 3, 5
Cords 8, 10, 11, 12
Make a 3.5-inch sennit with cords 4,
6, 7, 9
Row 16,
continued: Tie RIGHT SK with the
following groups:
Cords 13, 14, 15, 17
Cords 20, 22, 23, 24
Make a 3.5-inch sennit with cords 16, 18,
19, 21.
Rows 17 - 21: Mentally
re-number the cords where they are now.
Repeat Rows 11 -
15.
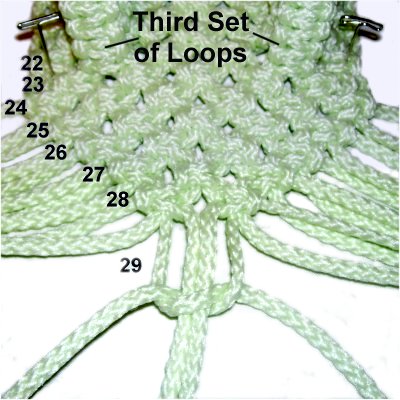
Before you make
the 3rd set of loops for your Kitchen Tool
Holder, you need to switch cords again.
Cords 6 and 7 will be the working cords
for the left SK sennit, with 5 and 8 as
the fillers.
Cords 18 and 19 will be the working cords
for the right SK sennit. The fillers
are 17 and 20.
Row 22:
Tie LEFT SK in the following groups:
Cords 1 - 4
Cords 9 - 12
Tie a 3.5-inch sennit with cords 6, 5, 8, 7
Tie RIGHT SK in the following groups:
Cords 13 - 16
Cords 21 - 24
Tie a 3.5-inch sennit with cords 18, 17, 20,
19
Row 23:
Mentally re-number the cords. Repeat
Row 11.
The final rows
for this section of the Kitchen Tool
Holder are done in a V formation.
Row
24: LEFT SK with 1 - 4, 5 -
8, 9 - 12
RIGHT SK with 13 - 16, 17 - 20, 21 - 24
Row 25:
LEFT SK with 3 - 6, 7 - 10, 11 - 14. RIGHT
SK with 15 - 18, 19 - 22.
Row 26:
LEFT SK with 5 - 8, 9 - 12. RIGHT SK with 13
- 16, 17 - 20
Row 27:
LEFT SK with 7 - 10, 11 - 14. RIGHT SK
with 15 - 18.
Row 28:
LEFT SK with 9 - 12. RIGHT SK with 13 - 16.
Row 29:
LEFT SK with 11 - 14.
Bottom Section - Wing Design
The next section is a repeat of the Wing Design
you made at the top area of the Kitchen Tool
Holder.
Step
10:Repeat
Step 2 to create the left upper
wing, using cords 5 - 12.
Cords 5 - 8 will be the holding
cords. Follow the diagonal slant of
the V design made in the last step.
Step
11:Repeat
step 3 to make the right upper
wing, using cords 13 - 20.
Cords 20 - 17 are the holding cords (in
that order).
Step
12: Repeat
step 4 to make the large Square
Knot in the center of the wings.
Cords 8 and 17 are the working
cords. The remaining holding cords
are the fillers.
Step
13:Repeat
Steps 5 and 6 to make the lower
set of wings. The holding cords are
numbered in this image.
The black lines indicate where the first
DHH are placed in each row, to allow space
in the center.
Step
14: Repeat
Steps 7 and 8to make
the Spirals in the lower section of the
Kitchen Tool Holder.
Use cords 1 - 4 to make LEFT Half Knots,
and make RIGHT Half Knots with cords 21 -
24.
Make sure the center of the beads line up
with the SK in the wings.
Bottom Section -- Square
The next step for your Kitchen Tool Holder is to
attach the cords to the second Square with Larks
Head knots. This is optional if you prefer
to finish the bottom in a different manner, or
leave out the square completely.
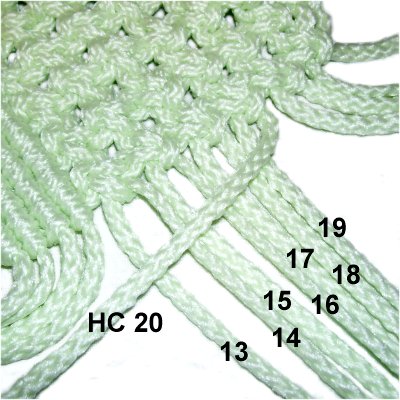
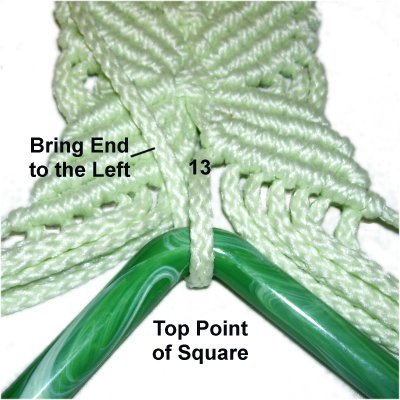
Step 15:
Arrange the square or ring just below the lower
wings, in the position you prefer. Mentally number
the cords.
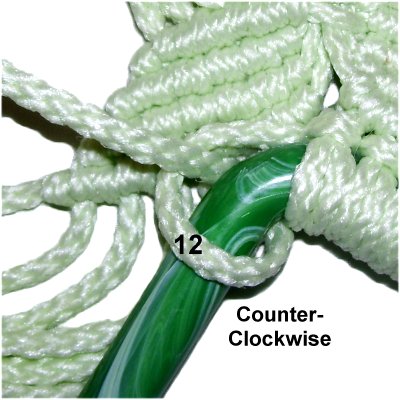
Pass cord 13
(right wing) over
- under the square.
Make sure you bring it to the left
of the portion coming off the wing design,
so that the loop is clockwise.
Pull the cord
to the right,
completing the first loop.
Pass it under
- over the square, and under
the cord, to make the second clockwise
loop.
Tighten both loops firmly so there are no
gaps between the square and the
wing.
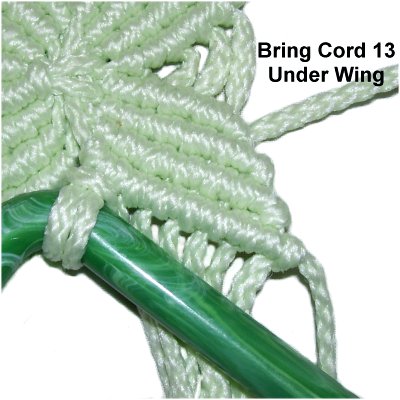
Step
15, continued: Bring cord
13 under the right wing, before
you attach the next cord.
Step 16:Repeat
step 15 with cords 14 - 20,
placing them to the right of the knot you
just tied.
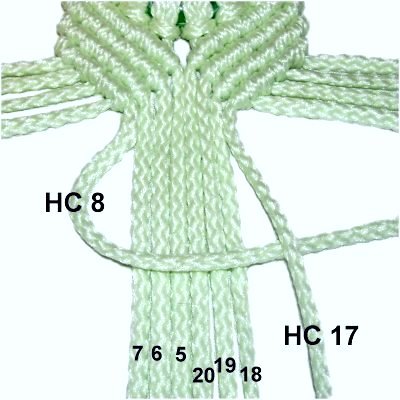
Step
17: Repeat the same process
on the left side, with cords 12 - 5(in that order). Pass each
cord under the left wing before attaching
the next one.
Rotate counter-clockwise
when making each loop of the Larks Head
knot.
Check to see if the cords from the spirals will
reach the square. Add extra knots if
needed.
You will only have room for 2 cords from the
spirals, so make sure you attach the working cords
rather than the fillers.
Step
18: Attach cords 1 and 4 to
the left of the others on that side, with
counter-clockwise
Larks Heads.
Attach cords 21 and 24 to the right of the
others on that side with clockwise
Larks Heads.
Step
19: Turn over the Kitchen
Tool Holder so you are working in the
back.
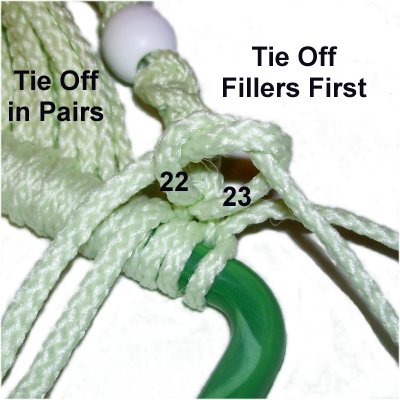
Locate the two fillers from the spirals (2
- 3 on the left and 22 - 23 on the
right). Tie them together with an
Overhand knot. Add glue while
tightening.
Step 19,
continued: Tie off the other cords
in the same manner, in sets of two.
When the glue is dry, cut off the excess material
close to the knots.
When using synthetic material to make your Kitchen
Tool Holder, you may be able to melt the tips with
a flame.
By
using any text or images on Free Macrame
Patterns, you are agreeing to ourTerms
of Use