|
|
| |

|
|
| |
|
Description: This
Hammock Chair is easy to make, but time
consuming, since it’s large. It features a
net-like panel that forms both the back and seat
in one long piece. It curves upward at the
bottom to form deep pocket.
This Macrame project is suitable for beginners,
since it is not complicated. Make sure you
are able to tie all the knots used in the
design, especially if you are a beginner.
The size of the seat is approximately 32 inches
wide. To increase the width, cut
additional cords. Make sure the
total is a multiple of four (36, 40, 44, etc.)
|
| |
| |
| |
|
Supplies Needed:
- 6mm cord material (355
yards)
- Two 3-inch welded metal
rings (heavy duty)
- Fabric glue that dries clear
|
| |
|
| |
| Knots used:
|
| |
|
|
|
| |
|
Preparation
|
| |
| |
|
Cut the cords as follows:
- Upper Side Supports --16 cords, each 3.5
yards long
- Lower Side Supports --16 cords, 4.5 yards
long
- Seat -- 32 cords, each 7 yards
long
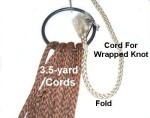
- Wrapped Knots -- 2 cords, each 50 inches
long
|
| |
| |
| |
Designer's
Note: The images below mimic the
details of each step, but in a smaller scale.
When you create your own Hammock Chair, the cords
will be thicker and there will be more of them. |
| |
|
| |
Mounting Cords to
Rings
|
| |
|
Step 1: Pass
8 of the 4.5-yard cords through one of the
rings, and match the ends to balance them.
Fold the cords around the lower part of the
ring.
Place 8 of the 3.5-yard cords on
top, then fold and balance them.
Tie a Wrapped Knot around the
cords, following the instructions below:
|
| |
|
| |
|
|
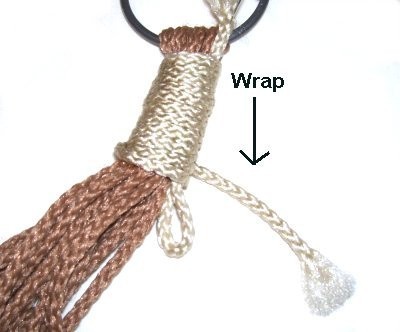
Secure one end of a 50-inch cord to the
right of the folded cords, next to the
ring.
Move
down 2 inches and fold
it. Bring the working end back to
the area close to the ring.
|
|
|
| |

|
|
Wrap the working end around the cords,
including the secured end of the working
cord.
Wrap firmly, moving forward,
until you are close to the fold.
|
|
| |
|
| |

|
|
The folded
area of the working cord now looks like a
loop. Pass the working end through
it. |
|
| |
|
| |

|
|
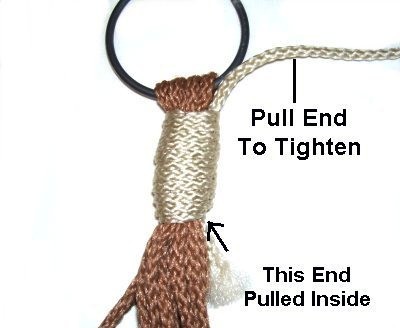
Pull on the secured
end, which is at the
top of the knot.
This will pull the working end, as well
as the loop, inside the Wrapped knot.
Trim both ends of the cord flush with
the top and bottom of the Wrapped knot,
then tuck the stubs inside where they
can't be seen.
|
|
| |
|
| |
Step 2:
Repeat step 1, mounting the
remaining 3.5-yard and 4.5-yard cords to the other
ring in the same manner.
On both rings, CAREFULLY pull each cord so they
grip the ring tightly. They should not slide back
and forth on the ring. |
| |
|
|
| |
Upper Edge of Back
|
| |
| |
Step 3:
Secure the rings to your work surface, or hang
them up so the cords dangle.
Select 2 of the shortest
cords (3.5-yard) coming from the right ring, and 2
more from the left. The cords you select
should rest close together where they come out of
the Wrapped knot.
These will act as holding cords for
the upper edge of the Hammock
Chair. |
| |
| |
|
|
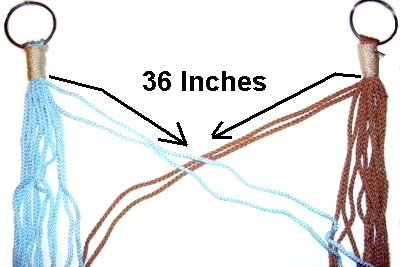
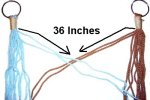
Move down 36
inches from the bottom of the
Wrapped Knot.
The four cords should be brought
towards each other, diagonally, so they
unite at this point.
|
|
| |
|
| |
|
|
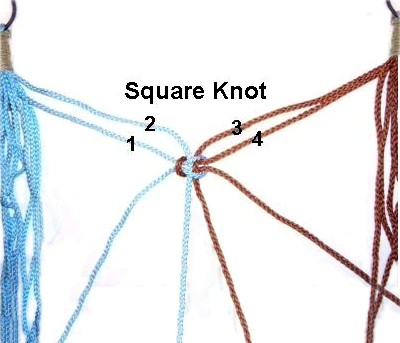
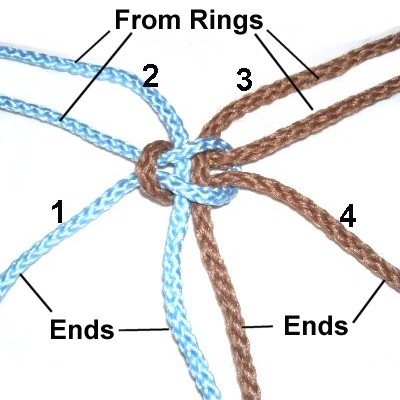
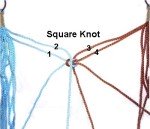
Step
4: Mentally number the left
cords as 1 and 2, and the right as 3 and
4.
Use them to tie a tight
Square Knot. The working cords are 1 and
4 and the fillers are 2 - 3.
|
|
| |
|
| |

|
|
Here's a closer view of the SK tied in
the holding cord.
You will be mounting the cords for the
back and seat of the Hammock Chair on
either side of this knot.
The ENDS are labeled, so you understand
the next step.
|
|
| |
| |
|
| |
Back and Seat
|
| |
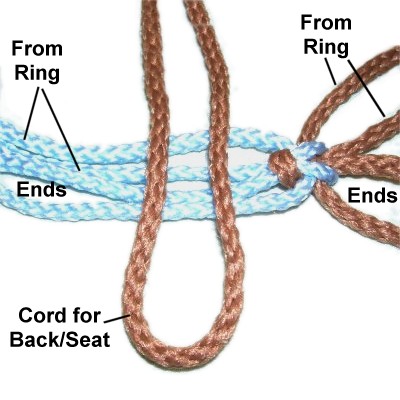
Step 5: Move the ends of
the four cords to the right and left, resting next
to the portion coming down from the rings.
The cords for the back and seat
of the Hammock Chair will be mounted onto
all four parts, which you can see in the image
below.
Designer's
Tip: The best best way to mount the cords
is to work flat on a table, so the cords are
horizontal. |
|
|
| |

|
|
Fold one 7-yard cord in half, and lay it
down on
top of the 4 holding cords to the
left of the Square knot.
The fold should be heading toward you. |
|
| |
|
| |

|
|
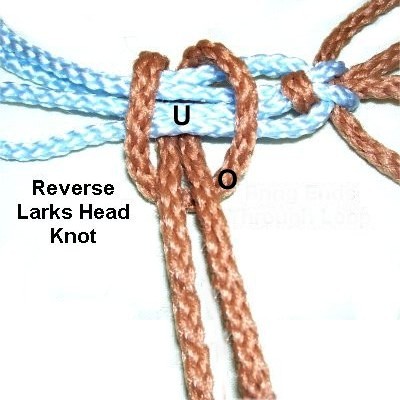
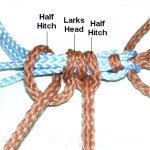
Bring both
halves under
the holding cords, and over
the folded area, pulling them
towards you. This is a reverse
Larks Head knot.
Leave some room between this knot and the
Square knot on the holding cord.
Tighten firmly. |
|
| |
|
| |

|
|
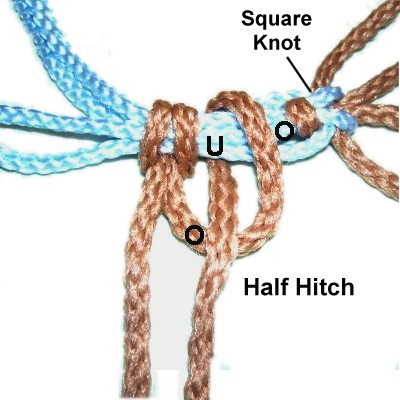
Tie a Half Hitch with the right
half of the cord, placing it to
the right of the Larks Head knot.
Pass it over
the holding cords, then under
them. Bring it over
the working cord as you pull it toward
you.
Tighten firmly.
|
|
| |
|
| |
|
|
Use the left
half of the working cord to
make a Half Hitch to the left of the
Larks Head knot.
Tighten firmly.
|
|
| |
|
| |

|
|
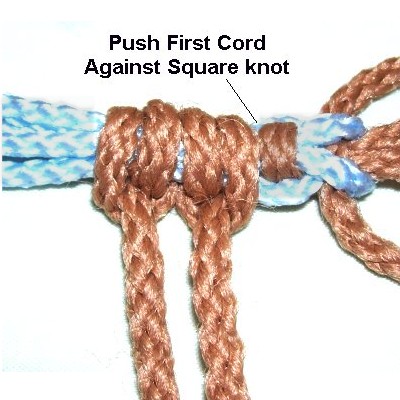
Push the first working cord to the
right, so it rests against
the Square Knot.
Repeat
step 5 with the remaining
7-yard cords.
A total
of 16 cords should be mounted
on each side of the SK in the center of
the holding cords.
|
|
| |
|
|
Important:
From this point on, you need to measure
carefully, so the rows of ASK are spaced
correctly.
Count the number of rows accurately,
so the spaces match the number of side supports
you have to work with. |
|
|
| |
|
Step 6: To
make the BACK of the Hammock Chair, tie 21
rows of Alternating Square Knots (ASK)
with the 7-yard cords.
The first row should rest against
the mounting knots from step 5. The
remaining rows should be 1-inch
apart. You can reduce this to
3/4-inch if you want a shorter back.
In row 1, tie LEFT SK with cords 1 - 32 and RIGHT
SK with cords 33 - 64. Repeat for the
remaining odd numbered rows (3, 5, 7, etc.).
In row 2, tie the LEFT SK with cords 3 - 34 and
RIGHT SK with cords 35 - 62.
Repeat for the remaining even numbered rows
(4, 6, 8, etc.).
Step 7: To start the seat,
tighten the knots in row
22 so they rest 1/2-inch
below those in row 21. Repeat for the
remaining rows.
You can arrange the knots 1/4-inch apart if you
want a tighter weave, but make sure the panel
can still stretch sideways.
Important:
DO NOT tie the knots for the seat close
together. There needs to be some space
between rows, or the panel will become too
narrow.
Stop when you have tied 23
rows (total of 44 for both the back and
seat).
|
|
|
|
| |
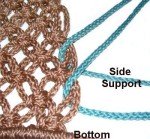
Lower Edge of Seat
|
| |
|
|
Step 8:
Hang the Hammock Chair by the rings, if you have
not already done so.
Select 2 of the LONG side supports
(4.5-yard) coming from the right ring, and 2
more from the left. Move all four of these cords
diagonally, towards each other.
This is similar to
what you did in step 3.
Measure at
least 60 inches down
from the Wrapped knot. That's the point where
the cords should unite.
Tie the Square knot to link them
together
temporarily.
Important:
Place the seat on top of these holding
cords, to check the depth
of the Hammock Chair.
The seat needs to come up so it's
on an angle
to the back. But it cannot come up too
high, or the Hammock Chair won't be
comfortable.
Change the
place where the holding cords are tied together,
to make the seat move up or down. Experiment with the
placement of the Square knot until you like
the depth of the seat.
Step
9: Once these lower holding cords are
at the correct placement, tighten the Square
Knot firmly. Apply
fabric glue as you tighten.
Step 10:
Move the ends
of the new holding cords so two go right, and
the other two head left, rather than letting
them dangle.
Attach half
the cords from the seat to the right of the
Square Knot, and the other half on the left,
using Double
Half Hitches.
Designer's
Tip: This is the same as step
5, only the type of knot used is
slightly different.
Start near the center
and move outward as you attach the cords (on
both sides of the SK).
|
|
| |
|
|
Tie a Barrel Knot with each cord, so the knot
rests under the seat of the
Hammock Chair, close to the lower edge.
Finish the seat by choosing one option:
(Option 1) Pass the ends through loops in the
BACK of the seat. You can trim them a bit first,
but make sure they are at least 2 inches long.
Use glue to hold them in place.
(Option 2) Trim the cords and leave a fringe,
so they dangle. Tie Barrel knots at the
tips to prevent unraveling.
|
| |
|
|
| |
Side
Supports
|
| |
|
|
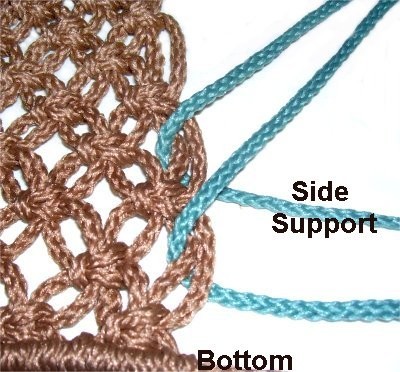
Step 11: Organize the
remaining cords for the right
side support, into sets of two.
You will move from
bottom
to top as you attach them to the right
side of the back and seat. The first side
support is placed next to the SK in row 42,
which is 2 rows up from the DHH at the bottom.
|
|
|
|
|
Slide
one of the LONG side supports (4.5-yard)
through a space next to the Square
knot. Do the same with the second
cord, placing it
in a different space,
next to the same SK.
Make sure the side supports are
straight, with a little tension.
|
|
|
|
|

|
|
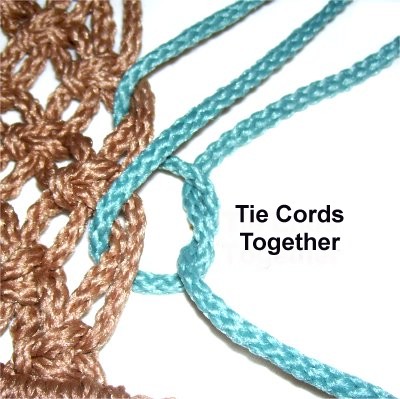
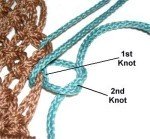
Tie the two
cords together with an Overhand knot.
Tighten it as much as possible, so it
touches the BACK of the seat.
|
|
|
|
|
|
|
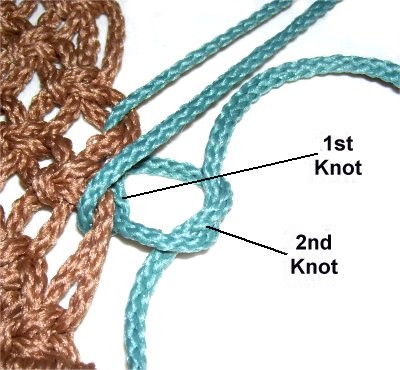
Tie another
Overhand knot next to the first.
After tightening it, make sure it rests
close to the back of the Hammock chair. |
|
|
|
|

|
|
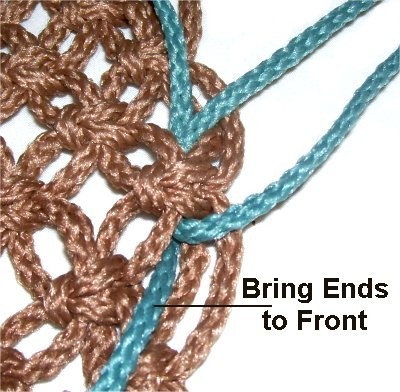
Pull the ends
to the front
of the seat before moving on to the next
step. |
|
|
|
|
Step 12:
Repeat step 11
with the remaining LONG side supports, placing
them every
3rd row along the right side of the
seat.
Then do the same thing with the SHORT side
supports, when you are working in the upper area
where the rows of SK are further apart. The
spacing should still be every 3 rows. Make
sure you place the supports as close to the Square
Knots as possible, even though the spaces are
larger.
Designer's
Tip: It's very helpful if you place the
support cords into position down the entire right
side, then go back and secure them with the
knots. This way you can make adjustments to
their placement if necessary.
|
|
|
|
Step 13:
Repeat
steps 11 and 12, attaching the
left side supports.
Make adjustments
to the knots as needed so the Hammock
Chair hangs evenly,
before
moving on to the next step. |
|
|
|
|
|
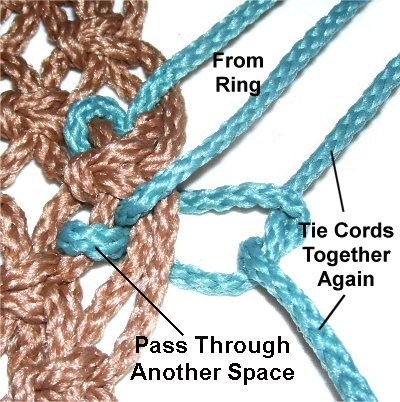
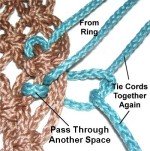
Step
14: Go back to where you
started, and pass the ends of the side
supports through another space, further in
(to the left). Then tie them
together again, with two
Overhand knots, as in step
11.
Do this to all the other side supports on
both the right and left sides. When
you are finished, apply glue to the knots
and allow it to dry before moving on. |
|
|
|
| |
|
Step 15: The
remaining material from the side supports can be
used to make a fringe.
You could also finish them off by
attaching them to the seat with additional
knots.
Another option is to tie Barrel
knots in each one, so they rest close to the
Square knots. Apply glue and cut off the
extra material.
|
|
|
| |
| Step 16:
Use chain
or thick
rope passed through the rings to
attach the Hammock Chair to a thick branch or
heavy-duty hooks in a ceiling beam. |
| |
| |
|
|
|
By
using any text or images on Free Macrame
Patterns, you are agreeing to our Terms
of Use
|
|
|
|
|
Have
any comments about the Hammock Chair? Contact
Me.
|
|
|
|
| |
 |
| |
|
| |