Description:
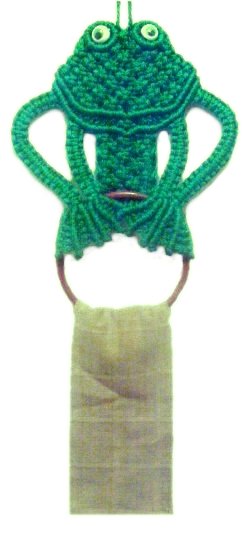
The Frog Holder features a comical green
frog attached to a ring (or branch).
He looks like he is holding the ring with
his large webbed feet.
You can use beads for eyes, but I
recommend you try to find some plastic
eyes, preferably with stems and washers.
The eyes shown in the example are for sale
in the Etsy Shop (AcajouCrafts). Click on the
green banner on the left to visit the
store.
The finished size is approximately 16
inches, from the top of the eyes to the
bottom of the ring.
This Macrame project is rated Easy, so is
suitable for beginners.
Step 1:Cut
14 cords, each 4 yards long. Prepare
the tips to prevent unraveling while you work on
your Frog Holder.
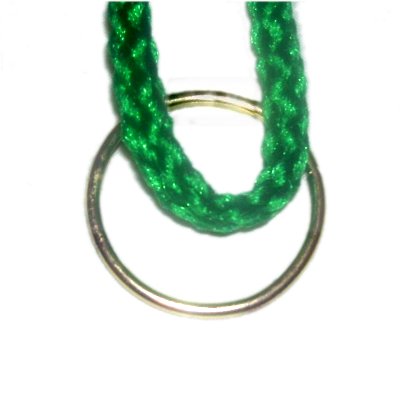
Step
2: Attach one 4-yard
cord to the top
of a ring with a reverse
Larks Head knot by folding the cord in
half and placing it on
top of the ring.
The ends should be heading towards the
back of your project board.
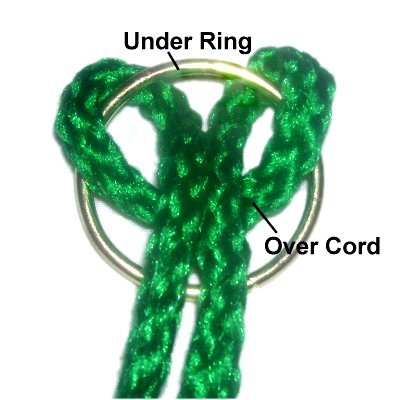
Bring the ends
under
the ring then over the folded area of the
cord, heading towards you.
Step
3: Should you decide to use bead
for the eyes of your Frog Holder, slide one onto
both halves of the cord.
For a plastic Frog eye, wait until all the cords
are mounted (step 4).
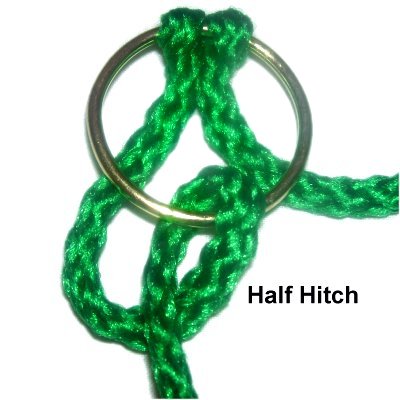
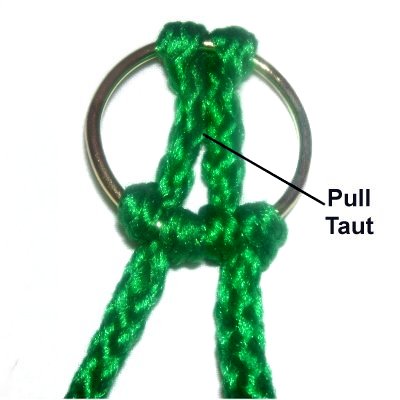
Attach each
end of the cord to the bottom of the ring
with a Double
Half Hitch (a single Half Hitch is shown
in this image -- make sure you tie two).
Make sure you
pull firmly on the cord as you tighten, so
the area inside
the ring has tension.
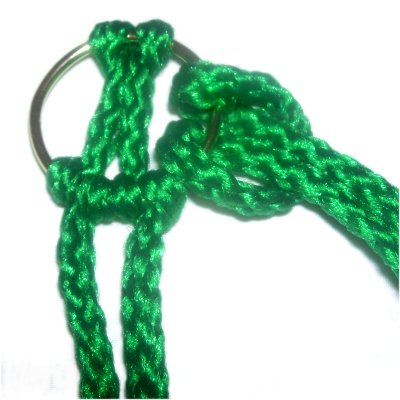
Step
4: Attach another cord to
the right side of the ring with a Reverse
Larks Head knot.
Make sure the folded area is heading outside
the ring. This is the opposite of
the first one, which was heading towards
the inside of the ring.
Tie one Half
Hitch with each end of the new cord onto
the ring, resting beside the Larks Head
knot.
This image shows the ring positioned
sideways.
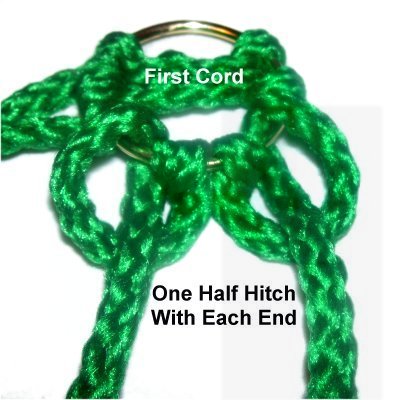
Step 4,
continued: Attach one more cord to
the right side of the ring in the same
manner.
Attach two more cords on the left side of the
ring. This will give you a total of five cords
attached to the ring.
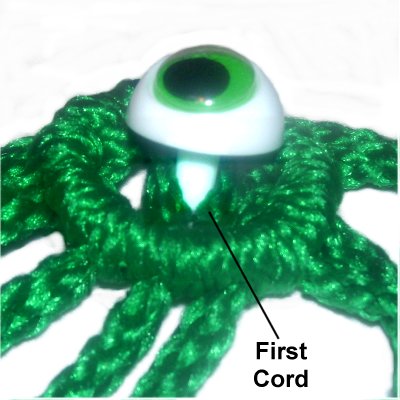
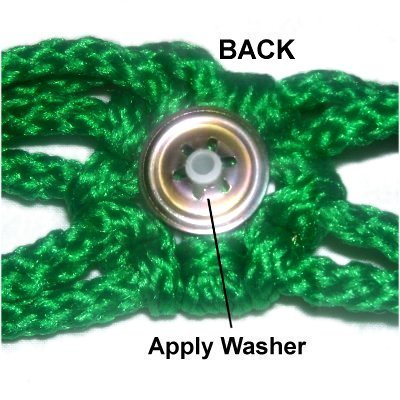
Step 4,
continued: Place
the stem of one eye through the two
segments of the first cord (inside the
ring).
Turn the
ring/eye over, so you are working in the
back.
Apply the washer to the stem. Make
sure it's pushed down as far as possible.
Step 5: Repeat steps 2-
4 to make a second eye/ring design for
your Frog Holder.
Face and Mouth
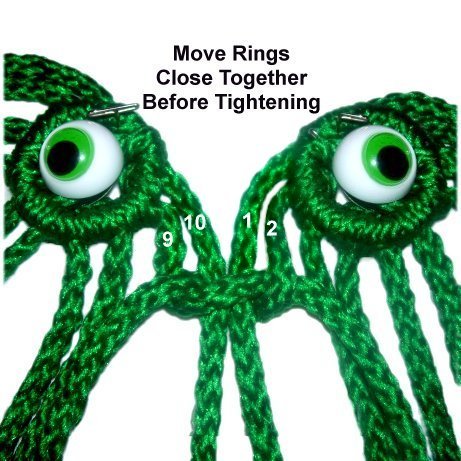
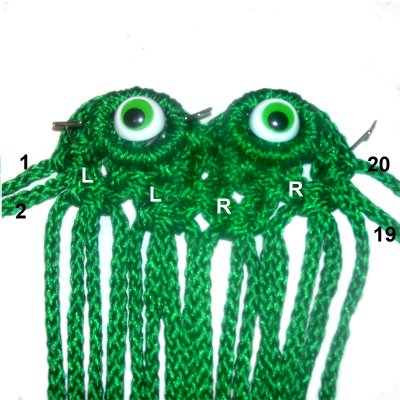
Step
6: Place the two rings
side-by-side, giving yourself a little
room to work.
Mentally number the 10 cords on each ring
(left to right). Use cords
9 -10 from the left ring, along
with cords
1 - 2 from the right ring, and
tie a Square Knot.
Move the rings closer together as you
tighten (see image below).
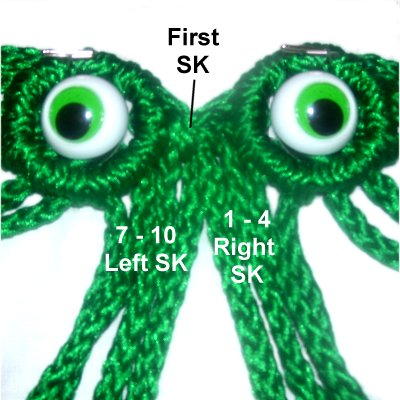
Step
7: Tie a LEFT
SK with cords 7 - 10 from the
left ring. Tighten it firmly so it
rests close to the first knot tied in step
6.
Tie a RIGHT
SK with cords 1 - 4 from the
right ring.
(See information below)
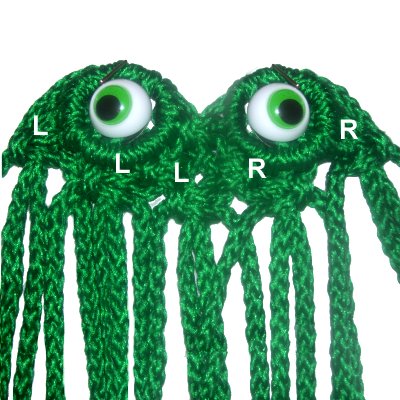
Whenever you
tie a RIGHT
SK, you begin by curving the right
working cord. In this case,
that's cord 4.
For a LEFT SK, you start with the working
cord on the left.
Designer's
Tip: Changing the direction of the
knots will ensure the Frog Holder is symmetrical
on both sides.
Step
8: To make row 3, mentally
number all the cords from left to right.
Tie LEFT
SK with cords 1 - 4, 5 - 8, and 9
- 12.
Tie RIGHT
SK with cords 13 - 16 and 17 -
20.
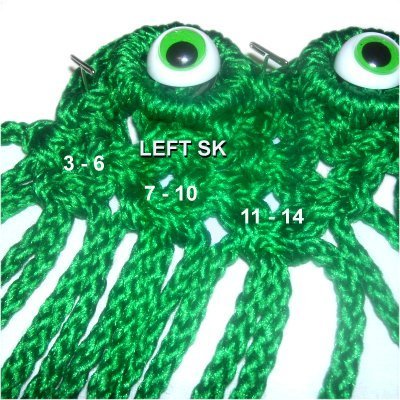
Step
9: Tie LEFT
SK with cords 3 - 6 and 7 - 10 to
begin row 4.
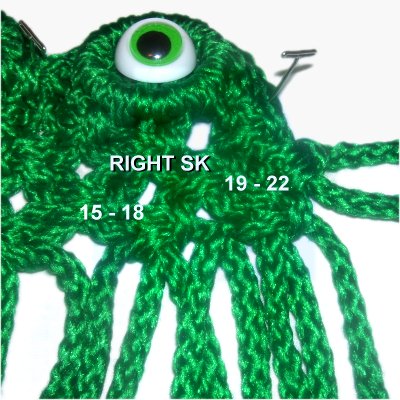
Tie RIGHT
SK with cords 11 - 14 and 15 -
18.
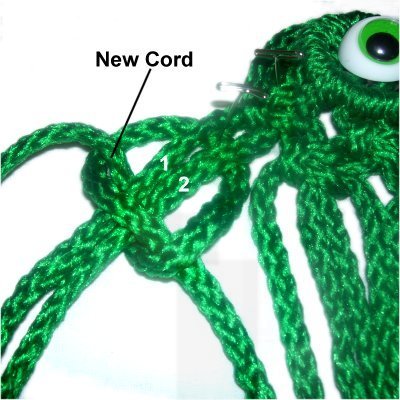
Step
10: Add 1 cord to the left side
of the Frog Holder by folding it in half
and sliding it under cords
1 - 2.
Tie a LEFT
SK using the two halves of the new
cord. Cords 1 and 2 are
the fillers.
Step
11: Add 1 cord to the right
side by folding it in half and sliding it
under cords
19 and 20.
Tie a RIGHT
SK with the new cord. Cords
19 and 20 are the fillers.
Mentally re-number the cords 1 - 24.
Step
12: To begin row 5, tie the
LEFT
SK using cords 3 - 6, 7 - 10, and
11 - 14.
Tie the RIGHT
SK using cords 15 - 18 and 19 -
22.
Step 13:Repeat
step 10, adding a new cord to cords
1 and 2with aLEFT
SK.
Repeat
Step 11, adding a new cord to cords
23 and 24 with a RIGHT
SK.
Step 14:
Mentally re-number the cords 1 - 28. For row
6, tie LEFT
SK with cords 3 - 6, 7 - 10, and 11 - 14.
Tie RIGHT
SKwith
cords 15 - 18, 19 - 22, and 23 - 26.
Step 15:
For row 7, tie the LEFT
SKwith
cords 5 - 8, 9 - 12, and 13 - 16.
Tie RIGHT
SK with cords 17 - 20 and 21 - 24.
Step 16:
The final row in this area of the Frog Holder is
tied as follows:
Tie LEFT
SK with cords 7 - 10 and 11 - 14.
Tie RIGHT
SK with cords 15 - 18 and 19 - 22.
Step
17: Move cord
1 to the right, to be used as a
holding cord for theupper mouth of your Frog
Holder. Secure it so it has tension.
Attach cords 2 - 14 to it with counter-clockwise
DHH, tightening each one firmly.
Move the holding cord to follow the curve
of the Square Knots.
Step 17,
continued: Move cord
28 to the left, to be used as the holding
cord on the right.
Attach cords 27 - 15 to it with clockwise
DHH, in that
order.
Step
18: Combine holding cords
1 and 28 with cords 14 and 15, and tie one
Square Knot.
Mentally re-number the cords.
Step
19: Move cord
1 to the right, to be used as a
holding cord for the lower
lip of the Frog Holder.
Attach cords 2 - 5 to it with counter-clockwise
DHH, pulling each cord firmly so the two
rows are close together.
Step 19,
continued: Attach cords 6 - 14,
gradually increasing the space between the two
rows of DHH.
When you reach the center, the DHH should rest against
the SK, so tighten the knots firmly and
push them close together as needed.
Move cord
28 to the left to be used as a
holding cord. Attach cords 27 - 24
with clockwise
DHH, so the two rows are close
together.
Then attach cords 23 - 15 with the same
spacing as the lower lip on the
left.
Push the knots close together as you work.
Body and Legs
Step 20:
Mentally re-number the cords. Cords 9 - 20
are used to make the body of the Frog
Holder. Tie 7 rows of ASK as follows:
Rows 1, 3, 5, 7:
Tie LEFT
SK with cords 9 - 12 and 13 - 16.
Tie RIGHT
SK with cords 17 - 20.
For rows 2, 4, 6:
Tie LEFT
SK with cords 11 - 14 and a RIGHT
SK with 15 - 18.
Step 21:
Now you will make the front legs for your Frog
Holder.
Tie a sennit of 9
Square knots using cords
5 - 8. Push the knots close
together as you progress.
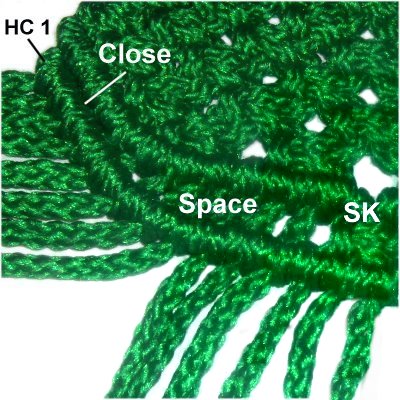
Important:
Make sure there are no gaps between the first SK
and the DHH. The sennit will rest on an angle,
heading outward. When the legs are attached
to the ring, they will curve.
Repeat this process with cords
21 - 24.
Place the 7-inch ring (or branch) against the last
row of SK in the body. The front legs should
touch the ring in the area next to the body (see
image below). Tie additional knots if
necessary.
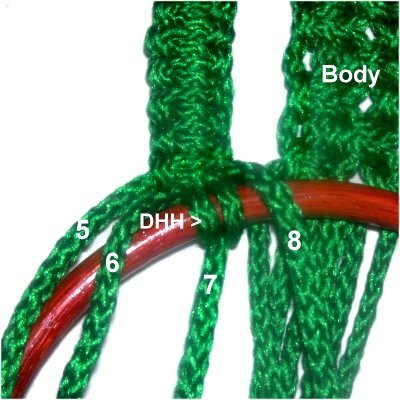
Step 22: Place cord
7 (left leg)
under
the ring, then attach it with a
DHH. Cord 8 should rest close
to the body.
Do the same with cord 22 (right leg),
attaching it on the right. Cord 21 should
be close to the body.
Step
23: To start the left back
leg for your Frog Holder, cut one piece of
wire, at least 25 inches long.
Slide it through the DHH made with cord
2 (left side of mouth), and fold
it in half.
Tie a sennit of 18 SK with working cords 1
and 4. The fillers are cords 2 - 3
(and both halves of the wire).
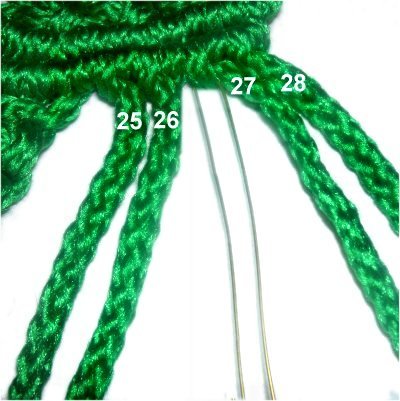
Step
24: Cut another 25-inch
piece of wire, and slide it through the
DHH made by cord 27 (right side of mouth).
Tie a sennit of 18 SK with working cords
25 and 28. Include the wire as part
of the fillers.
Webbed Feet
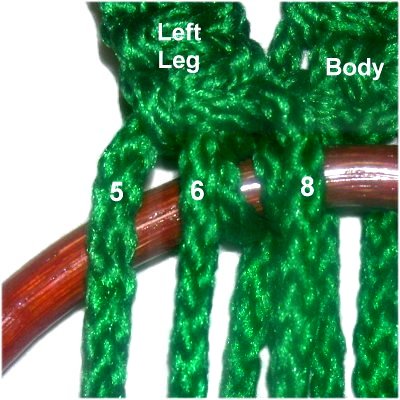
Step
25: Go back to the left
front leg and arrange cords 5, 6, and 8 on top
of the ring. These are the holding
cords for the foot, so secure
them with tension.
The working cords for the foot are the first
6 body cords (9 - 14). Make sure
the leg and body are resting close
together.
Step 26:
Pass working
cord 9under
the ring, and under
holding cord 8 (from the leg).
Tie a VERTICAL DHH onto cord 8, rotating counter-clockwise,
so the cord is always heading right to left.
When making DHH vertically, the second knot rests
below
the first (shown by the 1 and 2 on image below).
Pass cord 9 under
cord 6, and tie the next Vertical
DHH.
Pass cord 9 under
cord 5, and tie the final DHH.
All three
knots should rest close together.
Step
27:Repeat
step 26 with working cords 10 -
14, to make additional rows of Vertical
DHH.
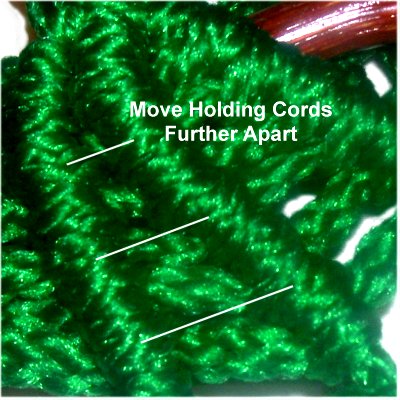
Increase the space between the knots by
moving the holding
cords further apart after you tie
each row.
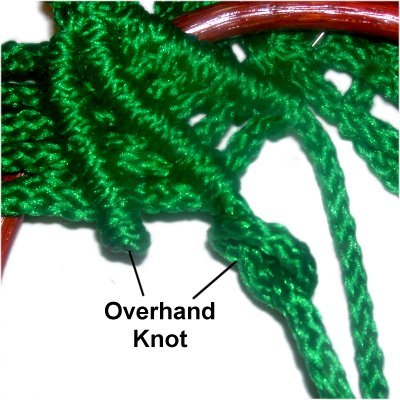
Step
28: Finish off the holding
cords by tying an Overhand knot with each
one, positioning it close to the last row
of DHH.
Apply glue while tightening. Cut off
the excess material when it's dry.
When using Bonnie Braid, you can apply a
flame to the stub to melt the material.
Step
29:Repeat
steps 25 - 28 to make the right
front foot. Use cords 21, 23, 24
from the SK sennit (right leg), as the
holding cords.
Use body cords 20 - 15 (in
that order) to tie the rows of
Vertical DHH. The Half Hitches are
tied in a clockwise
direction, since you are moving left to
right.
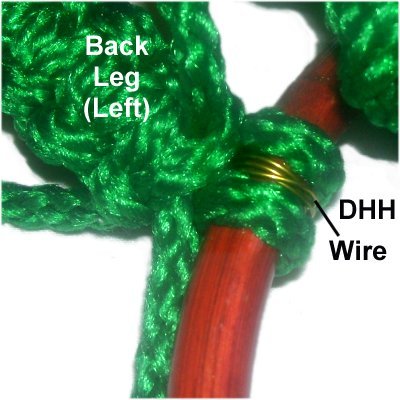
Step 30:
Bend the left back leg at the area where the 6th
and 7th SK rests.
Check to make sure the sennit reaches the ring
with the leg bent. Add extra SK if needed.
Attach the leg
to the ring by wrapping the wire around
it. Attach one of the cords to it as
well.
Try to place the DHH around the wire, with
one loop on each side.
Slide the knot close to the other leg.
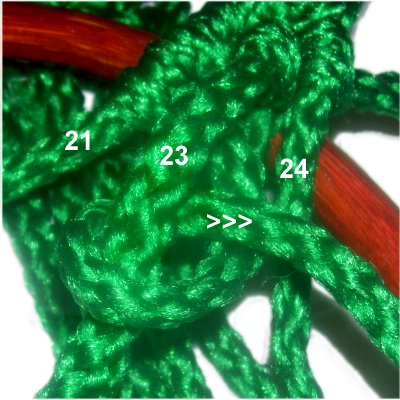
Step
31: Place the three
remaining cords from the back leg on top
of the ring, to be used as holding cords.
Create the webbed foot as you did in steps
26 - 28, using the same working
cords coming from the front foot (body
cords 9 - 14). See
more information below.
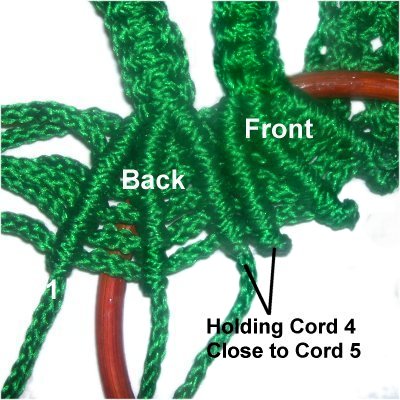
Important:The feet for the Frog Holder look better if
they are close together.
So arrange holding cord 4 next to cord 5 from the
front foot, and tighten the Vertical DHH firmly so
there is no space between them.
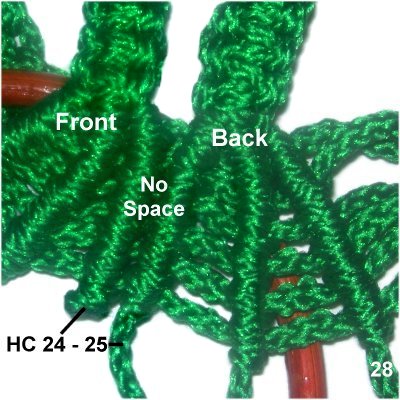
Step
32:Repeat steps
30 - 31to attach the right
back leg to the ring and create
the foot.
Holding cord 24 (front foot) should rest
close to holding cord 25 (back foot), so
there is no space between them. Use
the same working cords coming from the
front foot (body cords 20 - 15).
Finishing Touches
Step
33: Turn over the Frog
Holder so you are working in the
back. Attach the working cords from
the feet to the ring with DHH.
This is optional, but will give the ring
more support.
Step 34:
Finish off the cords by tying Overhand knots with
sets of two cords. Apply glue and cut off
the extra material.
When using Bonnie Braid, you can fuse the tips
with a flame.
By
using any text or images on Free Macrame
Patterns, you are agreeing to ourTerms
of Use