|
|
| |
|
|
|
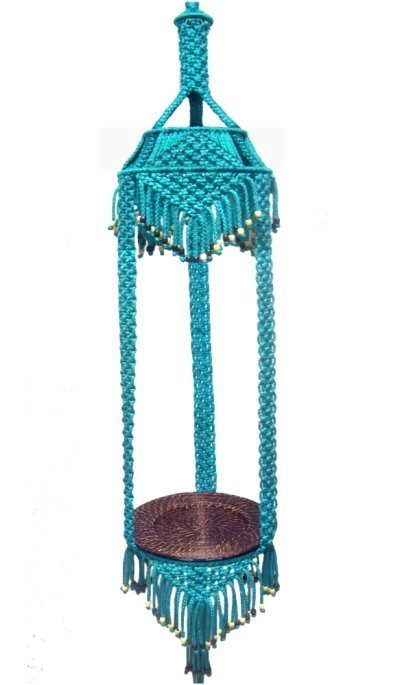
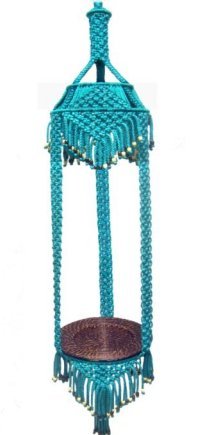
Description: The
Fringed Table features triangular V
shapes at the top and bottom, along with
a contoured fringe that can be beaded or
brushed.
This Macrame table is approximately 72
inches long, depending on how long you
make the fringe at the bottom. The
width is 12 inches.
This Macrame pattern is rated Moderate,
so is suitable for beginners who have
experience with the basic knots used in
the design.
Time
Consuming
|
|
| |
|
| |
| Supplies
Needed: |
| |
- 6mm Macrame Cord (260 yards)
- Two 3-inch Rings (heavy duty)
- Two 12-inch Rings (heavy duty)
- Optional:
192 beads --11mm with 5mm holes (for beaded
fringe)
|
| |
| |
|
Knots Used:
|
|
|
|
| |
Preparation and
Mounting
|
|
The cutting lengths are described within the
pattern, for each section of the Fringed
Table.
After cutting, make sure you prepare the cords to
prevent unraveling.
When using Bonnie Braid or nylon, test the
material to see if it MELTS
when a flame is applied to it. Then
you can briefly
touch the flame from a BBQ Lighter on the tips to
prepare the cords.
Do
not use this method if the material BURNS.
|
| |
|
|
Step 1:
Cut
12 cords, each 10 yards long.
While holding a 3-inch ring upright,
pass one
through it, the fold it around the bottom.
Match the ends so each half is the same length. |
|
|
|
|
|
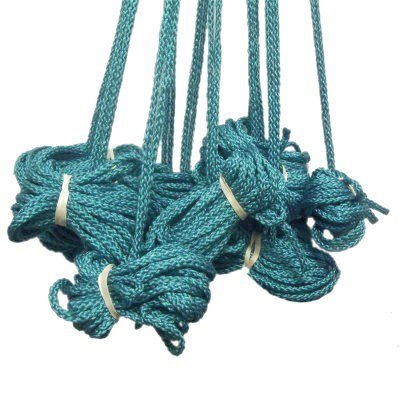
Roll up the
two halves of the cord into one bundle,
and secure it with a rubber band.
This is to make sure the two halves remain
together, since you will need to pull them
later on.
|
|
|
|
|
| Step 2:
Repeat
step 1 with the remaining cords. |
|
|
|
|
|
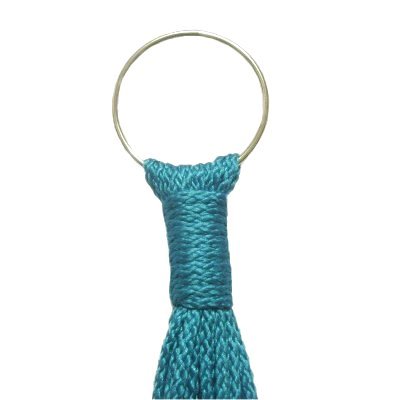
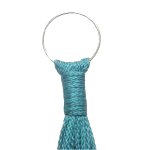
Cut
one cord, 36 inches long.
Use it to tie a Wrapped Knot around the
cords attached to the ring. Wrap
firmly and evenly, so the knot is neat.
It should be at least 1.5-inches
long. |
|
|
|
|
|
|
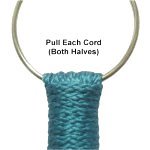
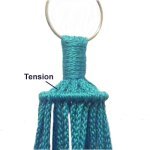
Pull downward
on each 10-yard
cord, making sure you pull both
halves at the same time.
Keep the cords rolled up, so they remain
balanced.
This will tighten the cords around the
ring at the top of the Fringed Table. |
|
|
|
|
|
|
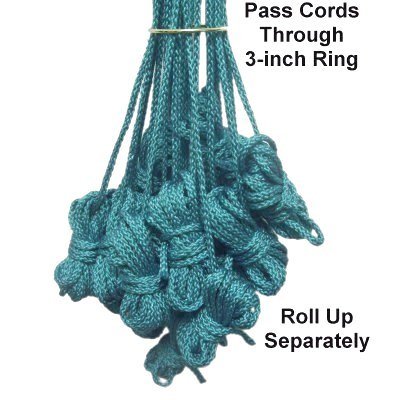
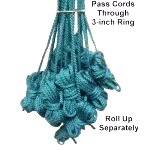
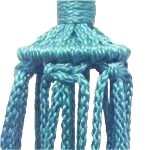
Step
3: Pass each bundle through
another 3-inch ring, while holding it horizontally,
as shown in this image.
Release all the cords and re-roll the two
halves separately, so you end up with 24
bundles.
See information below (bundling cords). |
|
|
|
|
 |
|
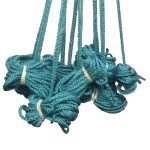
Making Bundles
|
|
|
|
Since you are working with very long cords to
make the Fringed Table, it's important to make
compact bundles so they don't get tangled.
|
| |
| |

|
|
Move down 12 inches below the ring, and
start wrapping the cord around your
hand.
Stop when you have about 12 inches
left.
Remove the bundle from your hand
carefully.
|
|
| |
|
| |
|
|
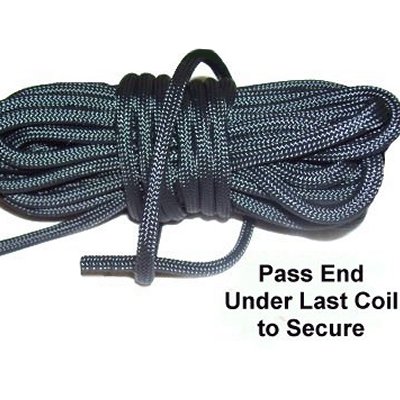
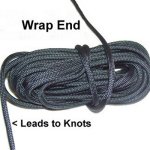
Wrap
the end around the center of the bundle
several times, to hold the coils together.
|
|
| |
|
| |

|
|
Pass the end under the last coil to
secure the bundle.
As you work on the Fringed Table, pull
to get more material when needed.
Tighten the wraps around the center as
needed.
|
|
|
|
|
| |
| |

|
|
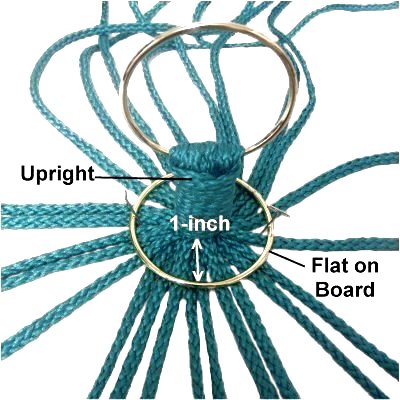
Step
4: Secure another 3-inch
ring FLAT
on your project board.
Secure the Wrapped knot in the center
of it. The Wrapped knot and first
ring should be upright.
Spread the cords out, so there is 1-inch
of space between the Wrapped knot and the
ring, all the way around. |
|
|
|
|
|
|
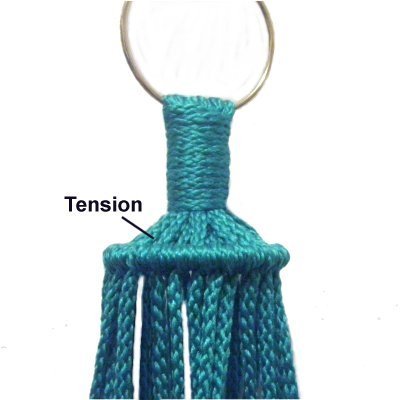
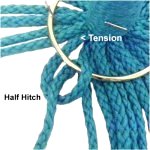
Attach each
cord to the new ring with a Double Half
Hitch.
Work from left to right, rotating counter-clockwise
when tying each Half Hitch.
Tighten each knot firmly so there is
tension in the area between the Wrapped
knot and the ring. |
|
|
| |
|
|
Suspend the
cords and check to make sure the second
ring is level with the floor.
Each cord should have the same amount of
tension between the Wrapped knot and the
ring.
Make adjustments to the DHH as needed. |
|
|
|
|
| |
Top Section of
Fringed Table
|
| |
|
|
Step
5: Tie the first row of
Alternating Square Knots, using four cords
per knot.
These SK should rest as close to the ring
as possible, so pull on the fillers after
each one is tightened. |
|
|
|
|
|
|
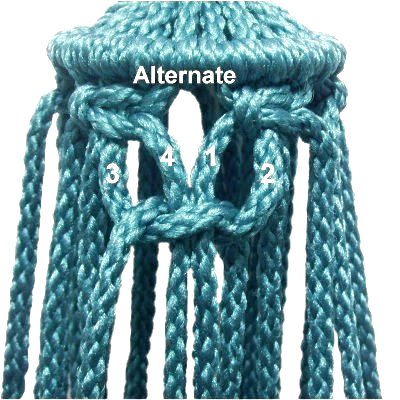
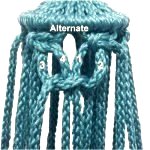
Row
2: Mentally number the
cords from two knots next to each
other.
To alternate,
combine cords 3 - 4 from the left SK with
cords 1 - 2 from the right SK.
Tie the new ASK with those four
cords. Tighten the knot firmly so it
rests against the SK in row 1. |
|
|
|
|
Row 2,
continued: Repeat the same process
with all the remaining cords.
Rows 3 - 12:
Tie 10 more rows of ASK (total of 12 rows).
Alternate the cords with each new row.
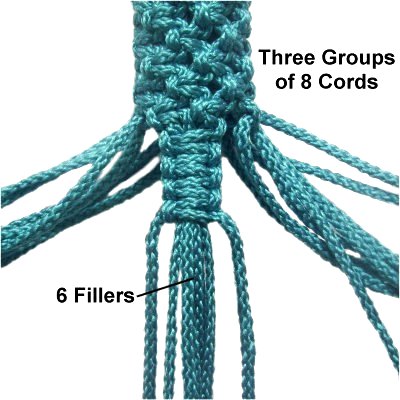
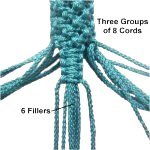
Place the top area of the Fringed Table in front
of you, so the ring at the top is straight (see
images for step 2).
Divide the cords into three groups of 8, with one
group coming toward you and the others heading
right and left. |
|
|
|
|
|
Step
6: Tie a sennit of 10 Square
Knots with each group, using 2
working cords and 6
fillers.
Keep the fillers organized so the sennits
are flat and neat. Tighten the knots
as much as possible, and push them close
together as you progress. |
|
|
|
|
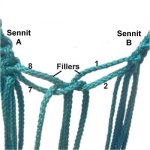
Step 6,
continued: Place all the cords for
the Fringed Table through the 8-inch
ring,
while holding it horizontally.
Mentally number the cords from one sennit 1 - 8. |
|
|
|
|
|
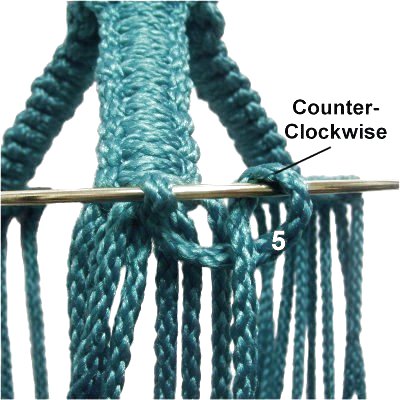
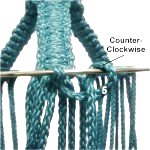
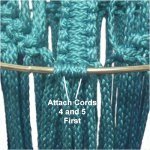
Step 7:
Attach cord
5 to the ring with a Double Half
Hitch. Rotate counter-clockwise
and move left to right.
Make sure you pull firmly when tightening,
so the ring rests against
bottom of the last SK.
|
|
|
|
|
|
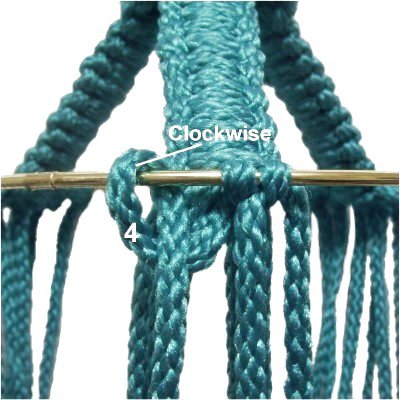
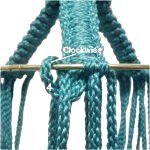
Attach cord
4 to the ring with a DHH.
Rotate clockwise,
and move right to left. Tighten
firmly.
|
|
|
|
Step 8:
Repeat
step 7 with the other two sennits,
attaching cords 4 and 5 in the same manner.
Make sure the ring is level with the floor (not
tilted).
Go back to each sennit, and attach cords
3 - 1 with clockwise
DHH, moving right to left.
Attach cords
6 - 8 with counter-clockwise
DHH, moving left to right.
Important: When all the cords are
attached, make sure there is an equal amount of
exposed ring between each set of cords.
|
|
|
|
|
|
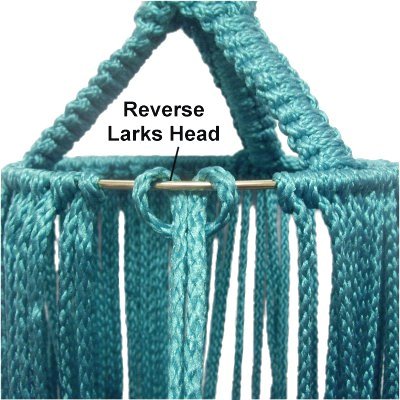
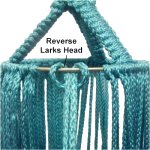
Step
9: Cut
14 cords, each 2 yards long.
Attach them to the ring, in
the exposed area between two
sennits. It will be a tight squeeze,
so push them close together as you
progress.
Mount them with reverse
Larks Head knots (heads face the
inside).
|
|
|
|
|
|
|
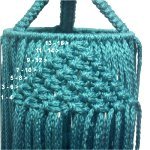
Step
10: Use the following chart to
make the first inverted
V shape for the Fringed
Table.
Use only the
2-yard cords.
The
numbers on this image show the cords
used to tie the first SK in each
row.
|
|
|
|
|
| ROW |
|
Cords used to tie
ASK
|
| |
|
|
| 1 |
|
13
- 16 |
| 2 |
|
11
- 14 and 15 - 18 |
| 3 |
|
9 -
12, 13 - 16, 17 - 20 |
| 4 |
|
7 -
10, 11 - 14, 15 - 18, 19 - 22 |
| 5 |
|
5 -
8, 9 - 12, 13 - 16, 17 - 20, 21 - 24 |
| 6 |
|
3 -
6, 7 - 10, 11 - 14, 15 - 18, 19 - 22, 23 -
26 |
| 7 |
|
1 - 4, 5 - 8, 9 - 12, 13
- 16, 17 - 20, 21 - 24, 25 - 28 |
|
| |
|
| |
| Step 11:
Repeat steps 9 - 10
two more times, adding 14 cords into the other two
exposed areas on the ring. |
|
|
|

|
|
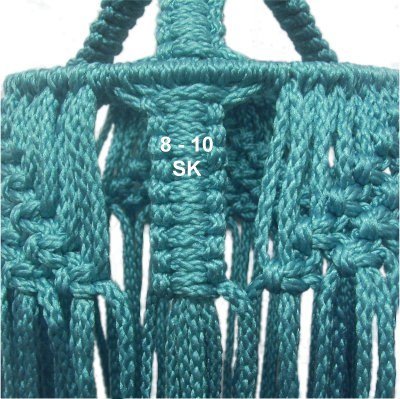
Step 12: Use one
group of 10-yard
cords, and tie a
sennit of 8 - 10 SK
using 2 working cords and 6
fillers.
Important:
Push the knots close together as you
progress. The sennit needs to be
the same length as the
V pattern you just made.
|
|
|
|
Step 12,
continued: Repeat the same process
with the other two groups of 10-yard cords.
|
|
|
|
|
|
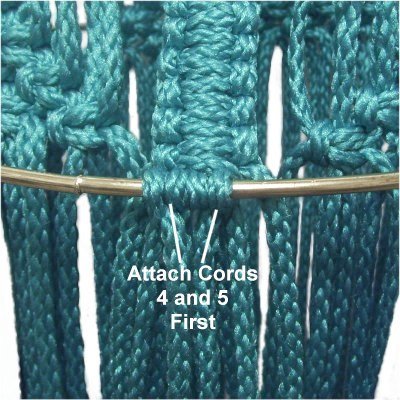
Step 13:
Place all the cords for the Fringed
Table through a 12-inch
ring, while holding it
horizontally.
Repeat steps 7 and 8, attaching
the 10-yard
cords
to
the ring with DHH.
|
|
|
|
|
Step 13,
continued: The ring should be level
when you are finished, and should rest against
the bottom of the last Square Knot in the
sennits.
Make adjustments to the knots if needed. |
|
|
|
|
|
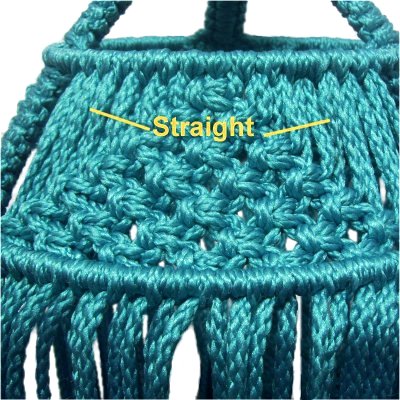
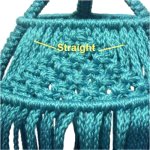
Step
14: Attach the 2-yard
cords to the same ring with DHH.
Pull each cord firmly, so the cords are
straight in the area above the V shape. |
|
|
|
|
|
|
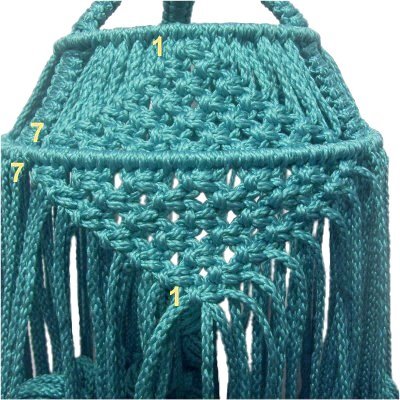
Step 15: Use
each group of
2-yard
cords to make three
more V designs below
the ring.
Use the chart for step
10, but reverse it,
so the first row has 7 knots. The
last row should have 1 knot, tied with cords 13 -
16. |
|
|
|
| |
Middle
Section of Fringed Table
|
| |
|
The middle section features long straps made
with Alternating Square Knots. Two of the
cords are shorter than the others, and must be
switched before tying the straps.
Mentally number one group of 10-yard
cords. |
|
|

|
|
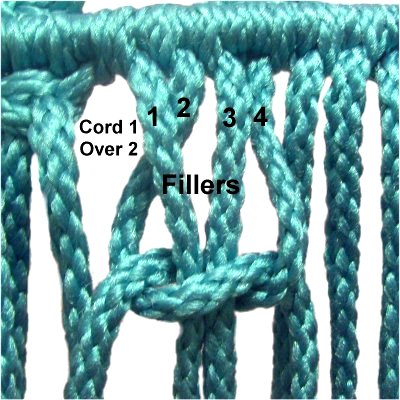
Step
16: Cross cord 1 over
cord 2
Tie a Square Knot using cords
2 and
4 as the working cords.
The fillers are cords 1 and 3.
Tighten the knot as much as you can and
push it close to the ring. |
|
|
|
|
|
|
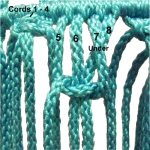
Step
17: Cross cord 8 under
cord 7.
Tie a Square Knot using cords
5 and 7 as the working
cords. The fillers are cords 6 and
8.
Make sure the knot is tight and close to
the ring. |
|
|
|
| |
|
Step 18: Mentally
re-number the cords in the order they are now.
Row 2 contains only one SK, tied with cords 3-
6. Tighten firmly, and pull on the fillers
so the knot is close to the two above it.
Step 19: Continue
tying rows of ASK, until the sennit measures 30
- 32 inches.
The odd numbered rows should be tied using
cords 1 - 4 and 5 - 8. Make sure these knots are
horizontal and are not tilted, so the loops
along the edges are the same size.
The even numbered rows should be tied with
cords 3 - 6.
Important:
Stop on an odd numbered row (2 SK).
Step 20: Repeat
step 16 - 19 using the other
two groups of 10-yard
cords. Measure as you progress,
making sure these two straps are the same length
as the first one.
I recommend you measure after every 5 rows, so
if you need to make adjustments you won't have
too many knots to remove.
|
| |
|
|
| |
Lower Area
of Fringed Table
|
|
To make the lower portion of the Fringed Table
work out properly, you must attach the long straps
to the 12-inch ring in a specific way.
The straps need to be on the outside
of the ring, so they fit around the table
top. Do not pass the cords inside the
ring as you did the others.
|
|
|
|
|
|
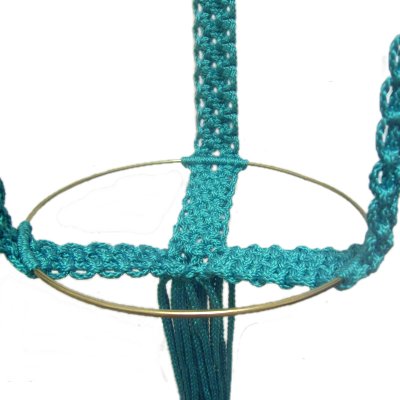
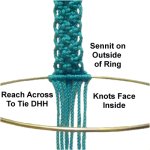
Step
21: Place the last row of
SK in one sennit against the ring, on the
OUTSIDE.
Reach across the ring and attach cords 4
and 5, as you did in step
7.
Pull firmly, so the bottom of the SK touch
the ring.
The
DHH should face the inside
of the ring. |
|
|
|
Step 22:
Repeat
step 21 with the other two sennits,
attaching cords 4 and 5.
Check to make sure the ring is balanced, then go
back to each sennit and attach the remaining
cords, as you did in step
8.
Measure the area between the sennits to make sure
they are spaced equally around the
ring. Make adjustments if needed.
|
|
|
|
|
Step 23: This is
where the Fringed Table has been changed from
the original.
Continue tying Alternating SK with the three
groups of cords, below the ring. Tie a
total of 12
rows, so you stop on a row with only
one SK.
Mentally number the cords for each sennit 1 -
8. Choose two sennits that rest next to
one another.
|
| |
|
|
|
|
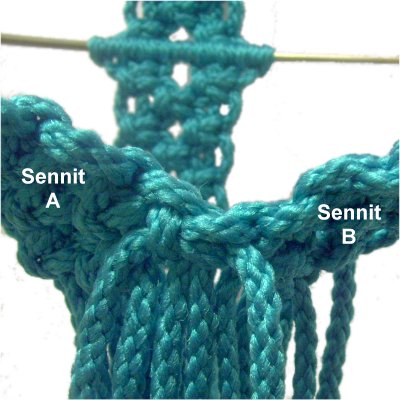
Step
24: Combine cords 7 and 8 from
the left sennit with cords 1 and 2 from
the right sennit.
Tie a SK to link them, using cords
7 and 2 as the working cords, and
cords 8 and 1 as fillers. |
|
|
|
|

|
|
Tighten the SK
gradually, moving the sennits
upward. Pull on the fillers after
you tighten the knot.
The knot should be touching both sennits
(A and B) when you are done.
|
|
|
|

|
|
Step
25:
Repeat step 24 to link
the remaining sennits.
They should all be straight with very
little bowing, and meet in the middle of
the ring. |
|
|
|
|
Step 26:
Cut
one cord
36-inches
long.
Use it to tie a Wrapped Knot around all the
cords, below the ring. |
|
|
| |
|
Step 27: In order to
make the V shapes at the bottom of the Fringed
Table, you need to add more cords to the lower
ring.
- Cut
6 cords, each at least 45 inches long.
This will give you enough material for a
5-inch beaded fringe, or an 8-inch brushed
fringe. Cut these cords longer if you
want to increase the fringe length.
- Cut
8 cords, each 36 inches long.
Mount the cords to one exposed area on the ring
(between the sennits), starting on the left and
moving right.
Attach them in
this order:
- Four 36-inch cords ---- Six 45-inch cords
---- Four 36-inch cords.
|
| |
|
|
|
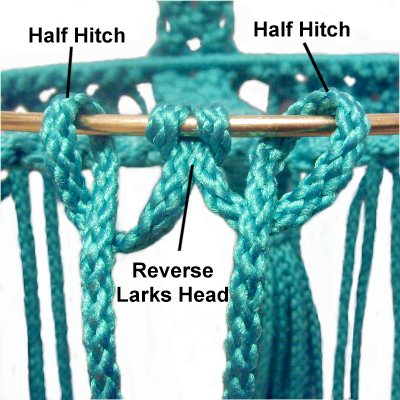
|
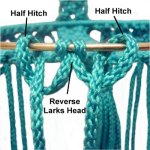
Mount them
with reverse Larks Head
knots, then add a Half Hitch with each
half of the cord.
|
|
|
|
|
Step 27, continued: Make a
Square Knot V design with these cords, as you did
in step
15 (point downward).
Tighten these knots firmly, then pull on the
fillers so all the knots are close together. |
|
|
|
| Step 28:
Repeat step 27,
adding 14 cords into the other two exposed areas
of the ring. |
|
| |
|
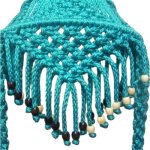
Step 29:
The Fringed Table is named for the fact that there
is a fringe along the edges of the V shapes at the
top and bottom. Here are your options:
- Wavy Fringe
(RETRO): Unravel each cord all the
way up to the SK. Measure each cord 4 -
6 inches below the SK, then cut off the
remainder.
- Brushed
Fringe: Unravel each cord, then brush
each
fiber until smooth. Measure
each cord 5 inches below the SK, then cut off
the remainder.
- Beaded
Fringe (MODERN): See
information below
|
|
|
|
|
Beaded
Fringe: Slide the cord
through a bead, and place it 3 - 5 inches
below the SK.
Measure carefully, so all the beads are in
the same position, and follow the angle of
the V shape.
Tie an Overhand knot below each bead,
applying glue as you tighten. |
|
|
|
|
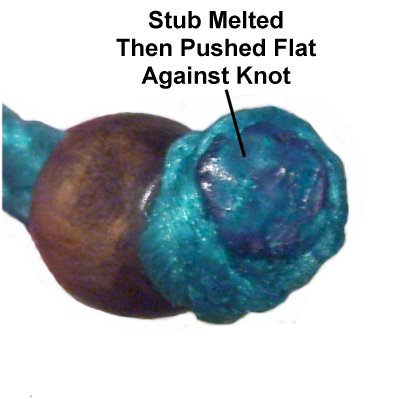
(Optional)
Finishing Technique for Beaded Fringe:
When using Bonnie Braid, nylon, or similar
material, you can melt the material to finish the
cords for the Fringed Table.
Test the material
first, and do not use this method if it BURNS. |
|
|
|

|
|
Cut off the
excess material close to the Overhand
knot.
Leave a little stub, approximately
1/4-inch long. |
|
|
|
|

|
|
Melt the stub
with a BBQ lighter.
Immediately push the handle of the lighter
against it, so the melted area is FLAT
against the Overhand knot. |
|
|
|
Step 30:
Use the same fringe method with the cords coming
down from the Wrapped knot in the center of the
ring.
This fringe should be at least 12 inches
long. |
|
|
|
Step 31: Place the table top on
the lower ring, so the long sennits pass around
the outer edge of it.
It's OK if the glass or wood does not rest
completely against the ring. |
|
|
|
By
using any text or images on Free Macrame
Patterns, you are agreeing to our Terms
of Use
|
|
|
|
|
Have
any comments about the Fringed Table? Contact
Me.
|
|
|
|
|
| |
|
| |