Prepare the cords by applyingtapeatone end,
which makes it easier to add the beads to your
Winter Tree.
Building the Tree
Step 1:
Arrange the four 2-yard
cords vertically on your board. The
end without
the tape should be in front of you.
Mentally number the cords 1 - 4.
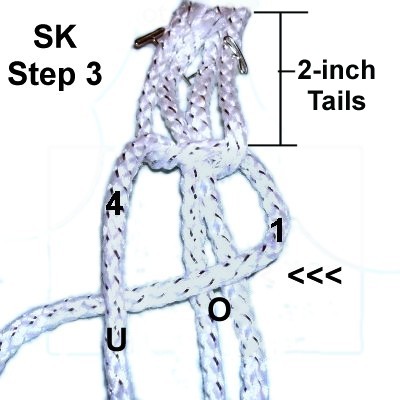
All the Square knots in the Winter Tree should be
tied following the 4-step instructions below.
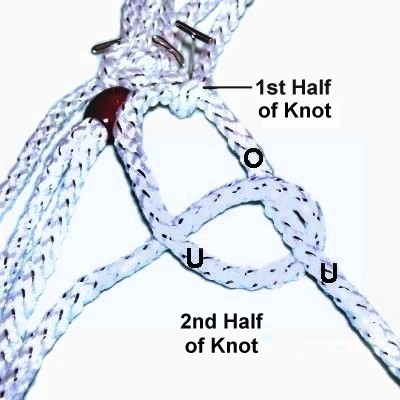
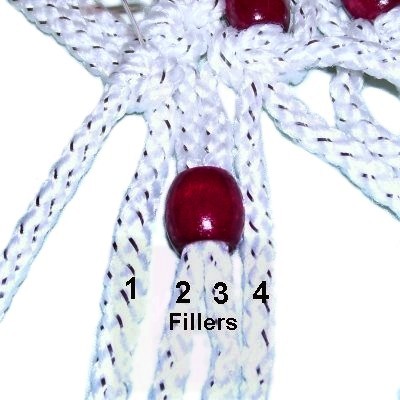
Move cord
1 to the right, passing it over
the fillers (cords 2 - 3) and under
cord 4.
Move cord
4under
the fillers and over
the curved area of cord 1, as you pull it
out on the left.
Pull both working cords to tighten the
first half of the SK.
Make sure the knot rests 2 inches from the
ends of the cords. The "tails" are used to
form the fringe.
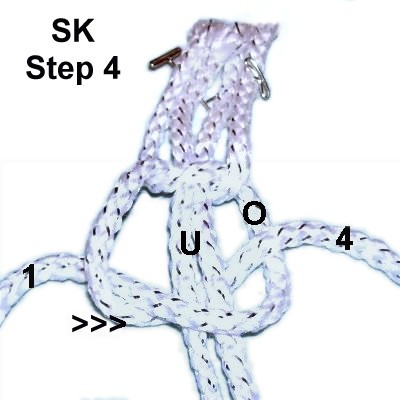
The two
working cords have switched places, so the
movements are the opposite for the second
half.
Move cord
1over
the fillers and under
cord 4 (right to left).
Move cord
4under
the fillers. As you pull it out on the
right, pass it over
the curved portion of cord 1.
Pull both working cords to tighten the
SK. Make sure the tails are still 2
inches long.
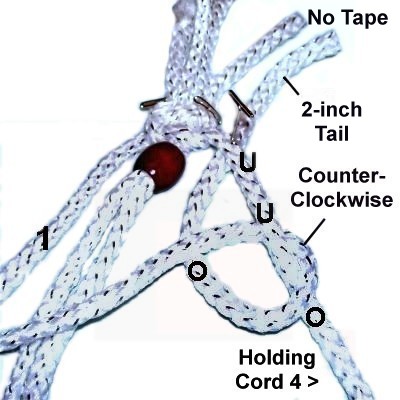
Slide the
first bead onto cords 2 and 3.
Move cord 1 and 4 to the sides and arrange
them on the diagonal
slant you want for the
edges of the Winter Tree.
Secure them so they have tension, since
they will function as holding
cords.
Step 2:
All the 1-yard
cords you will be adding to make the
Winter Tree will be attached to the holding cords
with 2-loop Larks Head knots, as described in
steps A - C below.
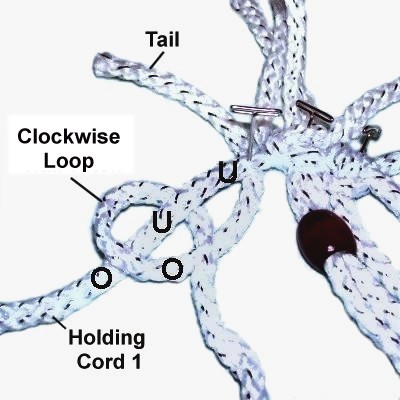
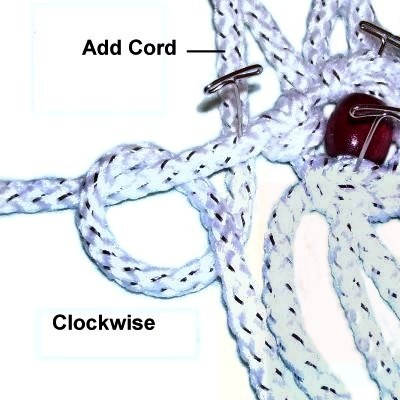
Step 2A:
Place a 1-yard cord under
holding
cord 4 close to the Square Knot.
The end without the tape should be in front of
you.
There should be a 2-inch
tail heading backward toward the right.
Step 2B:
Tie the first half of the Larks
Head knot by making a counter-clockwise
loop over
- under the holding cord.
As you pull it left, pass over
the cord you are holding. Tighten the knot
firmly.
Step
2C: Make another counter-clockwise
loop around the holding cord, passing it under
- over this time.
As you pull it left, pass under
the cord you are holding. Tighten the
knot.
Both loops = one Larks Head knot
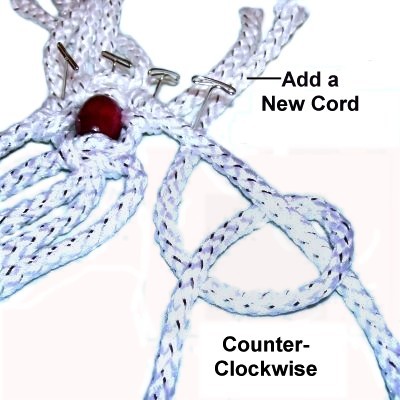
Step 2D:
Add a new 1-yard cord by placing it under
holding
cord 4. There should be a
2-inch tail heading backward to the left.
Repeat
steps 2B and 2C,
but rotate clockwise
to make the loops.
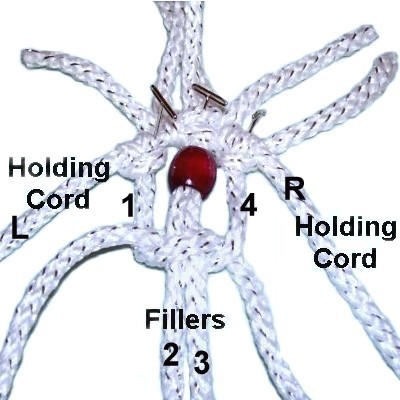
Step
3: Keep the holding
cords secured and mentally label
them right and left.
The two cords you just attached are the
working cords for the next SK (1 and
4). The fillers are the two cords
holding the bead (2 and 3).
Tie a Square knot with the new set of four
cords.
Repeat
steps 2A - 2C, adding a new
1-yard cord to the right
holding cord with a counter-clockwise
Larks Head knot.
Repeat
step 2D, adding another 1-yard
cord to the left
holding cord with a clockwise
Larks Head knot.
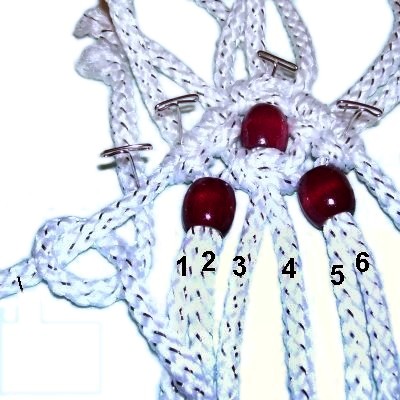
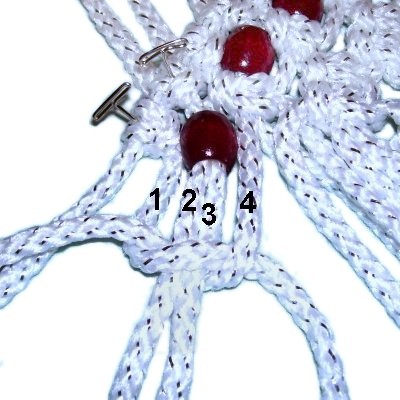
Step 4:
Mentally re-number the six cords resting between
the two holding cords.
Slide a bead onto cords
1 - 2, and another onto cords
5 - 6.
Repeat
steps 2A - 2C, adding a new
1-yard cord to the left
holding cord with a clockwise
Larks Head knot.
Repeat
step 2D, adding a 1-yard cord to
the right
holding cord with a counter-clockwise
Larks Head knot.
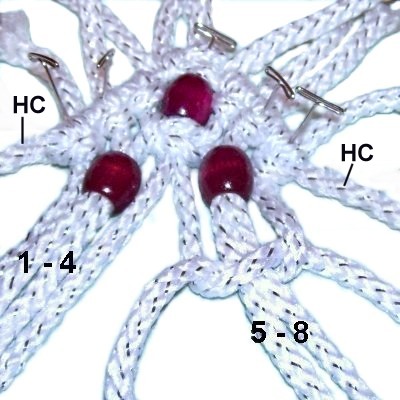
Divide the
working cords into two groups of
four.
Tie a Square Knot with cords
1 - 4. Do the same
with cords
5 - 8.
Addtwo1-yard cords
onto each
holding cord, as you did in steps
2A - 2D.
This will give you a total of 12 working
cords.
Mentally number them 1 - 12.
Place
a bead on cords
2 and 3, which are fillers for
the next knot.
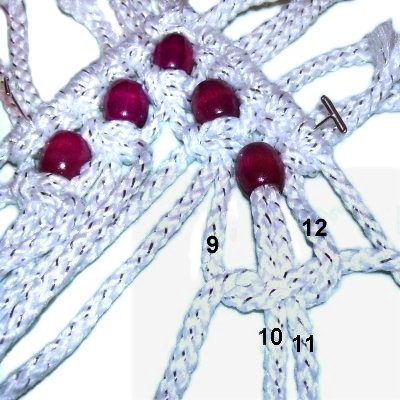
Tie a Square Knot with cords
1 - 4.
Slide the next
bead onto cords
10 and 11.
Tie a Square Knot with cords
9 - 12.
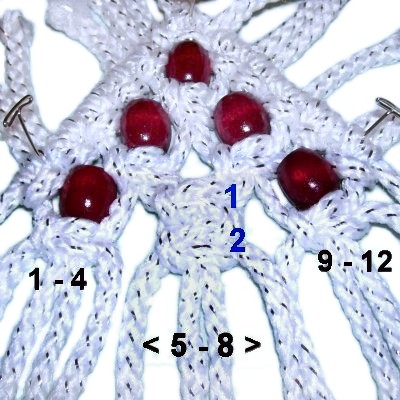
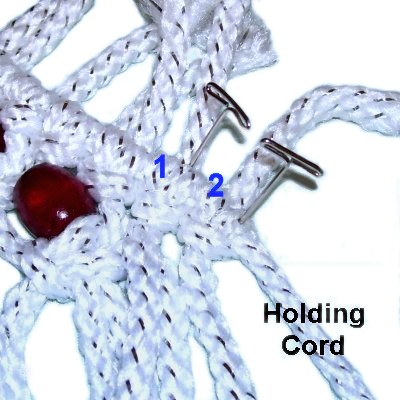
Step
5: Tie two
Square Knots with cords
5 - 8.
Make sure they are both tightened firmly,
so they line up with the two you just tied
in step
4.
The Winter Tree will look better if the
rows of SK are evenly spaced.
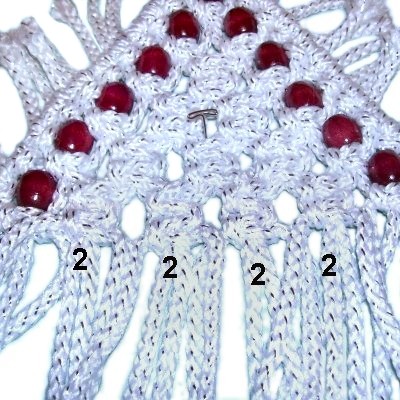
Step
6: Add two
more 1-yard cords to each holding cord
(total of 4).
Use the same technique as in steps
2A - 2D.
Mentally number the cords 1 - 16.
Place the next
bead on cords
2 and 3.
Tie a Square Knot with cords
1 - 4.
Add another bead to cords
14 - 15.
Tie a Square Knot with cords
13 - 16.
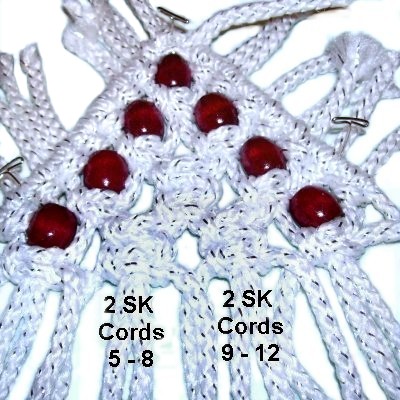
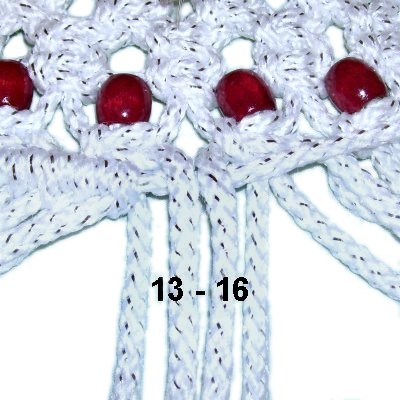
Step
7: Tie two
Square knots with cords
5 - 8.
Do the same with cords
9 - 12.
Tighten firmly so all the SK in that row
line up.
Step
8: Add two
more 1-yard cords onto each holding cord,
as you did in the previous steps.
Mentally re-number the cords 1 - 20.
Add a bead to
cords
2 - 3.
Tie a SK using cords
1 - 4.
Add a bead to cords
18 - 19.
Tie SK with cords
17 - 20.
Step 9:
Tie two
Square Knots in the following groups:
Cords 5 - 8, 9 - 12, and 13 - 16.
Repeat
step 8, adding two1-yard
cords to each holding cord. Mentally number
the cords 1- 24.
Place a bead on cords
2 - 3. Tie a Square knot with cords
1 - 4.
Place another bead on cords
22 - 23. Tie the SK with cords
21 - 24.
Tie two
Square Knots in the following groups:
Cords 5 - 8, 9 - 12, 13 - 16,
and 17 - 20.
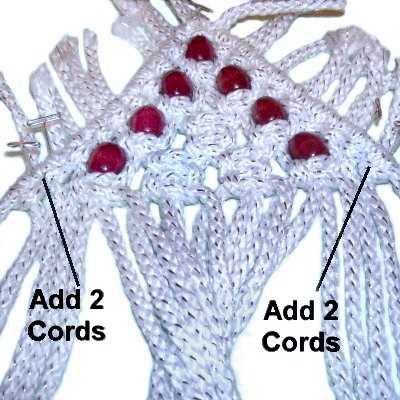
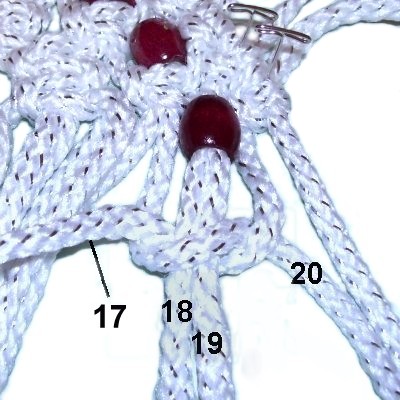
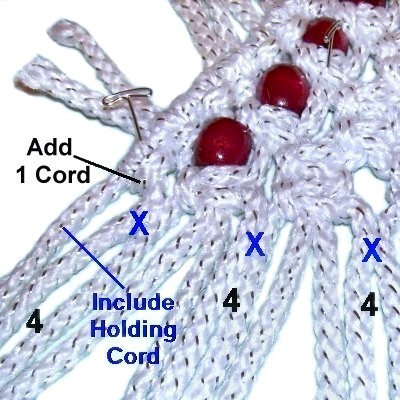
Step 10:
Add one
1-yard cord to each holding cord as
you did the others.
Include
the two holding cords and
mentally renumber all the cords 1
- 28.
Place beads on cords 2
- 3, 6 - 7, 10 - 11,
14 - 15,
18 - 19, 22 - 23, and 26 -
27. (X) in
image
Step 10,
continued: To make the final
row ofSK in the Winter tree, tie one
SK with the following groups of four cords:
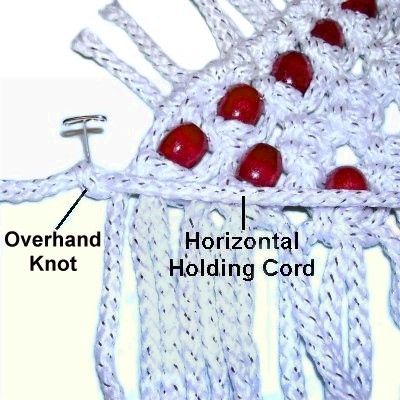
Step 11:
The two holding cords used previously are very
long compared to the others. Cut a piece of
18-inch material from one of them.
Important:Make sure the holding
cord hasat least
8 inches left, since you still
have one knot and a fringe to make for your Winter
Tree.
Another option is to cut the cord from the roll of
material.
Tie an
Overhand knot 2
inches from one end of the
18-inch cord. Secure it on the left
side of the tree, against the left edge.
Tie another Overhand knot at the opposite
end, placing it so it will rest against
the right
edge (when it's pulled taut).
Securethe
cord horizontally
with tension.
To create the bottom of the Winter Tree, you
will be tying Double Half Hitches with most
of the previous working cords. This includes the
two holding cords (total of 24 cords).
In the instructions they are called the vertical
cords.
A Half Hitch is tied by making a loopover
- under the holding cord. To
complete the loop, pass over
the working cord you are holding.
Tie a second knot the same way, to make it a Double Half
Hitch.
Step
12: Mentally number the vertical
cords 1 - 28.
Attach cords
1 - 12 onto the horizontal
holding cord with Double Half Hitches
(DHH). Since you are moving left to
right, the loops are made counter-clockwise.
Step
13: Separate vertical cords
13 - 16 (for the trunk).
Pass cords 14 and 15 in front
of the holding cord and leave the other
two behind it.
Tie a 3-inch sennit of Square Knots with
the four cords.
Step 13,
continued: Attach cords
28 - 17 to the horizontal holding cord
with clockwise
DHH (in that order -- right to left).
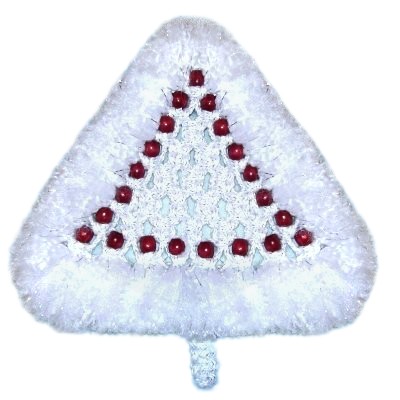
Brushed Fringe
Step
14: Start the brushed
fringe at the lower area of the Winter
Tree.
Trim each cord to 2 inches and save the
scraps.
Separate and brush the fibers. When
the entire
row is finished, trim to neaten
the fringe.
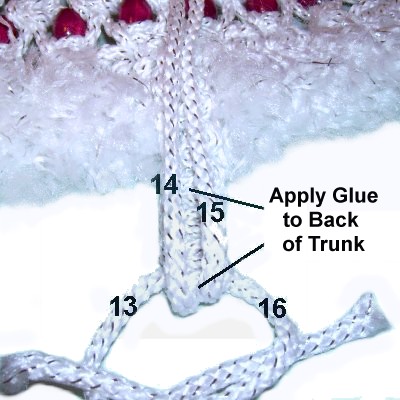
Step
15: Turn over the tree so
you are working at the back.
Apply glue to the back of the trunk,
then arrange cords
14 - 15 on top of the glue.
Use cords 13 and 16 to tie an Overhand
knot. Add glue as you tighten, so
it's on the inside.
Use clips to hold the cords until the glue
dries.
Step 15,
continued: When the glue is
dry, push the ends of cords
14 and 15 through spaces just above the
row of DHH.
They need to be passed to the front
of the Winter Tree so they can be part of the
fringe.
The other two cords (13 and 16) can be cut off.
Step
16: Cut 6-inch
pieces of material from the
scraps and/or what you have left in the
roll.
Slide one end through a small
space above
the row of DHH, so the cut edge is in the
front. Position the other
end through a
different small space.
When all the cords are added, separate and
brush the fibers while holding each one
steady.
Step
17: Add at least 2 cords to
the area above the trunk, so the fringe
rests over it.
The goal for the lower fringe of the
Winter Tree is to cover the entire row of
DHH. So add as many cords as
needed.
Step 18: Repeat
step 14, creating the fringe along the sides of the
tree.
Trim each cord to 1.5
inches, then separate and brush the
fibers. Do the same with the cords at the
top.
Repeat
step 16, adding 6-inch pieces of material
wherever you feel it's necessary to fill out the
fringe. Make sure at least one end of these
cords is passed through a SMALL
space. The other end can be pulled through a
larger space if necessary.
Trim and neaten the entire brushed fringe all the
way around the Winter Tree. Add a piece of
scrap cord to the back, and use it to hang your
new holiday decoration on a wall.
By using any
text or images on Free Macrame Patterns, you are
agreeing to ourTerms of Use.