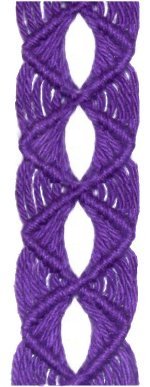
Description:
The Window Belt features diamonds made
with a vintage technique. The cords
are folded to form an oval-shaped opening
(window) in the center of each
diamond. The closure is a braided
tie.
This Macrame project is rated Moderate.
Beginners will need some experience with
creating diamonds before successfully
making this design.
Preparation:
Start the Window Belt by measuring your waist or
hips.
Cut 12 working cords, each 4 times the length you
measured. Prepare the tips of these cords
with glue or Overhand knots.
Cut 2 holding cords, each at least 1.5 times the
length you are making. Prepare these cords
with tape, so you can identify them easily.
Arrange the
working cords vertically, in two groups of
six. The holding cords should be
placed between the two groups.
Mark the center by applying a piece of
tape across that area horizontally.
For the first half of the Window Belt, you
will start at the center and move towards
one end of the cords.
Design
Tips: Since you are using fine
material to make the Window Belt, you cannot
secure each cord. So wrap each group
around a pin several times. Use a second pin
to hold them in place, leaning it over the cords
(or use tape).
Roll up each working cord to make them easier to
work with.
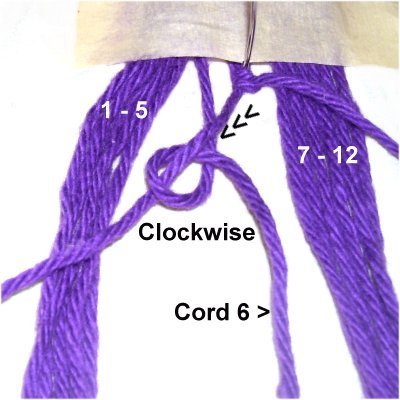
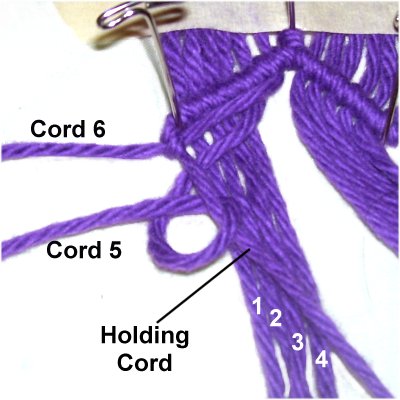
Step
1: The first knot for the
Widow Belt is tied with the holding
cords only.
Cross the holding cords left
under right.
Use the left cord to tie a clockwise
Double Half Hitch onto the right.
The knot should rest against the tape.
Step 2:
Arrange the two holding cords diagonally on top of
the working cords. The angle should be as close to
45 degrees as possible.
Important
Tip: It's hard to secure fine cords
so they remain taut. So I recommend you
guide the holding cord with one hand while tying
the knots with the other. That way you can
move the holding cord as needed.
Please
Note: The holding cords may not be
straight in the following images. They were
bent so you can see the knots better. When
you make this design, keep the holding cords
straight and taut at all times.
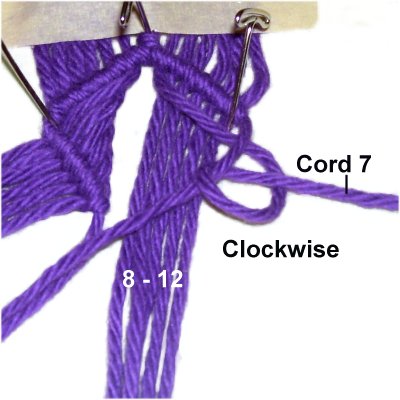
Attach working
cords 6 - 1 to the holding cord, in
that order.
Make sure each working cord is pulled
straight as you tighten each knot (see
next image).
The Half Hitches are tied clockwise,
since you are moving right to left
(diagonal arrows <<<).
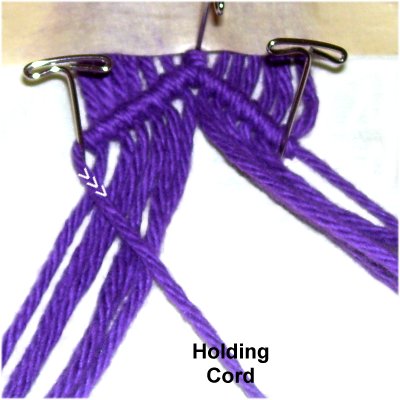
Step
3: Attach cords 7 - 12 to
the holding cord, in that order.
The knots are tied counter-clockwise,
since you are moving left to right
(diagonal arrows >>>).
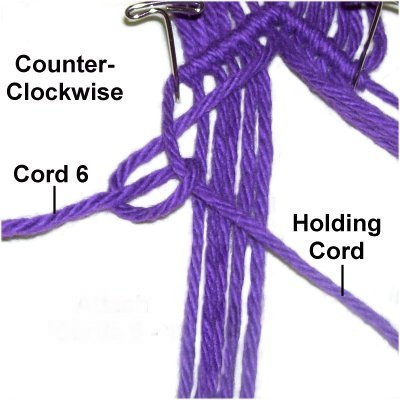
Step
4: To start the lower half of the
diamond, move the left holding cord
towards the right diagonally. Try to make
the angle as close to 45 degrees as
possible.
Organize and straighten the working cords.
Place a pin at the corner, with the
holding cord on the outside of it.
Step
5: Locate working cord 6,
which is closest to the center. Fold
it across the other cords, heading left.
Make sure it rests under
the holding cord.
Tie a counter-clockwise
DHH, since you are moving left to
right. Make sure it rests against
the pin at the corner.
Step
4: Attach cords 5 - 1 in the same
manner, folding each one across the
others.
Step
5: Move the right holding
cord diagonally towards the left, after
placing a pin at the corner.
Attach cords 7 - 12 to it with clockwise
DHH, folding each one across the others.
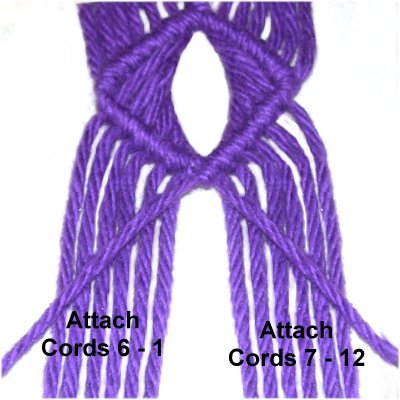
Step
6: To close the first
diamond for your Window Belt, attach the
left holding cord to the right holding
cord with a clockwise DHH.
Run your finger along the edges of the
window inside the diamond to make it as
oval shaped as possible.
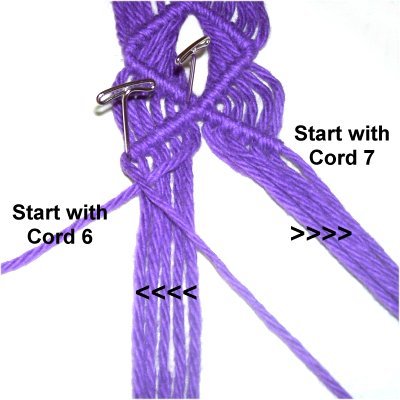
Step
7:Repeat
steps 2 - 6, creating the
remaining diamonds for the first half of
the Window Belt. Make sure you only
tie enough to make 1/2 the size you are
aiming for.
For the top half of each diamond, attach
cords 6 - 1 and 7 - 12 (in that order) to
the holding cords.
Try to keep
the cords straight in the area above the
row where you are working. That will
result in a gentle curve once all the pins
are removed.
For
the bottom half of each diamond, start
with cord 6, followed by 5 - 1, folding
each one across the others to the holding
cord on the left.
On the right, start with cord 7, then
attach 8 - 12.
Close the diamond by attaching the left
holding cord to the right.
Step 8:
When the first half of the Window Belt is
finished, turn it completely around and go back to
the center.
Repeat
steps 3 - 7 to make the second half.
Step
9: Tie off both ends of the
HOLDING cords by tying them together with
either an Overhand or Barrel knot.
Add glue and cut off the excess when it's
dry.
Now you will create the braided tie to form the
closure for the Window Belt.
This is optional if you prefer to create a
different type of clasp or closure.
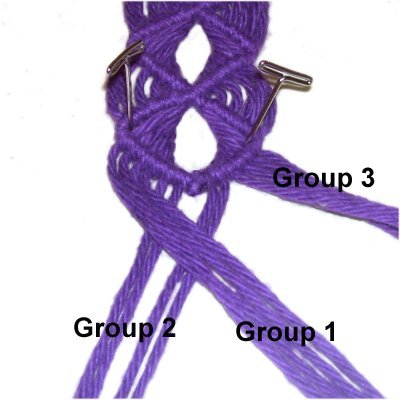
Step
10: Arrange the working
cords into three groups of four, and
mentally label them (left to right).
Move group 1 to the center, between the
other two groups. It should pass
over group 2.
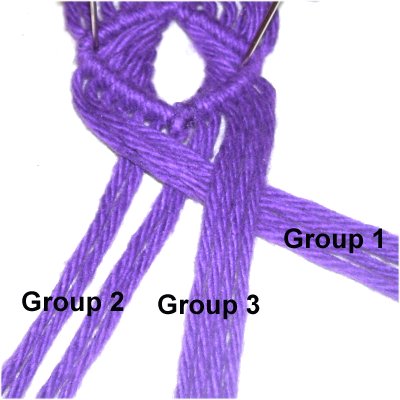
Step
11: Move group 3 to the
center, between the other two
groups. It should pass over group 1.
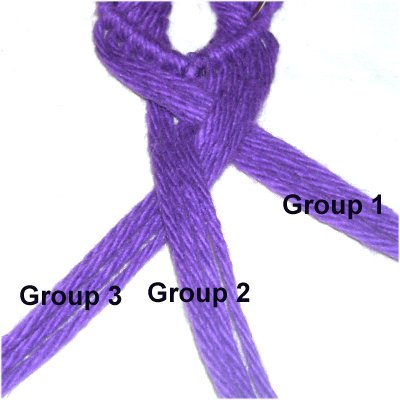
Step
12: Move group 2 over group
3. It's now in the center, between
the other two groups.
Step
13:Repeat
step 10 - 12 to continue braiding
the tie. Tighten as much as possible
so it's sturdy.
Stop when the tie is at least 12 - 15
inches long.
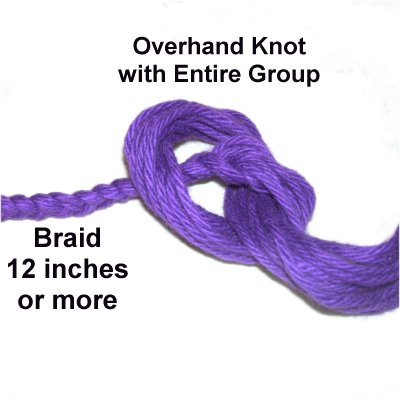
Step
14: To secure the braid,
use the entire group of cords to make an
Overhand knot. Try to keep the cords
neatly arranged.
Trim the cords to form a short fringe.
Step 15:Repeat
steps 10 - 14 at the other end of
the Window Belt.
By
using any text or images on Free Macrame
Patterns, you are agreeing to ourTerms
of Use