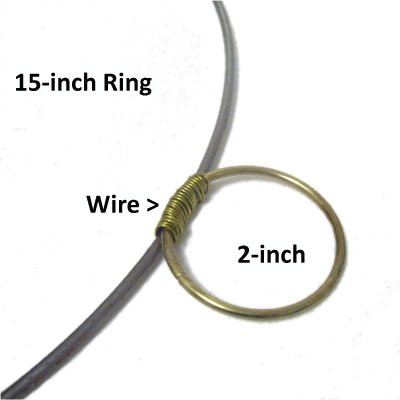
Step
1: Attach the 2-inch ring to the
15-inch ring by wrapping the wire around
both several times.
Make sure the connection is tight, so the
small ring doesn't slide around.
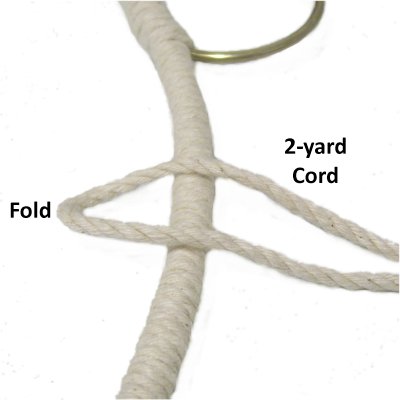
Step
2:Cut
one 3mm
size cord, 10 yards long.
Place the center
of it on top of the wire connecting the
two rings.
Use each half to wrap the 15-inch ring,
moving in opposite directions.
Wrap
tightly, and make sure the coils
don't overlap.
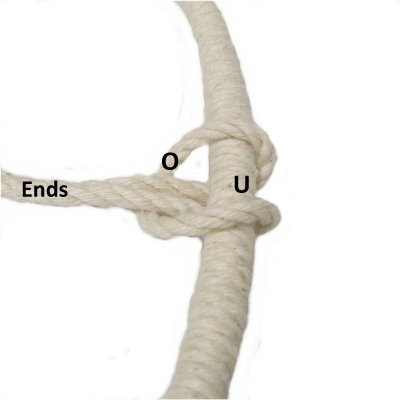
Step 2,
continued: Push the coils close
together as you progress, so there are no
gaps. The two ends should meet at the bottom
of the ring, straight down from where you started
(center).
Finish by tying one or two Half Hitches around the
ring with each half of the cord. Apply glue
before tightening.
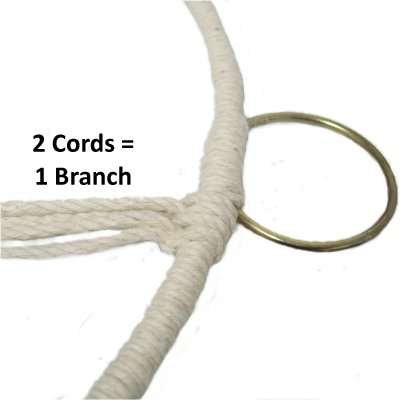
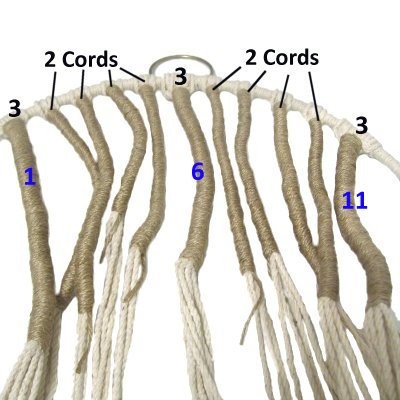
Branches
Now it's time to make the first branch for your
Tree Decoration. You start by attaching the
cords that form the CORE (inside) of the
branch.
In the example shown, the ring was wrapped with
Cotton cable cord, so the core of the branches
will be made with the same material. The
brown material is Jute, which is wrapped around
the core.
Step 3: Cut
two 3mm
size cords, each at least 60 inches
long. Prepare the tips with
Overhand knots, or use tape.
Step
4: Fold one cord in half
and place it on top of the 15-inch ring,
near the area where the 2-inch ring is
attached.
The fold should be heading towards the
inside of the ring.
To complete the
Larks Head knot, pass the ends under
the ring and over
the folded area of the cord.
Move the knot close to the 2-inch ring,
then pull the ends to tighten it.
Step
5:Repeat
step 4 with the other cord,
placing it beside the first.
Both cords are used to make the first
branch for the Tree Decoration.
Step 6:Cut
one 2mm
working cord, 4 yards long (Jute or Hemp).
Place the large ring on your project board so the
2-inch ring is at the top.
Tie an Overhand knot at one end of the working
cord. Place the knot on the outside
of the 15-inch ring, next to the holding
cords.
Secure the knot to the board with a pin.
Step 7:
Measure from the ring down 7.5
inches, then place a pin at that
spot.
Bring the
working cord down to the pin, then fold it
around and move it back up to the ring.
Take the long
portion of the cord (working end)
and roll it around your hand several
times. Remove it and secure the bundle
with a rubber band.
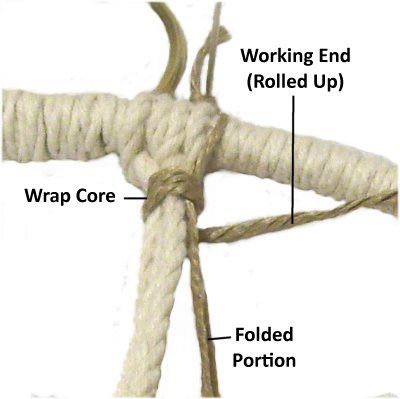
Step
8: Wrap the working end around
the core, as well as the secured portion
of the working cord.
Wrap firmly but NOT TIGHTLY, and push the
coils close together, so there are no
gaps.
Designer's
Tip: To successfully create the
Tree Decoration, the tightness of the working
cords (brown material) is very important.
When you are wrapping the original set of
branches, you need to be careful not to wrap too
tightly, so the secured portion can slide.
The working cord should fit snugly around the
core, without compressing those cords.
When you attach the branches to each other, and
create the trunk, you must wrap tightly so the
coils are neat.
Stop wrapping
when you are close to the folded area of
the working cord (approximately 7 inches).
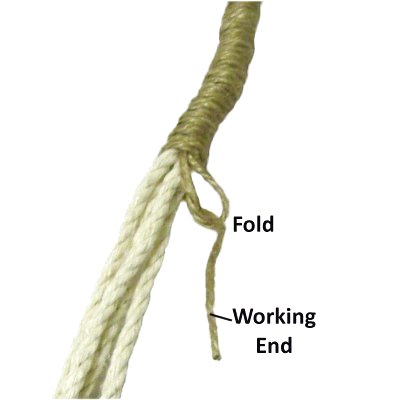
Pass the end through the folded portion,
which looks like a loop.
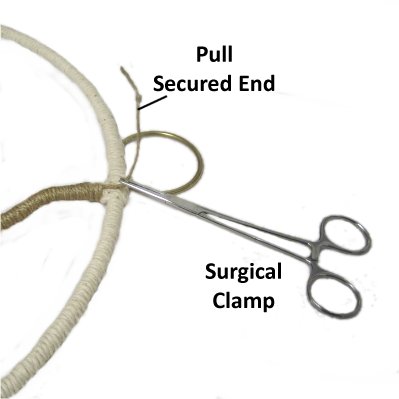
Step
9: Go up to the ring and remove
the pin from the secured
end.
Use the surgical clamp (or pliers) to pull
it gradually.
The folded
portion and working end will be pulled
inside the Wrapped knot.
Important:
Pull firmly on each of the cords making up
the CORE of the branch. This will
cause the branch to bend, making the Tree
Decoration look more authentic.
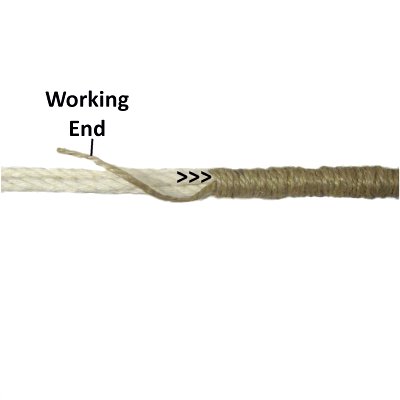
Step 9,
continued: Cut off the
secured
end of the working cord, so it is flush
with the top of the branch (near the ring).
Tuck the stub inside the wrapped portion.
Do not cut off
the excess material at the bottom.
Step
10: Make at least 10 more
branches for your Tree Decoration, by
repeating steps
3 - 9.
There should be 1/2-inch of space between
the branches.
Continued
Below
When you make branch
6, at the center where the small ring is
attached, use either
3 or 4 holding cords for the CORE.
This will make the branch thicker than the others.
The brown working cord should be at
least 5 yards long, so the branch is 7 -
8 inches long.
Do the same when you make branches
1 and 11, which are furthest to the right
and left. It helps if one branch is longer.
The remaining small branches for your Tree
Decoration should be different lengths. Cut
the brown working
cords to the lengths below, when changing
sizes.
4 yards = 7 inches
4.5 yards = 7.5 inches
5 yards = 8 inches
When measuring in step 7,
add 1/2-inch to the finished size of
the branch you are making, then place the second
pin at that point.
So for an 8-inch branch, the pin should be
placed 8.5 inches from the ring.
Connecting the Branches
Now you begin the process of constructing the
Tree Decoration by connecting the
branches. Mentally number them 1 -
11.
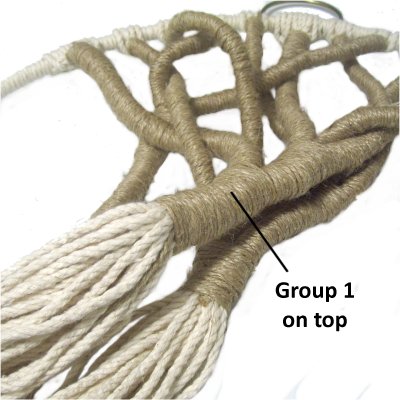
Locate branches 1, 6, and 11. These are the
thick branches made with 3 - 4 cords for the
core. These three branches should be
mentally labeled "group 1".
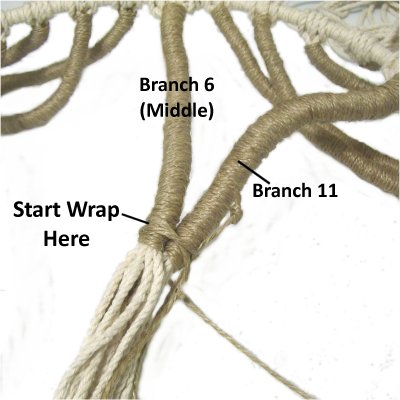
Step 11:Cut
1 working cord, at least 2 yards long.
Bring branches 6 and 11 together, bending them so
they look natural.
You can connect them side-by-side or with one
above the other.
Fold the
working cord 3.5
inches from one end as you begin
making the Wrapped knot.
Start the knot in the wrapped
area of the branches, at
least 1/4-inch above the end of
it.
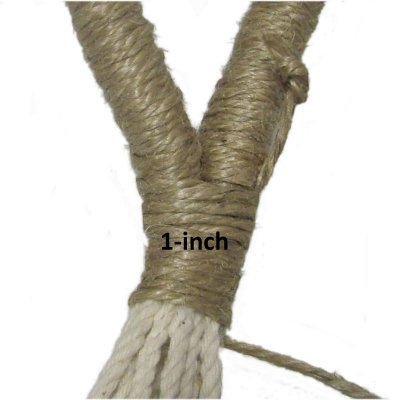
Wrap for 1-inch,
making sure the coils are TIGHTLY attached
to both branches, so they are as neat as
possible.
Take plenty of time to connect the
branches, since neatness is so
important.
Important:
You won't be able to push the coils close together
when connecting the branches for the Tree
Decoration.
So wrap slowly, placing each coil below the
previous one, fitting them close together.
Eliminate any gaps, so the cotton cords don't
show.
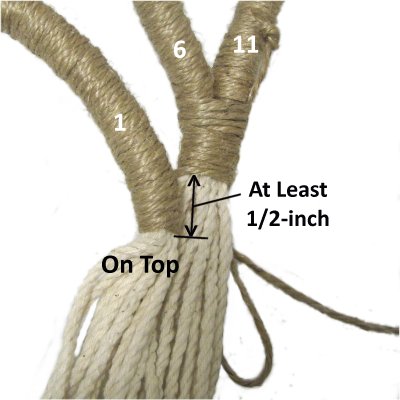
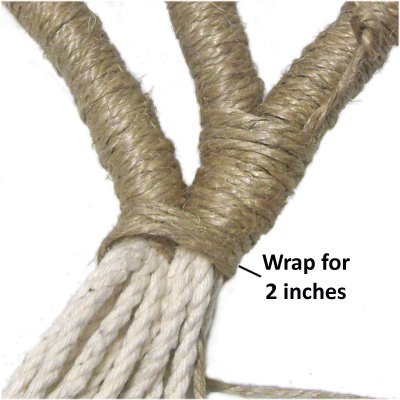
Step
12: Place branch 1 on
top (or beside) the two you just
connected.
Make sure the bottom of branch 1 is at
least 1/2-inch below the point
where you stopped wrapping in the previous
step.
Continue
wrapping for 2 inches, around all three
branches.
Complete the knot by passing the end
through the folded area (as in step
8).
Pull on the secured end (as in step 9).
Step 13:Repeat
steps 11 - 12 to make GROUP 2, connecting
four
branches. Cut the working cord at least 2.5
yards long, since you have an extra
branch. The Wrapped knot should be around
3.5 inches long.
Important:
Make sure you take the branches from different
areas on the ring, and intertwine them so the Tree
Decoration looks as natural as possible.
Repeat the same process again to make GROUP 3, but
cut the working cord at least 3 yards long.
This Wrapped knot should be longer than the other
two groups (at least 4 inches).
The Trunk
Now it's time to connect all three groups of
cords, making the trunk for your Tree
Decoration. They are connected with one
Wrapped knot, which needs to be long enough to
reach the bottom center area of the ring.
Step 14:
Locate group 1, which is the first set of branches
you connected. Measure the distance between
the lower edge of the Wrapped Knot and the bottom
of the ring.
Then cut the working cord to the appropriate
length:
For 7 inches or less, the working cord
should be 10 yards long.
For more than 7 inches, the working cord
should be 12 yards long.
Step
15: Place group 1 on
top of group 2.
Secure the working cord beside (or behind)
the two groups. Bring it down past
the bottom of the ring, then back up to
where you plan to start wrapping.
Step 15,
continued: Start wrapping in the
brown area, for at least 1-inch.
Before you reach the end of the knot connecting
GROUP 1, place group 3 under
the other two, then wrap for another 3
inches.
The reason you place the groups on top of each
other is to make sure the trunk of the Tree
Decoration is thicker front
to back, rather than side-to-side.
This is optional, if you prefer a wider trunk.
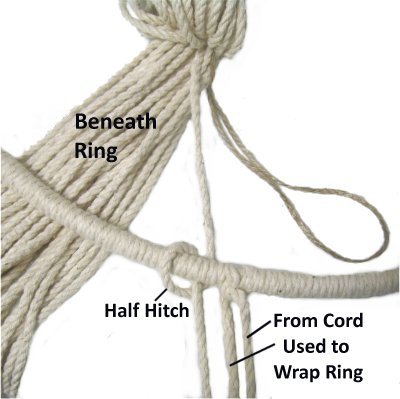
Step 16:
Divide the Cotton cords (core) into two equal
groups. Place one group beneath the ring.
Choose a cord
from the middle
of the group, and attach it to the bottom
of the ring with a Double Half
Hitch.
It should rest to the left
of the Half Hitches you tied with the cord
used to wrap the ring.
The image shows a single
Half Hitch. Make sure you tie two.
Step 16,
continued: Place the other half of
the cords on top of the ring. Choose one
cord from that group, and attach it to the ring
with a DHH.
Place it to the right
of the knots made with the cord used to wrap the
ring.
Step 17:
Resume tying the Wrapped knot, making sure the two
groups of Cotton cords stay in place.
Stop wrapping when you reach the bottom of the
ring.
Complete the knot by passing the working end
through the folded area. Pull on the
opposite end to secure the knot.
Finishing Touches
Hang up your Tree Decoration by the small ring
at the top, so you can work on the fringe.
You can make a two-layer fringe as described
below, or make the front and back cords all the
same length.
These represent the "roots", and you can make them
any length. In the image at the top of the
page, the fringe was 3 inches.
Locate the
cords resting behind
the ring, and trim them 10
- 15 inches below the ring.
The fringe should be shorter for the cords
in front
of the ring(6 - 8
inches long).
Unravel each cord completely (usually 3 -
4 strands).
An artificial vine with leaves or flowers can be
wrapped with the brown material so it blends in
with the branches of the Tree
Decoration. Secure it in several
places on the ring, and intertwine it around some
of the branches.
By
using any text or images on Free Macrame
Patterns, you are agreeing to ourTerms
of Use