Description:
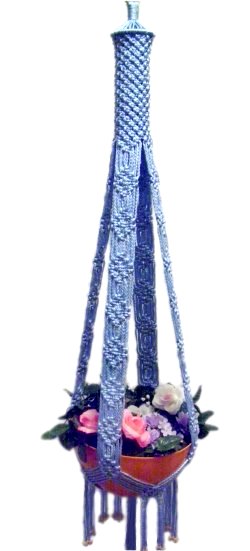
The Snowflake Hanger is an elegant way to
display your plants. The long straps
are made with a series of Snowflake
designs, which are Square knots arranged
in a rounded diamond shape.
The area at the top is a smooth round
tube, and there are two fringes at the
bottom, which can be beaded or
brushed.
When choosing a plant pot for this plant
hanger, it should be at least 10 inches
wide.
This Macrame project is rated Moderate,
since it requires a lot of work to balance
the tension of the
cords.
Beginners
should practice all the knots several
times before trying this pattern.
The finished size is 54 inches, which
includes a 10-inch fringe at the bottom.
Supplies
Needed:
4mm cord material (177 yards)
One 2-inch ring
One 3-inch ring
Project boards and pins
Flexible Measuring Tape
10mm Beads (48) -- hole size 4mm or
more (for beaded fringe)
Step 1: Cut
24 cords, each 7 yards long.
Prepare the tips to prevent them from unraveling
while you work on the Snowflake Hanger.
Cut
1 cord, 36 inches long (for the Wrapped
Knot).
Pass 6
cords through the 2-inch ring while
holding it upright, as shown in the next
image. Fold them over the bottom of the
ring, then balance each one by matching the
ends.
Place 6
more cords on top of the first group, and
balance them as well.
Using clips to hold the first set of cords, while
you balance the ones on top, makes this process
easier.
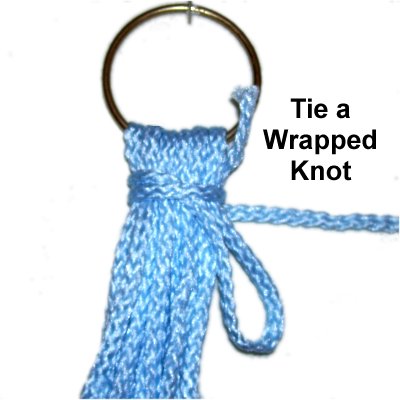
Step
2: Tie a Wrapped Knot
around the 12 folded cords, using a
36-inch cord.
The knot should be at least 1.5 inches
from top to bottom. Start it as
close to the ring as possible.
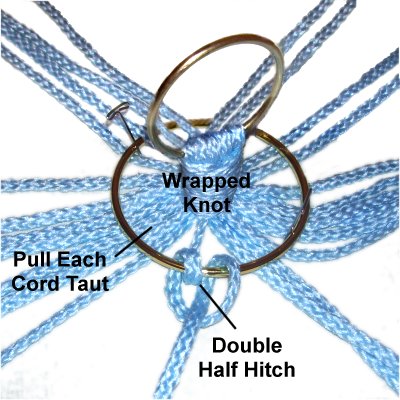
Step
3: Secure the Wrapped Knot
upright
on your project board, with the cords
arranged in a circle. Pass the 3-inch ring
over it, arranged so the knot is in the
center.
Attach each cord to the 3-inch ring with a
Double Half Hitch. Make sure you
pull each cord taut prior to tightening.
Step 4:
Organize all the cords into sets of two.
Make some space between each set.
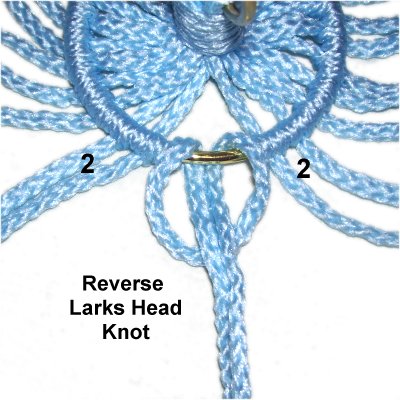
Mount the
remaining 12 cords onto the 3-inch ring
with REVERSE Larks Head knots.
They should be placed between each set of
2 cords already on the ring.
Step 4,
continued: When you are finished,
if the ring is not completely covered, add more
Half Hitches.
IMPORTANT:
Make sure you add the knots with the first
group of cords only (attached with DHH
in step 3), NOT the ones you added in this
step.
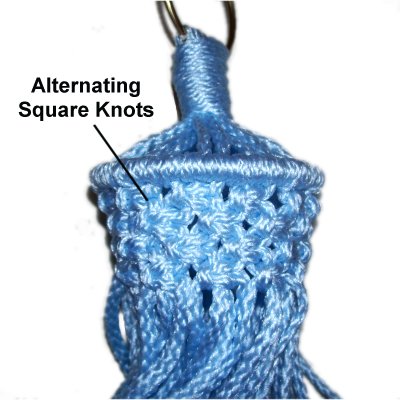
Step 5:
Hang up the cords by the 2-inch ring.
You cannot make the top area of the Snowflake
Hanger with the cords resting on a surface, since
you have to work in a circle.
Tie rows of
Alternating Square Knots, using 4 cords
per knot. Make sure the knots are tight,
and the first row rests against
the 3-inch ring.
Pull firmly on the filler cords after each
knot is tightened, to remove any
slack. This will produce a smoother
design.
Stop when you've reached 7
inches.
Long Straps -- Snowflake Design
The long straps for the Snowflake Hanger can be
made on a surface, or while the plant hanger is
suspended.
Take your time and focus on making sure there is
the same distance between each Snowflake. Measure carefully.
Tighten each knot firmly, with the same amount of
tension, keeping the knots level (not
tilted). The tension of the cords between
the Snowflakes needs to be the same, too.
IMPORTANT:
You need to be able to tie both left
and right Square knots, so if you are not
familiar with them, practice before you get
started.
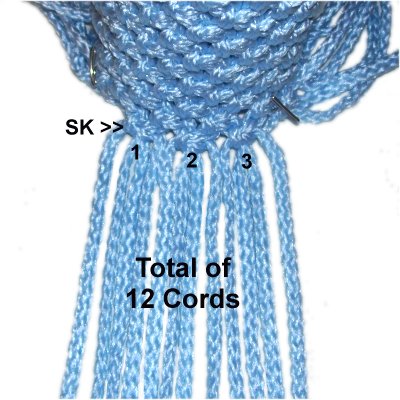
Step
6: Isolate the cords coming
from 3 Square knots resting next to each
other, in the last row of ASK.
Mentally number the 12 cords.
The following knots for the Snowflake
Hanger should be tightened firmly, so they
are close together.
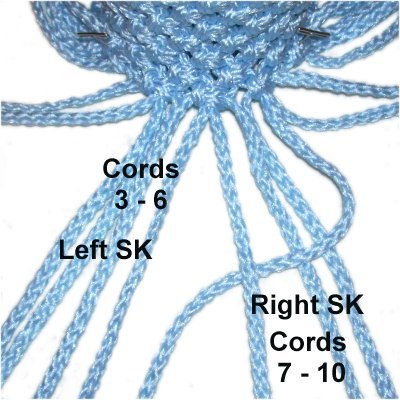
Step
7: Tie a LEFT
SK with cords
3 - 6. The first working
cord you move is on the left (cord 3).
Tie a RIGHT
SK with cords
7 - 10. The first working
cord you move is on the right (cord 10).
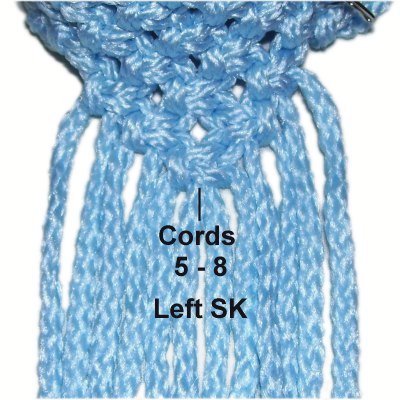
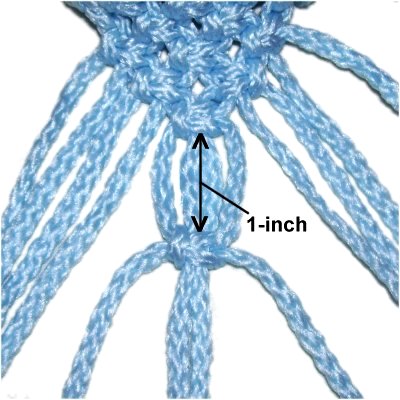
Step
8: To complete the V Shape,
tie a LEFT
SK with cords
5 - 8.
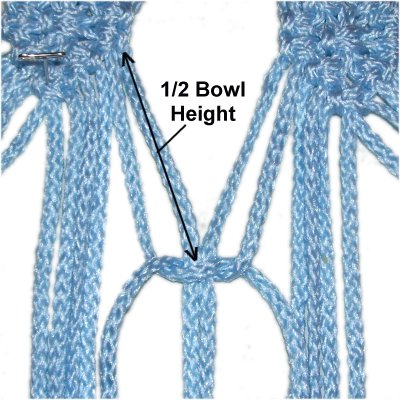
Step
9: Measure down 1-inch from
the knot tied in Step 8, then tie another
LEFT SK
with cords
5 - 8.
Carefully tighten the knot, while holding
the fillers taut.
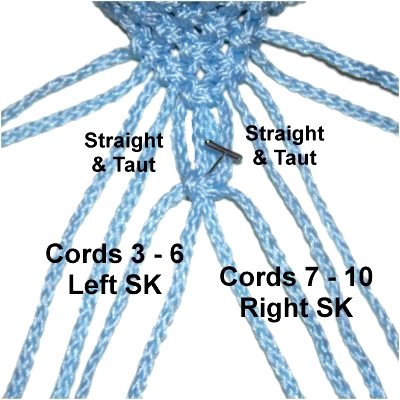
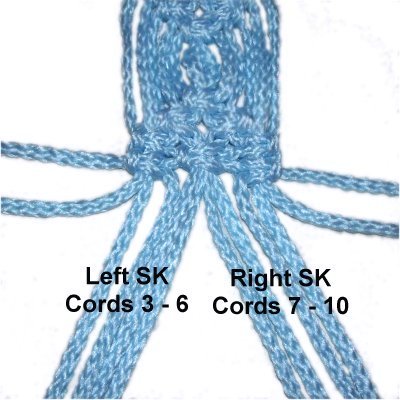
Step
10: Tie a LEFT
SK with cords
3 - 6.
Tie a RIGHT
SK with cords
7 - 10.
Make sure the cords are straight and taut
between the V shape and these knots (see
next image).
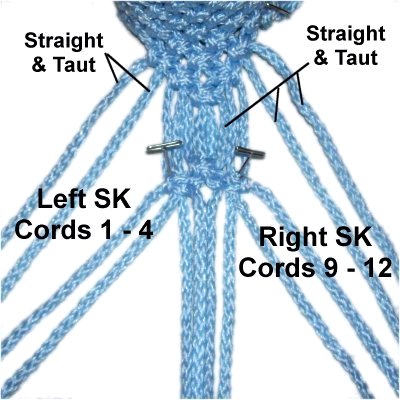
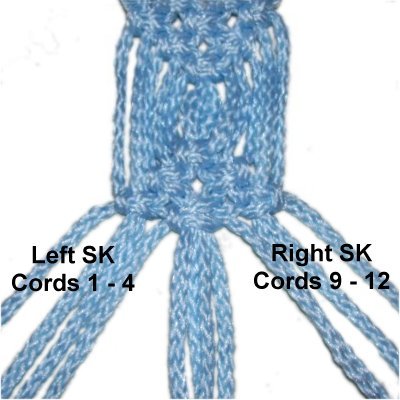
Step
11: Tie a LEFT
SK with cords
1 - 4.
Tie a RIGHT
SK with cords
9 - 12.
Make sure the cords are straight and taut
between the V shape and these knots.
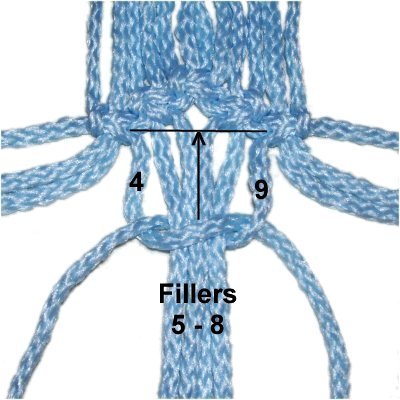
Step
12: Cords 4 and 9 are the
working cords for the large SK in the
center. The fillers are cords 5 - 8.
Tie a left SK. The first
half of it should line up with
the SK tied in step 11 (shown with lines
and arrow).
Step
13: Tie a LEFT
SK with cords
1 - 4.
Tie a RIGHT
SK with cords
9 - 12.
These knots should line up with the second half
of the SK in the center (from step
11).
Step
14: Tie a LEFT
SK with cords
1 - 4.
Tie a RIGHT
SK with cords
9 - 12.
Step 15:
Tie a LEFT
SK with cords
5 - 8.
Step 16:Repeat
steps 9 - 15 seven times, to make a total
of 8 Snowflakes for the same
strap of the Snowflake Hanger.
In step 9, measure down 1-inch from the knot tied
in step 15.
Important:
When you make the 4th and 8th Snowflake, cords 2
and 11 must be switched with cords next to them,
so they are used as working cords at least two
times. You can do this more often if you
wish.
So tie the two knots in step
13, then switch cords 2 and 3. Do
the same with cords 10 and 11. Mentally
re-number them in those positions, and continue on
to the next step.
Step 17:
Make three more straps for the Snowflake Hanger,
using the remaining cords. Repeat
steps 6 - 16 with each group.
Make sure each group of 12 cords come from three
Square knots.
Cradle and Fringe
The Cradle for the Snowflake Hanger is custom
made to fit the plant pot or bowl you are
using.
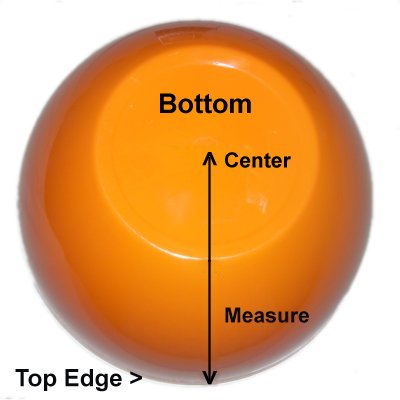
Step
18: Measure the pot or bowl
from the top edge down to the bottom
center area.
Divide that measurement by 2.
Use the result in step
20.
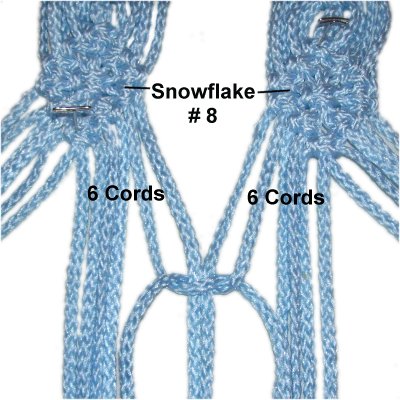
Step
19: Select two straps that lie next to each
other when the Snowflake Hanger
is suspended.
Six cords coming from Snowflake
#8 are combined to form a new
group of 12. Cords 6 - 12
from the left strap are combined with
cords 1 - 6 from the strap on the right.
Step
20: Mentally number the new group
of 12 cords.
Tie a SK with cords 5 - 8, after moving
down the result you got in step
18.
Make sure the cords are pulled taut as
shown.
Step 21:Repeat
steps 19 and 20, combining the remaining
cords. Make sure you choose 6 cords from two
different straps that
rest next to each other. Tie only
one SK for now.
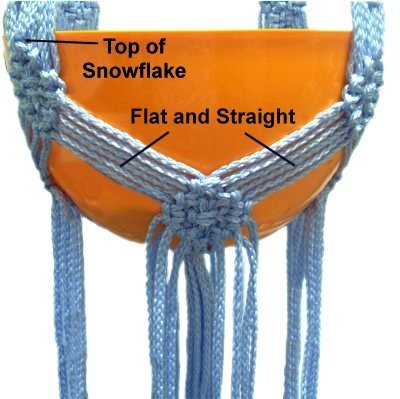
Place the bowl inside the Snowflake Hanger to
check the placement of these knots. Arrange
the last Snowflake (#8) from each strap so they
rest just below the top edge of the bowl or
pot. (See image below)
Step
22: When everything is
balanced and the knots in the right
position, complete the Snowflakes with
each set of 12 cords by repeating steps
10 - 15.
I recommend you keep the bowl in place, so
you get the tension right. The cords
need to lie flat and straight.
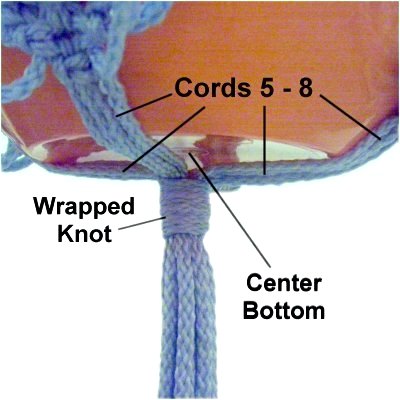
Step
23: Select cords
5 - 8 from each of the Snowflake
designs you just made, and gather them
together. Tie a Wrapped knot around the
group, making sure it rests at the bottom
of the pot or bowl, in
the center.
Placing something heavy inside the pot
really helps keep it from moving while you
do this step.
Step 24:
You have options in making the fringes for your
Snowflake Hanger. There are two of them --
the cords you wrapped in the previous step, and
the remaining cords
Option 1:
Unravel and brush the cords after trimming them to
the length you want.
Option 2:
Trim the cords and tie Overhand knots at the
tips. (See step 25)
Option 3:
Reduce to only one fringe (the wrapped
cords). Finish off the remaining cords by
tying knots so they rest in the back
of the Snowflake design.
Option 4:
For the wrapped cords (bottom of pot), trim them
to 12 inches, then apply beads to the tips,
followed by an Overhand knot. (See step 25)
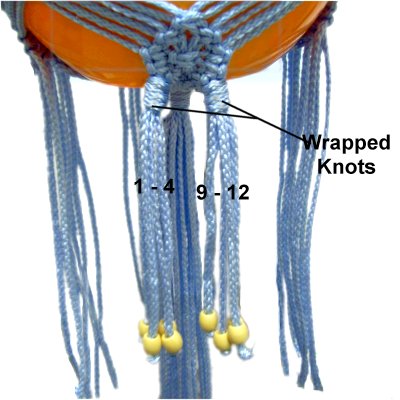
For the
remaining cords, gather them into groups
of four (cords 1- 4 and 9 - 12). Tie
Wrapped Knots around these groups, at
least 1/2-inches long.
Move down at least 5 inches, and apply
beads to each cord, followed by an
Overhand knot. (See step 25)
Step 25:
When using Bonnie Braid or similar material, cut
off the excess material close to the Overhand
knots and melt the stub with a flame.
When using material that does not melt, such as
cotton, you need to apply
glue to the Overhand knot while
tightening, or use a different type of knot.
By
using any text or images on Free Macrame
Patterns, you are agreeing to ourTerms
of Use